
Getting started with the Private Exchange service
Find out how to configure your Private Exchange server for the first time, from the delivery email to your first domain name
Objective
With the Private Exchange service, you get a dedicated Exchange server for your professional email accounts, with collaborative features such as calendar and contact synchronisation.
Hosted Exchange hosts your accounts on one of several shared servers, each with an IP address shared by all the customers of that server. Private Exchange gives you your own Exchange server: its resources are reserved for you, it comes with a dedicated IP address, and the SSL certificate is issued for your own server address. As the only sender on that IP address, you alone control the sending reputation of your email domain: no other customer's traffic can affect the deliverability of your emails, and vice versa.
Hosted Exchange
Sending reputationShared with the other customers of your server
Private Exchange
Sending reputationYours alone
This guide explains the first steps to take once your Private Exchange server has been delivered.
Requirements
- an OVHcloud Private Exchange solution
- the email confirming that your Private Exchange service has been delivered
- a domain name whose DNS zone you can edit, if it is not managed in the same OVHcloud account as your Private Exchange service
OVHcloud Control Panel Access
- Direct link:
- Navigation path:
Web Cloud>Exchange> Select your platform
Instructions
Once your order has been delivered, you must configure the server for the first time before you can create email accounts. This configuration takes place entirely in the OVHcloud Control Panel, and three of the five steps require an action from you: choosing your email server address (step 2), validating the domain name that carries it if it is not managed in the same OVHcloud account (step 3), then adding the domain name(s) for your email addresses and creating your accounts (step 5).
Step 1: Receive the delivery email
Once your order has been processed, an email is sent to the contact email address listed in your OVHcloud Control Panel. It confirms that your Private Exchange service is available and invites you to configure it from there.
To find this email in the , click on your account name in the top right-hand corner, then click Service emails. Look for the email with a subject similar to:
[ab12345-ovh] Your Private Exchange SE service is ready!
The name of a Private Exchange service in your OVHcloud Control Panel begins with private-, contains part of your NIC handle and ends with a number (1 for the first Private Exchange service installed, 2 for the second, etc.). SE is the Exchange version installed on your server; it is displayed under Exchange version on the General information tab.
At this stage, the server exists but is not yet usable: its address has not been chosen, and no domain name is associated with it. Move on to step 2.
Step 2: Choose your email server address
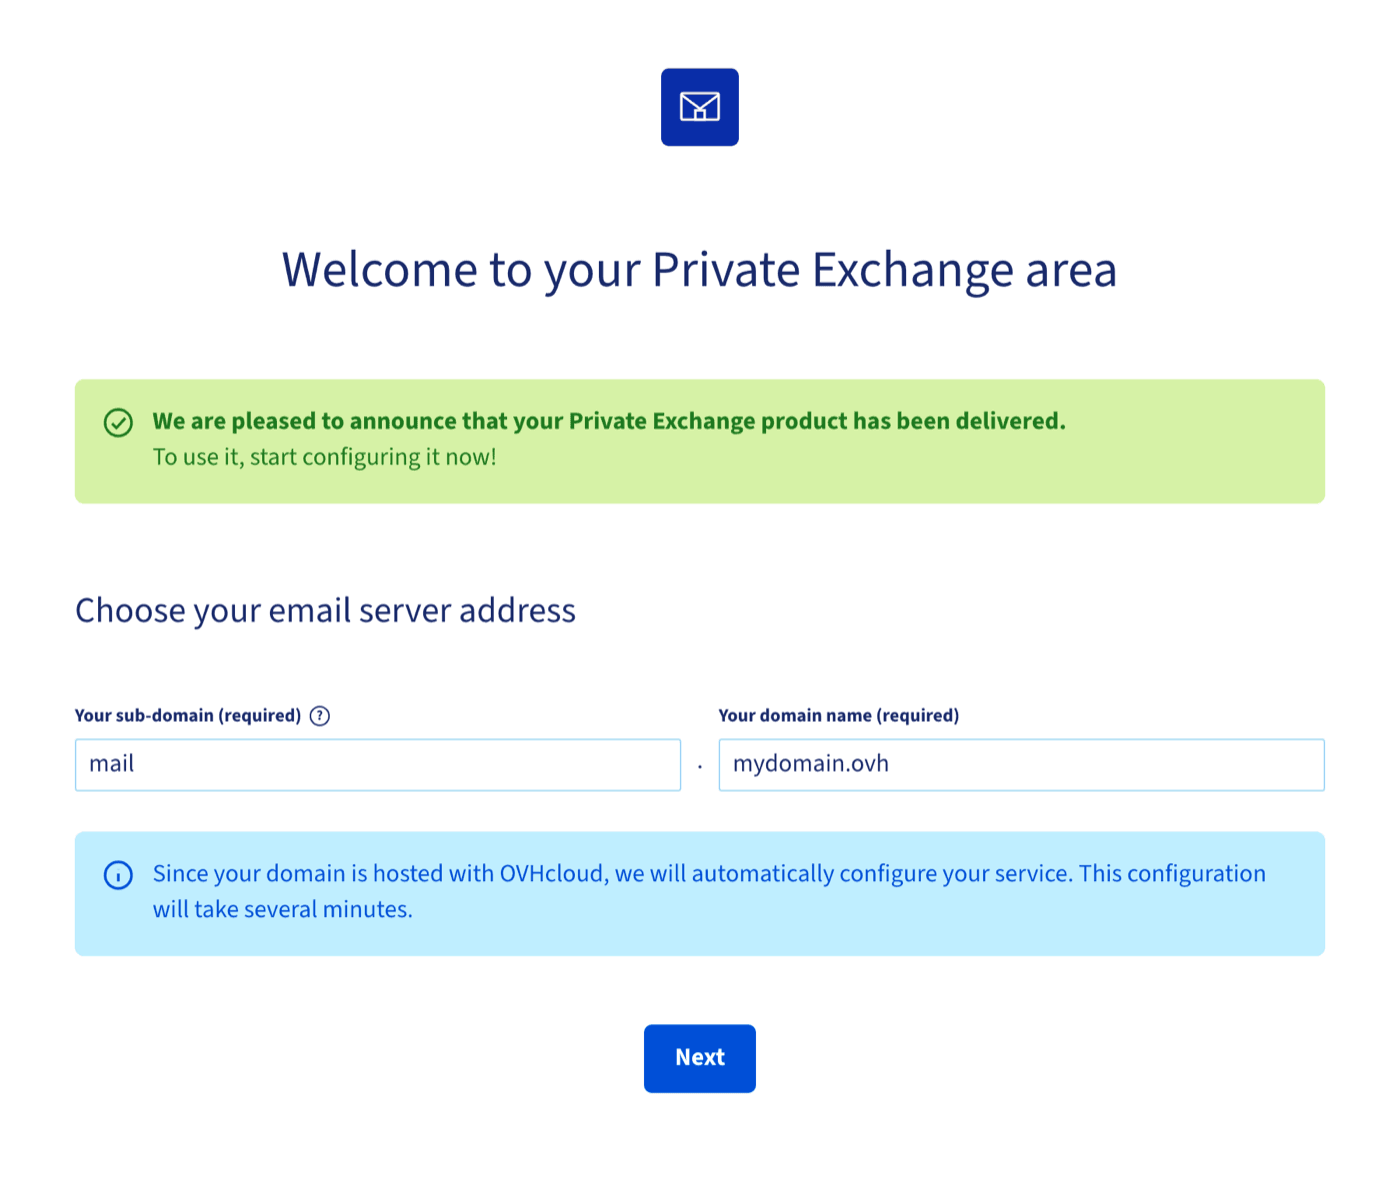
Select your Private Exchange service in the OVHcloud Control Panel. As the service has never been configured, a configuration assistant opens instead of the usual management page. It is titled Welcome to your Private Exchange area.
In the Choose your email server address section, two fields are required:
- Your sub-domain: the host part of the address, for example
mail. - Your domain name: the domain name that will carry your server address, for example
mydomain.ovh.
Together, they form your email server address, for example mail.mydomain.ovh. This address is used as:
- the Outlook Web App (OWA) webmail access link
- the server name to enter when configuring an email client such as Outlook
- the name covered by the SSL certificate issued for your server
The message displayed under the fields depends on where your domain name is managed.
If the domain name is managed in the same OVHcloud account as your Private Exchange service, an information message confirms that the service will be configured automatically. This configuration takes several minutes.
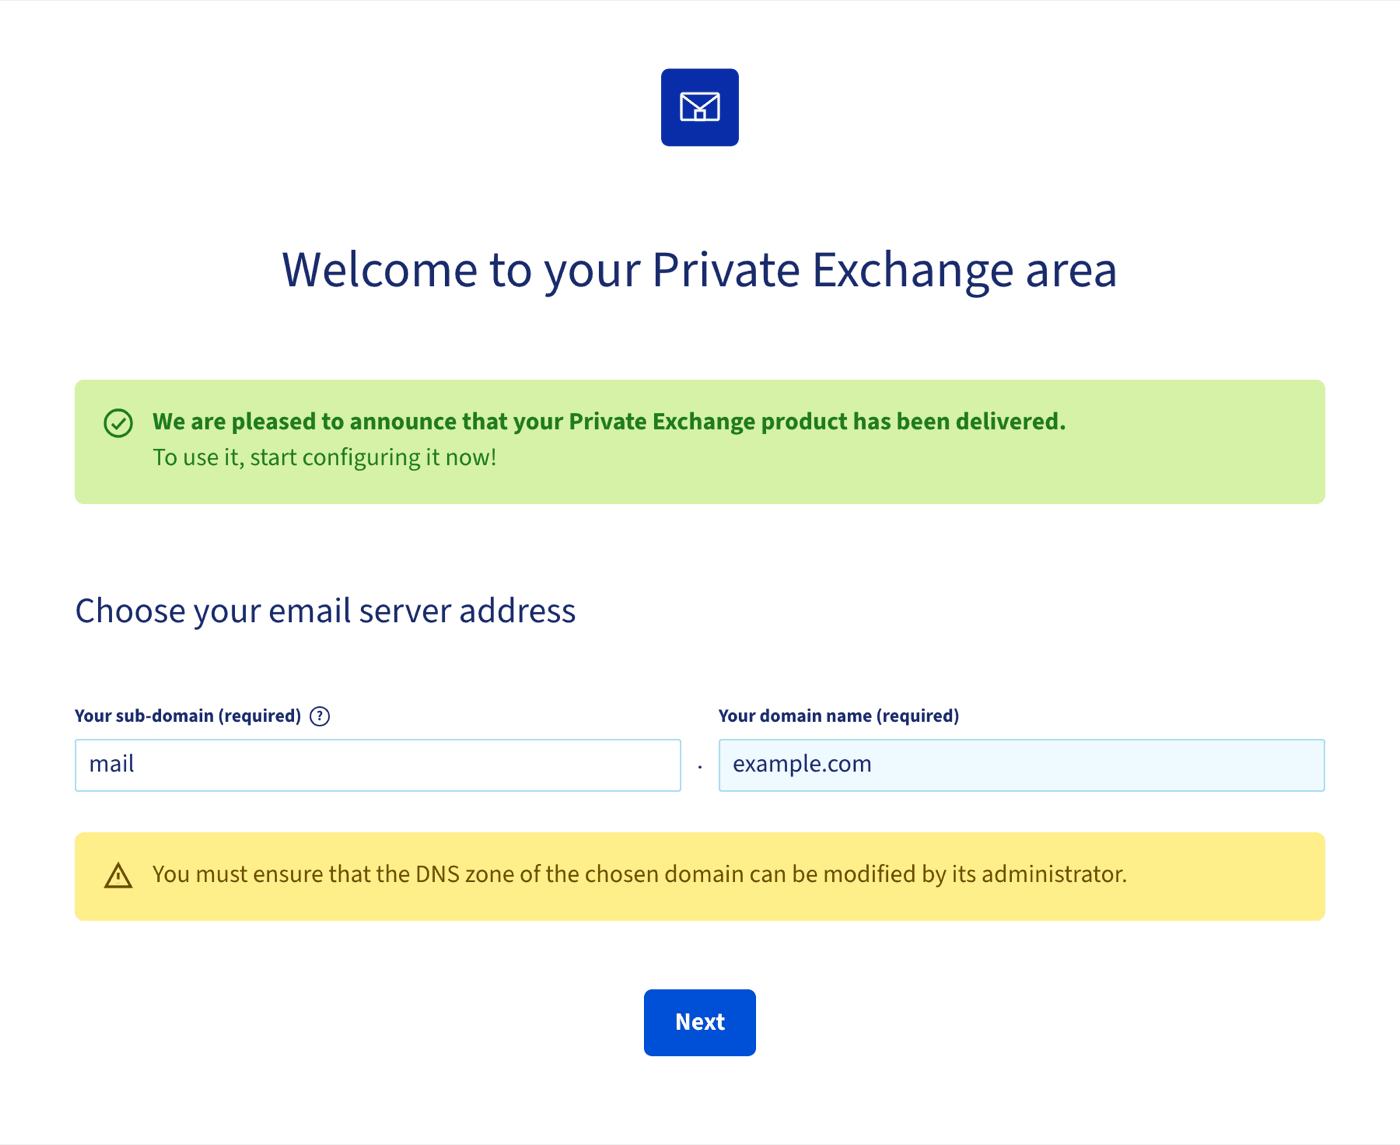
The email server address cannot be changed once confirmed. Check the sub-domain and the domain name carefully before continuing. If you need a different address later, the only option is to order a new Private Exchange service.
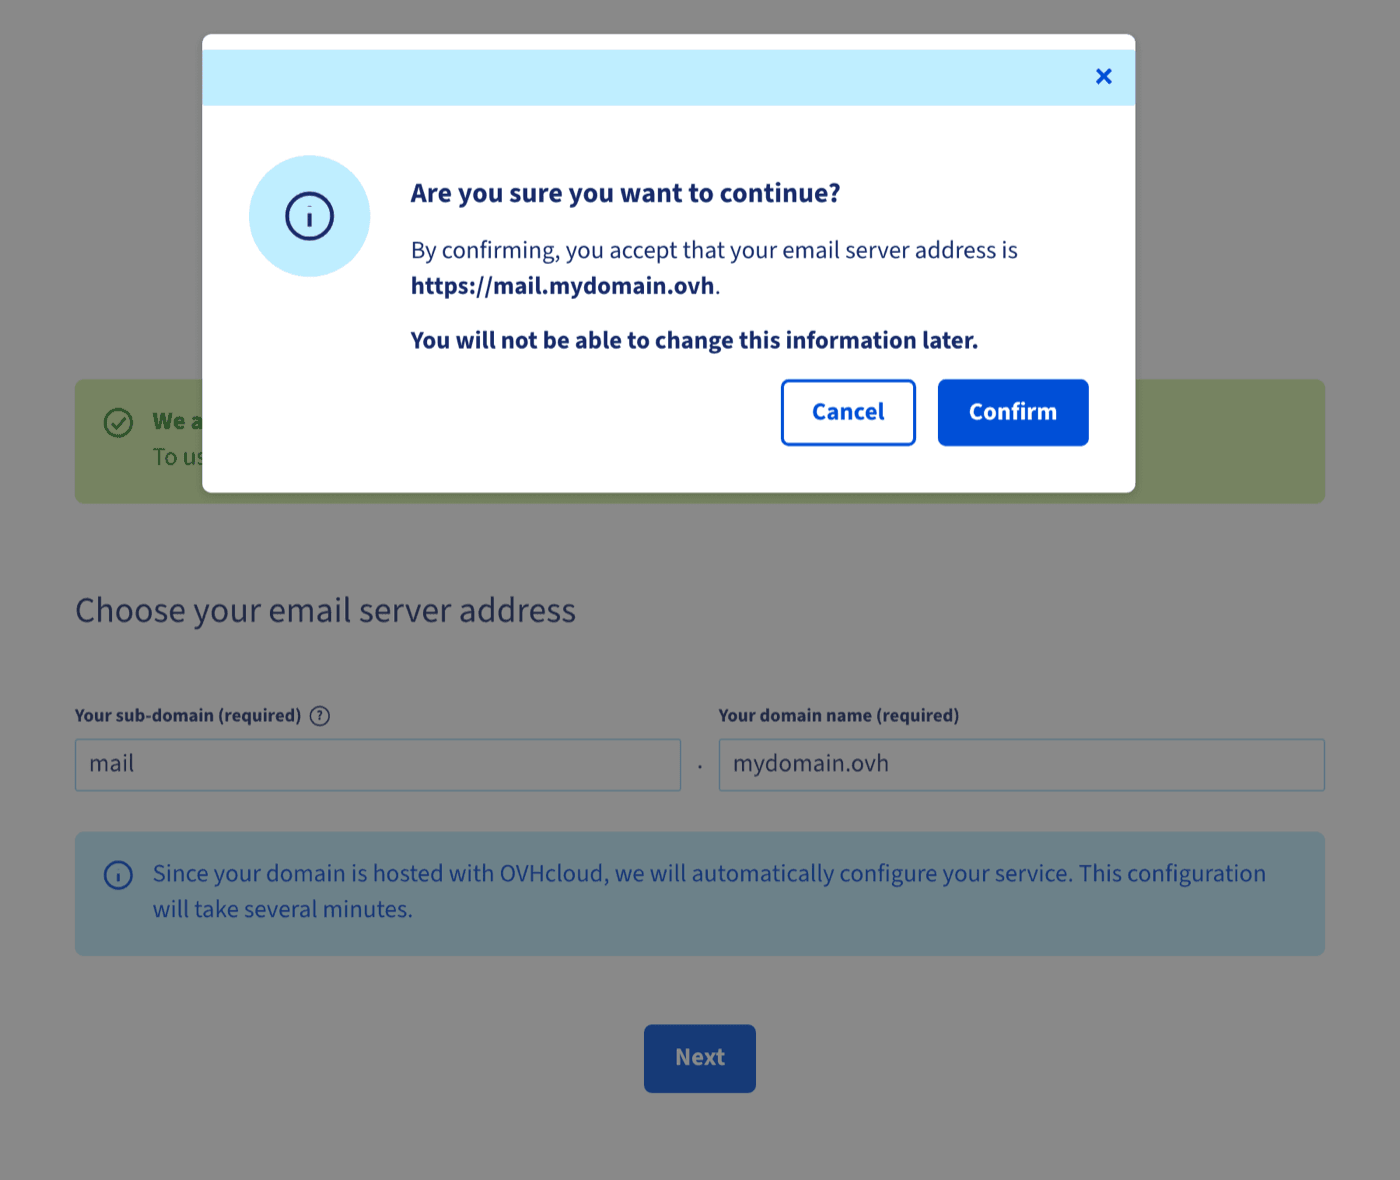
Click Next. A confirmation window displays the address that will be assigned to your server and reminds you that this information cannot be changed later. Click Confirm to continue.
Step 3: Validate the ownership of your domain name
This step only concerns domain names that are not managed in the same OVHcloud account as your Private Exchange service (domain name managed outside OVHcloud, or in another OVHcloud account).
Domain name managed in the same OVHcloud account: the configuration is automatic and you do not need to validate anything. The page described below may still appear for a few moments while the automatic configuration is in progress. Do not add the CNAME record yourself: wait. The page disappears on its own once the record has been created and detected. You can then move on to step 4.
For a domain name managed outside OVHcloud or in another account, the assistant displays the Configuring your Private Exchange product page, with the section Confirm your domain ownership. To prove that you control the domain name chosen in step 2, a CNAME record must be added to its DNS zone. The record to create is displayed on the page, with a button to copy it.
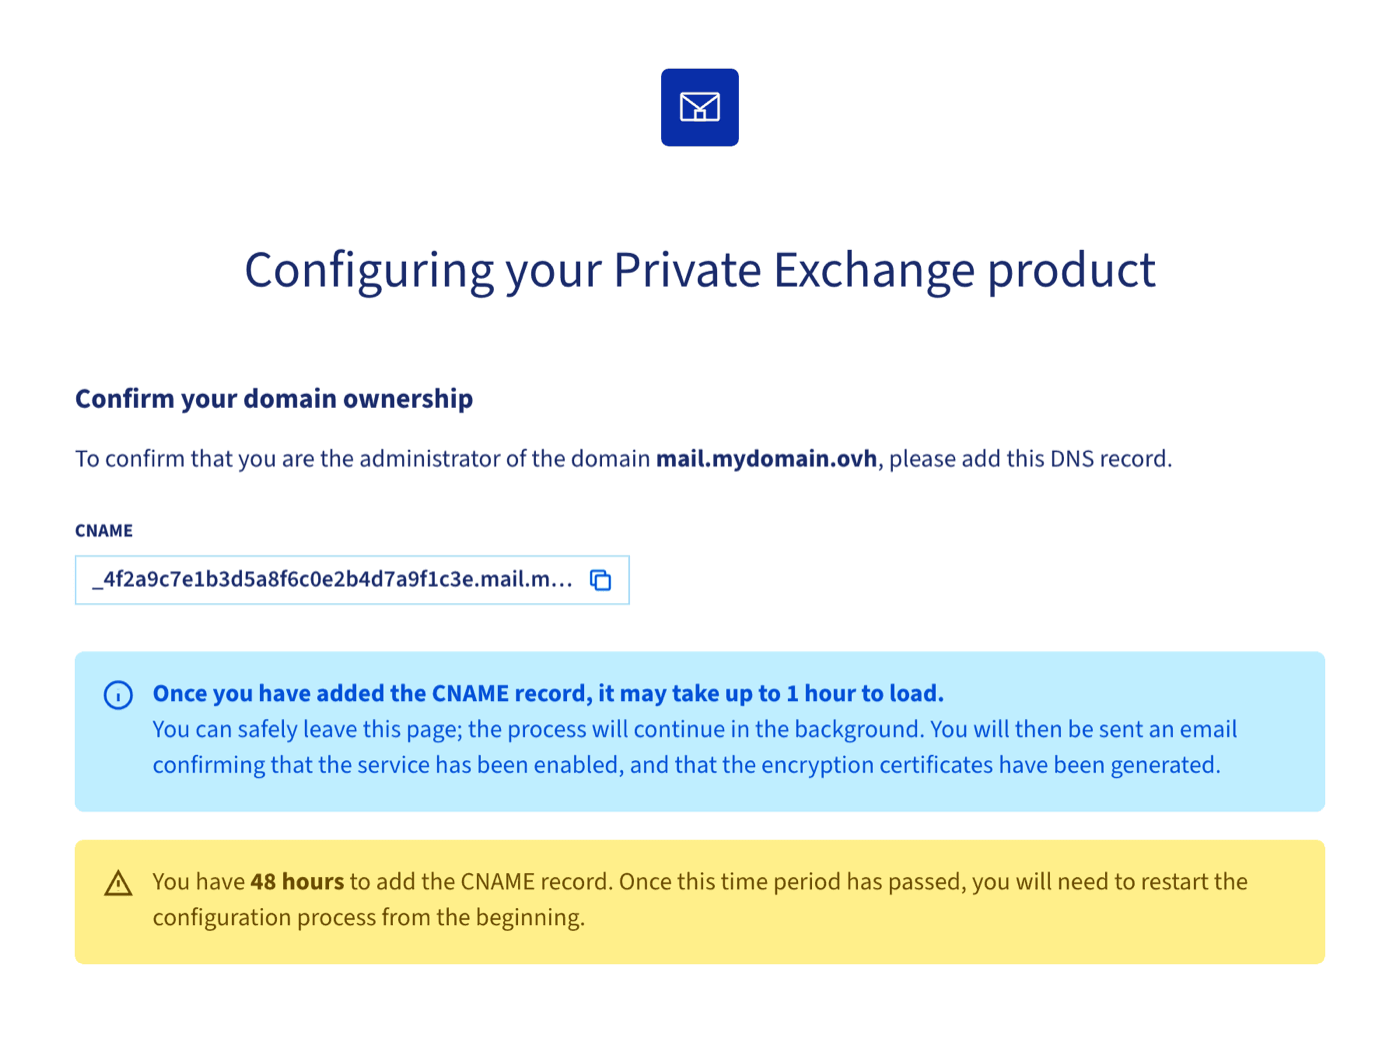
Copy the CNAME record before leaving the page, then create it from the interface where you manage your domain name's DNS zone.
- Once the record has been added, it may take up to 1 hour to be detected. You can leave the page: the process continues in the background.
- You have 48 hours to add the CNAME record. After this period, the configuration is cancelled and you must restart it from the beginning.
Once the CNAME record has been detected, the server configuration is completed automatically: the SSL certificate is generated for your email server address and the webmail is activated. Check the status of your server directly in the OVHcloud Control Panel, as described in step 4.
Step 4: Check that your server is ready
Select your Private Exchange service again in the OVHcloud Control Panel. The assistant no longer appears: the General information tab of the service is displayed.
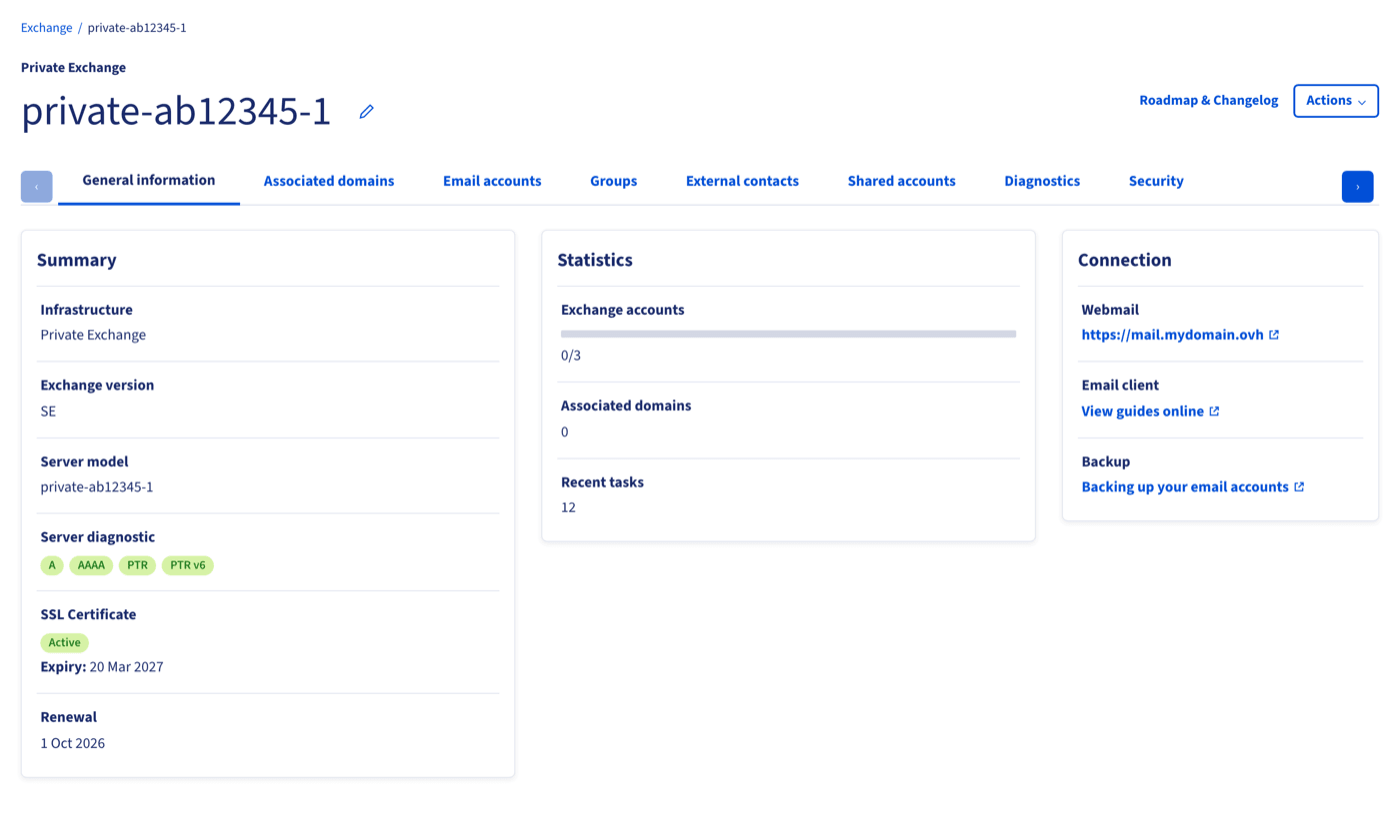
Check the following elements:
- Server diagnostic (Summary): the
A,AAAA,PTRandPTR v6badges indicate whether the DNS records of your email server address are correct. When a badge is not green, click on it to display the details and the values to configure. - SSL Certificate (Summary): must be Active, with its expiry date.
- Webmail (Connection): the link to your Outlook Web App, in the form
https://mail.mydomain.ovh. - Associated domains (Statistics): displays 0 at this stage. This is normal: the domain name for your email addresses is added in step 5.
If your domain name is managed outside OVHcloud or in another account, the A and AAAA badges will stay orange until you have created the corresponding records yourself. Click on each badge: the details show the record type, the sub-domain and the target value (the IPv4 or IPv6 address of your server) to enter from the interface where you manage your domain name's DNS zone.
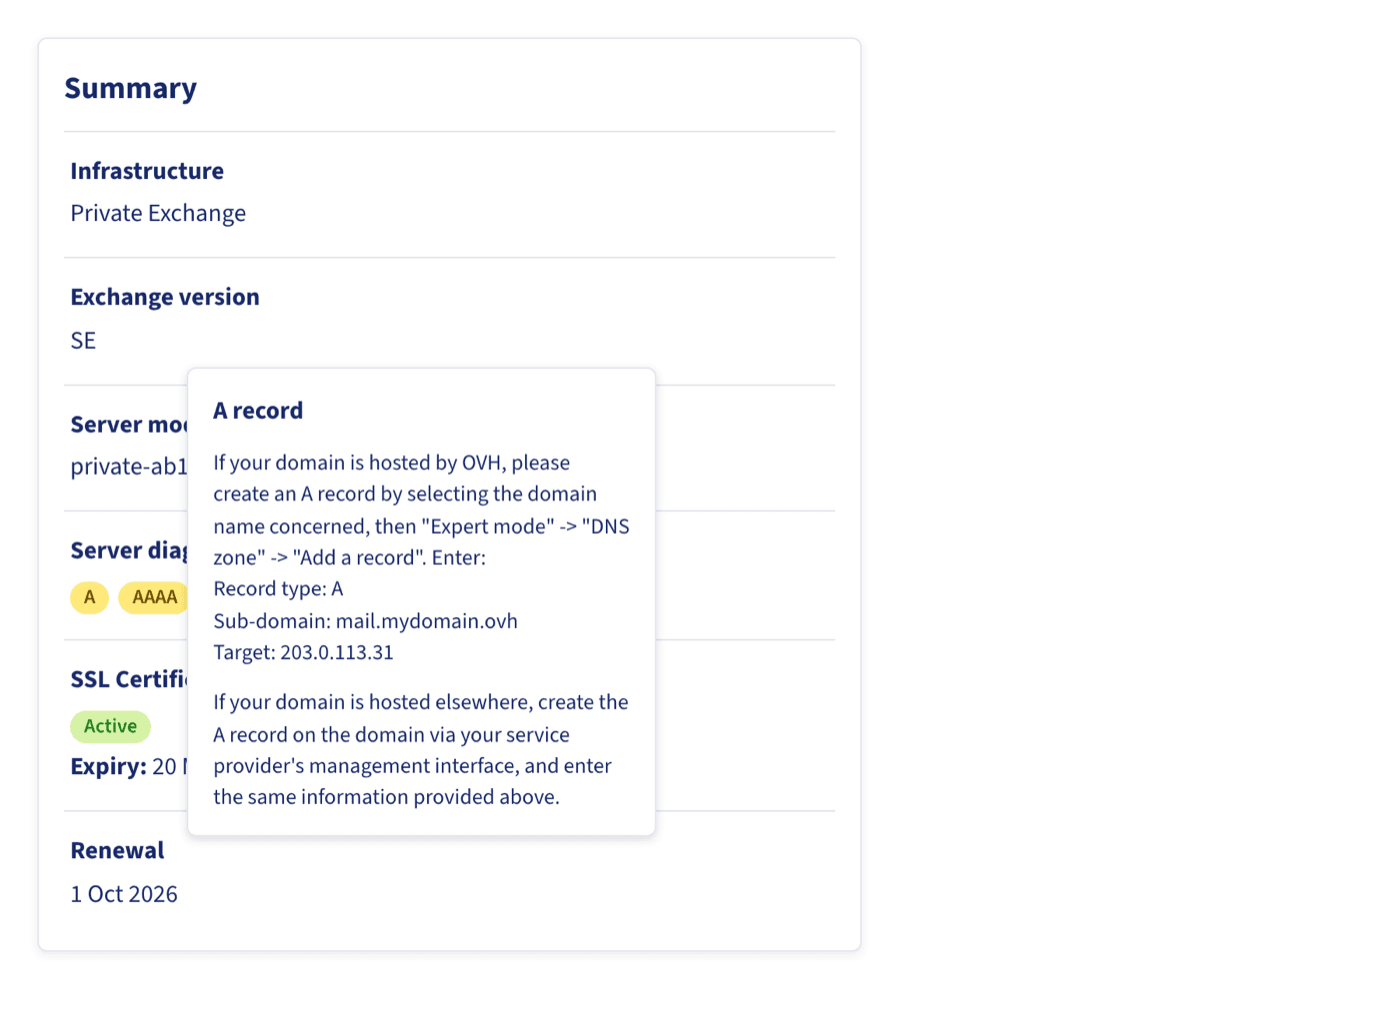
The PTR and PTR v6 records (reverse DNS) are managed by OVHcloud. If one of these badges reports a problem, you cannot fix it yourself: contact our support team.
Step 5: Add your domain name and create your accounts
Add your domain name
Your server is ready, but you cannot create email accounts until a domain name has been associated with it. This domain name will appear in your email addresses (for example john.smith@mydomain.ovh). It may be the same as the one used for the server address, or a different one.
Click on the Associated domains tab, then on the Add a domain button, and follow the steps described in our guide How to add a domain name to your Exchange service.
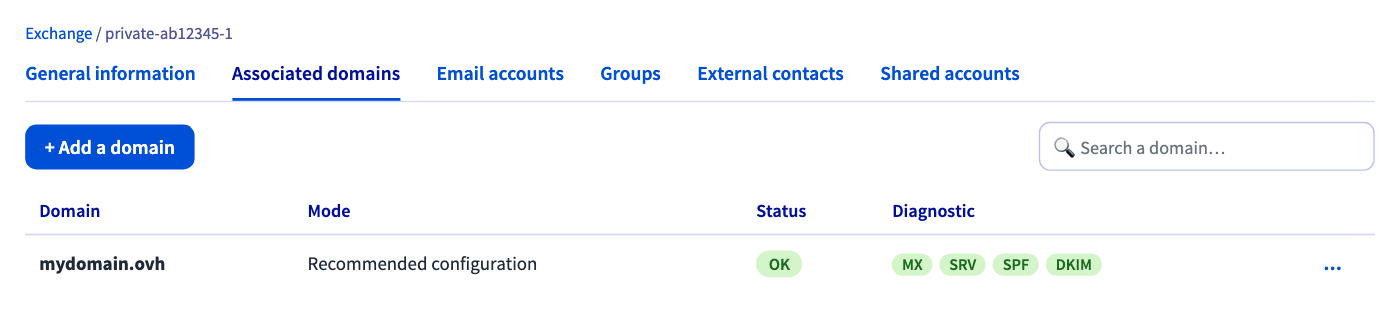
In the last step of adding a domain, the Recommended configuration option redirects all emails sent to your domain name to your Private Exchange service, immediately. If this domain name already receives emails through another service (another OVHcloud email solution, a third-party email service or an in-house server), choose Custom configuration: it lets you keep the other email solution running alongside your Private Exchange service and decide when to switch.
Once the domain name has been added, check the Diagnostic column of the table rather than the Status column: the status can be OK while the MX, SRV, SPF or DKIM badges are not yet green. A badge that is not green means that a DNS record is missing or incorrect. Click on it to display the value to configure. As long as the MX record is not correct, your domain name will not receive any emails on your Private Exchange service. The SRV record is needed to configure an Exchange account automatically in a compatible email client such as Outlook.
- Domain name managed at OVHcloud, with the Recommended configuration option: the records are created for you in the DNS zone. The badges only turn green once the changes have propagated, which can take up to 24 hours: you do not need to do anything.
- Domain name not managed by your OVHcloud account: the domain name first appears with the mode Validating domain and the status Confirmation, with a red
CNAMEbadge in the Diagnostic column. You must prove that you own it: click on theCNAMEbadge to display the record to create in the DNS zone of your domain name (in the formxxxxx-check.mydomain.ovhpointing toovh.com). You have 48 hours to do this. Once the domain name has been validated, create the email records yourself from the values displayed in the Diagnostic column. Please refer to our guide on Creating a CNAME record to validate your domain name on your email solution.
SPF and DKIM protect your sending reputation. With Private Exchange, that reputation is yours alone, so these two records matter even more: the SPF record tells receiving servers that your server is allowed to send emails for your domain name, and the DKIM signature proves that your emails have not been altered in transit. Without them, your emails are far more likely to be treated as spam, whatever the quality of your dedicated IP address.
The Recommended configuration creates both records for a domain name managed at OVHcloud (check the SPF and DKIM badges); for a domain name managed elsewhere, create them yourself. Please refer to our guides on the SPF record and the DKIM record, and complement them with a DMARC record.
Create your email accounts
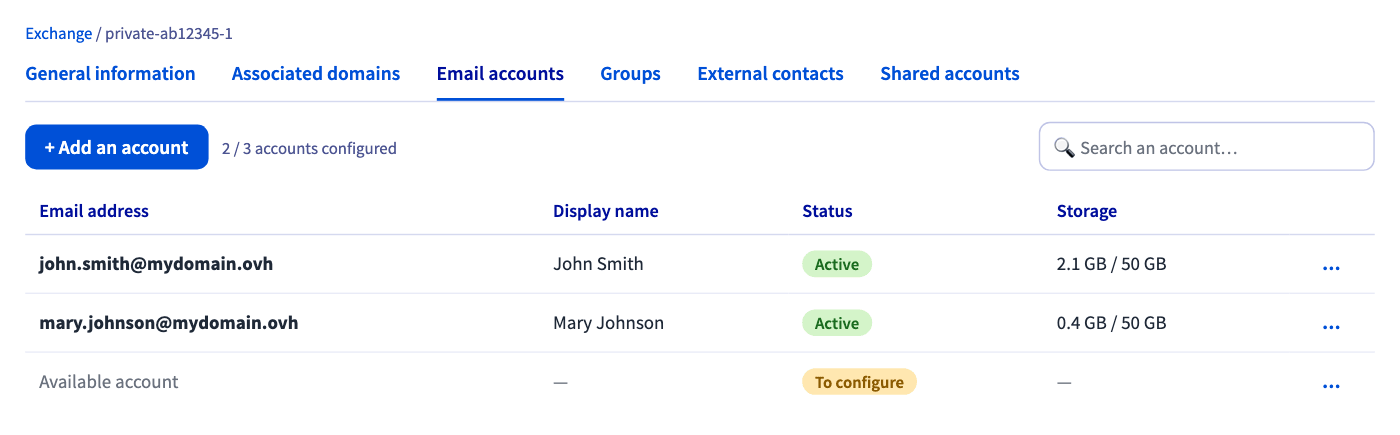
Once your domain name is associated, open the Email accounts tab and click Add an account to create your email accounts for this domain name (for example john.smith@mydomain.ovh). Your users can then sign in to the webmail at your email server address, or set up their accounts in an email client: see our Microsoft Exchange guides.
Renewing the SSL certificate
The SSL certificate issued for your email server address has a limited validity period. Its expiry date is displayed under SSL Certificate, in the Summary of the General information tab. When the expiry date is near, or once it has passed, a message invites you to renew the certificate. Do not wait for it to expire: with an expired certificate, the webmail and email clients display security warnings.
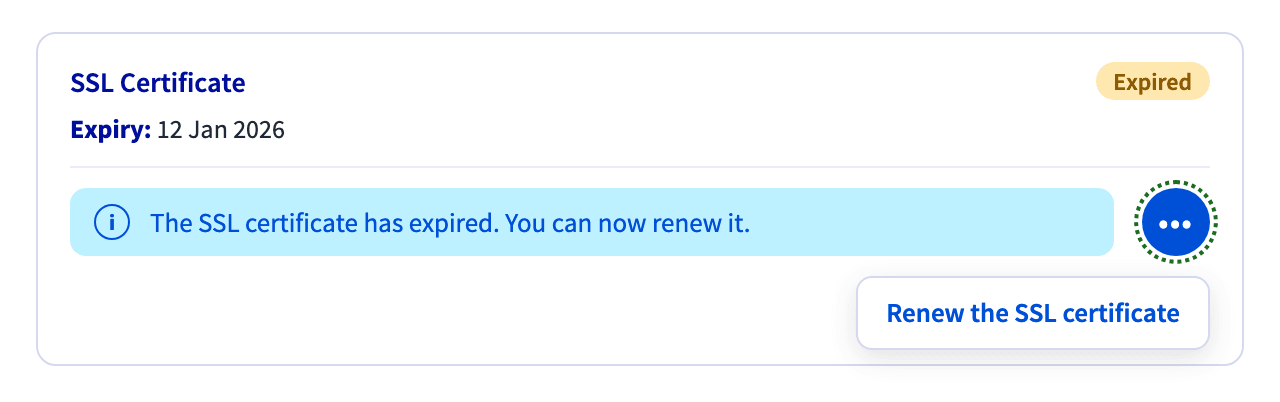
- Click the
...button next to the message, thenRenew the SSL certificate. - In the SSL certificate renewal window, select the email address that will receive the renewal confirmation. Only the administrative addresses of your domain names are offered, such as
admin@,administrator@orhostmaster@, followed by your domain name or your email server address. The address you select must exist: if none of them does, create the corresponding email account (or an alias pointing to an existing account) before continuing. - Click
Next. Check the information displayed (server model, server address and confirmation email), then clickConfirm.
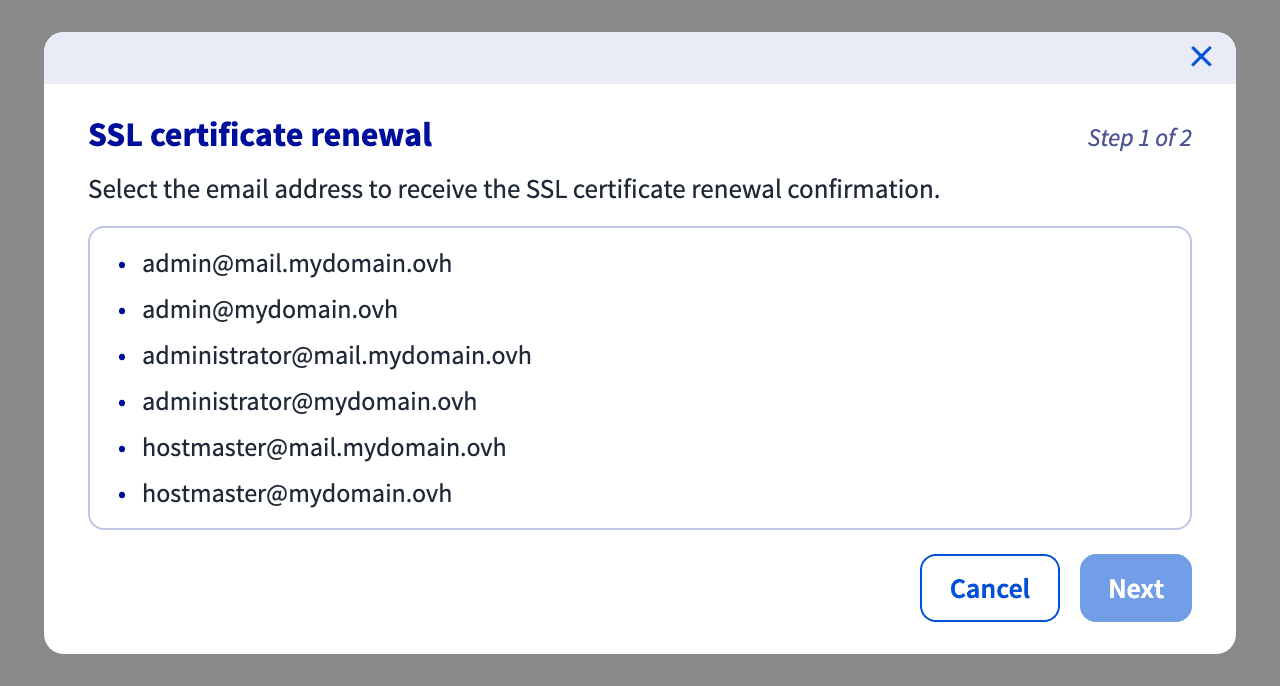
You must be able to read the emails received at the selected address: once the renewal has been processed, an email detailing the next steps is sent to it. Without this email, the renewal cannot be completed.
Once you confirm, a message at the top of the page states that the renewal has been processed and repeats which email address the next steps were sent to. In the meantime, the SSL Certificate section indicates that the certificate is being installed and cannot be renewed again. Follow the instructions in the email you have received: the new expiry date is displayed once the certificate has been installed.
Go further
How to add a domain name to your Exchange service
How to improve email security with an SPF record
How to improve email security with a DKIM record
How to improve email security with a DMARC record
Creating a CNAME record to validate your domain name on your email solution
Join our community of users.