IAM rights management
Find out how to manage users, roles, and access rights on your On-Prem Cloud Platform with Keycloak
Objective
This guide explains how to manage IAM (Identity and Access Management) rights and access on your On-Prem Cloud Platform (OPCP) through Keycloak, which centralises authentication to the platform's application services.
Requirements
- A delivered and operational On-Prem Cloud Platform service
- Access to the Keycloak interface with an account holding the
it_adminrole or higher - Familiarity with the guide Getting started with your OPCP
Instructions
Authentication architecture
Authentication on the OPCP relies on two distinct layers:
- Control plane access: SSH access to the controllers that make up the platform infrastructure, provided at service delivery
- Service access: centralised in Keycloak (Realm Master), which serves as the single entry point for:
- the Dashboard (unified service dashboard)
- the OpenStack Horizon graphical interface
- the OpenStack APIs (Keystone, Nova, Neutron, Glance, Ironic, etc.)
- the monitoring tools: Grafana, Netbox, Prometheus
Control plane access
When your OPCP is made available, you receive credentials to connect via SSH to the various controllers that make up the platform's control plane.
The access scope of the administrator account provided to you varies depending on the chosen management mode.
OVHcloud-managed mode
In managed mode, the administrator account provided to you has extended rights to run the platform administration tools:
opcp-cli: command-line tool for platform administrationopcp-diag: control plane diagnostic tool
The deployment and updates of the control plane are handled by OVHcloud.
Non-managed mode
In non-managed mode, the administrator account provided to you has full privileges over the control plane, allowing you to:
- Deploy the control plane
- Update the control plane
- Access all administration tools
In non-managed mode, OVHcloud does not handle control plane administration operations. You are responsible for deployment and updates.
Initial credentials
Two types of credentials are provided when your OPCP is initialised:
Linux administrator account: used for SSH connections to the controllers. By default, password authentication is disabled on the controllers. During the installation of your OPCP, an SSH public key of your choice can be provided to OVHcloud to be deployed and allow you first access. A password is also provided, useful only for direct server access via the console in the event that SSH access is unavailable.
Keycloak administrator account: provided in both managed and non-managed modes, this account has full administration rights over the Realm Master. A temporary password is assigned, which you must change at first login.
These initial credentials are separate from the user accounts you will subsequently create in Keycloak for your teams. Store them securely and change the temporary passwords immediately after delivery.
Accessing the Keycloak administration interface
Two methods are available to access the Keycloak administration interface of your OPCP.
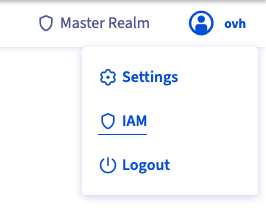
Via the Dashboard: log in to admin.dashboard.<domainname>, then click on your name in the top right corner. A menu appears with an IAM link that redirects you directly to the Keycloak interface.
Direct access: you can also access Keycloak directly via admin.keycloak.<domainname>.
Replace <domainname> with the domain name provided at the delivery of your OPCP.
Role hierarchy
The IAM model of the OPCP is based on four distinct roles, from the most restricted to the most privileged. These roles are a starting point — Keycloak gives you full flexibility to compose your own roles and assign them to user groups to match your organisation's needs.
You can create custom roles in Keycloak by combining available permissions, then assign them to user groups. Refer to the official Keycloak documentation for advanced role and group management.
The reader role
Supervision and audit profile. This role provides read-only access to the platform's monitoring tools.
It allows you to:
- View your own account settings in Keycloak
- Access Netbox in read-only mode (network inventory)
- Access Prometheus in read-only mode
- Access the Dashboard and its iframes (Grafana, Netbox, Prometheus, OpenStack)
- View OpenStack project resources in reader mode, subject to project attributes configured in Keycloak
The reader role's OpenStack access is limited to the reader role (read-only). It requires project attributes to be configured on the Keycloak account or group. Without a project attribute, no OpenStack resource is visible.
The dc_operator role
Datacenter operator. This role is intended for teams responsible for network and physical infrastructure.
It provides the following additional access compared to reader:
- Access Grafana in edit mode (modify dashboards)
- Access Netbox as an operator (create and modify network resources)
The dc_operator does not have access to OpenStack or to Keycloak user administration.
The it_admin role
Main platform operator. This role is intended for IT teams who manage OPCP resources on a daily basis.
It provides the following additional access compared to dc_operator:
- Manage Realm Master users in Keycloak (create accounts, assign rights)
- Access OpenStack with full rights (
reader,member,admin)
The it_admin role does not allow modification of global Keycloak realm settings (password policy, identity federation, etc.). These actions are reserved for master_admin.
The master_admin role
Platform administrator. This role has full rights, including complete administration of the Keycloak Realm Master.
It provides the following additional access compared to it_admin:
- Modify the Realm Master configuration (security policy, federation, etc.)
- Administer Netbox with full rights, including the
adminrole
The master_admin role is assigned by OVHcloud at service delivery. Its use should be limited to platform administration operations that cannot be delegated to an it_admin.
Rights matrix
The table below summarises the access for each role across the integrated applications.
Legend: ✅ Allowed | ❌ Not allowed | 🟡 Partial (subject to project attributes)
The reader role's OpenStack reader access requires project attributes to be configured on the user or their group in Keycloak. Without a configured project attribute, no OpenStack resource is accessible.
Creating a user and assigning a role
Creating a user
In the Keycloak interface, make sure you are connected to the Realm Master, then go to Users > Add user.
Fill in the following fields:
- Username: the user's login identifier
- Email: email address (recommended)
- First name / Last name: user's full name
Click Create, then open the Credentials tab to set a temporary password. Enable the Temporary option to force the user to change it at their first login.
Assigning a role to a user
In the user's profile, open the Role mapping tab, then click Assign role.
In the filter, select Filter by realm roles, then search for and select the desired role (reader, dc_operator, it_admin or master_admin). Click Assign.
A user can be assigned multiple roles. The effective permissions are the union of the rights from all roles assigned to them.
Assigning a role to a group
Assign roles to groups rather than to individual users to simplify rights management at scale.
In Keycloak, go to Groups > Create group, name the group, then open the Role mapping tab to assign the desired role.
Then add users to the group from their user profile via Groups > Join group.
Configuring OpenStack rights via Keycloak attributes
For the reader role, access rights to OpenStack projects are defined directly in the user attributes (or group attributes) in Keycloak.
Adding a project attribute to a user
In the Keycloak interface, navigate to the relevant user, then open the Attributes tab.
Add a new attribute with the following values:
- Key:
project - Value: a JSON object describing the project and role to assign
For the reader role, only the OpenStack reader role (read-only) can be assigned via project attributes. The member and admin roles remain reserved for it_admin and master_admin.
Assigning multiple projects to a user
You can add multiple project attributes to the same user or group. They will automatically be merged into a projects attribute in the token sent to Keystone.
Configuring attributes on a group
The same configuration can be applied to a Keycloak group. All members of the group will automatically inherit the project attributes defined on that group.
In Keycloak, go to Groups, select the desired group, then fill in the project attributes in the same way as for an individual user.
Attributes defined on a group and those defined directly on the user are merged. A user can therefore benefit from projects from multiple groups in addition to their own attributes.
Keycloak as the single source of truth
We recommend not creating users directly in OpenStack, to keep Keycloak as the single source of truth for platform accounts. Any account created directly in OpenStack would bypass the lifecycle managed by Keycloak and would not benefit from automatic cleanup or centralised rights management.
Service accounts for automation
For automation needs (Terraform, OpenTofu, scripts, CI/CD pipelines, etc.), we recommend creating a dedicated account in Keycloak with permissions scoped to the automation's requirements, then generating OpenStack application credentials associated with that account.
Application credentials allow your automation tools to drive OpenStack without depending on a personal user's credentials. A user connected to OpenStack with their Keycloak account can create their own application credentials from the Horizon interface, via Identity > Application Credentials > Create Application Credentials.
If the associated Keycloak account is deleted, the OpenStack application credentials will be automatically revoked. Avoid linking critical automation to a personal account.
For more details on configuring Keycloak authentication with the OpenStack CLI and obtaining your credentials, refer to the guide How to use the APIs and obtain the credentials.
Automatic account cleanup
The platform reacts to user deletion events in Keycloak: as soon as an account is removed from the Realm Master, the associated OpenStack users and application credentials are automatically deleted.
Deleting an account in Keycloak immediately triggers the revocation of the associated OpenStack application credentials. Consider this impact before deleting any account, particularly if automations or scripts rely on those credentials.
Advanced Keycloak configuration
All official Keycloak features are available on your OPCP. For any advanced configuration (password policies, fine-grained role management, client configuration, etc.), refer to the official Keycloak documentation.
Multi-factor authentication (MFA / OTP)
We strongly recommend enabling multi-factor authentication on your platform accounts, particularly for the it_admin and master_admin roles. Keycloak natively supports the TOTP (Time-based One-Time Password) protocol, compatible with any authentication application supporting this open standard, such as FreeOTP.
MFA configuration is done at the realm authentication flow level. Refer to the official Keycloak documentation to set up a post-login flow with mandatory or conditional OTP based on roles.
Identity federation and Identity Providers
Keycloak supports federating external directories (Active Directory, LDAP) or connecting third-party Identity Providers (SAML, OIDC). For example, to set up federation with an Active Directory, refer to the dedicated section of the official Keycloak documentation.
When setting up Keycloak federation or adding an Identity Provider pointing to an external endpoint, you must allow the corresponding network flows in the OPCP configuration file via the keycloakAllowedEndpoints variable.
Each entry corresponds to an external endpoint that Keycloak must be authorised to reach. Add as many entries as needed depending on your configuration.
Automation with OpenTofu / Terraform
User, group and role management in Keycloak can be automated using Infrastructure as Code tools such as OpenTofu or Terraform, via the official Keycloak provider.
This allows you to manage your access rights in a declarative, reproducible and version-controlled way.
Example resource to create a user:
For all available resources (users, groups, roles, federation, etc.), refer to the Keycloak provider documentation.
Listing all rights
Via opcp-diag (consolidated view)
To get a complete view of all accounts and their rights on the platform, connect via SSH to a controller and run:
This tool displays all accounts declared in Keycloak, on the controllers, and across the various tools that make up the control plane.
Available options
The available audit types for --only are:
For example, to audit only Keycloak and OpenStack:
For a human-readable text output:
Manipulating the JSON output
The default output is in JSON format, making it easy to manipulate and filter with tools like jq. For example:
opcp-diag audit is the recommended method for auditing your platform's access. Unlike the OpenStack CLI, it covers all accounts present on the platform, regardless of their connection history.
Via the OpenStack CLI
To list active role assignments in OpenStack:
To list the roles available on the platform:
These commands only return users who have already authenticated at least once via OpenStack. Users present in Keycloak who have never made an OpenStack connection will not appear in these results.
Go further
For training or technical assistance implementing our solutions, contact your sales representative or visit our Professional Services page to request a quote and have your project analyzed by our experts.
Join our community of users.