For AI agents: the complete documentation index is available at https://docs.ovhcloud.com/en/llms.txt, the full documentation bundle is available at https://docs.ovhcloud.com/en/llms-full.txt, and this page is available as Markdown at https://docs.ovhcloud.com/en/guides/web-cloud/web-hosting/cms-install-1-click-modules.md.
Find out how to set up your website using our 1-click modules
Objective
OVHcloud 1-click modules allow quick and easy website setups (without technical skills required). A 1-click module refers to an automated installation of a Content Management System (CMS). In this way, OVHcloud offers a simplified installation process for some of the most popular CMSs: WordPress, Joomla!, Drupal, and PrestaShop.
This guide explains how to set up your website using an OVHcloud 1-click module.
Your OVHcloud web hosting uses a recent PHP version and a compatible runtime environment. You can check the status of the different versions on this page. If you need assistance with this, please refer to our guide, to change this configuration quickly.
A configured .ovhconfig file must be present in the FTP root of your web hosting plan.
If you want to install the 1-click module in an existing folder, this folder must be empty.
The domain name (with subdomain if desired) that will be used for your website must be declared via the My sites tab on your web hosting.
OVHcloud Control Panel Access
Direct link:
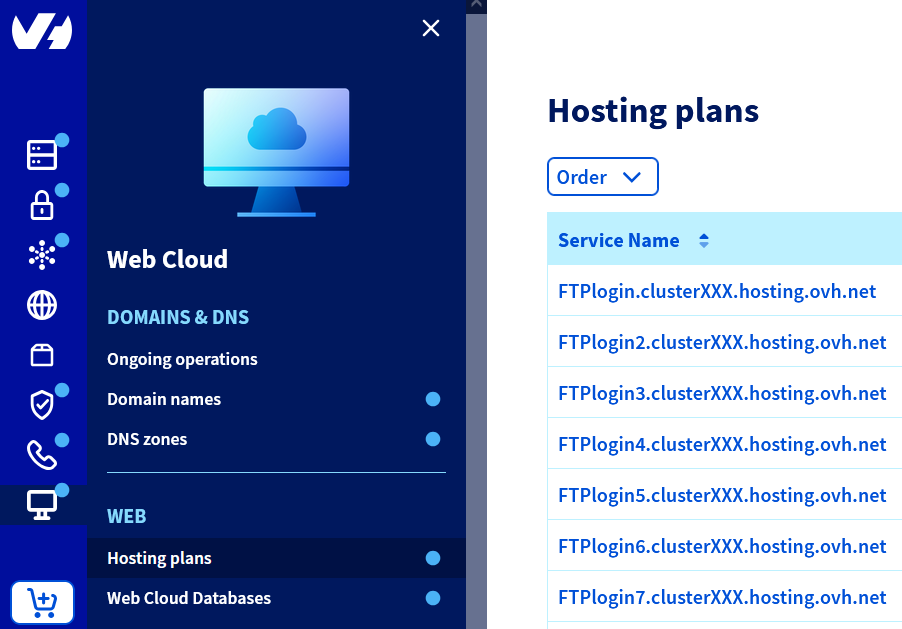
Navigation path:Web Cloud > Hosting plans > Select your web hosting plan
With a CMS, you can build a website via an easy-to-use interface. Several types of CMS exist, some are designed to create an e-commerce website, others to set up a showcase website, a blog, etc. You can then configure a ready-to-use, customisable website structure (themes, extensions, text, etc.) to suit your needs.
Of all CMSs, OVHcloud offers 4 with its 1-click modules, which can be installed automatically.
Using this solution, you will need to choose from the 4 CMSs listed above. If you have already made your choice, continue reading the steps in this guide. Otherwise, please refer to our CMS comparison to make your choice.
If you would like to install a CMS that is not available as a 1-click module, you can install it manually on your web hosting plan. This is provided that the CMS is compatible with our OVHcloud web hosting offers.
2 - Add a 1-click module
Two installation methods are available:
Quick installation (selected by default): OVHcloud installs the CMS and provides you with your admin credentials via email to your OVHcloud contact email address. This is the easiest and fastest way to install a 1-click module.
Advanced installation: It allows you to customise the configuration for the CMS installation. You will need to enter all of the information required for the CMS to work properly:
Login information for your database (server, username, port, password, etc.)
Installation path in your web hosting plan's FTP storage space
The installation directory for your 1-click module must be empty, and you must have at least one database available to create on your OVHcloud web hosting plan for the installation to be carried out.
For a quick installation, do not create the database beforehand because the installation robot will take care of it.
Click on one of the 2 installation methods below to display the content.
Quick installation of a 1-click module
Click on the tabs below to display each of the 4 steps in turn.
Step 1
Step 2
Step 3
Step 4
Go to the page, then choose the web hosting plan concerned.
On the page that opens, click the 1-click modules tab. You will find any 1-click modules already installed. You can manage your 1-click modules and install new ones.
In the 1-click modules tab of your hosting, click the Add a module button.
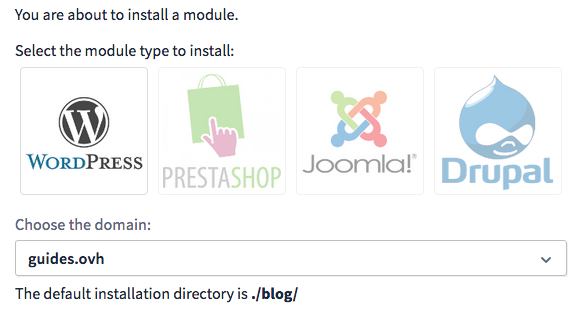
In the window that pops up, choose the CMS you want to use, then select the domain name you want to set up your website with:
Below the form for selecting a domain name (or subdomain), verify that the default Installation path is the one in which you want to install your 1-click module.
As a reminder, this directory must be completely empty.
Once your domain has been correctly added, try adding a 1-click module again.
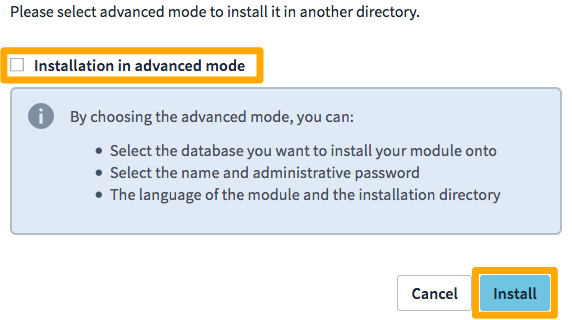
Choose the domain name for your CMS, verify the target directory that will appear automatically after you have chosen your domain name, then check that the Installation in advanced mode box has not been ticked. Then click the Install button.
Once the installation is complete, you will receive an email containing the login details for your CMS administrator interface (back office). Log in to the interface to customise your website.
Info
It may take up to 15 minutes for the module to be installed after you click the Install button in your .
Advanced installation of a 1-click module
Click on the tabs below to display each of the 8 steps in turn.
Step 1
Step 2
Step 3
Step 4
Step 5
Step 6
Step 7
Step 8
Go to the page, then choose the web hosting plan concerned.
On the page that opens, click the 1-click modules tab. You will find any 1-click modules already installed. You can manage your 1-click modules and install new ones.
In the 1-click modules tab of your hosting, click the Add a module button.
In the window that pops up, choose the CMS you want to use, then select the domain name you want to set up your website with:
Below the form for selecting a domain name (or subdomain), verify that the default Installation path is the one in which you want to install your 1-click module.
As a reminder, this directory must be completely empty.
Once your domain has been correctly added, try adding a 1-click module again.
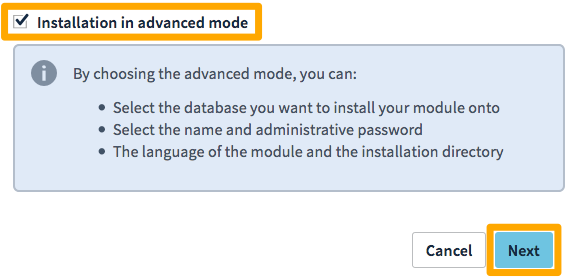
Ensure that the Installation in advanced mode box is ticked, then click Next.
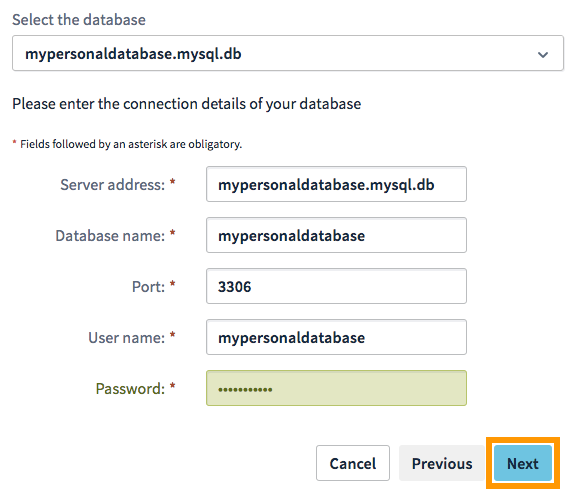
Enter the information required to connect to your database.
Warning
If the information you enter is incorrect, the installation will not complete successfully. To avoid this, we recommend that you test the connection to your database.
The database has already been created on your web hosting plan: Select it from the Select the database dropdown menu, then enter the information requested.
The database is created on your Web Cloud Databases instance: In the Select the database dropdown menu, select Database aside from your web hosting and enter the requested information. The instance and web hosting plan must be hosted in the same data centre.
The database is created on another OVHcloud web hosting plan: In the Select the database drop-down menu, select Database aside from your web hosting and enter the requested information. The database and web hosting plan must be hosted in the same data centre.
Enter the remaining database details:
Server address: Enter the name of your database server, included in the installation email and displayed in your OVHcloud Control Panel.
Info
The server name of a database included with your web hosting plan usually has this form: NameOfYourDatabase.mysql.db.
The server name of a Web Cloud Databases database starts with your OVHcloud NIC handle and is in the following form: OVHID(without-ovh)-XXX.eu.clouddb.ovh.net where the "X" are to be replaced by the reference of your Web Cloud Databases service.
Database name: This name was defined when the database was created in the .
Port: Use the number 3306 (the default port) for a database included with your web hosting plan. For a database on a Web Cloud Databases instance, see our guide "Getting started with the Web Cloud Databases service".
Username: It is identical to the database name if you are using a database included with your web hosting plan. For databases created on a Web Cloud Databases solution, please refer to the information in our guide "Getting started with the Web Cloud Databases service".
Password: It was sent to you by email when the database was created. You may have modified it since.
Once you have entered this information, click Next.
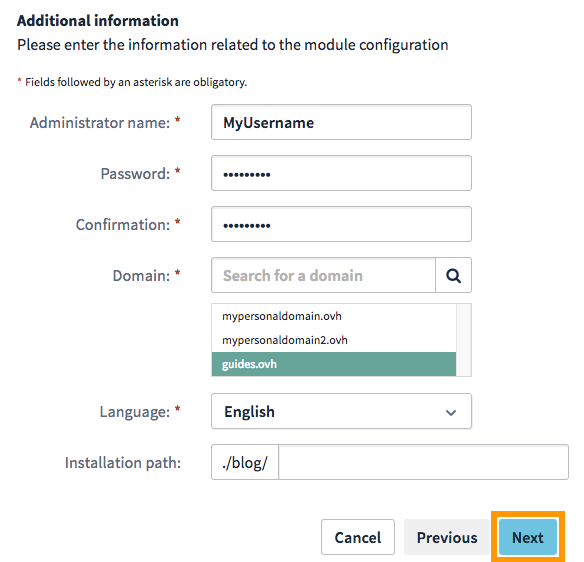
Enter the following information for the module configuration:
Admin name or email address: The username you will use to log in to your CMS administration interface (back office).
Password: The password you use to log in to your CMS admin interface.
Language: The language in which the CMS will be installed.
Installation path: This is automatically entered when you select your domain name. You can complete it by entering subdirectories (for informed users).
Info
Check that the Installation path contains the directory where you want to install your 1-click module with your domain name.
As a reminder, this directory must be completely empty.
In addition, if you enter a subdirectory in the Installation path field, it will appear in the URL used to access your 1-click module.
For example, if you enter the subdirectory test, the URL to access the 1-click module will look like this: http://domain.tld/test/.
Once you have entered this information, click Next:
Warning
The final folder specified in the installation path must be completely empty for the installation to succeed.
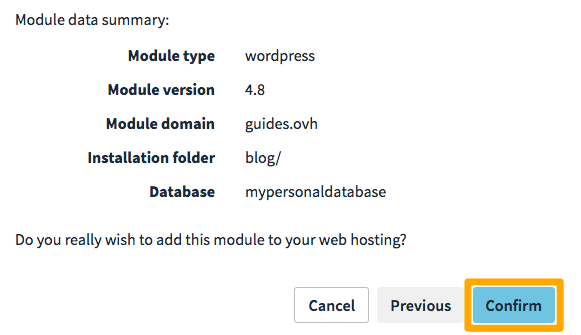
Check the information displayed, then click Confirm if everything is in order:
3 - Customise your website
The installation can take up to ten minutes.
Once it has finished, you will receive an email confirming that your CMS has been set up correctly. This email will prompt you to log in to your CMS admin interface. This way, you can edit your website's appearance, and publish your first pieces of content on it.
Warning
OVHcloud support does not provide assistance for using any CMS. The 1-click installation process is a free, noncontractual service to help install them.
If you need help with your CMS's features, please contact the publisher of the CMS you have installed. You will find documentation to support you in your project.