Tutorial - Installing a CMS manually on your Web Hosting plan
Find out more about some of the compatible CMS for Web Hostings
Objective
This tutorial will help you install a CMS (Content Management System) like WordPress, Joomla!, Drupal, PrestaShop, Pico, Grav, Typo3 or SPIP manually in just a few steps.
OVHcloud provides services that you are responsible for with regard to their configuration and management. It is therefore your responsibility to ensure that they function properly.
This tutorial is designed to help you with common tasks. Nevertheless, we recommend contacting a specialist provider or the publisher of the CMS you have chosen to install if you encounter any difficulties. We will not be able to assist you. You can find more information in the Go further section of this tutorial.
Find below the links to the respective official pages of the CMS mentioned above:
To install your CMS automatically from your , please refer to our documentation on installing a 1-click module.
This tutorial explains how to configure your website by manually installing a CMS.
Requirements
- An OVHcloud web hosting plan that contains at least one database
- A domain name
OVHcloud Control Panel Access
- Direct link:
- Navigation path:
Web Cloud>Hosting plans> Select your web hosting plan
Instructions
CMS overview
To help you choose your CMS, find below a short description for each of the CMS mentioned above.
WordPress
WordPress is typically used to create a website or blog. It is based on PHP technology and includes a range of tools such as a spell checker, as well as plugins for e-commerce, SEO and even your website security.
You can find more information on our WordPress module page.
Joomla!
Joomla! is a CMS that allows you to create websites and web applications with high performance.
The Joomla! community is very large and can provide assistance and services in all areas related to this CMS (help, documentation, technical assistance, themes, etc.)
You can find more information on our Joomla! module page.
Drupal
Drupal is a free open-source platform under PHP created in 2000. Drupal allows you to create dynamic websites quickly.
You can find more information on our Drupal module page.
PrestaShop
A CMS created in 2005 and dedicated to building e-commerce websites. Apart from the common features of online stores, this software can also be customised with modules, themes and templates.
You can find more information on our PrestaShop module page.
Pico
Pico is a lightweight PHP-based CMS, perfect for building websites and blogs. It does not require a database but uses Markdown files to manage content. It supports extensions to customise your website.
- Official Pico website
Grav
Grav is a modern and flexible CMS based on PHP. It is designed without databases and uses Markdown files for storing and managing content. Grav stands out for its package management system which makes it easy to install and update plugins and themes for your website.
- Official Grav website
Typo3
Typo3 is a PHP-based CMS designed for developing websites of all sizes, from small to large companies. It relies on a database to store the content. It offers a wide range of extensions to extend its features in order to customize your website.
- Official Typo3 website
SPIP
SPIP is a CMS designed primarily for publishing and managing editorial websites such as online newspapers or magazines. Based on PHP and based on an SQL database, it facilitates the creation of websites enriched with textual, graphical and/or multimedia content.
- SPIP official website
Whichever CMS you choose, please note that OVHcloud will not provide assistance with using these CMSs. If you encounter any difficulties, contact the publisher of the CMS you have chosen directly using the links indicated earlier in this tutorial.
Step 1: Prepare the installation
To install a CMS on your web hosting plan, you will need to make some preparations.
1.1 Check the root folder declaration
The "root folder" corresponds to the directory in which your future CMS will be installed in your hosting. It is recommended to choose an empty directory to avoid conflicts with your other potential websites.
Refer to our documentation which describes how to create a website on your web hosting to define the root folder to use with your CMS.
If you define a root folder name that does not exist on your Web Hosting plan, it will be automatically created in your Web Hosting plan’s FTP storage space.
1.2 Check the domain name resolution
- Make sure that the domain name you will use to access your CMS, along with its subdomain “www”, is mapped to the IP address of your web hosting plan.
To retrieve the IP address of your Web Hosting plan, log in to your in the Web Cloud section, then select your Web Hosting plan in the Hosting section.
In the General information box on your right, you will find the IP address of your web hosting plan in the IPv4 form.
If your domain’s active DNS zone is managed in your , compare your hosting plan’s IP address with the one in your domain’s DNS zone, using our OVHcloud DNS zones documentation .
If you have activated the CDN or Country IP options with your domain, use the appropriate IP address by referring to our documentation listing all shared hosting IP addresses.
If you are unable to perform these checks, contact the hosting provider for your active DNS zone to update the pointing of your domain name.
Any changes you make to your DNS zone can take between 4 and 24 hours to propagate.
- Get the information you need to log in to your Web Hosting plan’s FTP space.
- Retrieve access to your Web Hosting plan’s database if it already exists, or create one using our documentation.
1.3 Install the free FTP client FileZilla
If you are not already using an FTP client, you can use Filezilla. You can find the free download link and a tutorial on how to use it in our documentation on using FileZilla with your OVHcloud hosting plan.
There are other FTP clients that you can use, such as Cyberduck. You can find more information in our documentation on using Cyberduck with your OVHcloud hosting plan.
1.4 Prepare a database
Some CMS systems work without a database. If this is the case for the CMS you want to install, skip this step.
Most CMSs require a database to work. Our web hosting offers include them, with the exception of free hosting.
Use our documentation to create a database from your web hosting plan.
If you have a Cloud Databases web hosting plan in MySQL or MariaDB and you would like to use it to manually install your CMS, please refer to our guide on creating a database on a Cloud Databases web service.
Once you have created the database, retrieve the connection settings (server, database name, user name, and password) and save them for step 3 in this guide.
If you would like to install your CMS with an existing database, you can retrieve the connection settings for your database directly from the website files linked to it.
If this is also the same CMS you need to install, you can use this guide to identify the configuration files in your FTP storage space.
Then log in to your database to list the prefixes of the tables already inside. This is to avoid choosing a table "prefix" already used by another of your sites.
- To connect to your database linked to your Web Hosting plan, see this guide.
- To connect to a database on a Web Cloud Databases solution, see this guide.
Step 2: Start the installation
2.1 Retrieve your CMS source files
Go to the CMS publisher’s website to download the source files.
Below are links to the CMS download pages mentioned in this tutorial:
Retrieve the PHP version and, if your CMS uses a database, identify the MySQL or MariaDB version required to run your CMS.
To do this, open the link to the official CMS page that you want to install:
Then configure the PHP version on your web hosting plan by referring to our guide on Changing a Web Hosting plan’s PHP version.
If you are already using a PHP version that is equal to or higher than the required PHP version, no changes are required.
Follow the instructions provided by your CMS publisher until the source files are downloaded to your computer, then continue reading this tutorial.
If you have other websites hosted on your Web Hosting plan, check that they are compatible with the PHP version you choose for your new CMS.
2.2 Uncompress the downloaded source files to a new folder
To make things easier, replace the name of the CMS folder with the name of the CMS you have chosen (WordPress, Joomla!, Drupal, PrestaShop, etc.).
The downloaded file is in a compressed (zipped) format. Create a folder named CMS on your computer and then uncompress the contents of the downloaded file into the CMS folder.
To do this, open the folder in which you downloaded the compressed file, right-click on the file in question and then select “Extract all... ”.
Enter the destination CMS folder to extract your files to that folder.
2.3 Move the source files from the CMS folder to the root folder of your web hosting plan
Once you have unpacked the files in your CMS folder, log in to your storage space via FTP using FTP FileZilla client and copy the files from the CMS folder to the root folder you defined on your hosting in step 1 of this guide.
Below is an example with the CMS WordPress:
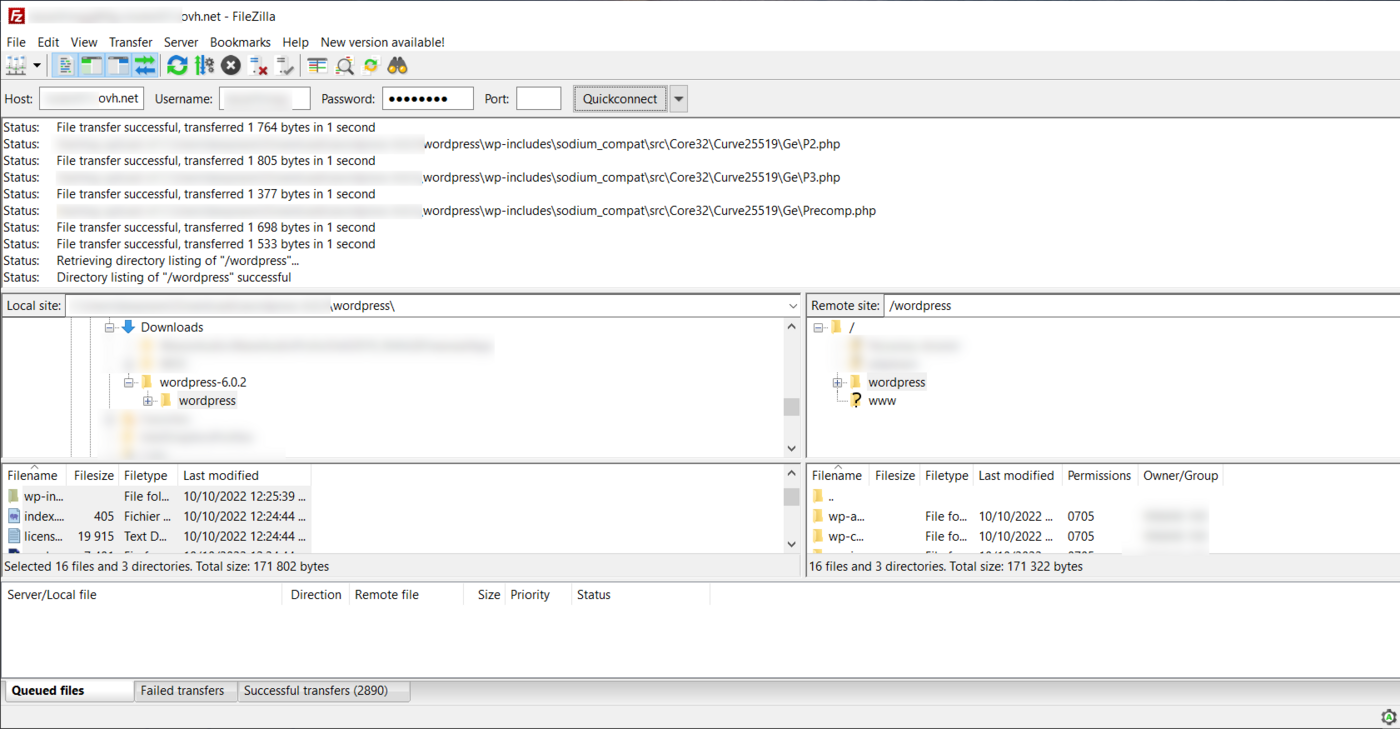
We strongly recommend that you use an empty root folder to avoid conflicts with other websites. Ensure that the destination folder does not contain any items before moving the files.
If the root folder you defined was not created automatically during the actions described in step 1, you can create it via FileZilla.
It may take a few minutes to upload files to your web hosting plan.
Once the transfer is complete, check that all the elements in the local CMS folder have been correctly transferred to the root folder on your Web Hosting plan.
Special Case: If you have a limited Internet speed and/or a hosting plan Professional or higher, you can use SSH connection to put your CMS source files in your Web Hosting plan’s storage space.
To log in to your hosting plan via SSH, please refer to our guide on Accessing a web hosting plan via SSH.
Once you have logged in via SSH, run the following commands:
- Go to the root folder where you want to install your CMS on your web hosting plan:
- Retrieve your CMS source files directly from your root folder using the command corresponding to the CMS you have chosen:
latest allows you to automatically install the latest version of the CMS.
- Unpack the source files of your CMS into your root folder using the command corresponding to the CMS you have chosen:
- A CMS folder is created in your root folder. Move its contents to the base of your root folder:
- Delete the empty CMS folder:
- Delete the compressed file corresponding to the CMS you have chosen:
Step 3: Finalise the installation
Before you continue with the installation, clear your Internet browser cache to avoid any errors.
From this stage onwards, the procedure will differ depending on which CMS you have chosen beforehand.
To continue with the installation, follow the guide corresponding to your CMS:
- Finalise a WordPress installation
- Finalise a Joomla! installation
- Finalise a Drupal installation
- Finalise a PrestaShop installation
- Finalise a Pico installation
- Finalise a Grav installation
- Finalise a Typo3 installation
- Finalise a SPIP installation
Go further
Migrating your website and emails to OVHcloud
Publishing a website on your Web Hosting space
Hosting multiple websites on your Web Hosting plan
For specialised services (SEO, development, etc.), contact OVHcloud partners.
If you would like assistance using and configuring your OVHcloud solutions, please refer to our support offers.
Join our community of users.