
How to recover a deleted database backup
Find out how to retrieve a database backup once it has been deleted from your OVHcloud Control Panel
Objective
Databases are included in most of our web hosting plans. If you accidentally delete a database linked to your web hosting plan, you can try to retrieve the backup via our APIs.
This guide explains how to retrieve a database backup via the OVHcloud API once it has been deleted via the OVHcloud Control Panel.
Information regarding OVHcloud service administration and how to find appropriate assistance
When using OVHcloud guides, please be aware of the following conditions:
- User instructions aim to provide as many details as possible but cannot cover individual use cases. You might need to adapt the pertinent actions to your requirements.
- The OVHcloud ecosystem is built for flexibility and freedom of choice. Customers are therefore responsible for the secure and proper configuration of their services. To prevent data loss, we strongly recommend to apply backup strategies to all your important data.
- Our guides and tutorials may reference third-party software or services in combination with OVHcloud solutions. The technical support provided by OVHcloud does not include the configuration of systems or products outside of our responsibility. This includes but is not limited to:
- Operating systems and user interfaces (Windows, Debian, Plesk, etc.).
- Any other third-party software (FTP clients, email software, etc.).
- Services offered by other providers (DNS, APIs, user interfaces, etc.).
To receive the appropriate assistance for any issues you might experience, follow these guidelines:
- You seek personalized advice or you would like to discuss a topic that is not covered in detail by our documentation?
Join the OVHcloud Community to search for your topic and reach out to other users. - You need to report an incident regarding your OVHcloud service or you are experiencing difficulties in the OVHcloud Control Panel?
Create a support request in our Help Centre. - You require professional assistance for your project or you need help with tasks outside our support scope?
Visit our partner portal to search for experts who are familiar with OVHcloud solutions. - You are looking for more detailed information regarding our support levels and Professional Services?
Please visit our web pages for OVHcloud support levels and OVHcloud Professional Services.
You can participate in improving our documentation:
- You would like to share feedback to improve a guide page or you want to report insufficient information on a specific page?
Use the "Was this page helpful?" buttons at the bottom of the page to let us know. - You would like to propose a specific documentation update?
Use the "Edit this page" function, available at the bottom of the page and in the sidebar.
Requirements
- You have an active OVHcloud web hosting plan that includes at least one shared database.
- The database deletion must be less than 30 days old.
OVHcloud Control Panel Access
- Direct link:
- Navigation path:
Web Cloud>Hosting plans> Select your web hosting plan
Instructions
The OVHcloud API is made available to developers or integrators to associate features, such as those not present in the OVHcloud Control Panel, directly with their applications or solutions.
The backups offered by OVHcloud for shared hosting plans and their associated databases are non-contractual. We offer them in addition to your services to help you in urgent situations. We recommend creating your own regular security backups to compensate for any potential data loss.
Furthermore, when a database is deleted by its user or administrator, OVHcloud cannot guarantee that its backup will be recovered, for the reasons mentioned above.
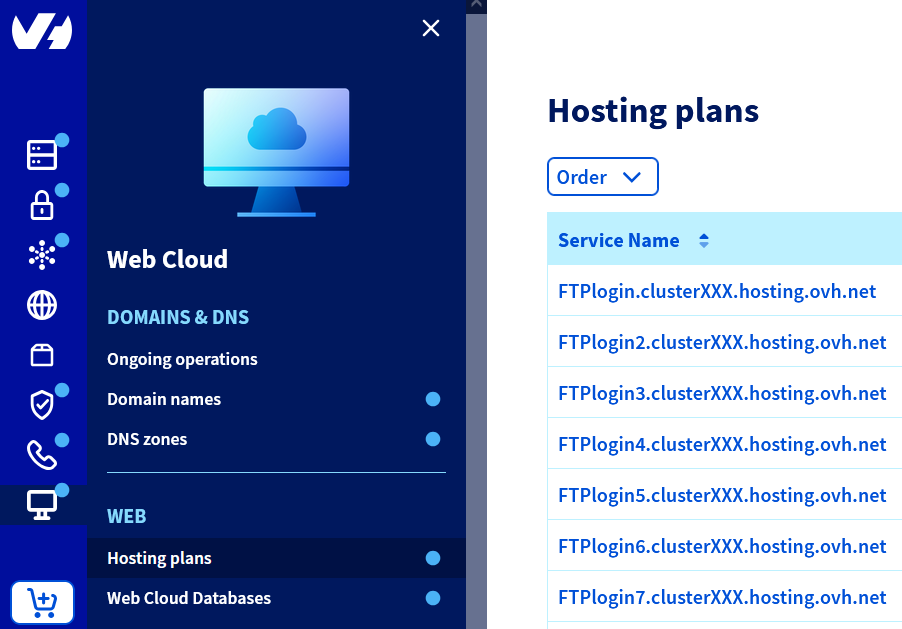
1 - Retrieve the name of the web hosting plan that the deleted database was linked to
To retrieve the name of your web hosting plan, click on the tabs below to view each of the 2 steps.
Go to the page, then select the web hosting plan concerned.

2 - Access the OVHcloud API and allow access to your services
To do this, perform the following steps:
- Go to our website .
- On the page that pops up, middle-click
Explore the OVHcloud API. - On the left-hand side the new page that appears, go to the form to the right of
v1, then select or enter/hosting/web. - From the list of endpoints that appears in the left-hand column, click on: GET /hosting/web/{serviceName}/dump. You can also click directly on the following path to access it:
- On the right-hand side of the page, you will then see the API path with its various parameters.
- Click the button in the top right-hand corner labeled
Authenticate, then theLogin with OVHcloud SSObutton. - The interface for connecting to your will open.
- Log in with your NIC handle, then click
Authorizeto use the OVHcloud API with the services in the OVHcloud Control Panel. - You will then be automatically redirected to the previous page of the path GET /hosting/web/{serviceName}/dump, while you are logged in to the OVHcloud Control Panel.
3 - Check the availability of backups and retrieve the ID of the last backup
To do this, fill in the forms as detailed below:
-
For the section entitled
PATH PARAMETERS:serviceName: Enter the name of your web hosting plan, which you retrieved in part 1 of this guide.
-
For the section entitled
QUERY-STRING PARAMETERS:creationDate.from: Leave the form empty.creationDate.to: Leave the form empty.databaseName: Enter the name of the database that was accidentally deleted (example: deletedDatabase.mysql.db).deletionDate.from: Leave the form empty.deletionDate.to: Leave the form empty.orphan: Enter lowercase value:true.
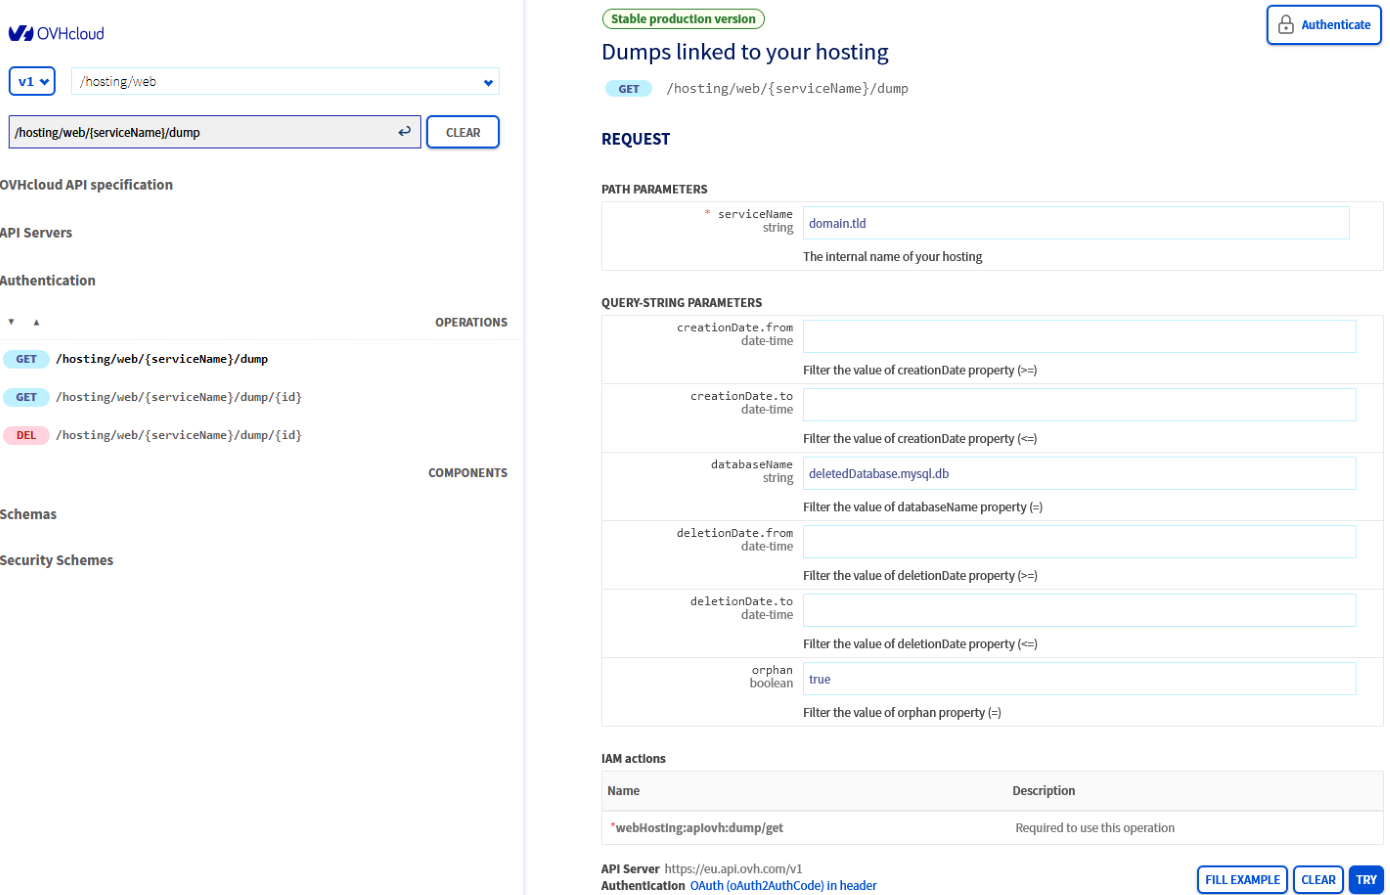
Once you have filled in the forms, click on the blue EXECUTE button in the bottom right-hand corner of the two sections that have been filled in.
If everything has been entered correctly and backups are available for the deleted database, a list of backup ID numbers will appear in the RESPONSE window below the EXECUTE button.
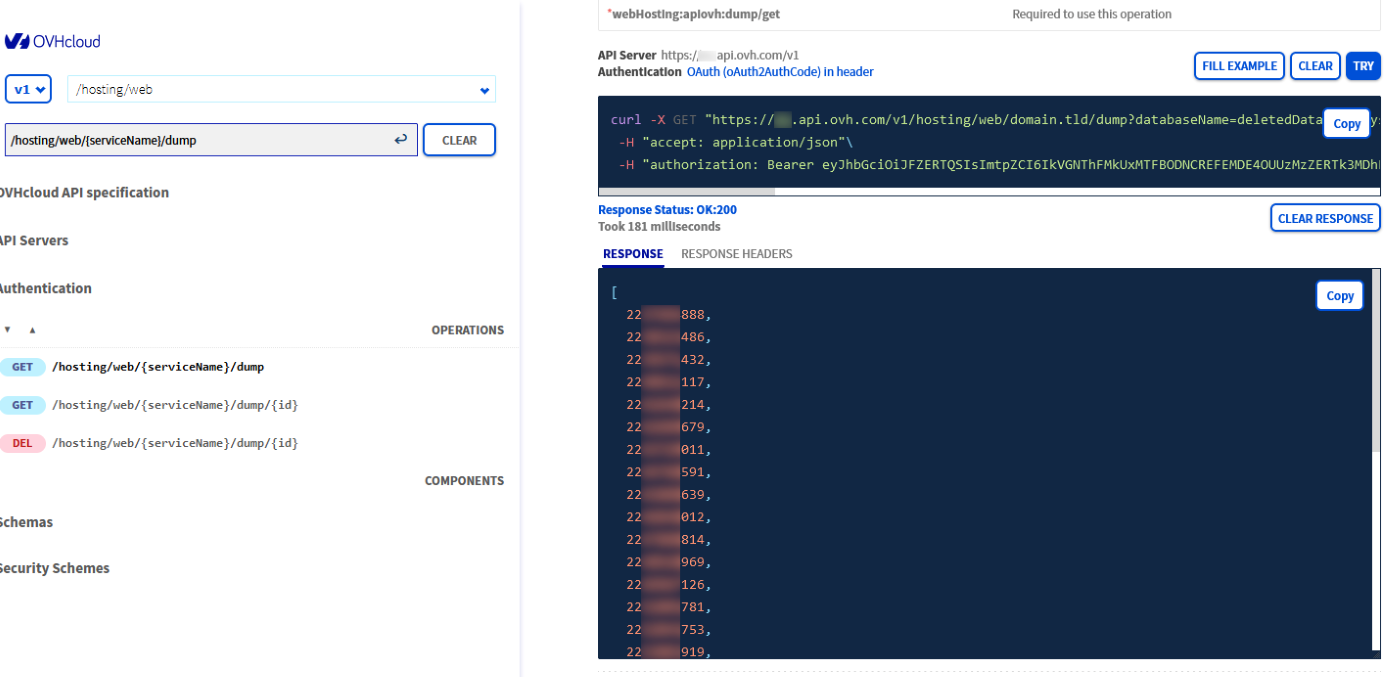
Each of these numbers corresponds to an available backup ID. These backup ID numbers appear from the most recent to the oldest. Copy the highest ID from the list (without the , at the end) if you want to recover (in part 4 of this guide) the most recent backup of your deleted database.
If no ID appears in the window, check that you are logged in correctly with the correct OVHcloud NIC handle (if you have several). Also, check the information entered in the PATH PARAMETERS and QUERY-STRING PARAMETERS sections. Then try the operation again.
If you still do not have an ID, it means that there are no or no more backups available for the deleted database on our infrastructure.
4 - Retrieve the last backup
Using the backup ID number retrieved in part 3, you can download the last backup of your deleted database using an API-generated link.
To do this, perform the following actions on our website :
- On the left-hand side of the page, go to the form to the right of
v1, then select or enter/hosting/web. - From the list of endpoints that appears in the left-hand column, click on: GET /hosting/web/{serviceName}/dump/{id}. You can also click directly on the following path to access it:
- On the right-hand side of the page, you will then see the API path with its various parameters.
Fill in the various forms in the PATH PARAMETERS section as follows:
id: Copy the backup ID number retrieved in part 3. If you were not logged out of our OVHcloud API website, the interface can offer you the different backup ID numbers available. If this is the case, you can click on the first ID number in the list just below the form id.serviceName: Enter the name of your web hosting plan, which you retrieved in part 1 of this guide.
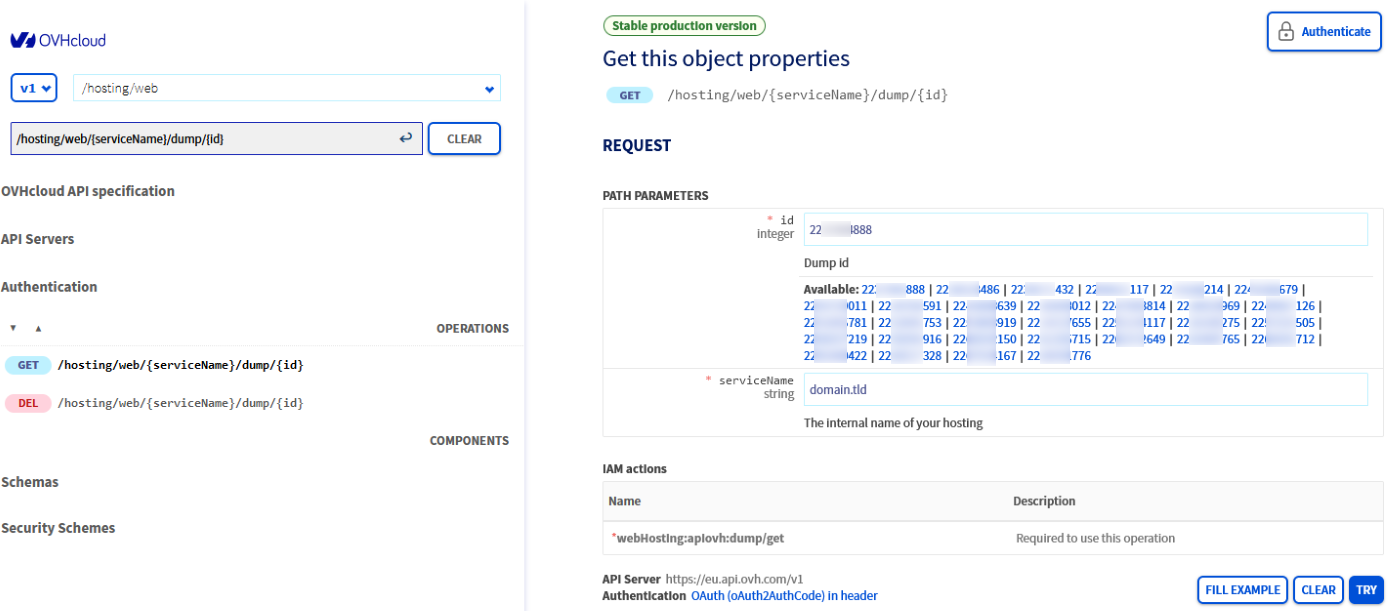
Once you have filled in the forms, click on the blue EXECUTE button in the bottom right-hand corner of the section that has been filled in.
If everything has been entered correctly, the following result will appear in the RESPONSE window below the EXECUTE button:
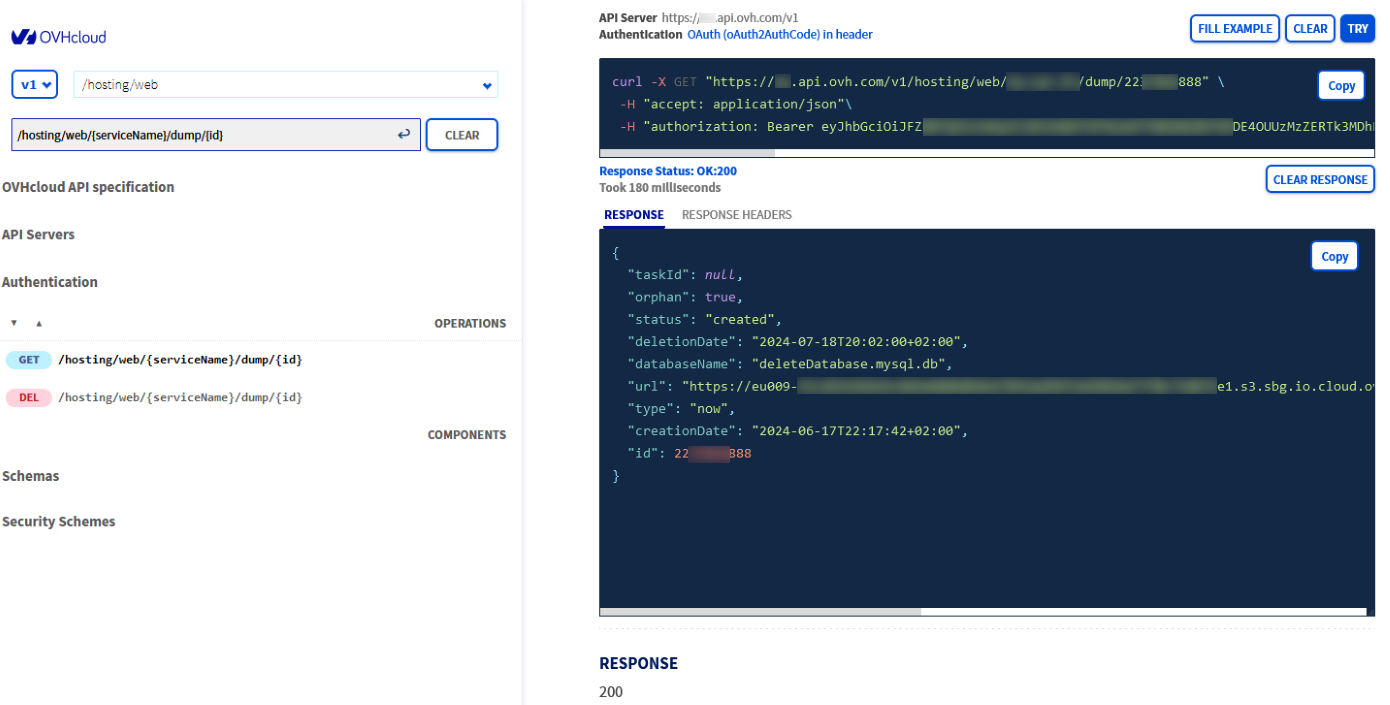
Rows in the above result may not always appear in this order.
In this result, copy the entire URL in HTTPS without the quotation marks in the line "url":, then paste it into the search bar of your web browser to start downloading the backup.
5 - Create a new database, import the backup file and re-establish the link between your website and the new database
Once you have retrieved the backup of your database, you will need to create a new database. To do this, please refer to our guide on "Creating a database on your web hosting plan".
Once this new database has been created, import the backup using our guide "Importing a backup into a Web Hosting plan database".
Finally, link your OVHcloud database with your website's configuration file in the FTP storage space of your OVHcloud hosting plan. To do this, replace the connection information of the database accidentally deleted with that of your new OVHcloud database. This information can be found in your website's "configuration/connection to your database" file.
To link your new database if you are using a Content Management System (CMS) such as WordPress, Joomla!, Drupal or PrestaShop, you can find information on their configuration files in part 2 of the guide "Changing a database password".
Go further
Creating a database on your web hosting plan.
Importing a backup into a web hosting database.
For specialised services (SEO, development, etc.), contact OVHcloud partners.
If you would like assistance using and configuring your OVHcloud solutions, please refer to our support offers.
Join our community of users.