
Web Hosting - Switching your website to HTTPS
Find out how to switch your website to HTTPS after activating an SSL certificate
Objective
With an OVHcloud Web Hosting plan, you can get an SSL certificate. This allows one or more of your websites to have a secure connection by being accessible in HTTPS. To do this, you will need to follow several steps before your websites can use this secure connection.
This guide explains how to switch your website to HTTPS after activating an SSL certificate.
Requirements
- An SSL certificate set up on your OVHcloud Web Hosting plan
- At least one website set up and accessible via your OVHcloud Web Hosting plan
Instructions
Security is becoming increasingly important on the Internet. You will certainly pay special attention to the confidentiality of your data, and the way it passes through the web. In general, Internet users trust websites that allow secure exchanges, especially when the data exchanged is sensitive.
When you visit a website with a secure connection, your web browser will show this in its address bar (URL) in several ways, such as:
- A logo (usually a padlock)
- A message
- A color code
- The protocol used, HTTPS rather than HTTP
These indicators help to determine whether your website has a secure connection or not.

Changing your website to HTTPS may be a tricky task.. Most of the actions you need to perform will be carried out in your website's source code. If they are not carried out correctly, you run the risk of your website's SEO (Google, Yahoo!, bing, etc.) dropping, or becoming completely inaccessible.
Information regarding OVHcloud service administration and how to find appropriate assistance
When using OVHcloud guides, please be aware of the following conditions:
- User instructions aim to provide as many details as possible but cannot cover individual use cases. You might need to adapt the pertinent actions to your requirements.
- The OVHcloud ecosystem is built for flexibility and freedom of choice. Customers are therefore responsible for the secure and proper configuration of their services. To prevent data loss, we strongly recommend to apply backup strategies to all your important data.
- Our guides and tutorials may reference third-party software or services in combination with OVHcloud solutions. The technical support provided by OVHcloud does not include the configuration of systems or products outside of our responsibility. This includes but is not limited to:
- Operating systems and user interfaces (Windows, Debian, Plesk, etc.).
- Any other third-party software (FTP clients, email software, etc.).
- Services offered by other providers (DNS, APIs, user interfaces, etc.).
To receive the appropriate assistance for any issues you might experience, follow these guidelines:
- You seek personalized advice or you would like to discuss a topic that is not covered in detail by our documentation?
Join the OVHcloud Community to search for your topic and reach out to other users. - You need to report an incident regarding your OVHcloud service or you are experiencing difficulties in the OVHcloud Control Panel?
Create a support request in our Help Centre. - You require professional assistance for your project or you need help with tasks outside our support scope?
Visit our partner portal to search for experts who are familiar with OVHcloud solutions. - You are looking for more detailed information regarding our support levels and Professional Services?
Please visit our web pages for OVHcloud support levels and OVHcloud Professional Services.
You can participate in improving our documentation:
- You would like to share feedback to improve a guide page or you want to report insufficient information on a specific page?
Use the "Was this page helpful?" buttons at the bottom of the page to let us know. - You would like to propose a specific documentation update?
Use the "Edit this page" function, available at the bottom of the page and in the sidebar.
Below are the main steps described in the rest of this guide to switch your website to HTTPS:
- Step 1 - Activate the SSL certificate on the Web Hosting plan: Enables you to activate or check that an SSL certificate has been set up on your Web Hosting plan/website.
- Step 2 - Check the technical environment for your website: Helps you ensure that switching your website to HTTPS will not cause any issues before you make any changes.
- Step 3 - Activate HTTPS on your website: Enables your website to use the HTTPS protocol. The method explained in this guide is not universal and will depend on the website used.
- Step 4 - Check that your website is working properly: Helps ensure that your website displays correctly after enabling HTTPS.
Step 1 - Activate the SSL certificate on the web hosting plan
To activate an SSL certificate on your Web Hosting plan, or check that an SSL certificate has already been set up for your website, please read our guide on "Managing an SSL certificate on a Web Hosting plan".
Step 2 - Check the technical environment for your website
Before you make any changes to your website's configuration, it is important to ensure that it is ready to use HTTPS protocol correctly. There is no one-size-fits-all approach, as it depends on the website you are using.
The information below is generic. We recommend contacting a specialist provider if you experience any difficulties.
2.1 - Avoid mixing HTTP and HTTPS content
When your website loads in HTTPS, you should avoid mixing HTTP and HTTPS content on the same page and on your entire website. So, if your website should be displayed in HTTPS, ensure that all of its content loads in HTTPS.
If this is not the case, you will offer on your website content that is considered mixed by web browsers, i.e. content that is considered potentially unsecure on a page that has been declared secure.
There are two possible scenarios for Mixed Content:
-
The website will display correctly, but a warning will appear in the address bar: Passive content (images, videos, etc.) uploaded to your page by your web browser from an unsecured source.
-
Some parts of the website are not displayed and a warning is present in the address bar: Content considered active by your web browser (scripts, iframes, CSS files, etc.) from an unsecured source has been blocked.
Make sure that all content loaded from your website comes from a secure source.
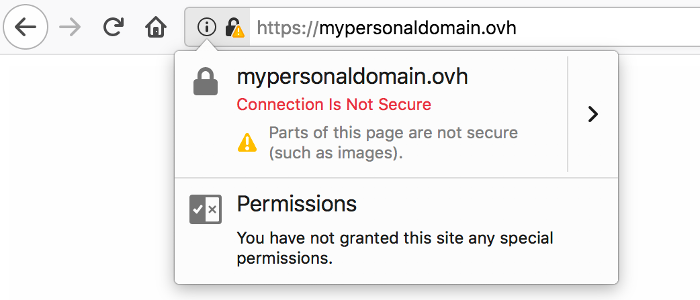
Please note that even if your Web Hosting plan has an SSL certificate, the content hosted on it can be loaded in HTTP or HTTPS. This depends on how you have identified this content in your website's code. This way, you can ensure that all of the content loaded from your website uses the HTTPS protocol.
For example, pay special attention to the addresses you use in your website's code. If possible:
- Prefer the use of relative addresses, for example:
../img/header.png. - Avoid using absolute addresses with the HTTP protocol, such as:
http://domain.tld/img/header.png.
If necessary, adapt your website's code accordingly.
If you use a turn-key website (WordPress, PrestaShop, Drupal, Joomla!), the structure of these websites is generally already designed to switch to HTTPS. You should not have to make any changes to your website's code.
2.2 - Avoid generating duplicate content
Depending on how your website is coded, please ensure that it cannot be accessed via different URLs — for example, the first using HTTP and the second using HTTPS. If this is the case, the same content will be accessible from several different addresses, which is considered duplicate content by search engines.
This can lower your website's search engine ranking. Check that your code forces the use of HTTPS, via a rewrite rule to be placed in your website's code when you want to enable HTTPS.
Please note that if you are using a turn-key website, its structure automatically manages rewrite rules. As a result, you should not have to make any changes to your website's code.
Step 3 - Activate HTTPS on your website
As soon as your domain name has an active SSL certificate via your web hosting and your website is ready to switch to HTTPS, you can activate it.
Before you take any steps, we recommend that you retrieve a full backup of your website. This backup must contain not only the files on the FTP storage space, but also those from the database if the website uses one.
You can do this directly from the files that make up your website. Do not hesitate to contact a specialist provider if you encounter any difficulties.
There are many ways to activate HTTPS on your website. To do this, you will need to make changes to the website's configuration. The information below can help you with this activation process, but it may also be incomplete or irrelevant, depending on your use case.
- You are using a turn-key website (WordPress, PrestaShop, Drupal, Joomla!, etc.):
You can usually activate HTTPS from your website's administration interface. The domain name and method for activating HTTPS* vary, depending on the turn-key website you are using.
For example, you may have a setting called "Force HTTPS" to activate, or you may need to edit your website's full URL to add an s: "http://domain.tld" would then become "https://domain.tld".
If you are not sure how to do this via the administration interface for your turnkey website, or if you have any doubts, please refer to the official documentation published by the publisher of your website.
- You are using a website created by yourself (or by a provider):
You will need to activate HTTPS directly in your website's code. If you have the necessary knowledge, modify your website's code to adapt it to use HTTPS. If you have any doubts about how to proceed, please contact your website's developer.
Below are some examples of scripts you can insert into a .htaccess file, if required. However, these are not a substitute for the assistance of a webmaster. Replace the domain name domain.tld present in the first script with your own domain name and adapt it if necessary.
This first example of a script redirects all URLs that arrive via port 80 to HTTP to the secure URL in HTTPS https://domain.tld/.
This second example of a script turns all URLs that arrive via the HTTP protocol into HTTPS, while leaving the rest of the URL after the :// intact.
For this second example, check that all of your target domain names or subdomains have an active SSL certificate.
Warning, for Cloud Web hosting plans, the script to use is as follows:
Step 4 - Check that your website is working properly
Once you have activated HTTPS on your website, please check that it works properly, and that all of your content displays the same way it did before you made any changes. To do this, try to access it, check if no messages or warnings appear, and take a few moments to examine the layout of several parts of your website.
If you notice any faults, try to resolve them as quickly as possible, or go back by disabling HTTPS. If you really need it, you can also use the full backup of your website created in step 3.
If your website displays correctly and no warning appears after switching to HTTPS, you have carried out the operation correctly. If you would like to activate HTTPS on another website, please repeat all of the steps described in this guide.
Go further
Managing an SSL certificate on a Web Hosting plan
For specialised services (SEO, development, etc.), contact OVHcloud partners.
If you would like assistance using and configuring your OVHcloud solutions, please refer to our support offers.
Join our community of users.