
How to improve email security with an SPF record
Find out how to configure an SPF record on your domain name to improve email security
Objective
The SPF (Sender Policy Framework) lets the receiving server check that an email was sent from a trusted server.
Why set up the SPF record for your emails?
- It helps prevent potential identity theft via email addresses using your domain name (spoofing).
- You can also use it to authenticate the emails you send.
- The SPF record is added as a record in the domain name's DNS zone.
This check relies on the information in the SPF record, a TXT record in the DNS zone, which contains:
- Servers and/or IP addresses: these are identified as legitimate sending sources.
- A qualifier: tells the receiving server how to treat a message from a source that is not listed.
Make sure the SPF record lists every source that sends emails with your domain name: your own email server, your provider's, or an OVHcloud email solution.
Example
You are sending an email from your address john.smith@mydomain.ovh.
Only outgoing server A is declared in the SPF record of the domain name mydomain.ovh.
When the inbound mail server receives the email, it reads the SPF record in the DNS zone of mydomain.ovh.
- Outgoing Mail Server A is listed in the SPF record, so the email will arrive normally in the recipient's inbox.
- Outgoing Mail Server B is not listed in the SPF record, so the email sent from this server will be marked as suspicious in the inbox. Depending on the receiving server's rules, the email may then be tagged
[SPAM]in its subject, moved to aJunkfolder, or deleted outright.

The SPF record is only an indication provided to servers that receive emails, including yours. It is up to these servers to apply, or not, what is specified in the SPF record of domain names for which they receive messages.
Find out how to configure an SPF record for your domain name at OVHcloud.
Requirements
- The domain name concerned must use the OVHcloud configuration (i.e. the OVHcloud DNS servers).
OVHcloud Control Panel Access
- Direct link:
- Navigation path:
Web Cloud>Domain names> select your domain name >DNS zonetab
If your domain name does not use OVHcloud DNS servers, you will need to modify the SPF record using the interface of the service provider managing your domain name's DNS.
If your domain name is registered with OVHcloud, you can check if it is using the OVHcloud configuration in your . Click on the DNS servers tab of your domain name.
Instructions
Checking your current SPF configuration
If your domain name uses OVHcloud DNS servers, you can check whether an SPF record is already configured.
How do I check an existing SPF configuration?
Open Web Cloud > Domain names, select the domain name concerned, then click the DNS zone tab.
This table lists the DNS records of your domain name's zone, one per line.
In case of doubt, verify that your domain name is actually using OVHcloud DNS servers from the DNS servers tab.
To find the SPF record, filter the table with the Filter button on both the TXT and SPF types (the record can be of either type). You will get one of the following results.
-
An SPF record that corresponds to OVHcloud email solutions is displayed: Your domain name currently uses the OVHcloud configuration. If you no longer wish to use it, you must modify it in the next step.
-
An SPF record that does not match the OVHcloud configuration is displayed: Your domain name already uses a custom SPF. If it is incorrect, modify it or switch to the OVHcloud configuration in the next step.
-
No SPF record is displayed: first check that it does not exist under the other type (SPF or TXT) by changing the filter. If no SPF record appears in the zone at all, your domain name does not use one; add it in the next step.
An SPF record always follows this form: "v=spf1 sources qualifier". For example, the OVHcloud SPF is: v=spf1 include:mx.ovh.com ~all.
Configuring a new SPF record
Click Add an entry above the table and select the SPF type. A form opens where you build your SPF record field by field.
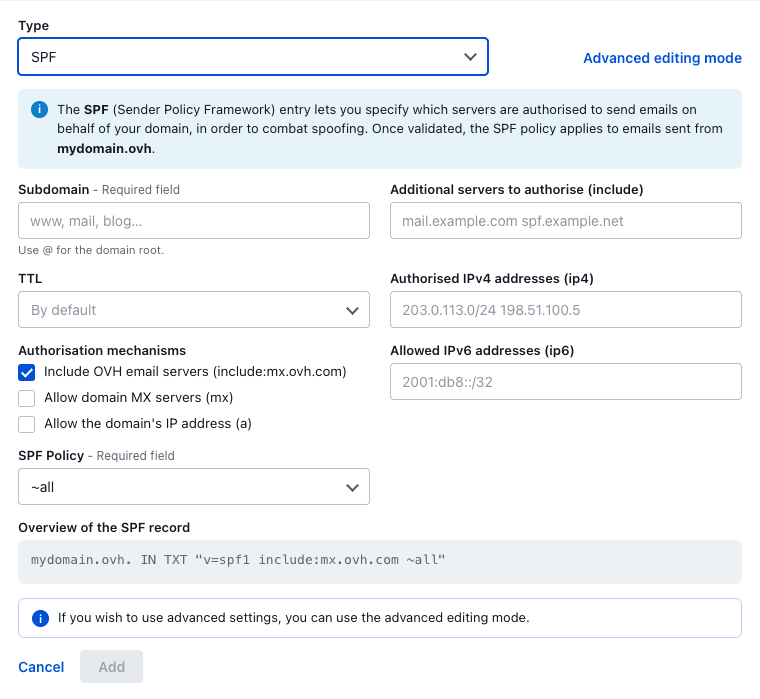
- Subdomain: leave it empty (or set
@) to apply the SPF to the whole domain name, or enter a subdomain if you only send emails from one. - Authorisation mechanisms: tick the sources that are allowed to send emails for your domain name.
- Include OVH email servers: authorises all of the OVHcloud outgoing email servers at once by inserting
include:mx.ovh.com. Tick this if you use an OVHcloud email solution, and check that section for the value to use in your zone. - Allow domain MX servers (mx): authorises the servers that receive your emails to also send them.
- Allow the domain's IP address (a): authorises the server that hosts your domain name (useful when your website and emails share the same IP address, for example on a dedicated server).
- Include OVH email servers: authorises all of the OVHcloud outgoing email servers at once by inserting
- Additional servers to authorise (include): add the SPF domains of other providers that send emails on your behalf (marketing platform, CRM, etc.), so their servers are treated as legitimate.
- Authorised IPv4 addresses (ip4) and Allowed IPv6 addresses (ip6): add specific IP addresses or blocks authorised to send emails.
- SPF Policy: choose how receiving servers should treat an email sent from a source that is not listed (see our recommendation below).
- TTL: leave it on
By defaultor set a value.
The Overview of the SPF record box shows the record being built as you fill in the fields. Once you are done, click Add.
Both the ~all and -all SPF Policy values are valid, but for the best protection we strongly recommend -all, which asks the servers receiving your emails to reject any message sent from a source that is not listed in your SPF record.
Only choose -all once you are sure your record lists every legitimate sending source: your OVHcloud email solution, but also any third party that sends emails on your behalf (marketing platform, CRM, ticketing tool, etc.). If a legitimate source is missing, its emails will be rejected. If you are not certain the list is exhaustive, use ~all, which flags those emails as suspicious instead of rejecting them.
For an OVHcloud email solution, the minimum SPF record is simply the Include OVH email servers box ticked — this produces v=spf1 include:mx.ovh.com ~all (see OVHcloud SPF configuration for shared email offers).
If you already have the complete SPF string (provided by your email service) or you need a tag that the form does not expose, you can enter it directly: select the TXT type instead of SPF and paste the full v=spf1 … value in the Value field, or use the Advanced editing mode.
It can take between 4 and 24 hours until the configuration is fully effective.
Modifying an SPF record
Open Web Cloud > Domain names, select the domain name concerned, then click the DNS zone tab.
In the table listing your DNS records, locate your TXT or SPF record, open its actions menu ⋮ and click Edit the entry.
See Configuring a new SPF record for details on the SPF fields.
OVHcloud SPF configuration for shared email offers
The general OVHcloud SPF configuration applies to the solutions below:
- MX Plan standalone or included in an OVHcloud Web Hosting plan
The configuration is as follows:
OVHcloud SPF configuration for Private Exchange
For Private Exchange, enter your server's IP addresses with the ip4 argument (IPv4, A record) and the ip6 argument (IPv6, AAAA record).
If you also use a shared email service, add include:mx.ovh.com to the record:
How do I retrieve the IP addresses of a Private Exchange server?
Click Exchange under Microsoft, then click the name of the Private Exchange service concerned.
In the General information tab, click A and AAAA in the Server Diagnostics section and read the value in the window that opens.

If the A and AAAA indicators are green, clicking them does not show the IP addresses. Retrieve them instead from the DNS zone of the domain name attached to your Private Exchange platform: first copy the webmail link from the Connection box of the General information tab.

Go to the Domain names section, select the domain name attached to your Private Exchange platform, then click on the DNS zone tab. Retrieve the IPv4 (record A) and IPv6 (record AAAA) addresses corresponding to the webmail URL.
Go further
Modifying an OVHcloud domain name's DNS servers
Join our community of users.