
Creating inbox rules in OWA (MX Plan)
Find out how to create email redirections and filters using OWA
Objective
With the "Inbox rules" option, you can create an elaborate set of rules to handle incoming emails. These can help you to keep your email account organised by automatically sorting emails into folders. This is also the way to define forwarding settings (redirections) and to filter out spam messages.
Find out how to create email filters and redirections using the Outlook Web App (OWA).
Requirements
- an OVHcloud email solution already set up (MX Plan, available as part of our Web Hosting plans, included in a free hosting or ordered separately as a standalone solution; Hosted Exchange or Email Pro)
- login credentials for the email address you want to configure
Instructions
Step 1: Navigating to the options section
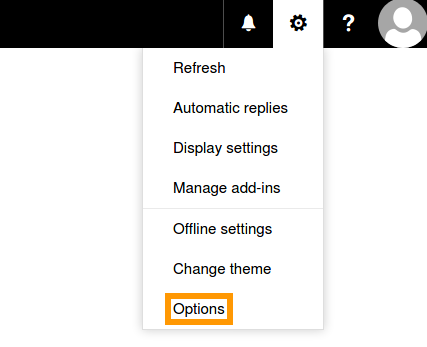
Log in to your Exchange account via the OVHcloud webmail. Click on the gear symbol on the top right to unfold the "Options" menu and select Options.
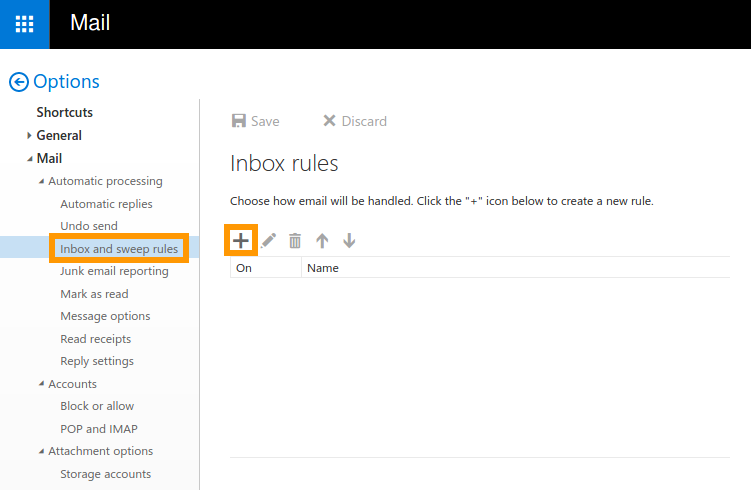
From the "Options" tree, select Inbox and sweep rules to access the rules interface. You can see here the list of rules that are applied to this account. Create a new rule by clicking on the + icon.
Step 2: Creating rules
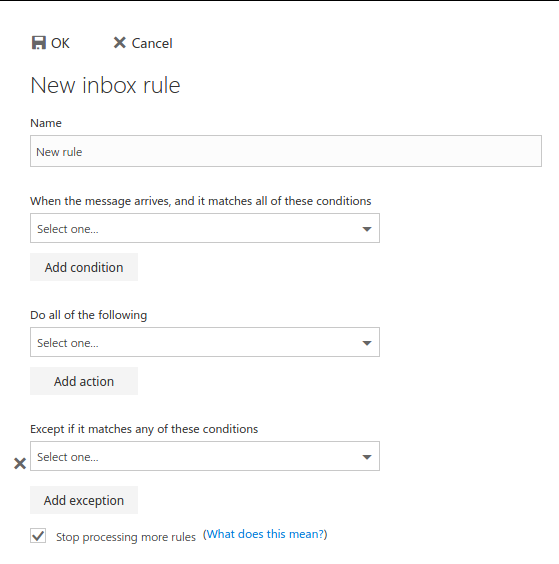
The rules editor assists in setting up distinct measures for all incoming emails depending on various presuppositions. Specifying a rule is done in three parts:
For example, you can set as condition "Received from..." and specify an email address, then elect to move these messages into a certain folder.
Checkbox "Stop processing more rules"
If you have created several rules, it is possible that more than one will apply to an incoming email. Leave this option activated for any rule that should never be followed by other rules; this is a simple way to prevent further treatment of emails that match multiple conditions.
Creating useful rules by means of two examples: Redirection and spam filtering
Since there are many conditions and actions available, we are unable to cover all of them in this guide. Below you can find two examples that are instrumental in using an OVHcloud email account.
Information regarding OVHcloud service administration and how to find appropriate assistance
When using OVHcloud guides, please be aware of the following conditions:
- User instructions aim to provide as many details as possible but cannot cover individual use cases. You might need to adapt the pertinent actions to your requirements.
- The OVHcloud ecosystem is built for flexibility and freedom of choice. Customers are therefore responsible for the secure and proper configuration of their services. To prevent data loss, we strongly recommend to apply backup strategies to all your important data.
- Our guides and tutorials may reference third-party software or services in combination with OVHcloud solutions. The technical support provided by OVHcloud does not include the configuration of systems or products outside of our responsibility. This includes but is not limited to:
- Operating systems and user interfaces (Windows, Debian, Plesk, etc.).
- Any other third-party software (FTP clients, email software, etc.).
- Services offered by other providers (DNS, APIs, user interfaces, etc.).
To receive the appropriate assistance for any issues you might experience, follow these guidelines:
- You seek personalized advice or you would like to discuss a topic that is not covered in detail by our documentation?
Join the OVHcloud Community to search for your topic and reach out to other users. - You need to report an incident regarding your OVHcloud service or you are experiencing difficulties in the OVHcloud Control Panel?
Create a support request in our Help Centre. - You require professional assistance for your project or you need help with tasks outside our support scope?
Visit our partner portal to search for experts who are familiar with OVHcloud solutions. - You are looking for more detailed information regarding our support levels and Professional Services?
Please visit our web pages for OVHcloud support levels and OVHcloud Professional Services.
You can participate in improving our documentation:
- You would like to share feedback to improve a guide page or you want to report insufficient information on a specific page?
Use the "Was this page helpful?" buttons at the bottom of the page to let us know. - You would like to propose a specific documentation update?
Use the "Edit this page" function, available at the bottom of the page and in the sidebar.
Example 1: Redirecting emails to another address
Create a new rule by clicking on the + icon. Give your rule a name and select below which emails it should apply to. For this example, we initially choose to include all messages. Next, select the appropriate action; here we will focus on illustrating a redirection. Please note the technical distinction: if you "forward" a mail, the final recipient will see your email address as a sender. "Redirecting" an email on the other hand will send it to your target address without changing the original sender address.
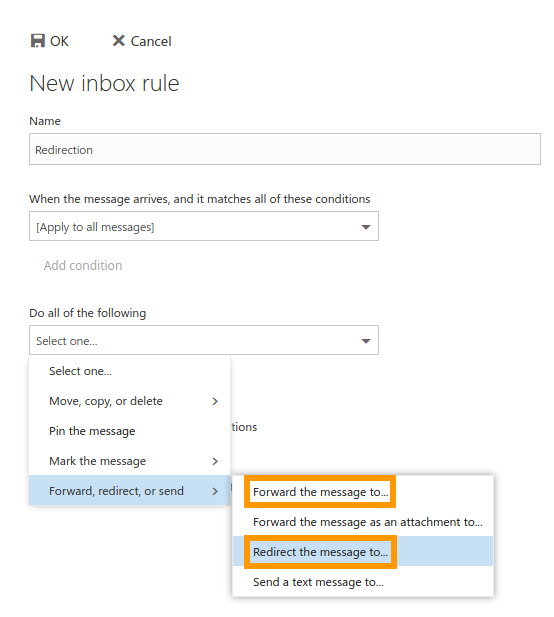
In the next interface, select from "Your contacts" (+) or type an email address into the top bar. You can also search for users not listed here as a contact. Once finished, click Save to get back to the "New inbox rule" interface. You can extend this rule further if you click Add action. If appropriate, also add exceptions below, for example to prevent the redirection if an incoming message was sent by a specific email address or if it contains certain keywords. Save the rule by clicking OK.
The new rule is now listed with an explanation of what it does and it can be edited, deactivated or deleted.
Example 2: Filtering undesired emails (spam)
These instructions are only feasible if your domain is using the OVHcloud MX records appropriately. Other configurations are possible with the service but might not use our spam protection.
Create a new rule by clicking on the + icon.
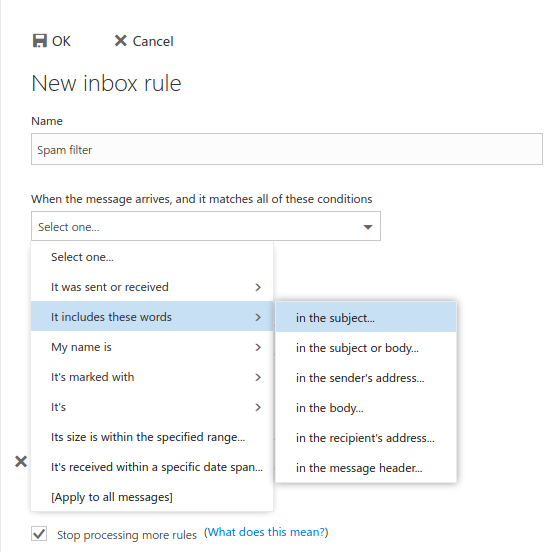
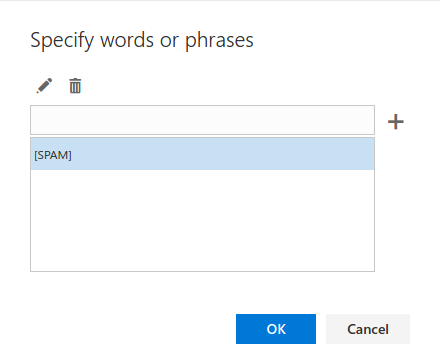
Give your rule a name and select as conditions "It includes these words" and "in the subject...". In the next interface, type "[SPAM]" to single out the messages that were pre-tagged by our spam protection. Add it with +, then click on OK.
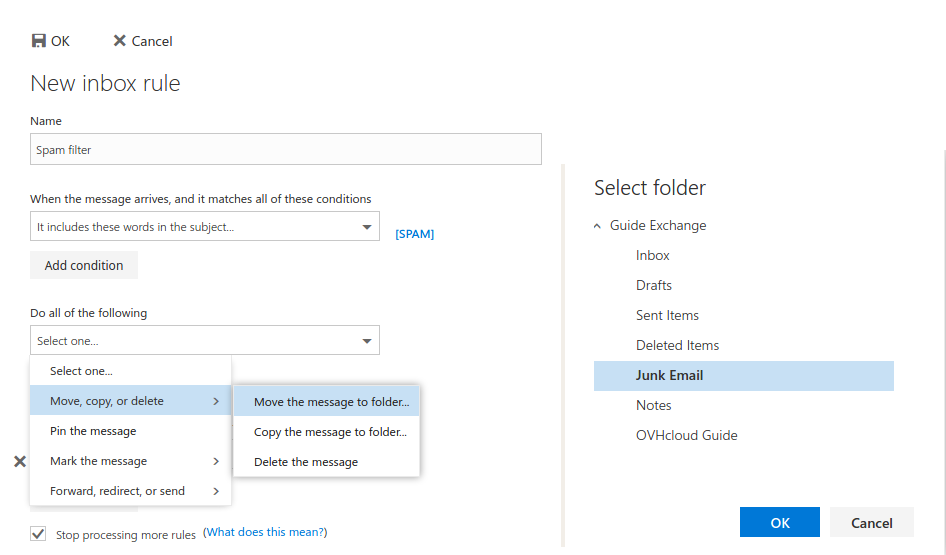
Since no automated spam protection can decide with perfect accuracy whether an email is actually spam, it is good practice to collect these emails in a dedicated folder. This way, you can verify the contents of this spam folder before emptying it. To achieve this, select as action "Move, copy, or delete", then "Move the message to folder...". Select a folder from the list. Save the rule by clicking OK.
Please note that spam false positives cannot be declared directly from OWA. If you receive emails falsely marked as [SPAM], we recommend to inform our support team by creating a support request.
Go further
Creating automatic replies in OWA
Join our community of users.