How to create a Public Cloud instance and connect to it
Find out how to configure Public Cloud instances in the OVHcloud Control Panel and the first steps with your instances
Objective
Public Cloud instances are easy to deploy and manage. However, being part of the OVHcloud Public Cloud ecosystem, instances offer many configuration options and can be adjusted to different use cases. The following instructions include all the necessary and optional steps to create an instance in the OVHcloud Control Panel and access it remotely.
You can then go further with your Public Cloud project according to your needs.
This guide explains how to get started with a Public Cloud instance.
Requirements
- A Public Cloud project in your OVHcloud account
OVHcloud Control Panel Access
- Direct link:
- Navigation path:
Public Cloud> Select your project
Take advantage of reduced prices by committing to a period of 1 to 36 months on your Public Cloud resources. More information on our Savings Plans page.
Instructions
If you have not created a Public Cloud project yet, start with our guide on how to create a project.
Important technical details about the OVHcloud Public Cloud are available on this guide page.
Content overview
- Objective
- Requirements
- Instructions
- Content overview
- Step 1: Create an SSH key set
- Step 2: Import SSH keys
- Step 3: Prepare the network configuration
- Step 4: Create the instance
- Step 5: Connect to the instance
- Step 6: First steps on a new instance
- Go further
You need to provide a public SSH key when creating Public Cloud instances in the OVHcloud Control Panel. After the instance is created you can configure your remote access at your own discretion.
Exception: Login authentication on Windows instances requires username and password because Windows uses RDP (Remote Desktop Protocol).
Step 1: Create an SSH key set
If you already have an SSH key pair ready to use, you can skip this step.
The SSH protocol enables encrypted client-server communication. An SSH key pair consists of a public key and a private key.
- The public key is added to your Public Cloud instance (and can also be stored in the OVHcloud Control Panel).
- The private key is stored on your local device and must be secured from unauthorized access. Only client devices with the matching private key can access your instance. A user account password is not required to connect.
You have 2 options to create and manage your SSH keys:
- Command line interface of your OS (basic OpenSSH client)
- Additional software (compatible with the OpenSSH protocol) with a command line or graphical interface
Most contemporary desktop operating systems natively include the OpenSSH client which can be accessed through the system's command line application (cmd, Powershell, Terminal, etc.). If you are not familiar with using SSH keys as an authentication method, you can use the instructions in this guide to get started and create your key pair.
If you use an alternative software, refer to its user documentation. A usage example for the open-source solution PuTTY is available in our guide: How to use PuTTY.
Step 2: Import SSH keys
You can store your public SSH keys in your Public Cloud project. This is not mandatory but makes the instance creation process more convenient.
Stored SSH keys help you to create your instances faster in the OVHcloud Control Panel. To change key pairs and add users once an instance is created, please refer to the guide on additional SSH keys.
Public SSH keys added to your OVHcloud Control Panel will be available for Public Cloud services of all regions. You can store keys encrypted with RSA, ECDSA and ED25519.
Open SSH Keys in the left-hand menu under Settings. Click on the button Add an SSH key.
In the new window, enter a name for the key. Fill in the Key field with your public key string, for example the one created in Step 1. Confirm by clicking Add.
You can now select this key in Step 4 to add it to a new instance.
Step 3: Prepare the network configuration
Before creating your instance, we recommend to consider the way the instance will be used in terms of networking.
- If you do not need to configure the instance with a private network at this time, you can proceed with step 4. You can create an instance exposed to the public Internet. (See Public Mode below.)
- If the instance needs to be connected to a new private network (OVHcloud vRack), please note that the vRack is created automatically when you create your Public Cloud project. No prior action is therefore required. For more information, see the Public Cloud vRack guide.
Public Cloud Networking - Modes
Public Mode
Instances in Public Mode are exposed to the public Internet directly via IPv4/IPv6. IP addresses cannot be modified but instances can have Additional IP addresses attached (including your own) and they can be connected to a vRack.
Private Mode
Instances in Private Mode can only be exposed to the public Internet via a Gateway or a Load Balancer service and Floating IP addresses.
For more information, please consult our guides in the Public Cloud Network Services section. The Concepts guide provides an introduction to Public Cloud Networking.
Local Private Mode
Local Private Mode only applies if you create an instance in a Local Zone. They can be exposed to the public Internet directly via IPv4/IPv6. Only instances in the same Local Zone can be connected via private networks. Local Zones are not compatible with vRack. In this mode, DHCP automatically provides IP addresses to your instances.
Find out more on the Local Zones web page.
Step 4: Create the instance
On the Home page, click Create an instance.
4.1 Name
Enter a full name for your instance.
4.2 Location
Select a location closest to your users. Note that selecting a Local Zone applies network limitations (see Step 3). Refer to the guide Deployment Mode Comparison for differences between 3-AZ, 1-AZ and Local Zones.
4.3 Model
Open the Instance Model drop-down list and select the model type suited to your use case. The model (flavor) determines the resources allocated to your instance: processor, memory, and associated capabilities.
Your total Public Cloud resources will initially be limited. Check your quotas via Quota & Regions under Settings in the left navigation bar. See the dedicated documentation for more information.
You can upgrade your instance after creation to have more resources available. However, downgrading to a smaller model is not possible with a regular instance. See step 4.9 for details.
4.4 Image
Select the OS via the Distribution Type and Image Version drop-down menus. Available options depend on the model and region chosen.
4.5 SSH key (not applicable to Windows instances)
Select a stored SSH key from the list (see Step 2), or click Create a new SSH key to paste a public key directly.
4.6 Backup
Automated backups are enabled by default. Select the rotation type (7 or 14 days).
4.7 Network
The Network settings section is split into two parts:
- Private network: Select an existing private network or click
+ Create a private network. If a private network is selected but does not have a gateway, toggleAssign a gatewayto attach a gateway automatically. - Assign public connectivity: Enable the toggle to assign a public IP. Choose
Basic Public IP(free, tied to the instance lifetime, incompatible with a gateway) orAssign a Floating IP (Reusable)(persistent and reusable).
See Step 3 for an overview of networking modes.
4.8 Billing
Choose between monthly (lower cost, non-reversible) or hourly (flexible, convertible to monthly). Hourly billing runs until the instance is deleted. See the billing documentation.
4.9 Advanced settings (optional)
- Flexible instance: single 50 GB disk, allows resizing to higher or lower models.
- Post-installation script: add your post-installation script.
4.10 Finalize
Review the summary on the right side of the screen and configure the number of instances. Click Launch my instance. Delivery may take a few minutes.
Step 5: Connect to the instance
The instructions in this part concern remote connections by means of the OpenSSH and RDP protocols through a public network (Internet).
Note that we provide alternative ways of access (mainly used for troubleshooting) which are only available via your OVHcloud Control Panel:
If you have installed an OS with application, refer to our guide on first steps with applications as well as the official documentation by the respective publisher.
5.1: Verify the instance status in the OVHcloud Control Panel
Select Instances in the left-hand navigation bar under Compute. Your instance is ready when the status is set to Enabled in the table. If the instance was recently created and has a different status, click on the "Refresh" button located next to the search filter.
Click on the instance's name in this table to open the Dashboard on which you can find all information about the instance. To learn more about the functions available on this page, consult our guide on managing instances in the Control Panel.
A user with elevated permissions (sudo) is automatically created on the instance. The username reflects the image installed, e.g "ubuntu", "debian", "fedora", etc. You can verify this on the right-hand side of the Dashboard in the section Networks.
Via the OVHcloud CLI, check the instance status and retrieve its IP address with:
If your SSH key pair is set up correctly, you can now connect to the instance with the preconfigured user and your SSH key. You can find more detailed instructions in the subsequent paragraphs.
Access via VNC console on a new GNU/Linux OS instance created in the Control Panel must be enabled first as described in the guide section below.
This guide does not cover private networking for instances. Please consult our documentation on Public Cloud Network Services regarding this topic.
5.2: First login on an instance with a GNU/Linux OS installed
If you receive error messages regarding your SSH keys, verify that your local device has a properly configured private SSH key using the information in this guide.
If you still encounter issues, you can replace the key pair with the help of this guide.
If you have created an instance without an SSH key, via the OVHcloud API or the OpenStack Horizon interface, you can only add an SSH key to your instance via rescue mode by following the instructions set out in this guide.
You can access your instance immediately after creation through the command line interface of your local device (Terminal, Command prompt, Powershell, etc.) via SSH.
Example:
Depending on your setup, you will have to enter a passphrase that protects your private key or specify the path to your key file. Consult our SSH keys guide for detailed information on this topic.
If you use an alternative SSH client software, refer to its user documentation. A usage example for the open-source solution PuTTY is available in this guide.
Continue with Step 6 below.
5.3: Windows instances
5.3.1: Finish the installation of the Windows instance
After verifying that the Windows instance is installed, open the tab VNC console in your .
You will then need to complete the initial setup of your Windows OS. Follow the steps below by navigating through the tabs:
Configure your country/region, the preferred Windows language, and your keyboard layout. Then click on the button Next at the bottom right.


5.3.2: Log in remotely from Windows
On your local Windows device, you can use the Remote Desktop Connection client application to connect to your instance.

Enter the IPv4 address of your instance, then your username and passphrase. Usually a warning message will appear, asking to confirm the connection because of an unknown certificate. Click on Yes to log in.
If you experience any issues with this procedure, verify that remote (RDP) connections are allowed on your device by checking your system settings, firewall rules and possible network restrictions.
5.3.3: Log in remotely from another OS
Connections from a desktop OS other than Windows usually require a client software compatible with the Remote Desktop Protocol (RDP). Some desktop environments and operating systems might have a native client built in.
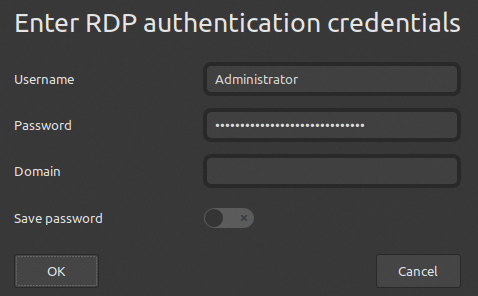
Whichever client you are using, you only need the IP address of your instance and your password for the Administrator account to connect.
Example of use
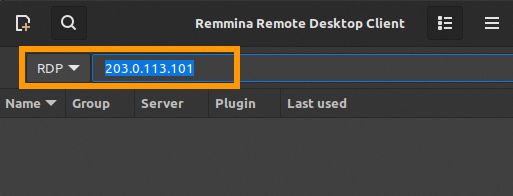
The free and open-source software Remmina Remote Desktop Client is available for many GNU/Linux desktop distributions. If you do not find Remmina in your desktop environment's software manager, you can obtain it from the official website.
Open Remmina and make sure the connection protocol is set to "RDP". Enter the IPv4 address of your Public Cloud instance and press Enter.

5.4: VNC console access
The VNC console allows you to connect to your instances even when other means of access are not available.
Select Instances in the left-hand navigation bar under Compute. Click on the instance name and open the tab VNC console.
You will need to have a user account with a password configured on the instance in order to use the VNC console. To set a password for the preconfigured account, follow the steps in section 6.1.1 below.
Step 6: First steps on a new instance
Windows instances
There are no additional steps required for instances with a Windows OS installed.
You can find more information in the Go further section below.
6.1: User management
When configuring user accounts and permission levels on an instance, we recommend to make use of the information in our user account guide.
6.1.1: Set a password for the current user account
When logged on to your instance, set a password for the current user by entering this command:
Enter a passphrase, confirm with Enter and repeat.
This is sufficient to enable logins via the VNC console in your . Remote SSH logins with this password however are still disabled by default.
6.1.2: How to enable remote logins via password (optional)
This step is not necessary and should only be executed if you have a viable reason to enable this access type; for example if you need to temporarily log in to the instance from a device that does not have your private SSH key stored on it.
The following example illustrates a temporary solution on an instance with Ubuntu installed. Note that you might need to adjust the commands according to your OS. It is not recommended to keep this configuration permanently because it adds a potential security risk by opening the system to SSH-based attacks.
When logged on to your instance, open the pertinent configuration file with a text editor. Example:
Edit the line #PasswordAuthentication yes as follows:
Edit the line Include /etc/ssh/sshd_config.d/*.conf as follows:
Save the file and close the editor.
Restart the SSH service with one of the following commands:
You can now log in via SSH with username and password as well.
Reverse these changes to return to the key-based login for the instance.
6.2: Additional SSH keys
If you want to allow more user accounts to access the instance, the standard procedure is as follows:
- Create the account on the instance.
- Create a new SSH key pair on the device concerned.
- Add the public key to the instance.
Use our dedicated guide for a detailed explanation of these steps.
Go further
How to activate a Windows licence for an instance in private mode
How to reset a Windows Administrator password
Instance management in the Control Panel
How to get started with OpenStack
How to get started with Horizon
If you need training or technical assistance to implement our solutions, contact your sales representative or click on this link to get a quote and ask our Professional Services experts for a custom analysis of your project.
Join our community of users.