Getting started with the MX Plan solution
Find out how to get started with an MX Plan solution
Objective
If you have just purchased an MX Plan solution, this means you have email addresses that you can use to send and receive messages from a device of your choice.
Find out how to get started with an MX Plan solution.
Requirements
- An MX plan solution, available with a web hosting plan, a free hosting, or ordered separately
OVHcloud Control Panel Access
- Direct link:
- Navigation path:
Web Cloud>MX Plan> Select your MX Plan service
Instructions
Continue with the email technology used by your MX Plan service.
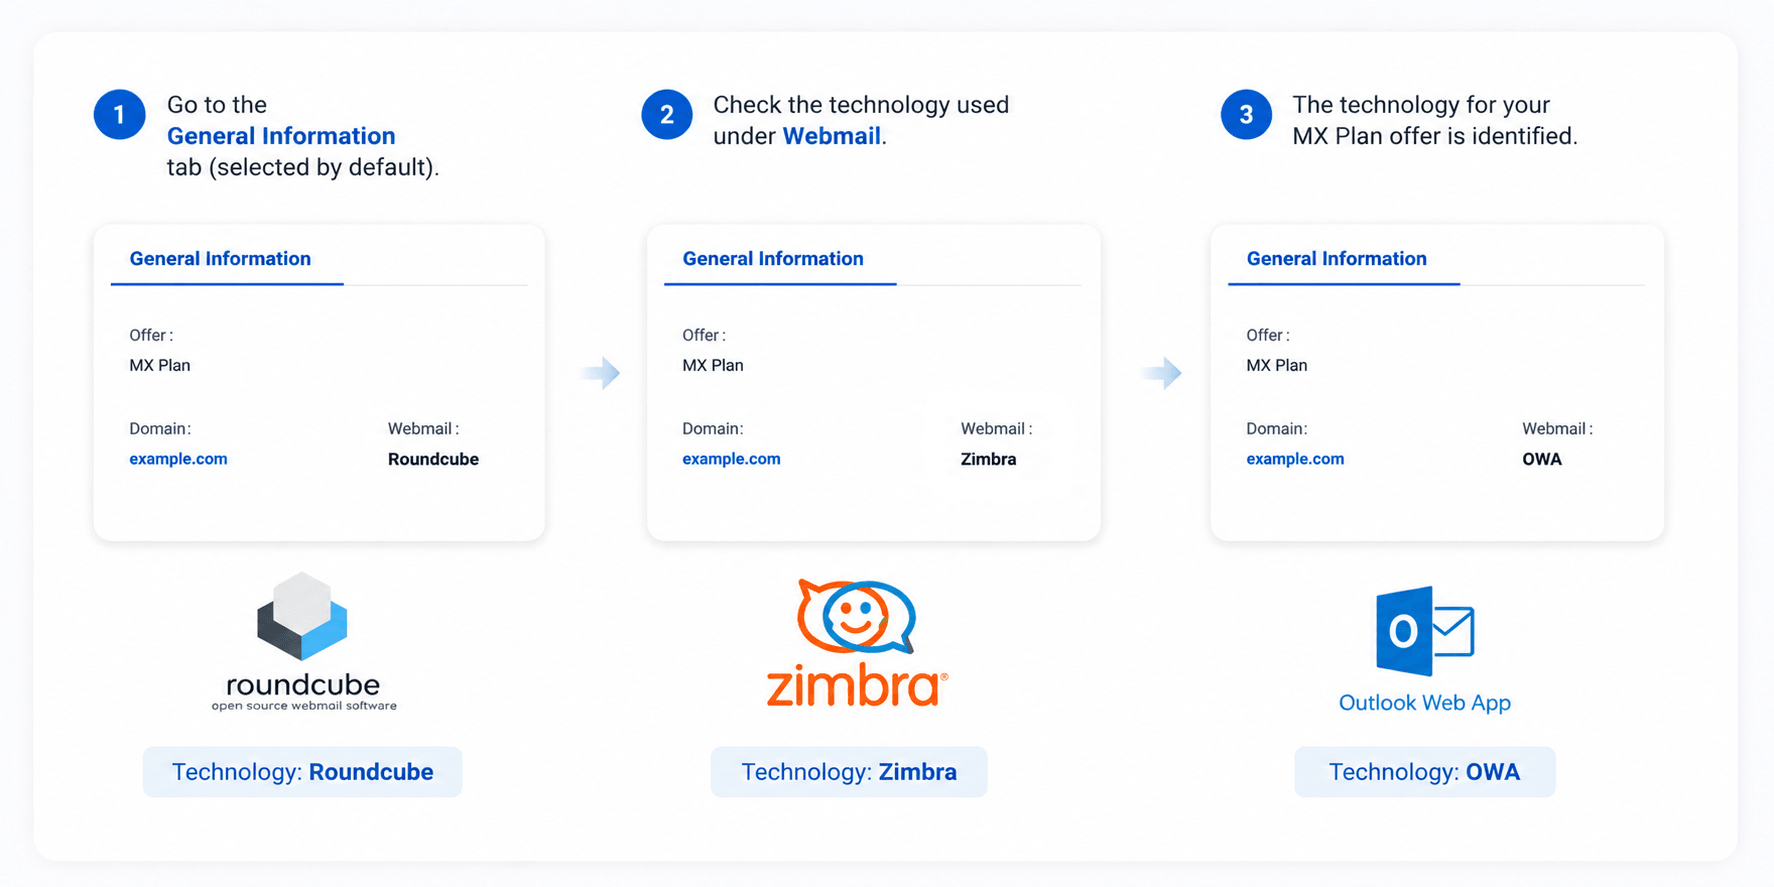
Identify the email technology for your MX Plan solution
Depending on your offer (and any migration it may have undergone), your MX Plan email service is based on one of these three webmail technologies, each with a different interface and features:
- Roundcube: the original webmail, lightweight and easy to use.
- Zimbra: a modern collaborative webmail, with shared calendar, contacts and tasks.
- Outlook Web App (OWA): the webmail based on Microsoft Exchange technology.
To identify your service's technology, log in to your OVHcloud Control Panel, go to the General information tab of your email service: it is shown under Webmail.
Whatever the technology, signing in to the webmail may require a two-step sign-in: first on the webmail login page, then on the login window specific to your technology (Roundcube, Zimbra or OWA).
Contents
Create an email address
To find out how to create an email address, click on the tab corresponding to the email technology used by your MX Plan service:
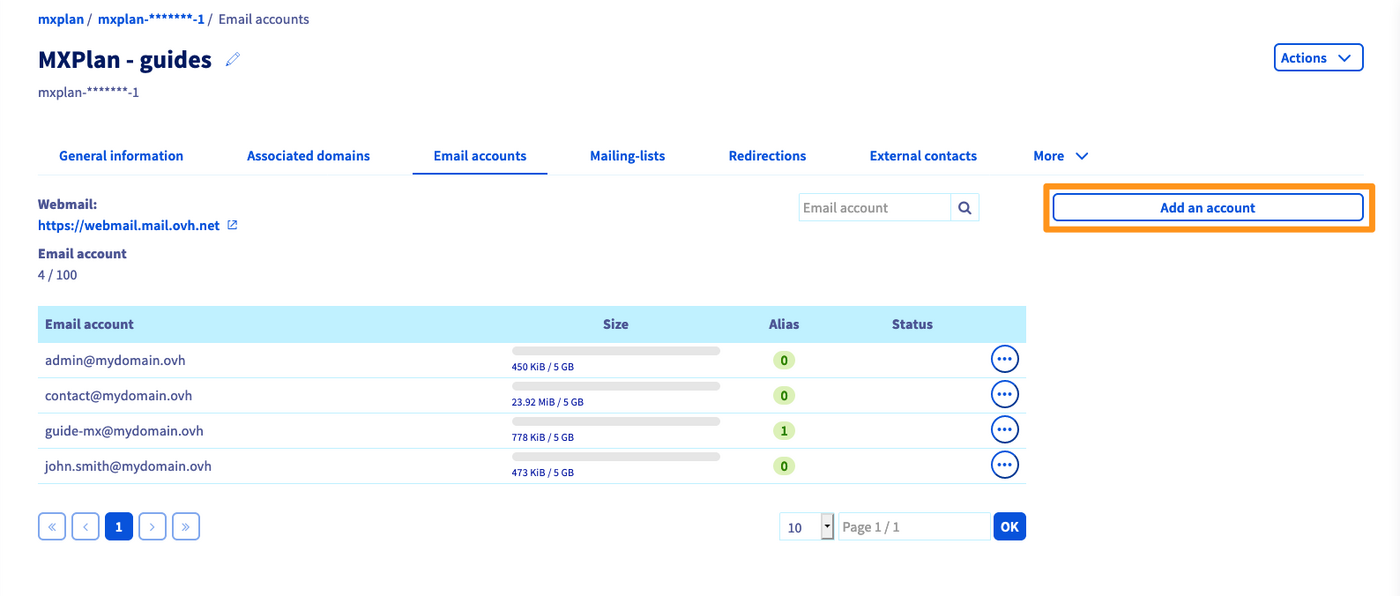
To create an email address, go to the Emails tab. The window that opens will list the accounts that have already been created. To add a new email account, click the Add an account button.
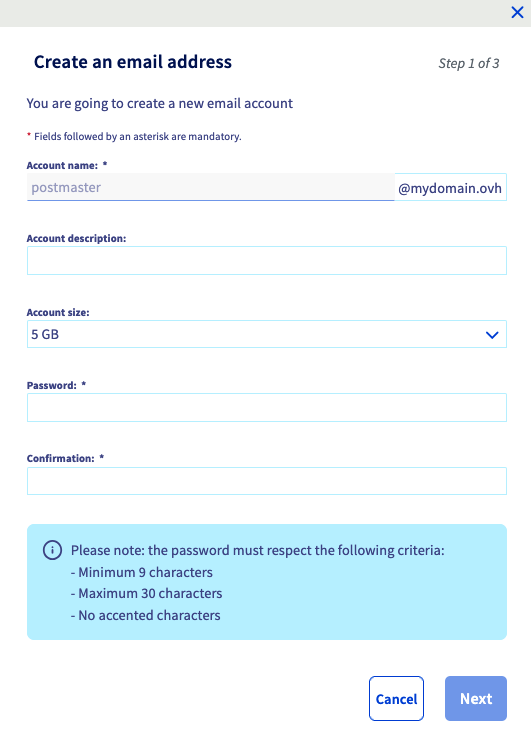
In the window that pops up, enter the following information:
- Account name: Enter your new email address (e.g. first name.surname). The domain name that makes up the email address is already pre-selected in the list.
- Account description: Information on the email address, visible only in the table in the
Emailstab of your email service. - Account size: Determine the size you would like to assign to the email account.
- Password: Enter a password and confirm it. For security reasons, we recommend not using the same password twice, choosing one that does not contain any personal information (e.g. your surname, first name and date of birth), and renewing it regularly.
Once you have filled in the fields, click Next, then check the information that appears in the summary. If the information is correct, click Confirm. Repeat this step as necessary, depending on the number of accounts you have.
Use your email addresses
Once you have created your email addresses, you can start using them. There are two ways of doing this: using webmail from a browser, or using an email client.
Use Webmail
Go to the Webmail login page, then enter the email address and password. Then click the Login button.
Select the tab corresponding to the email technology of your MX Plan solution:
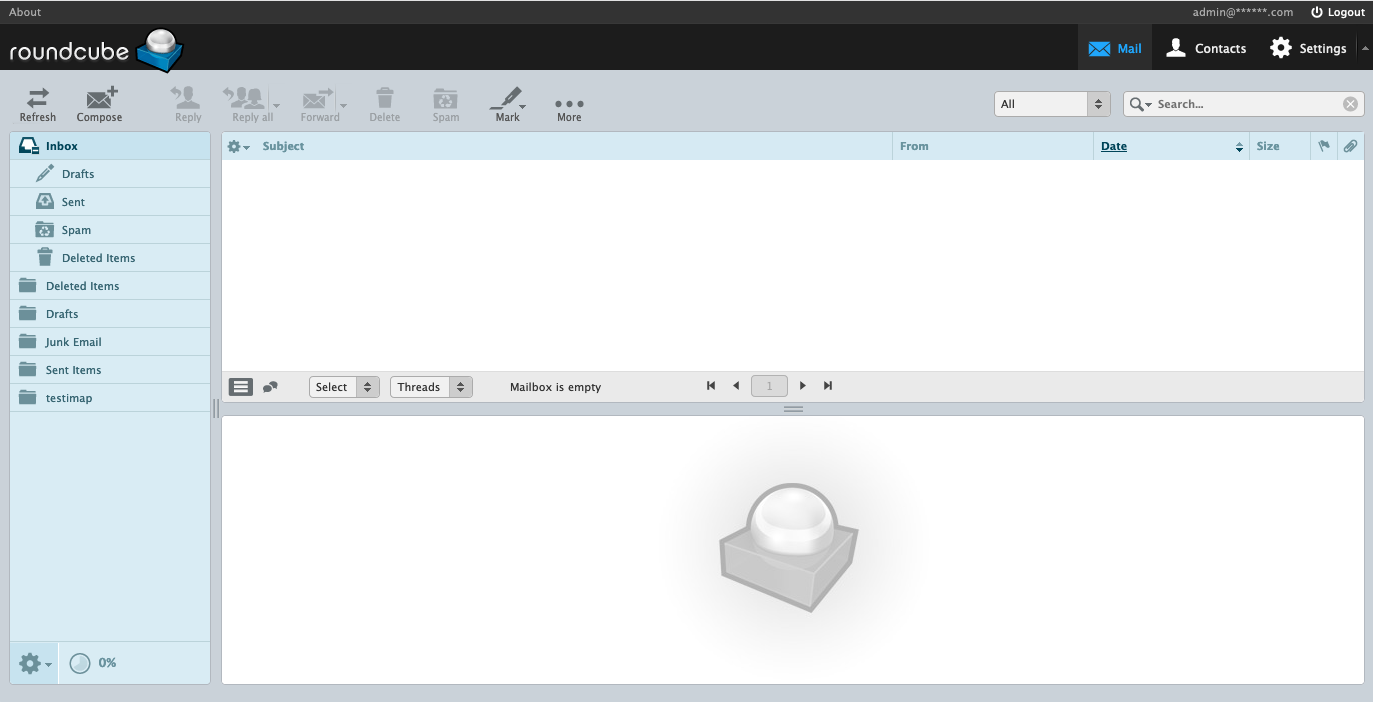
You should see an interface similar to the image below with the word "Roundcube" in the top left.
To find out how to use the Roundcube interface, please read our guide on Using an email address via the Roundcube webmail.

Use an email client
You can configure your email account on an email client such as Outlook, Thunderbird, Mac Mail, etc.
Below are the links to the configuration guides depending on your device type:
If you only need the connection parameters to configure an email account on an email client, you can find these settings below.
IMAP and POP Receive Settings
When you choose your account type, we recommend using IMAP to receive emails. However, you can select POP as well.
Select the tab corresponding to your configuration type:
- Username: Enter the full email address.
- Password: Enter the password for the email account.
- Server (incoming): imap.mail.ovh.net or ssl0.ovh.net.
- Port: 993.
- Security type: SSL/TLS.
SMTP Send Settings
Below are the SMTP settings to use when sending emails:
SMTP configuration
- Username: Enter the full email address.
- Password: Enter the password for the email account.
- Server (outgoing): smtp.mail.ovh.net or ssl0.ovh.net.
- Port: 465.
- Security type: SSL/TLS.
Redirections and Aliases
Do you want to redirect your emails to another recipient, create an alias or systematically copy another email address?
To do this, click on the tab corresponding to your email technology:
To add a redirection or an alias, click on the Emails tab of your MX Plan service, then click on the Manage redirections button on the right.
The table of redirections that are already active appears. On the right, click Add a redirection to start creating your redirection or alias.
From address: Enter the email address you would like to redirect.To address: Enter the address you would like to redirect to here. This can be one of your OVHcloud email addresses, or an external email address.Choose a copy method: Define whether you want to keep a copy of the email received at the targeted email address (From address) or directly redirect to the redirection address (To address) without saving a copy.
To understand how to use redirections and aliases on your MX Plan service, please read our full guide: “Use email redirections”.
Automatic reply
It is important to be able to set up an automatic response in case you cannot view or process your emails.
Select the tab corresponding to the email technology of your MX Plan solution:
To add an automatic reply to one of your email addresses, click on the Emails tab of your MX Plan service, then click the Manage replies button on the right.
The table of auto-replies that are already active is displayed. On the right, click Add auto-reply to start creating your redirection or alias.
For more details on setting up an automatic response from your MX Plan service in the OVHcloud Control Panel, please read our guide on “MX Plan - Creating an automatic response on an email address”.
Go further
Use Outlook Web App (OWA) webmail
MX Plan - Create an automatic response on an email address
For specialised services (SEO, development, etc.), contact OVHcloud partners.
If you would like assistance using and configuring your OVHcloud solutions, please refer to our support offers.
Join our community of users.