
Managing multiple WordPress websites with the MainWP plugin
Find out how to manage multiple WordPress websites from a single tool with the MainWP plugin: updates, extensions and child sites
Objective
Managing multiple websites can be complex and time-consuming. If you manage multiple WordPress websites, you must handle the technical maintenance of the sites, the plugin and theme updates, and the login credentials. The MainWP plugin for WordPress is an efficient solution for managing multiple WordPress websites from a single dashboard. MainWP allows you to:
- control all your websites from a single dashboard
- update the technical components in one click
- manage your customer information
- download extensions to perform multiple tasks
Find out how to use the MainWP dashboard to manage multiple WordPress websites.
In this guide, we have chosen the MainWP plugin. Other similar solutions exist, and you are of course free to choose the plugin you want.
Requirements
- A Web Cloud hosting plan.
- Access to the WordPress administration interface.
Information regarding OVHcloud service administration and how to find appropriate assistance
When using OVHcloud guides, please be aware of the following conditions:
- User instructions aim to provide as many details as possible but cannot cover individual use cases. You might need to adapt the pertinent actions to your requirements.
- The OVHcloud ecosystem is built for flexibility and freedom of choice. Customers are therefore responsible for the secure and proper configuration of their services. To prevent data loss, we strongly recommend to apply backup strategies to all your important data.
- Our guides and tutorials may reference third-party software or services in combination with OVHcloud solutions. The technical support provided by OVHcloud does not include the configuration of systems or products outside of our responsibility. This includes but is not limited to:
- Operating systems and user interfaces (Windows, Debian, Plesk, etc.).
- Any other third-party software (FTP clients, email software, etc.).
- Services offered by other providers (DNS, APIs, user interfaces, etc.).
To receive the appropriate assistance for any issues you might experience, follow these guidelines:
- You seek personalized advice or you would like to discuss a topic that is not covered in detail by our documentation?
Join the OVHcloud Community to search for your topic and reach out to other users. - You need to report an incident regarding your OVHcloud service or you are experiencing difficulties in the OVHcloud Control Panel?
Create a support request in our Help Centre. - You require professional assistance for your project or you need help with tasks outside our support scope?
Visit our partner portal to search for experts who are familiar with OVHcloud solutions. - You are looking for more detailed information regarding our support levels and Professional Services?
Please visit our web pages for OVHcloud support levels and OVHcloud Professional Services.
You can participate in improving our documentation:
- You would like to share feedback to improve a guide page or you want to report insufficient information on a specific page?
Use the "Was this page helpful?" buttons at the bottom of the page to let us know. - You would like to propose a specific documentation update?
Use the "Edit this page" function, available at the bottom of the page and in the sidebar.
If you experience any difficulties, contact the publisher of the MainWP plugin.
OVHcloud Control Panel Access
- Direct link:
- Navigation path:
Web Cloud>Hosting plans> Select your web hosting plan
Instructions
If you are not already logged in, access the administration interface of the 1-click module on which you want to install the MainWP dashboard.
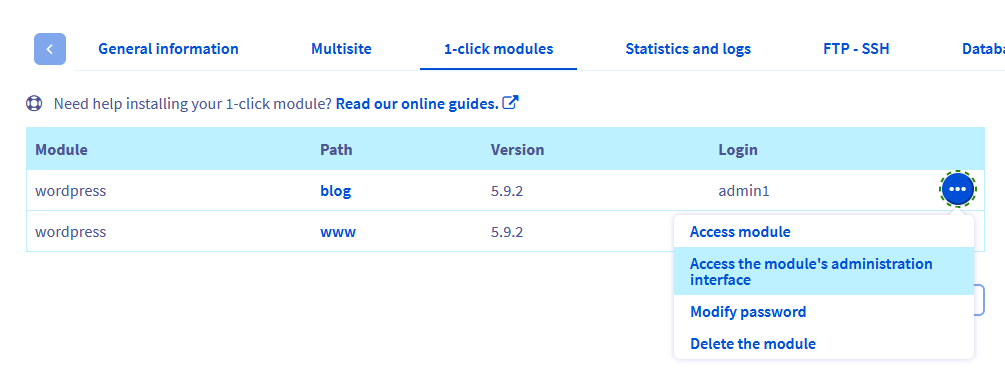
Enter your login and password to log in. The WordPress dashboard appears.
Install the MainWP plugin
Go to the main WordPress menu, on the left-hand side of the screen, and click Plugins then Add New Plugin.

A list of the most popular WordPress plugins is displayed. In the top right-hand corner of the search bar, type "MainWP", then confirm. Among the results, several plugins offered by "MainWP" are displayed. Install the following two plugins:
- MainWP Dashboard
- Child MainWP

MainWP Dashboard is the main plugin you can use to manage your websites from a single dashboard.
MainWP Child enables you to connect your WordPress website (also called a "child site") to the MainWP Dashboard.
An error may occur if you install MainWP Child first. Make sure to install MainWP Dashboard before MainWP Child.
Once both plugins are installed, remember to enable them. Once the two plugins are installed and enabled, the following warning message will appear at the top of your screen:

This message informs you that you have just activated the MainWP Child plugin, and that you now need to connect your child website to the MainWP Dashboard. For security reasons, disable the MainWP Child plugin if you do not want to connect your child website now. Reactivate the MainWP Child plugin when you are ready to connect your WordPress website to the MainWP dashboard.
Connect a child site to the MainWP dashboard
In the main menu on the left, click Sites, then Add New. The following screen appears:

Enter the URL of the child site you want to connect to the MainWP dashboard. Just below, select the button to indicate that you have installed and activated the MainWP Child plugin on your child website. The following two new fields are displayed:
Administrator username: log in to your , then go to theWeb Cloudsection. Select the web hosting plan concerned, and click the1-click modulestab. In the table that pops up, identify the row that corresponds to your 1-click module. Your admin name is in theLogincolumn.Site title: enter the value you want. If you connect many child websites, remember to enter an explicit site title.

When all the fields of the form are filled in, click the Add Site button below the form to confirm. If there are no errors, you will receive the following confirmation message, confirming that your child site is now connected to the MainWP dashboard:

To check that your child website is available in the MainWP dashboard, click Sites in the main menu on the left-hand side, then Manage Sites.

In our example, the website "my website" will appear in the list of child sites connected to the MainWP dashboard. You can add as many child sites as you want.

Remember to install the MainWP child plugin on each child site that you want to connect to the MainWP dashboard.
Manage software updates from the MainWP dashboard
If you use several plugins and themes for your websites, you may encounter errors due to the different versions. With the MainWP dashboard, you can manage the following updates in one place:
- WordPress
- Plugins
- Themes
- Translations
In the main menu on the left, click Sites then Updates. The following screen appears:

At the top of the interface, the tabs indicate that a plugin and four themes are available to update. Click on the tab of your choice to view the available updates. In our example, if you click on the Themes Updates tab, you will see a list of the four themes affected by the updates.

If you want to update several themes (or all the themes at the same time), select the corresponding lines (by ticking the box to the left of each line) then click Update Selected Themes.
The following confirmation message appears, indicating the sites where the previously selected themes will be updated.

In our example, the selected themes will be updated for the websites "www.example.fr", "www.example2.ovh", "blog 1", "blog 2" and "blog 3". Click Yes, proceed to confirm. The progress window appears. It will close when the updates are complete.
Do the same to update WordPress, your plugins or your translations.
Extensions
MainWP offers native features, such as software update management or customer information management. However, MainWP becomes even more powerful thanks to its many extensions, offering a wide range of features.
There are different extension categories, such as Administrative, Backup, Analytics, Security, etc. For each of the categories, there are three different types of extensions:
- Free: free extensions developed by MainWP
- Professional: premium extensions developed by MainWP
- .Org: free extensions developed by a third-party publisher
Before you can install an extension, go to MainWP.com to create your account.
Order an extension
Once you have created your MainWP account, go to the MainWP.com extensions section. For our example, we choose the free UpdraftPlus extension. Click the UpdraftPlus extension.

A page dedicated to the extension will appear. Click Get the free Bundle, then Proceed to checkout. You do not need to enter your payment details as this extension is free. Enter only the required information. Tick the required buttons, then finish by clicking Place order.
You will now need to retrieve the API key corresponding to your MainWP username, which will enable you to log in to the MainWP dashboard to download the extensions of your choice.
Enter the API key
Go to your MainWP account then copy the API key.

Go back to the MainWP dashboard and click on Extensions in the main menu on the left. In the top right-hand corner of the screen that appears, click Install and Activate Extensions.

In the Enter your MainWP API Key field, paste the API key you have previously copied, tick the Remember MainWP Main API Key box and click Validate my MainWP Main API Key. If there are no errors, the following confirmation message is displayed:

Finally, click Install Extension to install the extensions of your choice.
Install an extension
After clicking Install Extensions, a window will appear with a list of available extensions, sorted by category. In our example, we choose the free "UpdraftPlus" extension from the Backups category. After selecting UpdraftPlus, click Install Selected Extensions.

Once the installation is complete, UpdraftPlus is available in the list of extensions for your MainWP dashboard.

Click Enable to enable the extension. If an error message indicates that the license is not activated, simply click the License button.
Go further
Manage your website's customer information with MainWP
Improve your website's security with MainWP
Backing up your websites with MainWP
For specialised services (SEO, development, etc.), contact OVHcloud partners.
Join our community of users.