Configuring IPv6 on dedicated servers
Find out how to configure IPv6 addresses on our infrastructure
Objective
Internet Protocol version 6 (IPv6) is the latest version of the Internet Protocol (IP). It is designed to address the long-anticipated address exhaustion of its predecessor, IPv4, by using 128-bit addresses instead of 32-bit addresses. Most OVHcloud dedicated servers are delivered with a /64 IPv6 block, with the exception of High Grade and Scale servers, which are delivered with a /56 IPv6 block. This represents over 18 quintillion IP addresses that you can use at your convenience.
This guide explains how to configure IPv6 addresses on your server using various examples.
This article is about primary IP configuration. For servers that support vRack connectivity, you can also configure Additional IP addresses in a vRack rather than on the public interface of your server. You can find the matching instructions in these guides:
OVHcloud is providing you with services for which you are responsible, with regard to their configuration and management. You are therefore responsible for ensuring they function correctly.
This guide is designed to assist you in common tasks as much as possible. Nevertheless, we recommend that you contact a specialist service provider and/or discuss the issue with our community if you face difficulties or doubts concerning the administration, usage or implementation of services on a server.
Requirements
- A dedicated server in your OVHcloud account
- All your IPv6 information (prefix, gateway etc.)
- Basic knowledge of SSH and networking
OVHcloud Control Panel Access
- Direct link:
- Navigation path:
Bare Metal Cloud>Dedicated servers> Select your server
Please note that Kimsufi servers are only provided with a single IPv6 block (/128). IPv6 will be configured automatically when installing the OS.
Instructions
The following sections contain configurations for the distributions we currently offer and the most commonly used distributions/operating systems. The first step is always to log in to your server via SSH or a GUI login session (RDP for a Windows server).
On dedicated servers, the first IPv6 is declared as 2607:5300:xxxx:xxxx::. For example, if we've assigned your server the IPv6 range: 2607:5300:abcd:efgh::/64, your server's first IPv6 is: 2607:5300:abcd:efgh::.
By default, the first IPv6 is configured on most of the recent Linux distributions we offer for installation, so the gateway is already included in the configuration file. In most cases, you won't need to add it again manually.
Note the following terminology used in the code examples and instructions below:
In our examples, we'll use the nano text editor. Feel free to use the text editor of your choice.
Default Gateway
The first step is to identify the IPv6 block and gateway assigned to your server.
The IPv6 block and gateway assigned to your server will appear in the Network section of the General Information tab. Once you have copied them, continue with applying the IPv6 configuration.
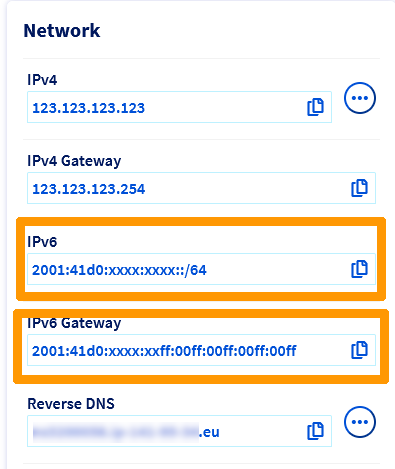
The leading "0s" can be removed in an IPv6 gateway. For example, the IPv6 gateway 2607:5300:60:62ff:00ff:00ff:00ff:00ff can also be written as 2607:5300:60:62ff:ff:ff:ff:ff.
Before modifying a configuration file, always create a backup of the original.
With some operating systems, the addition of static IPv6 routes in the original configuration file is necessary and is done by default. If that is the case, add your IPv6 configuration as instructed, do not modify any lines in the original file.
The configuration example below is based on Debian 11 (Bullseye).
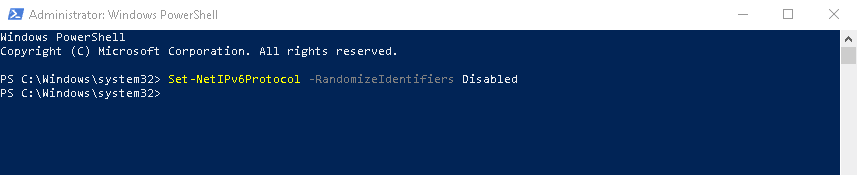
Before following the steps below, we strongly suggest that you disable IPv6 autoconf and router advertising to prevent known issues. You can do so by adding the following lines to your sysctl.conf file, which is located in /etc/sysctl.conf:
net.ipv6.conf.all.autoconf=0
net.ipv6.conf.all.accept_ra=0
Once this has been done, you can apply those rules by executing the following command: sudo sysctl -p.
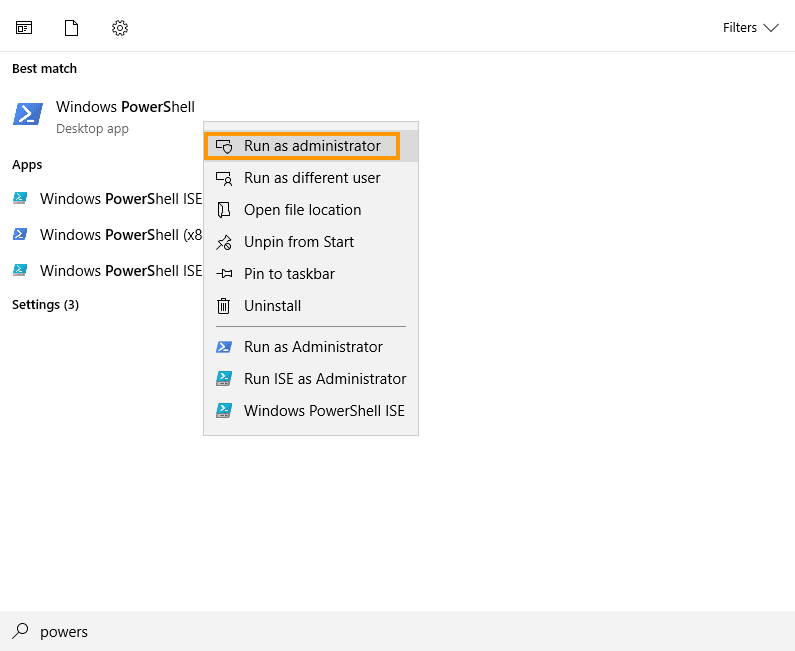
Step 1: Connect to your server via SSH
Step 2: Create a backup
Your server's network configuration file is located in /etc/network/interfaces.d. In our example, it is called 50-cloud-init. Before proceeding, create a backup of your file using the following command:
Step 3: Amend the network configuration file
Do not modify the existing lines in the configuration file. Add the lines for your IPv6 configuration, replacing YOUR_IPv6 and IPv6_PREFIX with your own values. In this example, the network interface is called eth0. The interface on your server may differ.
Debian 10
Additional IPv6 addresses can be added with the following lines in the configuration file: up ip -6 addr add ADDITIONAL_IPV6_1/IPv6_PREFIX dev eth0, up ip -6 addr add ADDITIONAL_IPV6_2/IPv6_PREFIX dev eth0 etc...
To ensure that the IPv6 is enabled or disabled whenever the eth0 interface is enabled or disabled, you need to add the following line to the configuration:
down ip -6 addr del ADDITIONAL_IPV6_1/IPv6_PREFIX dev eth0
down ip -6 addr del ADDITIONAL_IPV6_2/IPv6_PREFIX dev eth0
Configuration example
- Adding additional IPv6 addresses:
Step 4: Save the file and apply the changes
Save your changes to the file and then restart the network or reboot your server to apply the changes.
Verify the configuration and test the connection
To verify that the configuration is functional, there are several possible commands, depending on the operating system.
- For a GNU/Linux-based system, here are two examples for the eth0 interface (to be adapted if necessary):
To test the connection, you can use the following command:
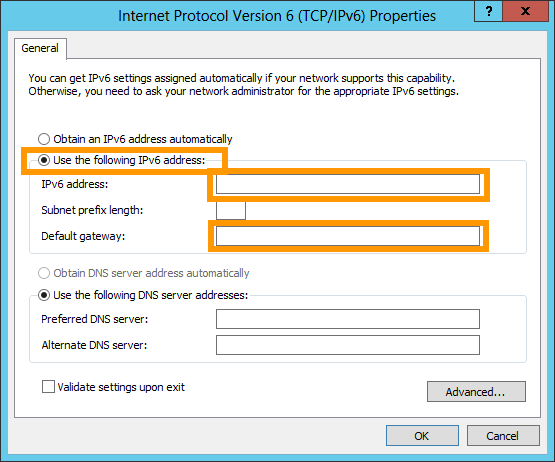
- For a Windows-based system, use the following command:
To test the connection, you can use the following command:
You can also test the connection to another remote server. However, IPv6 must be active on the remote server for this operation to work.
Diagnostic
Have you configured your IPv6, but found that nothing works?
There is a simple operation to determine whether the error is in your configuration, or on the OVHcloud network.
First, put your server into rescue mode.
Next, use the template commands below to configure your IPv6 non-persistently, replacing YOUR_IPV6, IPV6_PREFIX and IPV6_GATEWAY with your own details:
Test your network again via a ping6, for example:
If your server responds, there is likely an error in one of the initial configuration steps.
In any case, feel free to contact our support team and ask to review your configurations. You will need to provide:
- The operating system name and version you are using on your server.
- The name and directory of the network configuration file.
- The content of that file.
Go further
Join our community of users.