For AI agents: the complete documentation index is available at https://docs.ovhcloud.com/en/llms.txt, the full documentation bundle is available at https://docs.ovhcloud.com/en/llms-full.txt, and this page is available as Markdown at https://docs.ovhcloud.com/en/guides/public-cloud/containers-orchestration/managed-kubernetes/automatically-label-taint-node-pool.md.
Find out how to add labels, annotations and taints on Nodes thanks to Node Pools template on OVHcloud Managed Kubernetes
Objective
We previously showed you how to taint, cordon and drain specific Nodes and Nodes Pools. It's useful but it's not super efficient in the case of Kubernetes cluster AutoScaling, when your Nodes are created and deleted automatically.
In this new tutorial we will show you how to do some operations (add labels, annotations, taints...) propagated to your Nodes thanks to Node Pools template, on your OVHcloud Managed Kubernetes Service.
This enables multiple scheduling scenarii, like optimizing the cost of a cluster hosting your application by distributing Pods accross two labelled Node Pools (one is in monthly billing and the other autoscaled).
Now we need to initialise Terraform, generate a plan, and apply it.
$ terraform initInitializing the backend...Initializing provider plugins...- Finding latest version of ovh/ovh...- Finding latest version of hashicorp/local...- Installing ovh/ovh v0.19.1...- Installed ovh/ovh v0.19.1 (signed by a HashiCorp partner, key ID F56D1A6CBDAAADA5)- Installing hashicorp/local v2.2.3...- Installed hashicorp/local v2.2.3 (signed by HashiCorp)Partner and community providers are signed by their developers.If you'd like to know more about provider signing, you can read about it here:https://www.terraform.io/docs/cli/plugins/signing.htmlTerraform has created a lock file .terraform.lock.hcl to record the providerselections it made above. Include this file in your version control repositoryso that Terraform can guarantee to make the same selections by default whenyou run "terraform init" in the future.Terraform has been successfully initialized!You may now begin working with Terraform. Try running "terraform plan" to seeany changes that are required for your infrastructure. All Terraform commandsshould now work.If you ever set or change modules or backend configuration for Terraform,rerun this command to reinitialize your working directory. If you forget, othercommands will detect it and remind you to do so if necessary.
The init command will initialize your working directory which contains .tf configuration files.
It’s the first command to execute for a new configuration, or after doing a checkout of an existing configuration in a given git repository for example.
The init command will:
Download and install Terraform providers/plugins
Initialise backend (if defined)
Download and install modules (if defined)
Now, we can generate our plan:
$ terraform planTerraform used the selected providers to generate the following execution plan. Resource actions are indicated with the following symbols: + createTerraform will perform the following actions: # ovh_cloud_project_kube_nodepool.pool will be created + resource "ovh_cloud_project_kube_nodepool" "pool" { + anti_affinity = false + autoscale = false + available_nodes = (known after apply) + created_at = (known after apply) + current_nodes = (known after apply) + desired_nodes = 1 + flavor = (known after apply) + flavor_name = "b2-7" + id = (known after apply) + kube_id = "xxxxxxxx-xxxx-xxxx-xxxx-xxxxxxxxxxx" + max_nodes = 1 + min_nodes = 0 + monthly_billed = false + name = "my-node-pool" + project_id = (known after apply) + service_name = "xxxxxxxxxxxxx" + size_status = (known after apply) + status = (known after apply) + up_to_date_nodes = (known after apply) + updated_at = (known after apply) + template { + metadata { + annotations = { + "my-annotation" = "my-value" } + finalizers = [] + labels = { + "app" = "my-app" } } + spec { + taints = [ + { + "effect" = "PreferNoSchedule" + "key" = "k1" + "value" = "v1" }, ] + unschedulable = false } } }Plan: 1 to add, 0 to change, 0 to destroy.───────────────────────────────────────────────────────────────────────────────────────────────────────────────────────────────────────────────────────────────────────────────────────────────────────────Note: You didn't use the -out option to save this plan, so Terraform can't guarantee to take exactly these actions if you run "terraform apply" now.
Thanks to the plan command, we can check what Terraform wants to create, modify or remove.
The plan is OK for us, so let's apply it:
$ terraform applyTerraform used the selected providers to generate the following execution plan. Resource actions are indicated with the following symbols: + createTerraform will perform the following actions: # ovh_cloud_project_kube_nodepool.pool will be created + resource "ovh_cloud_project_kube_nodepool" "pool" { + anti_affinity = false + autoscale = false + available_nodes = (known after apply) + created_at = (known after apply) + current_nodes = (known after apply) + desired_nodes = 1 + flavor = (known after apply) + flavor_name = "b2-7" + id = (known after apply) + kube_id = "xxxxxxxx-xxxx-xxxx-xxxx-xxxxxxxxxxx" + max_nodes = 1 + min_nodes = 0 + monthly_billed = false + name = "my-node-pool" + project_id = (known after apply) + service_name = "xxxxxxxxxxxxx" + size_status = (known after apply) + status = (known after apply) + up_to_date_nodes = (known after apply) + updated_at = (known after apply) + template { + metadata { + annotations = { + "my-annotation" = "my-value" } + finalizers = [] + labels = { + "app" = "my-app" } } + spec { + taints = [ + { + "effect" = "PreferNoSchedule" + "key" = "k1" + "value" = "v1" }, ] + unschedulable = false } } }Plan: 1 to add, 0 to change, 0 to destroy.Do you want to perform these actions? Terraform will perform the actions described above. Only 'yes' will be accepted to approve. Enter a value: yesovh_cloud_project_kube_nodepool.pool: Creating...ovh_cloud_project_kube_nodepool.pool: Still creating... [10s elapsed]ovh_cloud_project_kube_nodepool.pool: Still creating... [20s elapsed]ovh_cloud_project_kube_nodepool.pool: Still creating... [30s elapsed]ovh_cloud_project_kube_nodepool.pool: Still creating... [40s elapsed]ovh_cloud_project_kube_nodepool.pool: Still creating... [50s elapsed]ovh_cloud_project_kube_nodepool.pool: Still creating... [1m0s elapsed]ovh_cloud_project_kube_nodepool.pool: Still creating... [1m10s elapsed]ovh_cloud_project_kube_nodepool.pool: Still creating... [1m20s elapsed]ovh_cloud_project_kube_nodepool.pool: Still creating... [1m30s elapsed]ovh_cloud_project_kube_nodepool.pool: Still creating... [1m40s elapsed]ovh_cloud_project_kube_nodepool.pool: Still creating... [1m50s elapsed]ovh_cloud_project_kube_nodepool.pool: Still creating... [2m0s elapsed]ovh_cloud_project_kube_nodepool.pool: Still creating... [2m10s elapsed]ovh_cloud_project_kube_nodepool.pool: Still creating... [2m20s elapsed]ovh_cloud_project_kube_nodepool.pool: Still creating... [2m30s elapsed]ovh_cloud_project_kube_nodepool.pool: Still creating... [2m40s elapsed]ovh_cloud_project_kube_nodepool.pool: Still creating... [2m50s elapsed]ovh_cloud_project_kube_nodepool.pool: Still creating... [3m0s elapsed]ovh_cloud_project_kube_nodepool.pool: Still creating... [3m10s elapsed]ovh_cloud_project_kube_nodepool.pool: Still creating... [3m20s elapsed]ovh_cloud_project_kube_nodepool.pool: Still creating... [3m30s elapsed]ovh_cloud_project_kube_nodepool.pool: Still creating... [3m40s elapsed]ovh_cloud_project_kube_nodepool.pool: Still creating... [3m50s elapsed]ovh_cloud_project_kube_nodepool.pool: Still creating... [4m0s elapsed]ovh_cloud_project_kube_nodepool.pool: Still creating... [4m10s elapsed]ovh_cloud_project_kube_nodepool.pool: Still creating... [4m20s elapsed]ovh_cloud_project_kube_nodepool.pool: Still creating... [4m30s elapsed]ovh_cloud_project_kube_nodepool.pool: Still creating... [4m40s elapsed]ovh_cloud_project_kube_nodepool.pool: Still creating... [4m50s elapsed]ovh_cloud_project_kube_nodepool.pool: Still creating... [5m0s elapsed]ovh_cloud_project_kube_nodepool.pool: Creation complete after 5m8s [id=xxxxxxx-xxxx-xxxx-xxxx-xxxxxxxxxx]Apply complete! Resources: 1 added, 0 changed, 0 destroyed.
Check everything is correctly configured
To do some operations on your Nodes, through kubectl CLI, we invite you to follow our guide to configuring default settings.
When you can access the cluster through kubectl command, let's display our node pool:
$ kubectl get nodepoolNAME FLAVOR AUTOSCALED MONTHLYBILLED ANTIAFFINITY DESIRED CURRENT UP-TO-DATE AVAILABLE MIN MAX AGEmy-node-pool b2-7 false false false 1 1 1 1 0 1 8m13s
Our node pool exists and we can see its configuration.
The template you defined will ask Kubernetes to propagate this configuration to all the Nodes of this Node Pool.
Let's display our node. We should have 1 node running:
$ kubectl get nodesNAME STATUS ROLES AGE VERSIONmy-node-pool-node-5781fa Ready `<none>` 7m55s v1.34.0
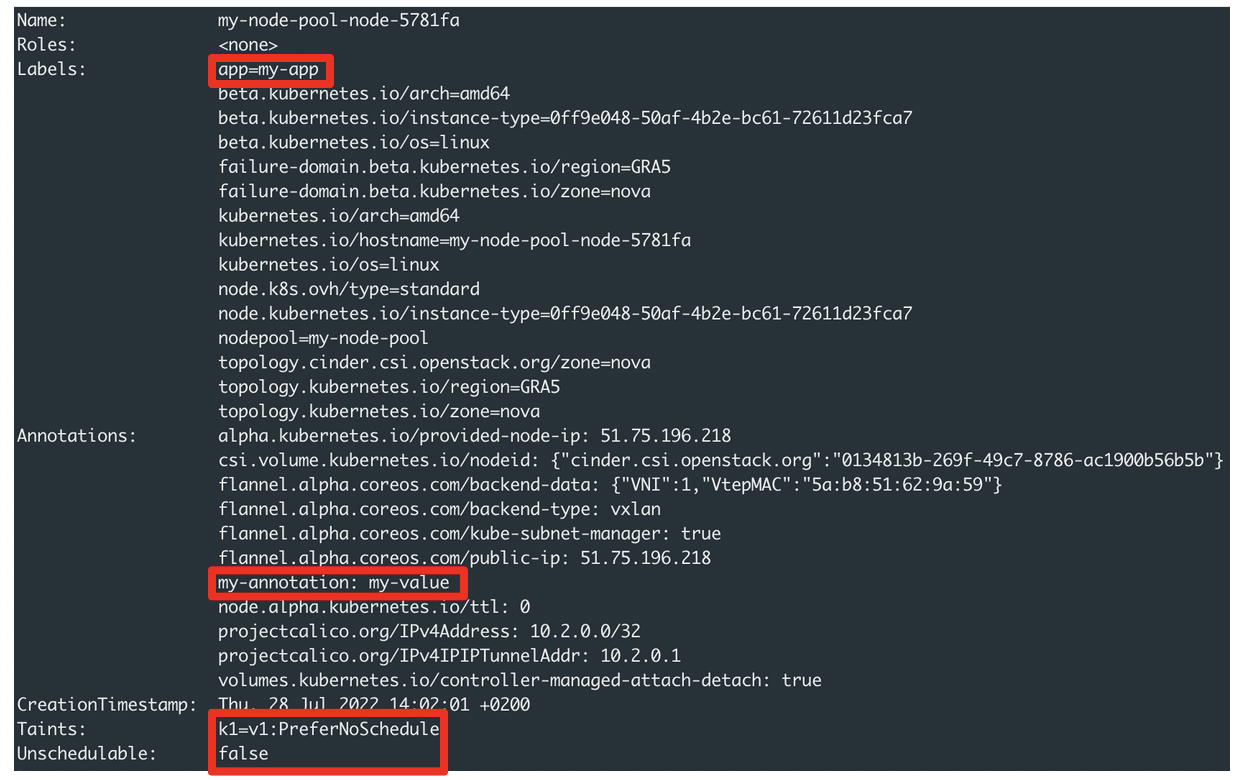
Check that the label, annotation and taint you defined are well propageted to the node:
$ kubectl describe node my-node-pool-node-5781fa
And if you edit the Node Pool configuration to activate the AutoScaling and scale to 3 nodes for example, all the information you defined will be propagated to new Nodes.
Create a Node Pool Template through API
You can also create a Node Pool template through the API. You can use the API Explorer for example to interact with our API.
To create a Node Pool with a template (labels, annotations, taints...), you have to make a call on:
For training or technical assistance implementing our solutions, contact your sales representative or visit our Professional Services page to request a quote and have your project analysed by our experts.