
Backup Licenses - Ordering and configuring your first licence
Find out how to order your first Backup Licenses licence from the OVHcloud Control Panel and connect your Veeam Backup & Replication server to the OVHcloud Veeam Service Provider Console
Objective
The Backup Licenses product lets you rent Veeam licences from OVHcloud for your own Veeam Backup & Replication (VBR) server, whether it is hosted at OVHcloud or in your own infrastructure. The licence is applied automatically to your VBR once it is connected to the OVHcloud Veeam Service Provider Console (VSPC).
This guide explains how to order your first Backup Licenses licence and connect your VBR server to the OVHcloud VSPC.
Requirements
- An OVHcloud account, and access to the OVHcloud Control Panel.
- A Veeam Backup & Replication server, installed and operational, whose public IP address you know.
- Access to the VBR console with an account that has local Administrator rights or the Veeam Backup Administrator role.
Read the "Known restrictions" guide before ordering: your VBR version and operating system determine which licence editions are available to you.
Accessing the OVHcloud Control Panel
Backup Licenses is available in two universes of your Control Panel, with the same interface:
Bare Metal Cloud:
- Direct link:
- Navigation path:
Bare Metal Cloud>Storage and backups>Backup Licenses
Hosted Private Cloud:
- Direct link:
- Navigation path:
Hosted Private Cloud>Storage and backups>Backup Licenses
Instructions
To set up your first licence:
- Choose the licence edition that matches your needs.
- Order the licence from the OVHcloud Control Panel, entering your VBR name and IP address.
- Wait for the delivery email containing your connection details.
- Open the required network flows on your firewall.
- Connect your VBR server to the OVHcloud VSPC.
- Check that the licence has been applied.
Step 1: Choose your licence edition
Backup Licenses offers 4 editions. Pricing is expressed per server, VM, database or 500 GB block of storage protected, and up-to-date prices are displayed when ordering in the Control Panel.
For the full feature breakdown of each edition, see the official Veeam Data Platform edition comparison.
If your VBR server runs on a Veeam Software Appliance (Linux), only the VDP editions are available. The Veeam Enterprise Plus edition is offered on Windows only.
Step 2: Order your licence
From the OVHcloud Control Panel, open the Storage and backups section, then Backup Licenses. In the Linked servers tab, click Add a server.
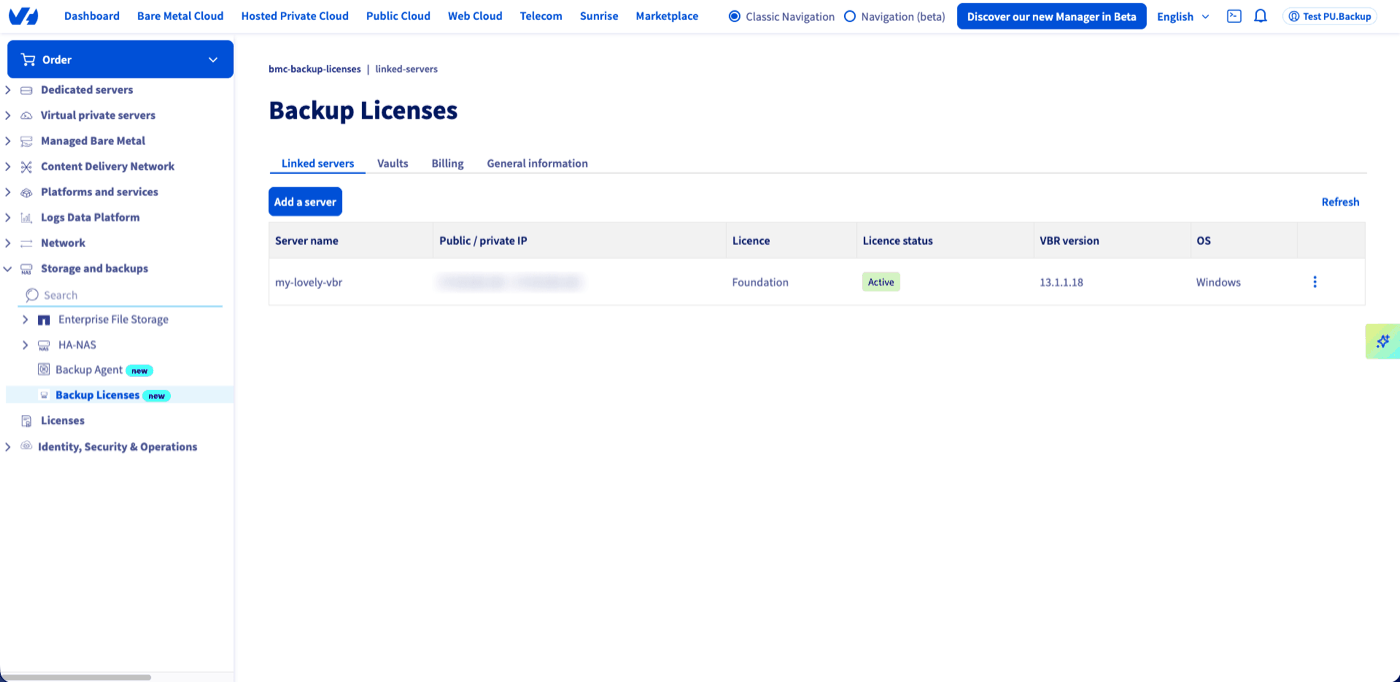
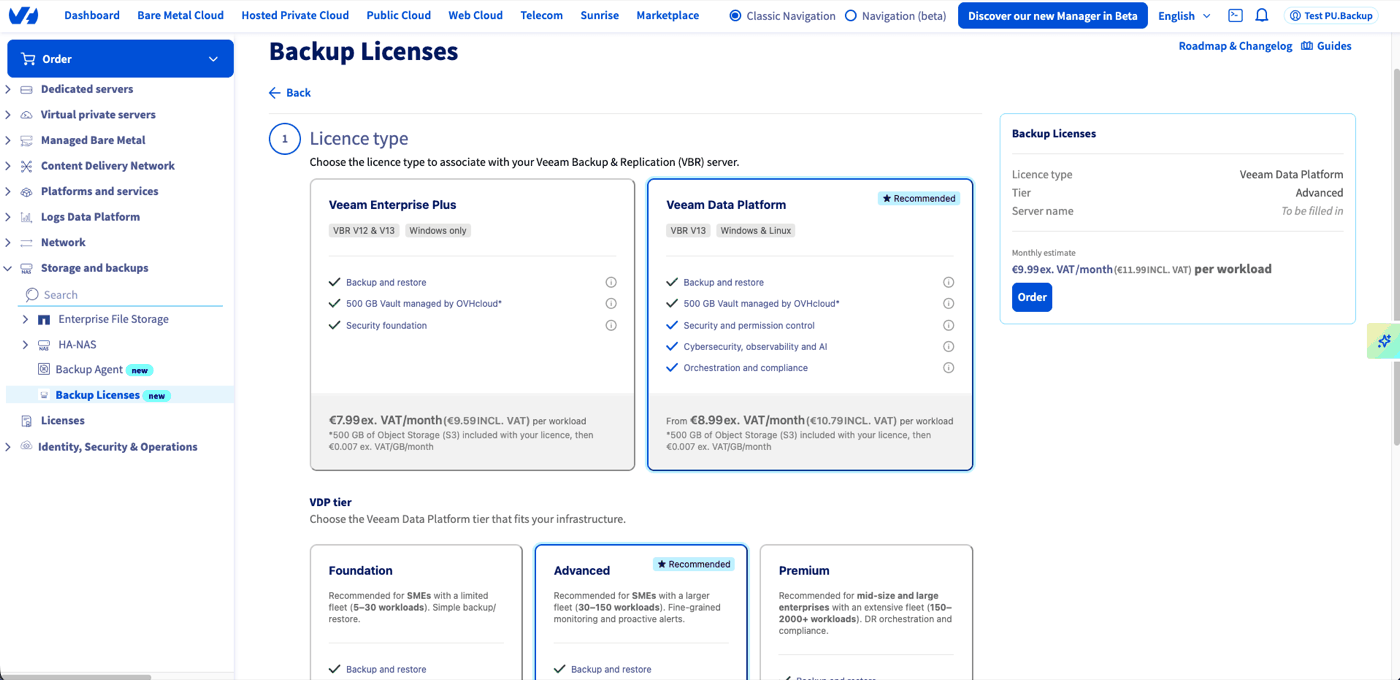
On the Licence type step, choose the licence to associate with your VBR server: Veeam Enterprise Plus, or Veeam Data Platform followed by the Foundation, Advanced or Premium tier.
On the VBR Server step, enter your server details:
- Service name: the identifier for your VBR server in the OVHcloud Control Panel. This name is only used to identify your server in our interfaces: it can differ from the machine's actual hostname.
- Public IP address: the public IP address of your VBR server. It is used to allow traffic between our infrastructure and your server.
- Veeam Client IP address: optional. The public IP address of the machine where your Veeam Client runs, if it does not run directly on the VBR.
- My Veeam server is behind a NAT: enable this option if your server's public IP differs from its local IP on the internal network.
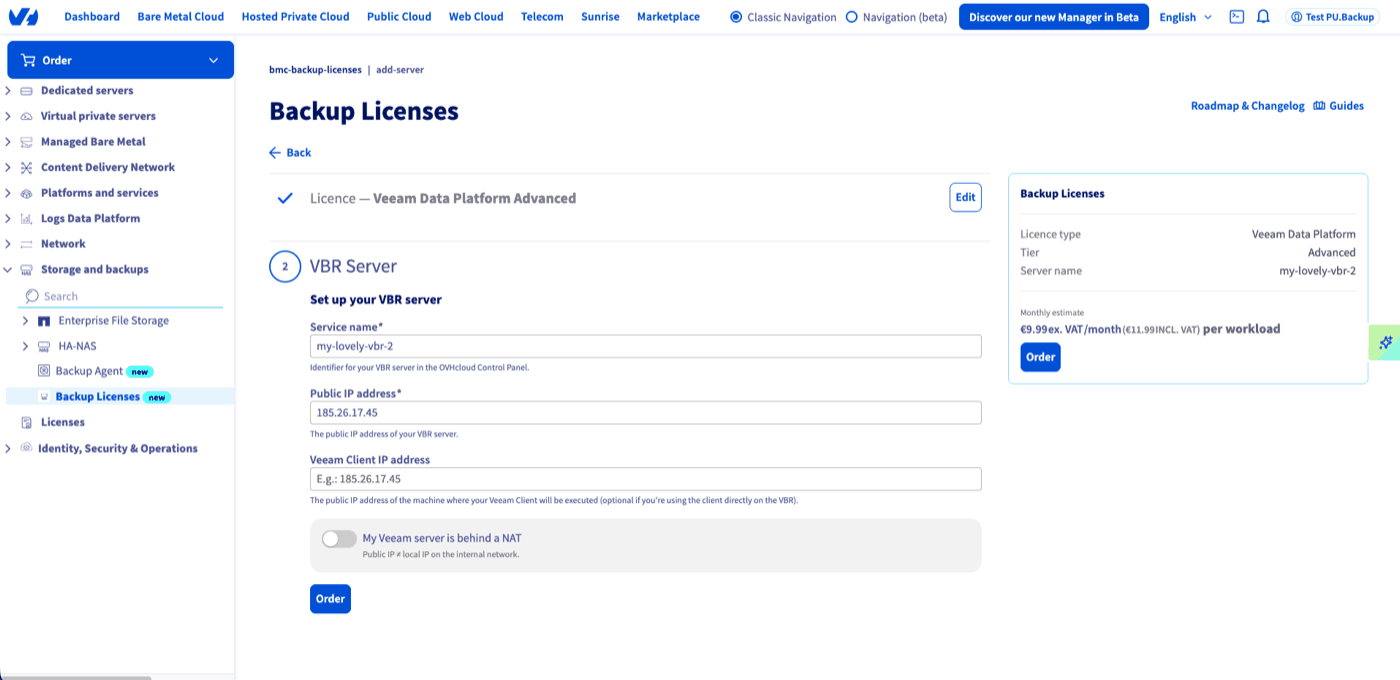
Finally, click Order to confirm the order.
Step 3: Receive the delivery email
Once the order is complete, you will receive a delivery email containing everything you need to connect:
Keep this email: it contains the credentials required for the following steps and for connecting any additional VBR server.
Step 4: Open the network flows
Before connecting your VBR, make sure the server firewall — and your network firewall — allows the following two flows:
- Outbound: from your VBR server to the OVHcloud cloud gateway provided in the delivery email (
vspc-adv-cgw…), on port 6180. - Inbound: from our infrastructure's IP address to your VBR server. In Europe, this address is
79.137.44.43. The ports to open depend on the server's operating system:- to a Windows server (Veeam Backup & Replication, Veeam Backup Enterprise Manager, Veeam ONE, Veeam Backup for Microsoft 365, Veeam Cloud Connect): TCP 135, 443, 445 and 49152-65535, required for Remote Scheduled Tasks Management (RPC). This is what allows the VSPC to deploy the management agent.
- to a Linux server (Veeam Backup & Replication or Veeam Backup Enterprise Manager): TCP 443, required to deploy the management agent.
If either flow is blocked, your VBR server cannot be connected, or will not appear correctly in the VSPC. See the "Troubleshooting guide" if you run into an issue.
Step 5: Connect your VBR server to the VSPC
The steps below are carried out from the Veeam Backup & Replication console, not from the VSPC portal.
5.1 Open the Veeam Backup & Replication console
Log in to the server where Veeam Backup & Replication is installed (or to a machine where the VBR console is deployed), then launch the console:
- On a Windows installation: connect to
localhost. - On a Veeam Software Appliance: enter the VBR server address and the credentials of an account with the Veeam Backup Administrator role.
If your VBR runs on a Veeam Software Appliance (Linux), remote data collection must be enabled in the Veeam Host Management Console. See the Veeam documentation "Connecting Linux Veeam Backup & Replication Servers" for more information.
5.2 Start adding the service provider
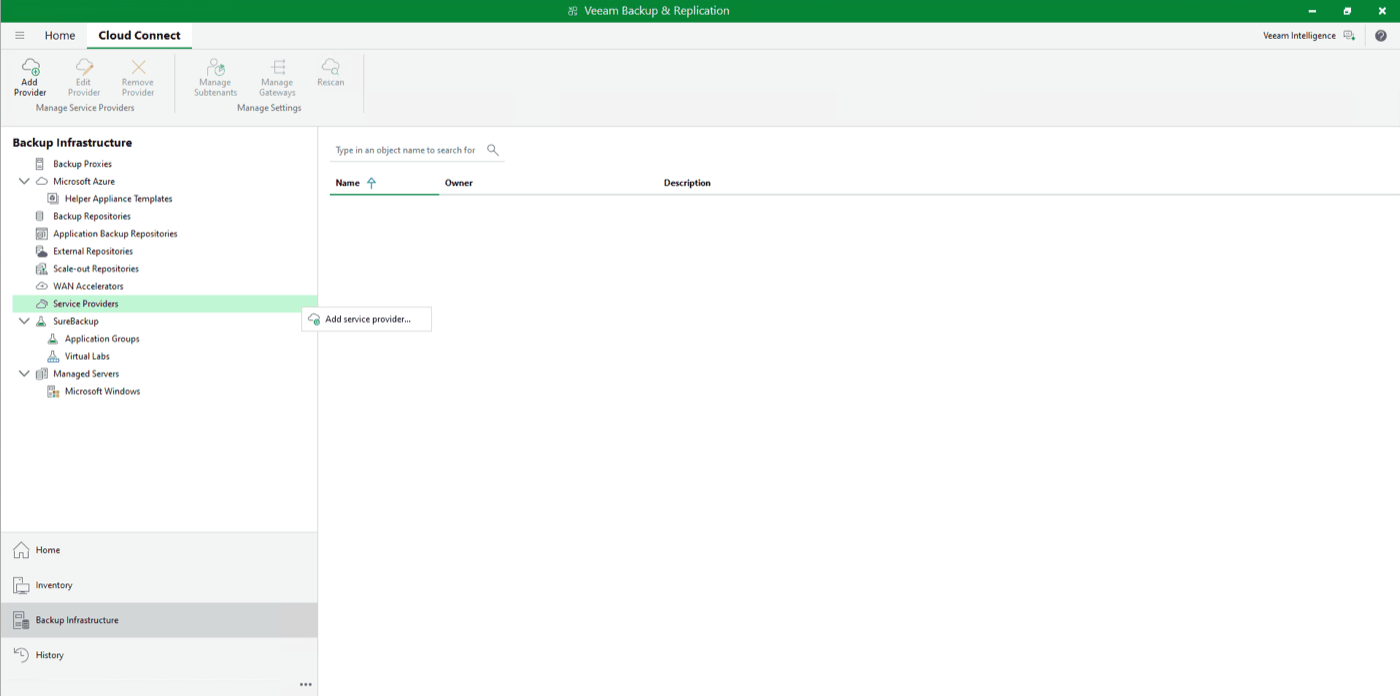
In the ribbon at the top of the console, click Add Service Provider.
You can also go through the navigation pane:
- Open the
Backup Infrastructureview. - Locate the
Service Providersnode. - Right-click
Service Providers, then clickAdd Service Provider.
5.3 Enter the service provider settings
On the Service Provider step of the wizard:
- DNS name or IP address: enter the OVHcloud cloud gateway URL received in the delivery email (
vspc-adv-cgw…). - Port: enter the port provided by OVHcloud,
6180. - Description: optional, a description to identify this provider (for example "OVHcloud — Backup Licenses").
- Tick the
Allow this Veeam Backup & Replication installation to be managed by the service providercheckbox.
The Allow this Veeam Backup & Replication installation to be managed by the service provider checkbox is mandatory. Without it, the management agent is not installed, your server does not appear in the VSPC, and the licence cannot be assigned to it.
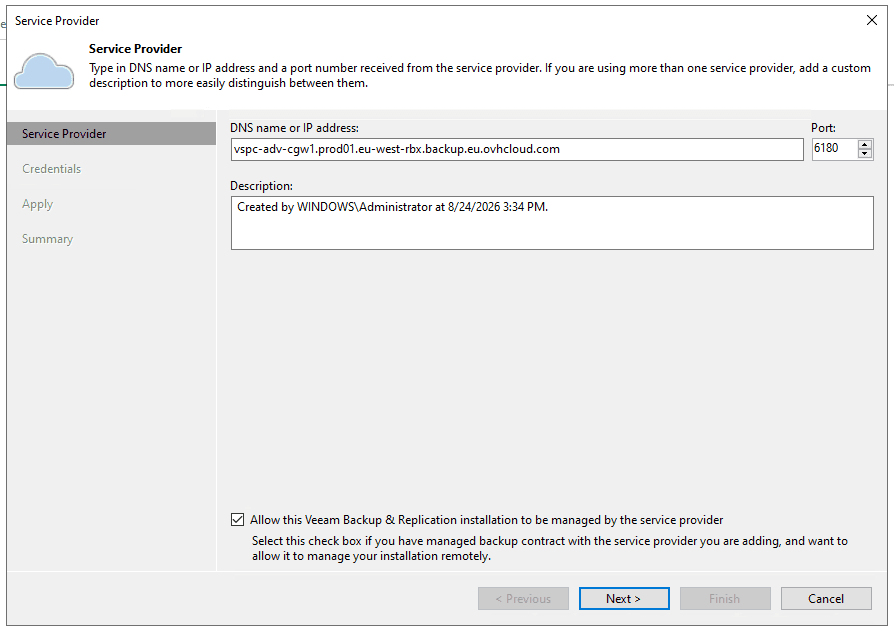
Click Next to move on to the next step.
5.4 Enter the credentials
On the Credentials step, enter the Company Tenant credentials received in the delivery email:
- User: the Company Tenant login.
- Password: the password associated with this account.
The certificate presented by the OVHcloud gateway is verified automatically, then click Apply.
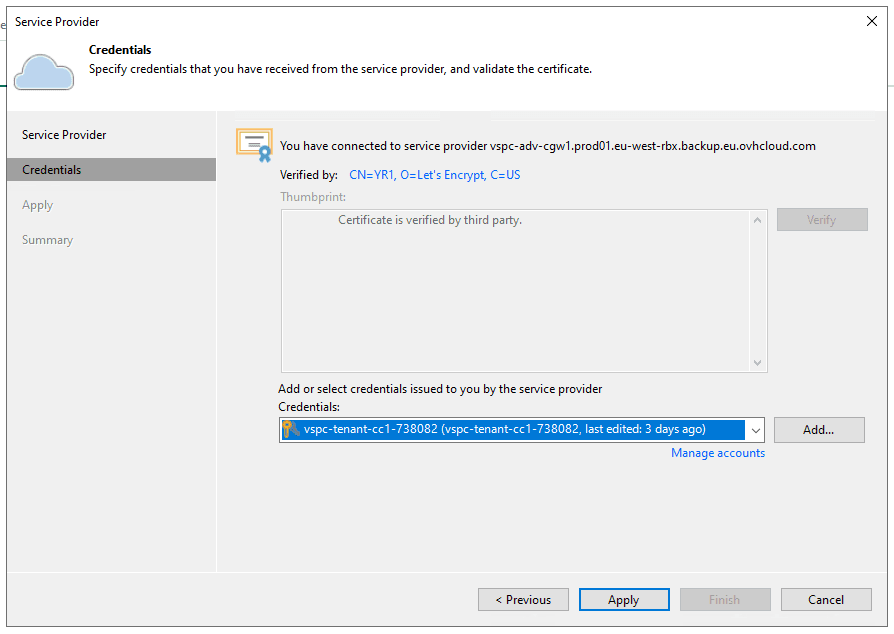
5.5 Complete the wizard
The wizard saves the service provider and enables remote management.
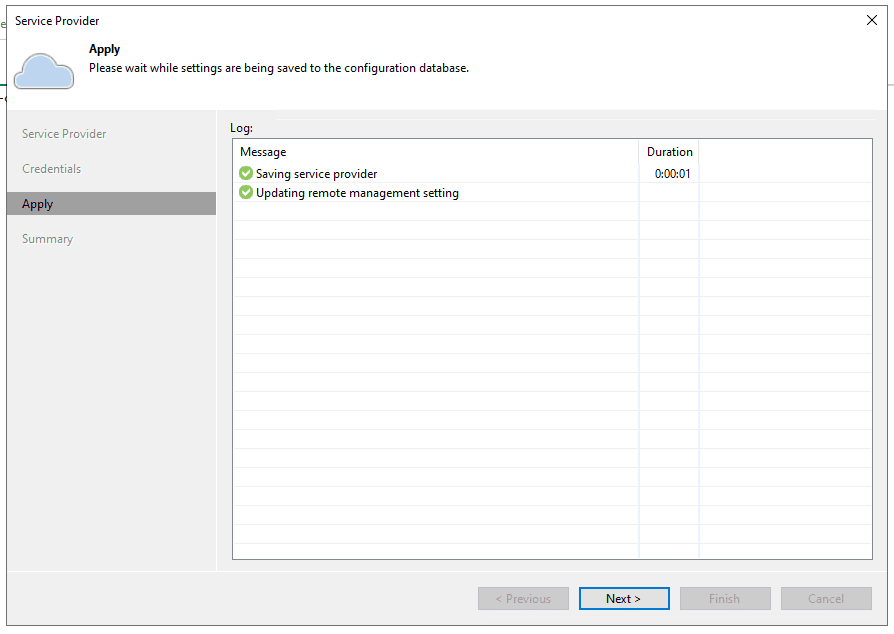
Click Next, review the summary, then click Finish on the last step.
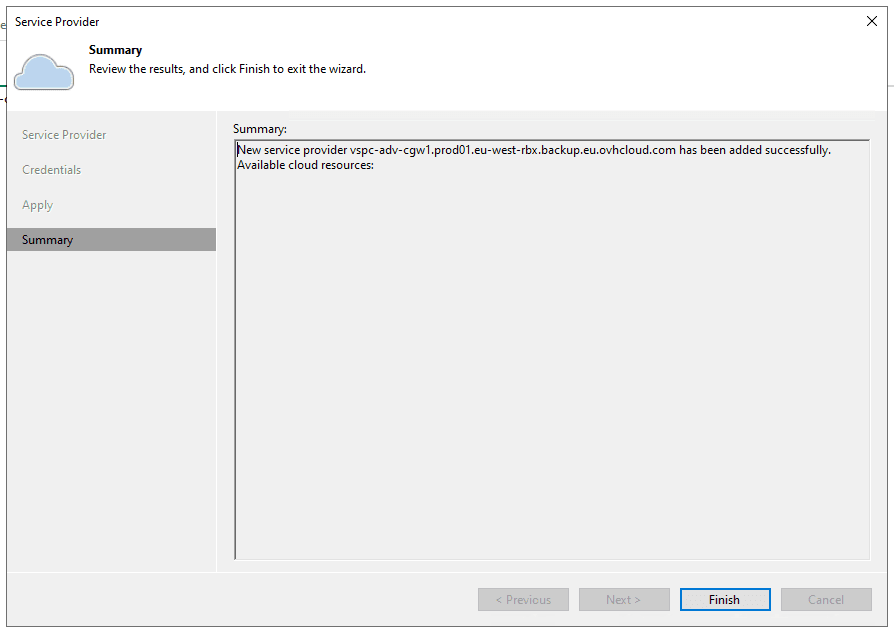
The console then runs a Service Provider Rescan job, which must complete with the Success status.
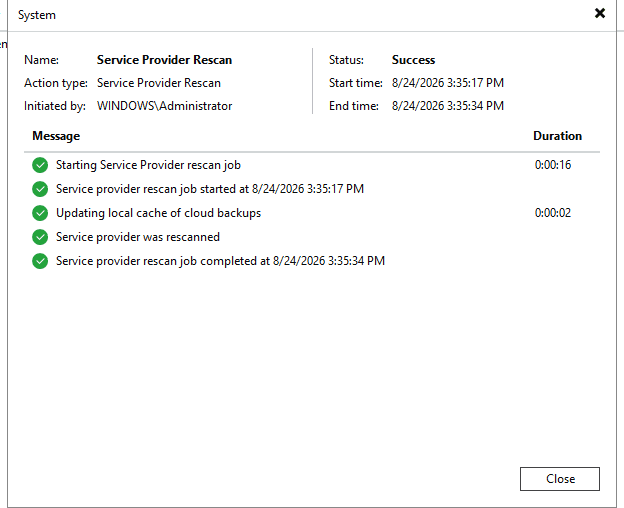
The OVHcloud service provider then appears in the Service Providers list of your VBR console.
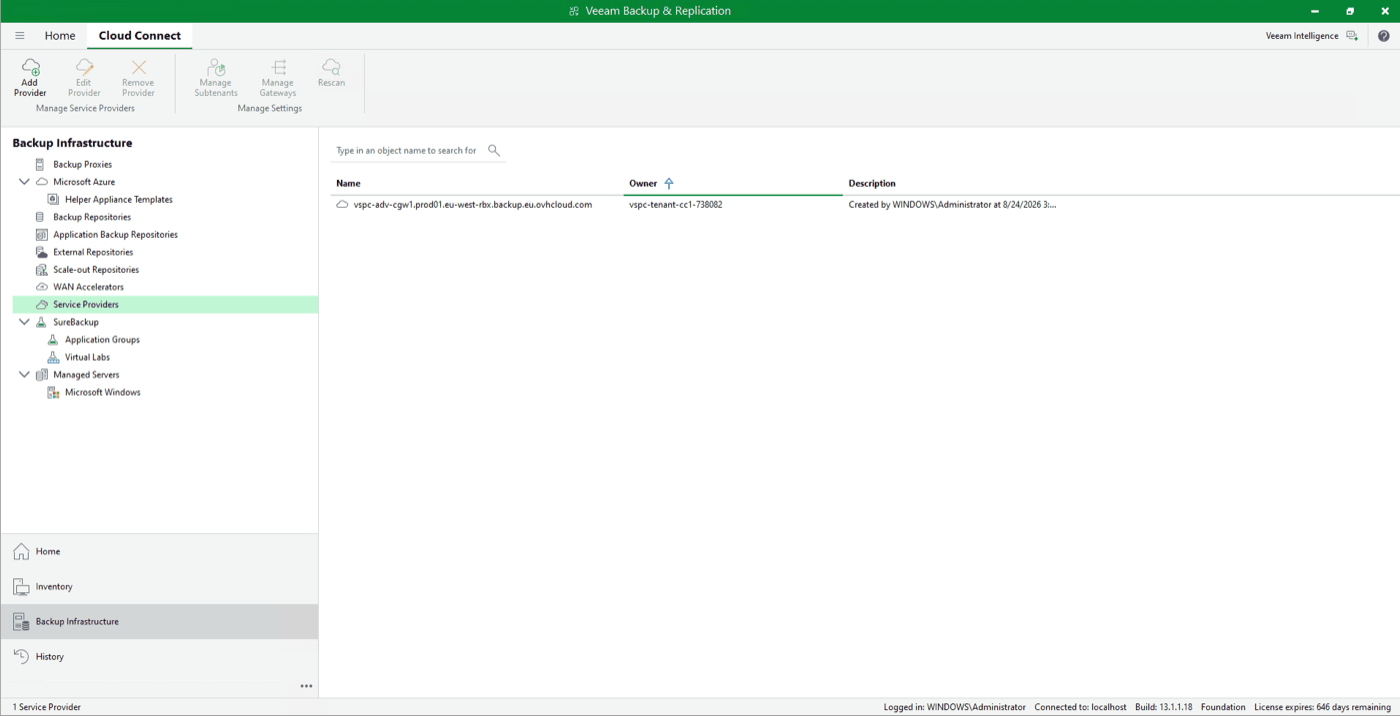
The management agent is deployed on your VBR server and the connection to the OVHcloud VSPC is established.
On a VBR server running Windows, enrolling the server takes at least 15 minutes after the wizard completes. During this time, it is normal for your server not to appear in the VSPC yet, and for the licence not to be applied yet. Wait for this delay to elapse before troubleshooting.
Step 6: Check the licence on your VBR
Once the connection is established, check that the licence provided by OVHcloud is correctly in place:
-
In the Veeam Backup & Replication console, open the main menu and click
License.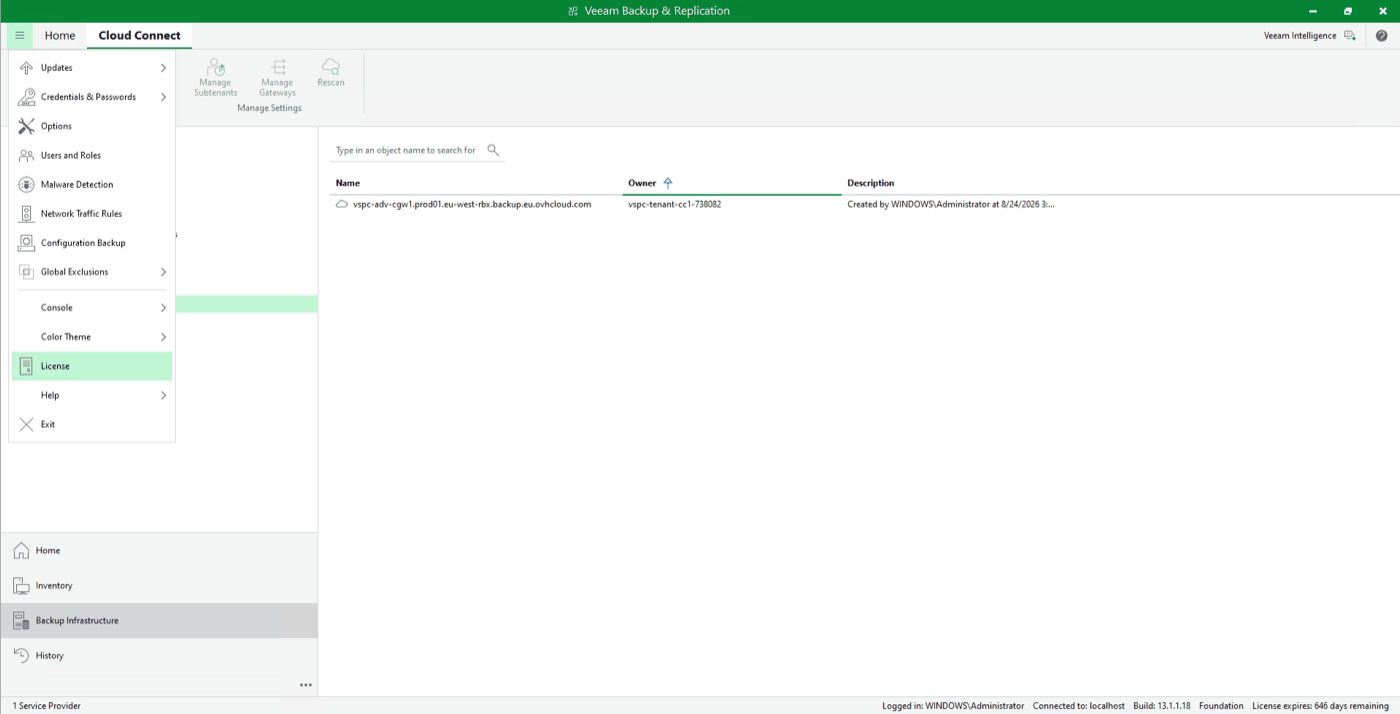
-
In the
License Informationwindow, check the following:
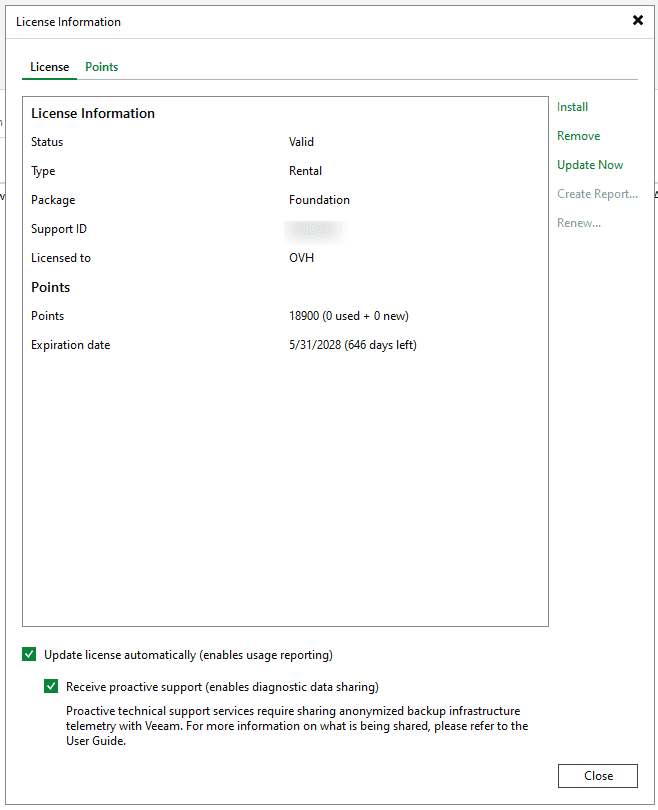
If the status is Valid and the capacity matches your order, the licence has been applied correctly.
Step 7: Check the connection from the VSPC
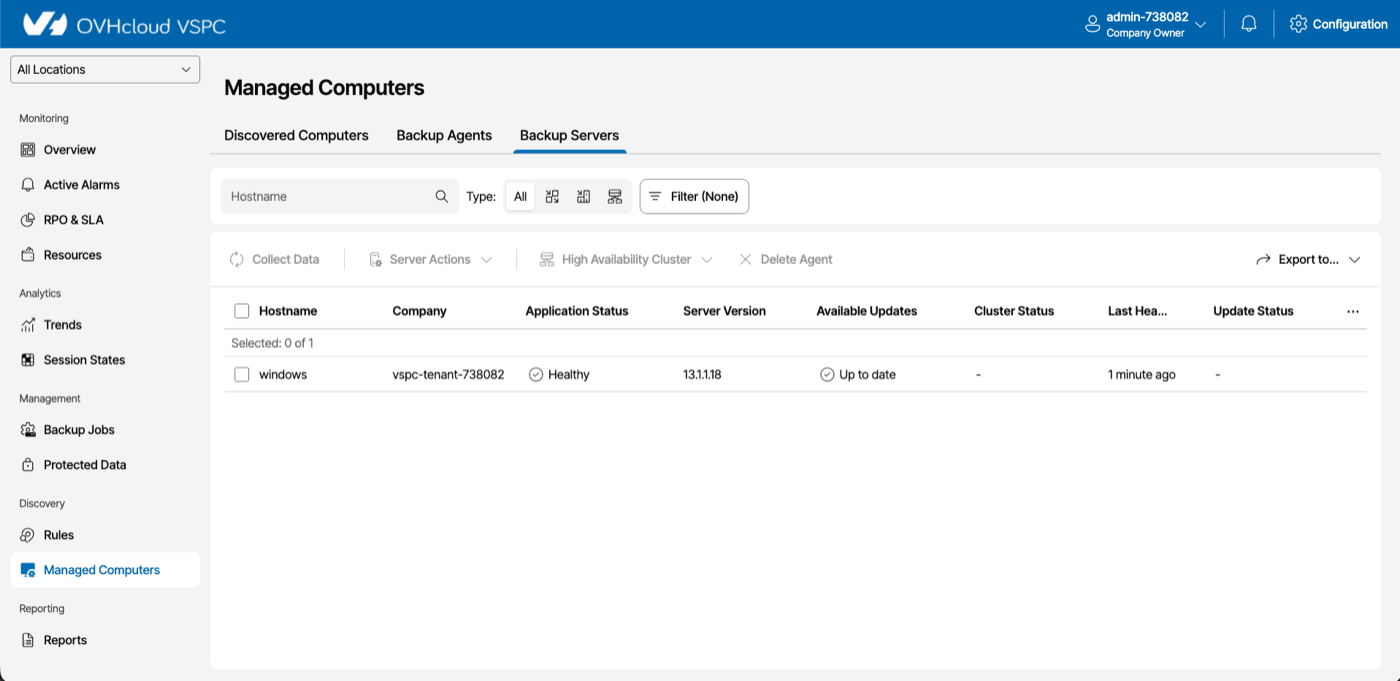
You can also check the connection from the VSPC portal, using the Company Owner account received in the delivery email:
-
Log in to the VSPC portal. The access link is available in the
General informationtab of the Backup Licenses product, underVSPC access.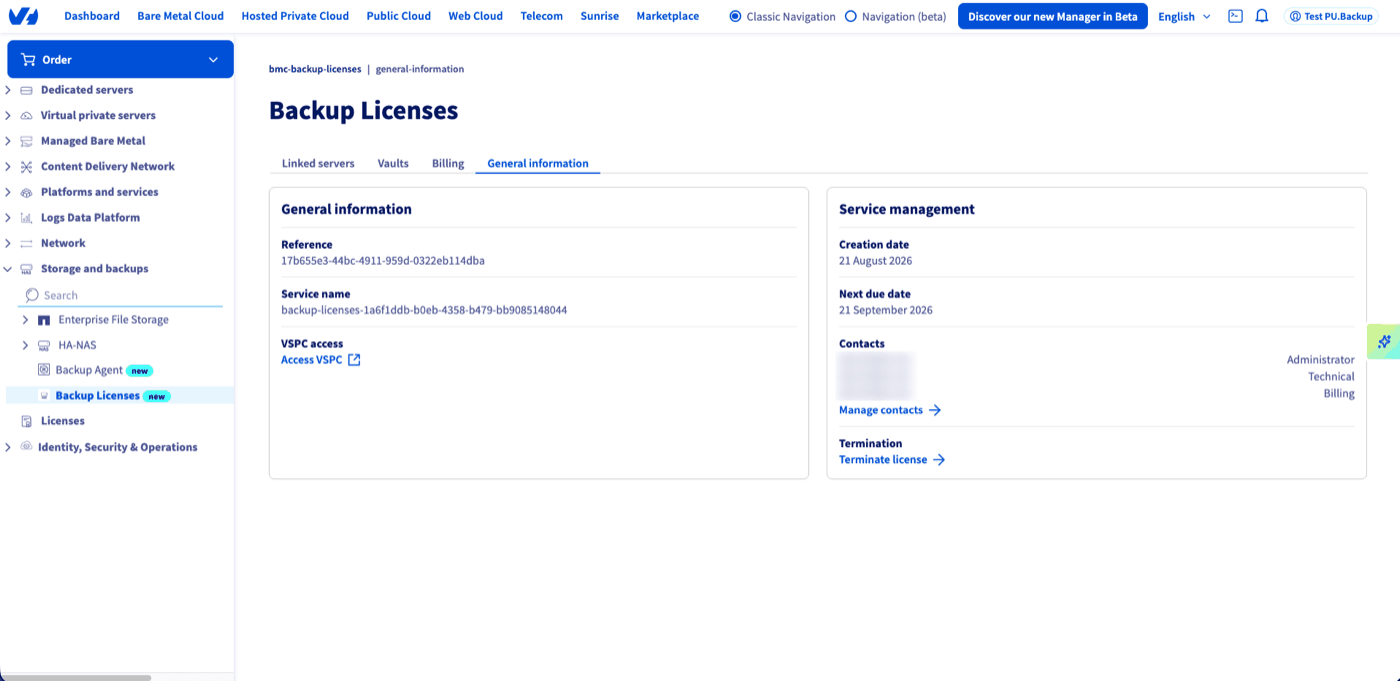
-
Go to the
Managed Computerssection,Backup Serverstab. -
Check that your VBR server appears with the
Healthystatus.
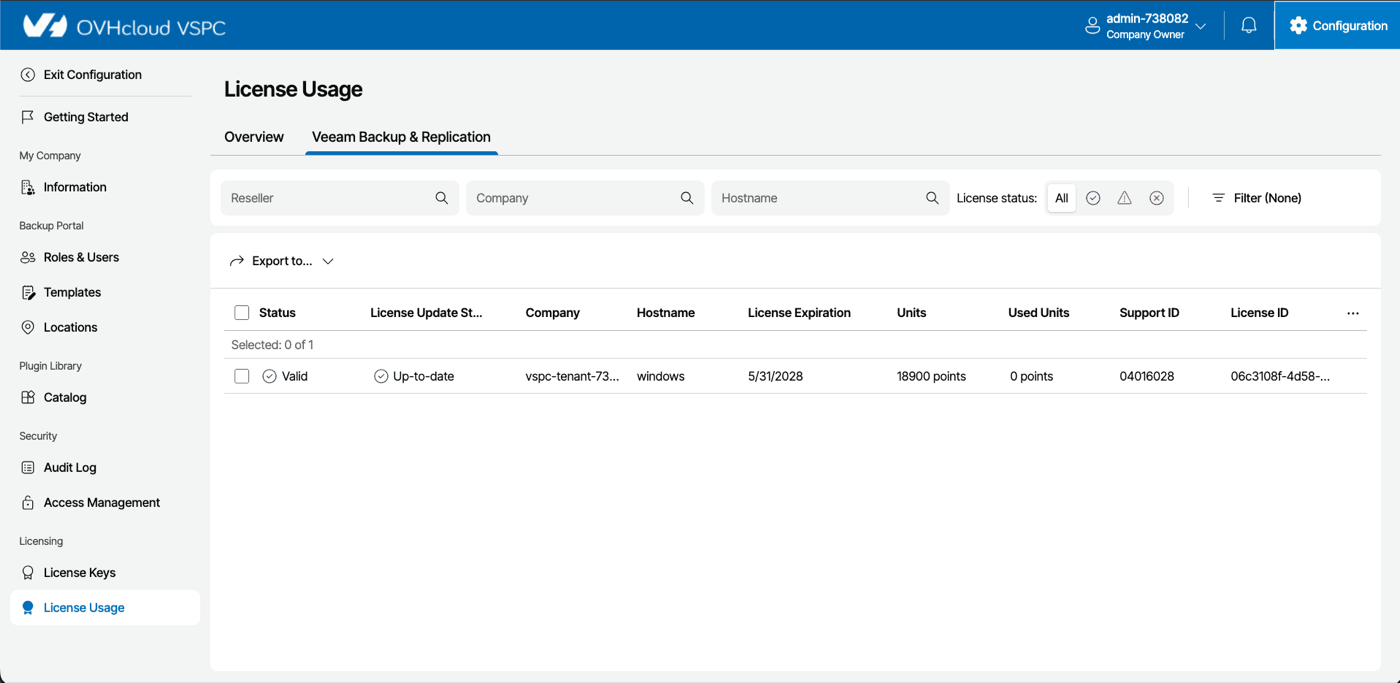
You can also check the licence assignment from Configuration > License Usage, Veeam Backup & Replication tab: your server must appear there with the Valid status, its expiry date and the number of points allocated.
Once enrolment is complete, your server also appears in the Linked servers tab of your Control Panel, along with its licence, VBR version and operating system.
Important points
- Do not connect the same VBR server twice to the VSPC with different credentials: this would skew the data displayed.
- If MFA (multi-factor authentication) is enabled on the VBR server, it may appear as
Inaccessiblein the VSPC. See Veeam KB 4431 for the resolution procedure. - If your VBR is the primary node of a high availability cluster, the VSPC registers it as a cluster node: the secondary node must then be connected separately.
Go further
- Backup Licenses - How Vaults work
- Backup Licenses - Known restrictions
- Backup Licenses - Troubleshooting guide
- Backup Licenses - Migrating from Veeam Enterprise to Backup Licenses
Join our community of users.