
Configuring the firewall on Linux with iptables
Find out how to secure a server with iptables
Objective
Your VPS is equipped with a firewall. Firewalls create a barrier between a trusted network and an untrusted network. Firewalls work by defining rules that govern both authorised and blocked traffic. The firewall utility developed for Linux systems is iptables.
Find out how to secure a server with iptables.
Information regarding OVHcloud service administration and how to find appropriate assistance
When using OVHcloud guides, please be aware of the following conditions:
- User instructions aim to provide as many details as possible but cannot cover individual use cases. You might need to adapt the pertinent actions to your requirements.
- The OVHcloud ecosystem is built for flexibility and freedom of choice. Customers are therefore responsible for the secure and proper configuration of their services. To prevent data loss, we strongly recommend to apply backup strategies to all your important data.
- Our guides and tutorials may reference third-party software or services in combination with OVHcloud solutions. The technical support provided by OVHcloud does not include the configuration of systems or products outside of our responsibility. This includes but is not limited to:
- Operating systems and user interfaces (Windows, Debian, Plesk, etc.).
- Any other third-party software (FTP clients, email software, etc.).
- Services offered by other providers (DNS, APIs, user interfaces, etc.).
To receive the appropriate assistance for any issues you might experience, follow these guidelines:
- You seek personalized advice or you would like to discuss a topic that is not covered in detail by our documentation?
Join the OVHcloud Community to search for your topic and reach out to other users. - You need to report an incident regarding your OVHcloud service or you are experiencing difficulties in the OVHcloud Control Panel?
Create a support request in our Help Centre. - You require professional assistance for your project or you need help with tasks outside our support scope?
Visit our partner portal to search for experts who are familiar with OVHcloud solutions. - You are looking for more detailed information regarding our support levels and Professional Services?
Please visit our web pages for OVHcloud support levels and OVHcloud Professional Services.
You can participate in improving our documentation:
- You would like to share feedback to improve a guide page or you want to report insufficient information on a specific page?
Use the "Was this page helpful?" buttons at the bottom of the page to let us know. - You would like to propose a specific documentation update?
Use the "Edit this page" function, available at the bottom of the page and in the sidebar.
Requirements
- A Virtual Private Server in your OVHcloud account
- Administrative access (root/sudo) to your server via SSH
Instructions
This guide lists the commands for an Ubuntu Server distribution.
This guide is for general use. You may need to adapt some commands depending on the distribution and/or operating system you are using. Some tips may suggest using third-party tools. If you have any questions about their use, please refer to their official documentation.
Most of the rules outlined in this guide assume that your iptables is configured by default to DROP incoming traffic, and that you selectively authorize incoming traffic. If you intend to set up a different type configuration, we recommend that you consult the additional documentation.
Step 1: Update your system
Distribution and operating system developers offer frequent software package updates, very often for security reasons. Keeping your distribution or operating system up-to-date is essential for securing your server.
Please refer to our guide on securing a VPS for more information.
Step 2: Install the iptables firewall in Ubuntu
There are two different versions of iptables, for IPv4 and IPv6. The rules we cover in this Linux iptables tutorial concern IPv4. To configure iptables for IPv6, you must use the iptables utility. These two different protocols do not work together and must be configured independently.
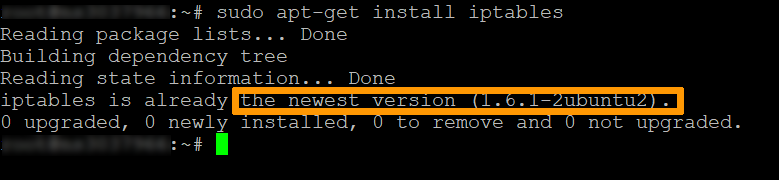
iptables is installed by default on most Linux systems. To confirm that iptables is installed, use the following command:
The example output in Ubuntu confirms that the latest version of iptables is already present:
Typically, an iptables command is as follows:
Here is a list of some common iptables options:
- -A --append: Adds a rule to a string (at the end).
- -C --check: Finds a rule that matches the requirements of the string.
- -D --delete: Removes the specified rules from a string.
- -F --flush: Deletes all rules.
- -I --insert: Adds a rule to a string at a given position.
- -L --list: Displays all rules in a string.
- -N --new chain: Creates a new string.
- -v --verbose: Displays more information when using a list option.
- -X --delete-chain: Deletes the supplied string.
Step 3: Check the current status of iptables
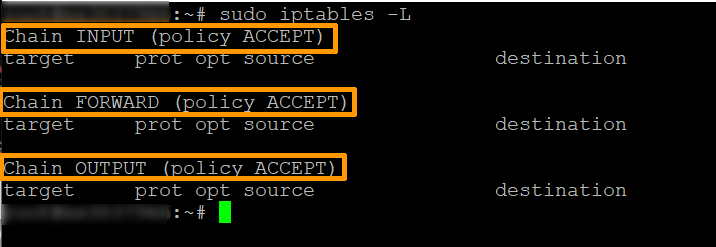
To display all of the current rules on your server, enter the following command in the terminal window:
The system displays the status of your channels.
The output will list three strings:
Step 4: Allow traffic on localhost
To allow traffic from your own system (the localhost), add the input string by entering the following:
This command configures the firewall to accept traffic for the localhost (lo) interface (-i). From now on, everything that comes from your system will pass through your firewall. You must set this rule to allow applications to communicate with the localhost interface.
Step 5: Allow traffic on specific ports
These rules allow traffic on the different ports that you specify using the commands listed below. A port is a communication endpoint specified for a specific type of data.
To allow HTTP Web traffic, enter the following command:
To allow only inbound SSH (Secure Shell) traffic, enter the following (note that we use the default SSH port number 22. If your port number is different, make sure to adjust the commands accordingly):
To allow HTTPS Internet traffic, enter the following command:
The options work this way:
- -p: Checks the specified protocol (tcp).
- --dport: Specifies the destination port.
- -j jump: Performs the action.
If you lose access to your server, you can always use the KVM/IPMI tool to access it again and modify your configuration or delete your rules.
For more information on accessing this tool, please refer to this guide.Step 6: Control traffic by IP address
Use the following command to accept traffic from a specific IP address.
Replace the IP address in the command with the IP address you want to authorise.
You can also block traffic from an IP address:
Replace the IP address in the command with the IP address you want to block.
You can reject traffic from an IP address range with the following command:
The iptables options we used in the examples work as follows:
- -m: Matches the specified option.
- -iprange: Instructs the system to wait for a range of IP addresses instead of one.
- --src-range: Identifies the IP address range.
Step 7: Delete unwanted traffic
If you are defining iptables firewall rules, you must prevent unauthorised access by removing all traffic from other ports:
The -A option adds a new rule to the string. If a connection goes through ports other than those you have defined, it will be discontinued.
If you type this command before performing step 5, you will block all access including the current one, SSH access. This is particularly problematic on a machine you access remotely.
Step 8: Delete a rule
A more precise method is to delete the line number of a rule.
First, list all rules by entering the following:
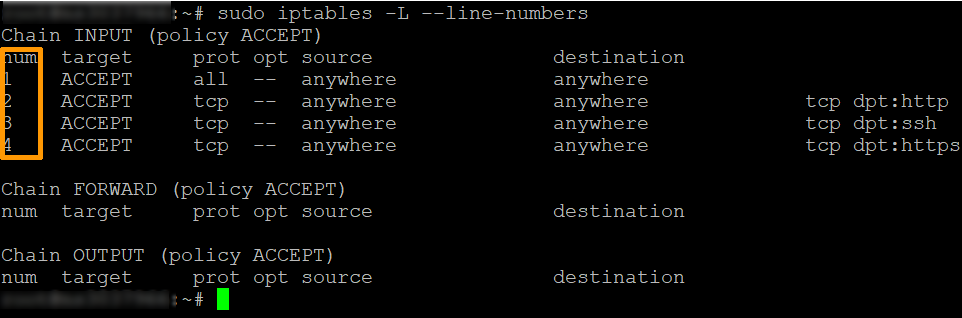
Locate the line for the firewall rule you want to remove and run this command:
Replace Number with the rule line number you want to delete.
Step 9: Save your changes
When the system is restarted, iptables does not keep the rules you created. Whenever you configure iptables on Linux, any changes you make apply only until the next reboot.
On Ubuntu-based systems, the iptables-persistent package takes care of restoring your rules at boot. Install it with:
During installation, you are asked whether to save the current IPv4 and IPv6 rules. Answer Yes to keep the rules you have just created.
Afterwards, save your rules at any time with:
Your IPv4 rules are written to the file /etc/iptables/rules.v4 (and your IPv6 rules to /etc/iptables/rules.v6).
The next time your system boots, iptables will automatically reload the firewall rules.
You can now configure basic iptables firewall rules for your Linux server. Feel free to experiment because you can always delete the rules you don't need, or empty all the rules and start over.
Go further
Join our community of users.