AI Notebooks - Manage and use data in a notebook via UI
Learn how to manage and access data from your Object Storage in your Notebook
Objective
This guide shows how to access Object Storage data from your notebooks via the OVHcloud Console.
Requirements
- a Public Cloud project in your OVHcloud account
- a Public Cloud user with
AdministratororAI Operatorrole, see here for more information
OVHcloud Console Access
- Direct link:
- Navigation path:
Public Cloud> Select your project >Storage>Object Storage
Upload data to your Object Storage
First, you need to push some data to the Object Storage before accessing it from the notebook.
Click Object Storage under Storage in the left-hand menu of your Public Cloud project. Your containers are listed in the Containers tab.
You can upload different types of data: datasets, code, notebooks, connection weights, text or csv files, etc.
Let's assume that a file named my-dataset.zip exists locally on your computer and contains your dataset. You will be able to upload it into an object container in your Object Storage by following these steps.
1- Create your container
In the Containers tab, click Create an object container. Select the Container type (Swift API or S3-compatible API), name your container my-dataset, then select the deployment mode and the region, and click Create.
To optimize the download and upload times, we advise you to store your data in the same place as your notebook (GRA or BHS).
To attach an S31 compatible bucket to your notebook, you first need to declare it as a datastore in the S3 volumes tab of the Configuration page of AI Notebooks. Find out more in the S3 compatible Object Storage guide.
You have created your container to host your dataset. You are now ready to load your data!
2- Add objects to your container
In the Containers tab, click the name of your container my-dataset: its Objects tab opens. Click Add an object, then click Browse files, select your local my-dataset.zip file and click Upload.
You will now see your my-dataset.zip file displayed in your object container.
You can also create a new empty my-weights container in which you can save your connection weights (or your validated model) at the end of your training.
We assume that we now have two object containers available:
my-dataset, containing the filemy-dataset.zipmy-weights, empty
You are now ready to launch a notebook with your data!
Launch a notebook with attached data
To launch an AI notebook, click AI Notebooks under AI in the left-hand menu of your Public Cloud project, then click Create a notebook.
For the name, flavor, framework and editor of your notebook, please refer to this tutorial.
Choose the notebook region
In the Region section, you can choose between 2 datacenters for the storage of your notebook: GRA or BHS.
Attach container or a Git repository
You can attach your different types of data to your notebook in the Advanced configuration section of the creation page.
To attach a container, turn on the Volumes switch and click Add a volume. In the Add a datastore volume dialog, select the Datastore that holds your container, then the Container (you can also create a new one on the fly by typing its name), enter the Mount path and choose the Permission. Then click Add.
Access with Read-Only permissions
You can load the container my-dataset in the /workspace/dataset directory, with the Read only permission.
You will not be able to modify the dataset from this notebook because you loaded it with Read only permission.
Read only permissions are to ensure you don't modify your data by mistake. If you want to modify data from your notebooks, to store a trained neural network for example, you can use the Read / write permission instead.
Access with Read-Write permissions
Similarly to the Read only mode, you can load data with the Read / write permission: for example, load the container my-weights in the /workspace/weights directory.
Once you have some data that you want to save from the notebook to Object Storage (connection weights in this example), you can simply write it to the /workspace/weights folder.
This folder will be uploaded to your Object Storage when you stop your notebook.
While your notebook is in the Stopping state, the upload is still in progress. Once the state changes to Stopped, all the data has been uploaded to your Object Storage.
Attach a public Git repository
If Python code, notebooks or other files are available on a public GitHub repository, you can attach them to your notebook.
To be able to edit and make changes easily, use the Read / write permission.
Turn on the Git Public switch and click Add a repository. Enter the URL in the Public git repository field, then the Mount path (for example /workspace/git-hub-repository) and the Permission, and click Add.
To make your repository URL valid, don't forget to add a .git at the end of the GitHub repository URL.
Use cached volumes
When loading large files from the Object Storage, it can take some time to download to your notebooks. In these cases, you can cache the volumes so that it does not need to be downloaded again when you start new notebooks that use the same data.
To do so, tick Cache the volume close to the instance in the Add a datastore volume dialog.
Cached volumes will be deleted at least 72 hours after the last notebook using it has stopped. Note that the cache is shared with all users in your project. The main consequence you need to be careful about is the fact that if someone else modifies the data in your cached volume, you will also see the modifications on your side.
Launch and access the notebook
Your notebook is now ready to be launched with your data! The attached volumes are listed in the summary of the creation page. Click Create the notebook.
Once the notebook is created, its attached volumes are listed in its Containers tab. You can add or detach volumes from this tab while the notebook is stopped.
You can read the Getting started page to know how to find your notebook URL.
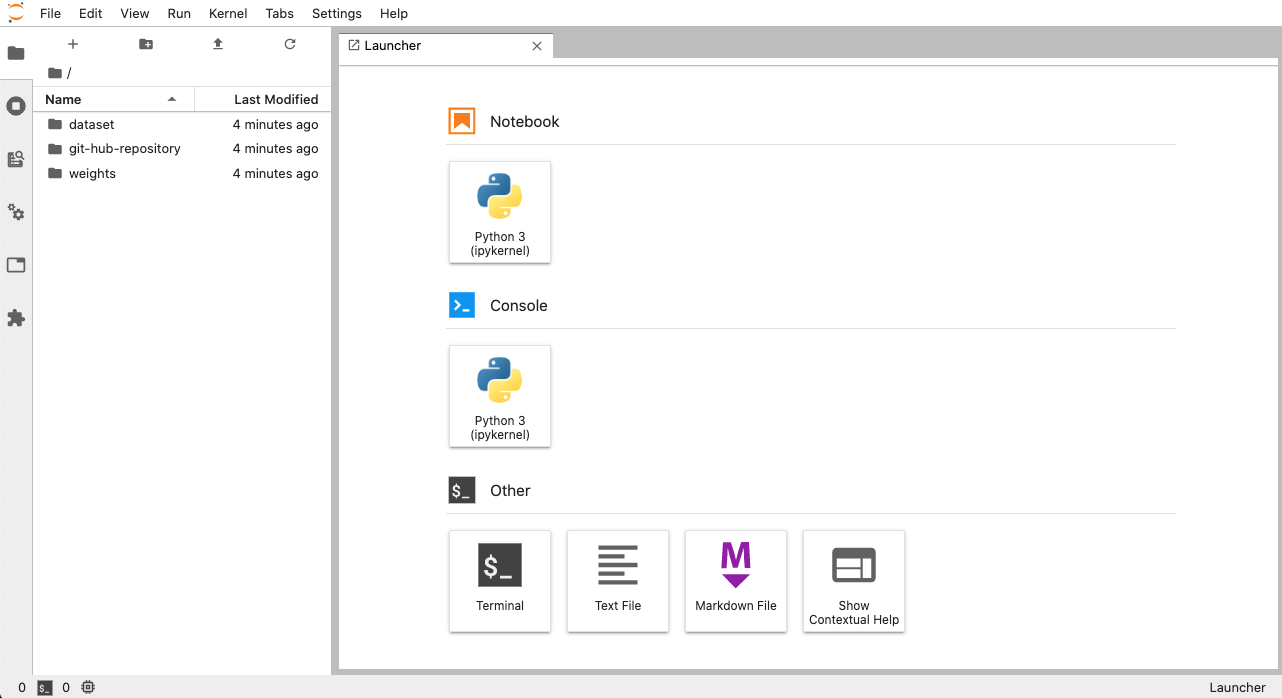
As soon as you access your notebook, you will see your different folders containing your data.
Feedback
Please send us your questions, feedback and suggestions to improve the service:
- On the OVHcloud Discord server
For training or technical assistance implementing our solutions, contact your sales representative or visit our Professional Services page to request a quote and have your project analysed by our experts.
1: S3 is a trademark of Amazon Technologies, Inc. OVHcloud's service is not sponsored by, endorsed by, or otherwise affiliated with Amazon Technologies, Inc.