
Manually migrate your email address
How to migrate your email address manually to another email address
Objective
You can migrate an email address automatically via our OVHcloud Mail Migrator tool. You can also migrate your email address manually using an email client.
Find out how to migrate your email address manually.
Information regarding OVHcloud service administration and how to find appropriate assistance
When using OVHcloud guides, please be aware of the following conditions:
- User instructions aim to provide as many details as possible but cannot cover individual use cases. You might need to adapt the pertinent actions to your requirements.
- The OVHcloud ecosystem is built for flexibility and freedom of choice. Customers are therefore responsible for the secure and proper configuration of their services. To prevent data loss, we strongly recommend to apply backup strategies to all your important data.
- Our guides and tutorials may reference third-party software or services in combination with OVHcloud solutions. The technical support provided by OVHcloud does not include the configuration of systems or products outside of our responsibility. This includes but is not limited to:
- Operating systems and user interfaces (Windows, Debian, Plesk, etc.).
- Any other third-party software (FTP clients, email software, etc.).
- Services offered by other providers (DNS, APIs, user interfaces, etc.).
To receive the appropriate assistance for any issues you might experience, follow these guidelines:
- You seek personalized advice or you would like to discuss a topic that is not covered in detail by our documentation?
Join the OVHcloud Community to search for your topic and reach out to other users. - You need to report an incident regarding your OVHcloud service or you are experiencing difficulties in the OVHcloud Control Panel?
Create a support request in our Help Centre. - You require professional assistance for your project or you need help with tasks outside our support scope?
Visit our partner portal to search for experts who are familiar with OVHcloud solutions. - You are looking for more detailed information regarding our support levels and Professional Services?
Please visit our web pages for OVHcloud support levels and OVHcloud Professional Services.
You can participate in improving our documentation:
- You would like to share feedback to improve a guide page or you want to report insufficient information on a specific page?
Use the "Was this page helpful?" buttons at the bottom of the page to let us know. - You would like to propose a specific documentation update?
Use the "Edit this page" function, available at the bottom of the page and in the sidebar.
Requirements
- An email service with OVHcloud, such as an Exchange, Email Pro, Zimbra or MX Plan solution (via the MX Plan or included in an OVHcloud web hosting solution)
- Access to the email accounts you want to migrate (the source accounts)
- Access to the OVHcloud email accounts that will be receiving the migrated data (the target accounts)
OVHcloud Control Panel Access
Email Pro:
- Direct link: Email Pro
- Navigation path:
Web Cloud>Email Pro> Select your platform
MX Plan:
- Direct link:
- Navigation path:
Web Cloud>MX Plan> Select your MX Plan service
Exchange:
- Direct link:
- Navigation path:
Web Cloud>Exchange> Select your platform
Instructions
First of all, check if automatic migration is possible using our OVHcloud Mail Migrator. To do this, please use our guide on Migrating email accounts with OVHcloud Mail Migrator.
In this guide, we have carried out operations on the most commonly used email software, i.e. Outlook, Mail on Mac OS and Thunderbird.
The following instructions are divided into two parts:
-
Exporting: By doing so, you can extract a full backup of your email account, and migrate it to another computer, email software, or import it to another account. If you need to move items from one email address to another address that is configured on the same email software, you can copy/paste or drag/drop one to the other. However, it is recommended that you use the export system of the software you are using.
-
Importing: This allows you to apply a backup that you have made on your new computer or software. Verify that the backup file you want to import is compatible with the email software you are using.
Outlook
If you have an OVHcloud Exchange email account, you can export it directly in PST format via the OVHcloud Control Panel.
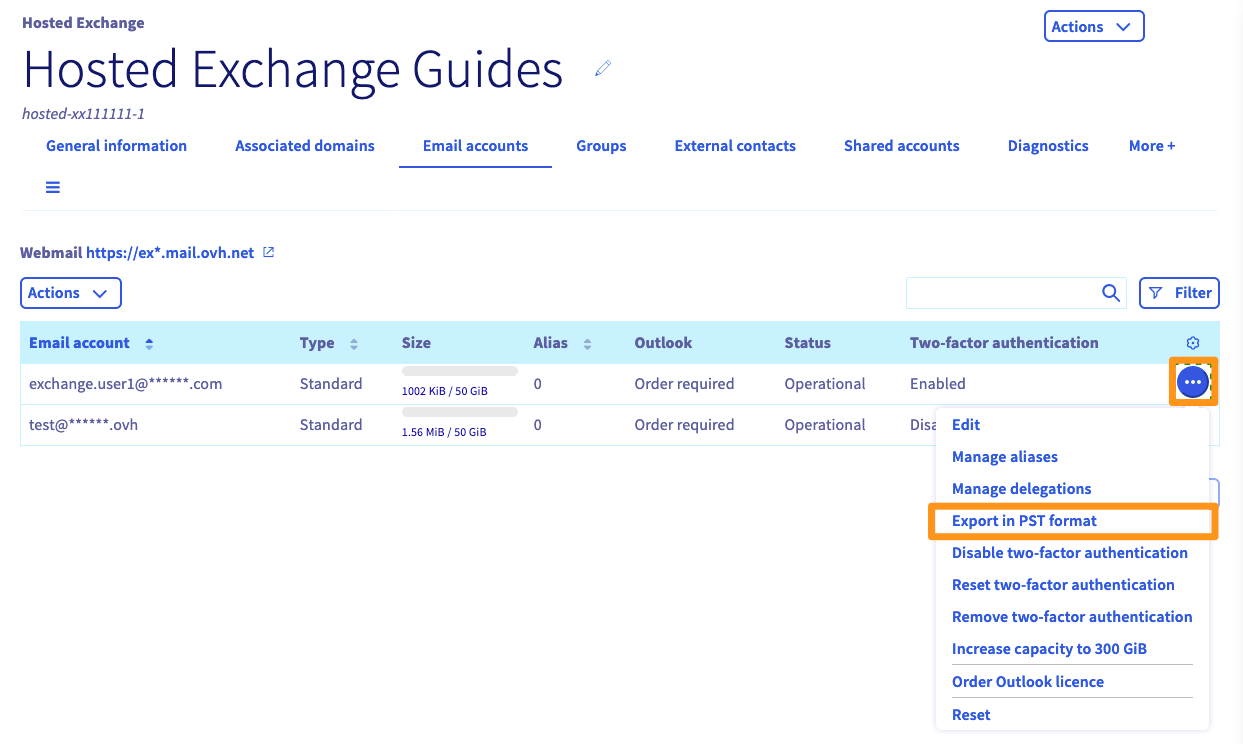
Once on your Exchange service page, in the Email accounts tab, click the ... button to the right of the email account you want to export, then Export in PST format.
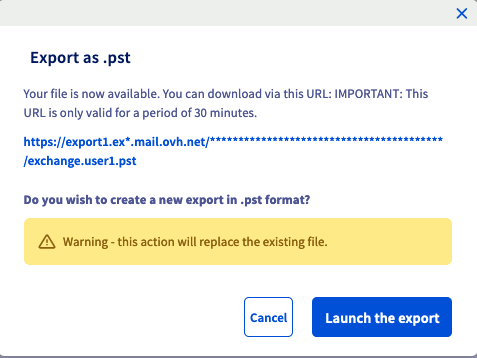
You will then need to wait for the export process to complete, which may take from a few minutes to several hours, depending on the size of the export. At the end of it, you just need to return to the Export in PST format button to retrieve a link to download the file.
Windows
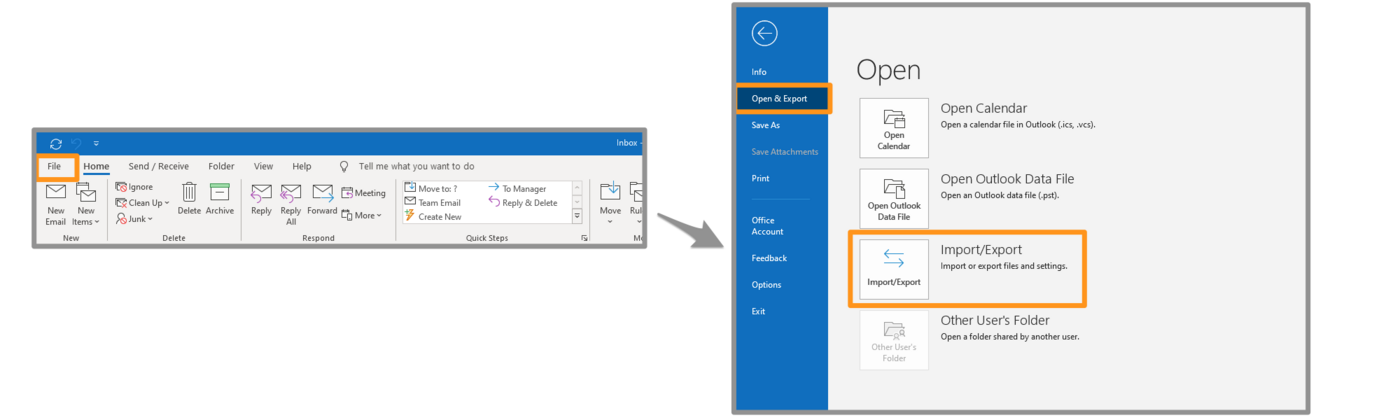
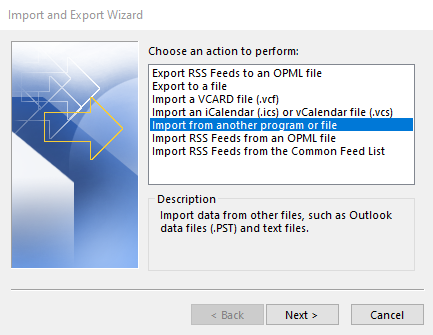
- Click
Filein the top left-hand corner, thenOpen and Export, and thenImport/Export.
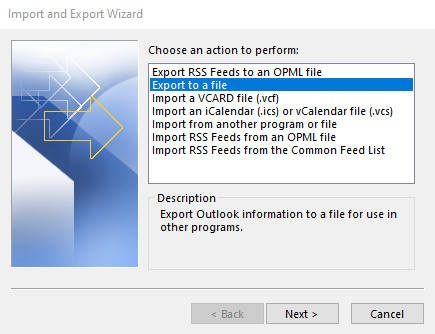
- Select
Export to a fileand then clickNext.
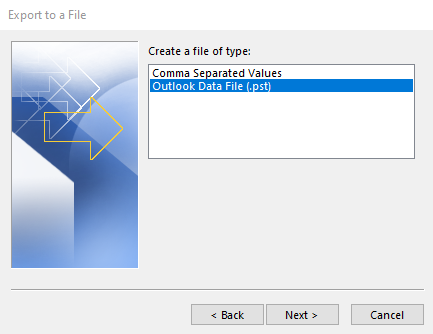
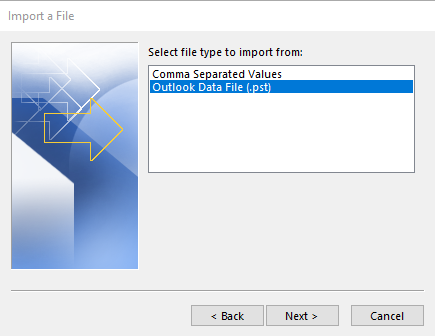
- Select
Outlook Data File (.pst)and clickNext.
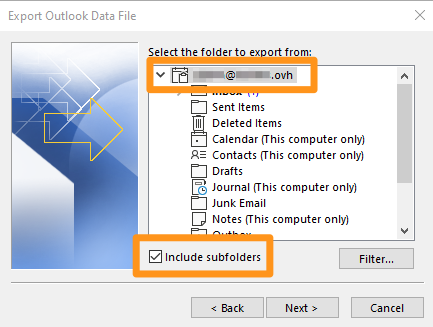
- Select the name of the email account to export.
You can only export one account at a time.
Select Include subfolders, then click Next.
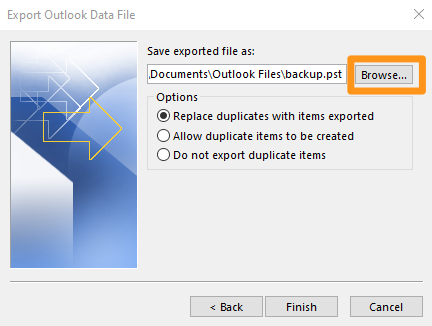
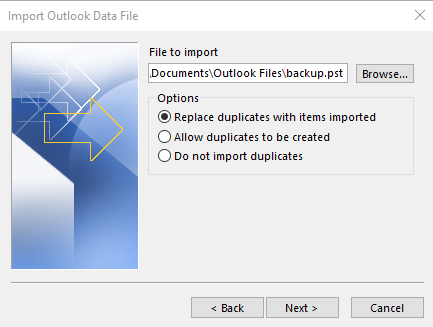
- Choose the destination folder for your backup and enter a name for it by clicking
Browse. Select the option you want, and then clickFinish.
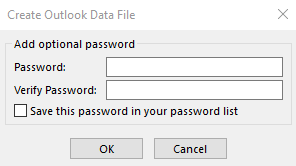
Your file is being exported. When you create a file, you will be asked to set a password. This is optional.
Mac OS
In the Tools tab of your Outlook window, click Export.

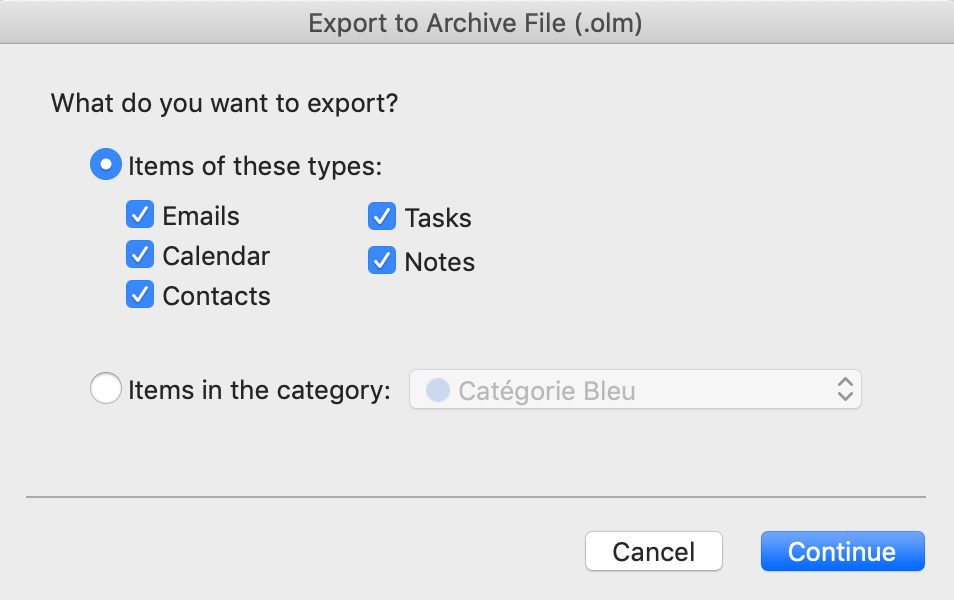
In the Export to archive (.olm) window, tick the items you want to add to your backup file, then click Continue.
Then select the destination folder for your backup, and click Save.
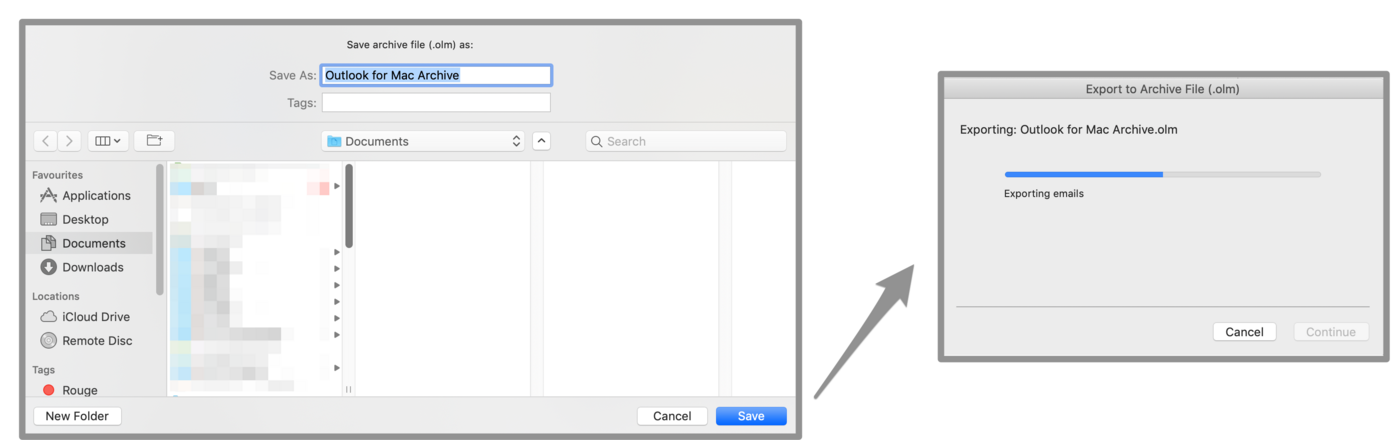
A progress window will appear, click Continue at the end of the operation. You will find your backup file in the folder you selected earlier.

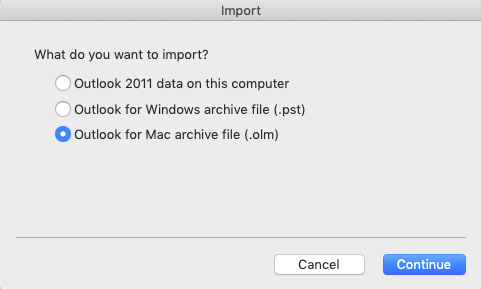
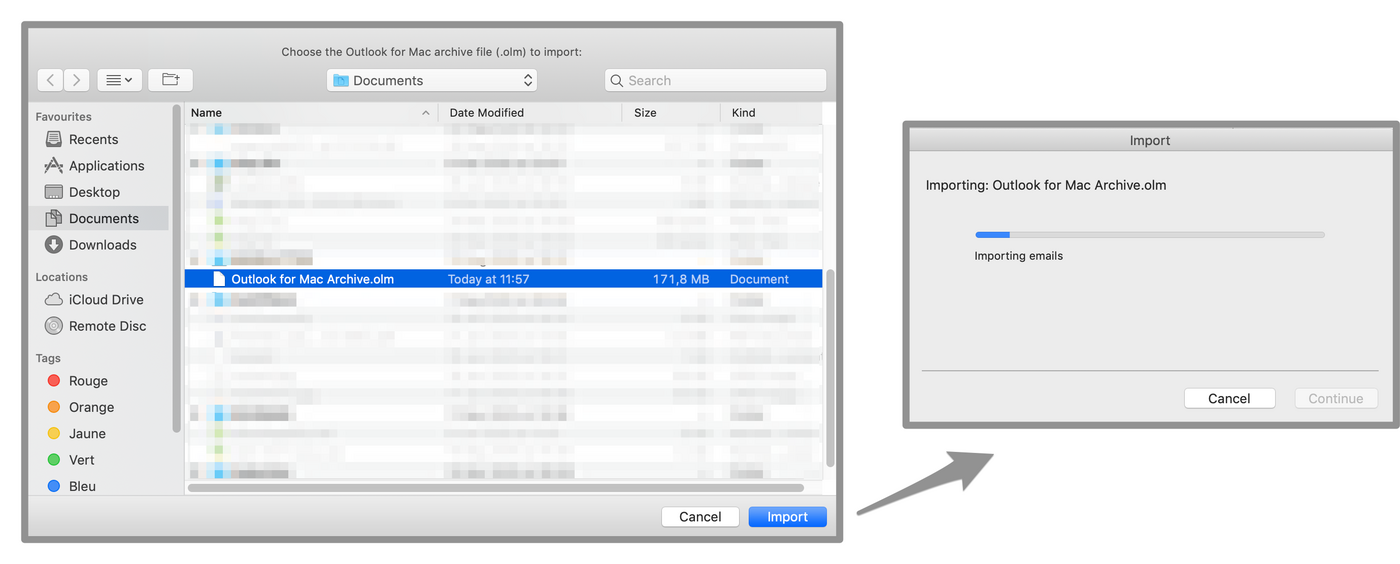
Mail on Mac OS
In the left-hand column, select one or more email accounts. Click Mailbox in the horizontal menu, and then click Export Mailbox.
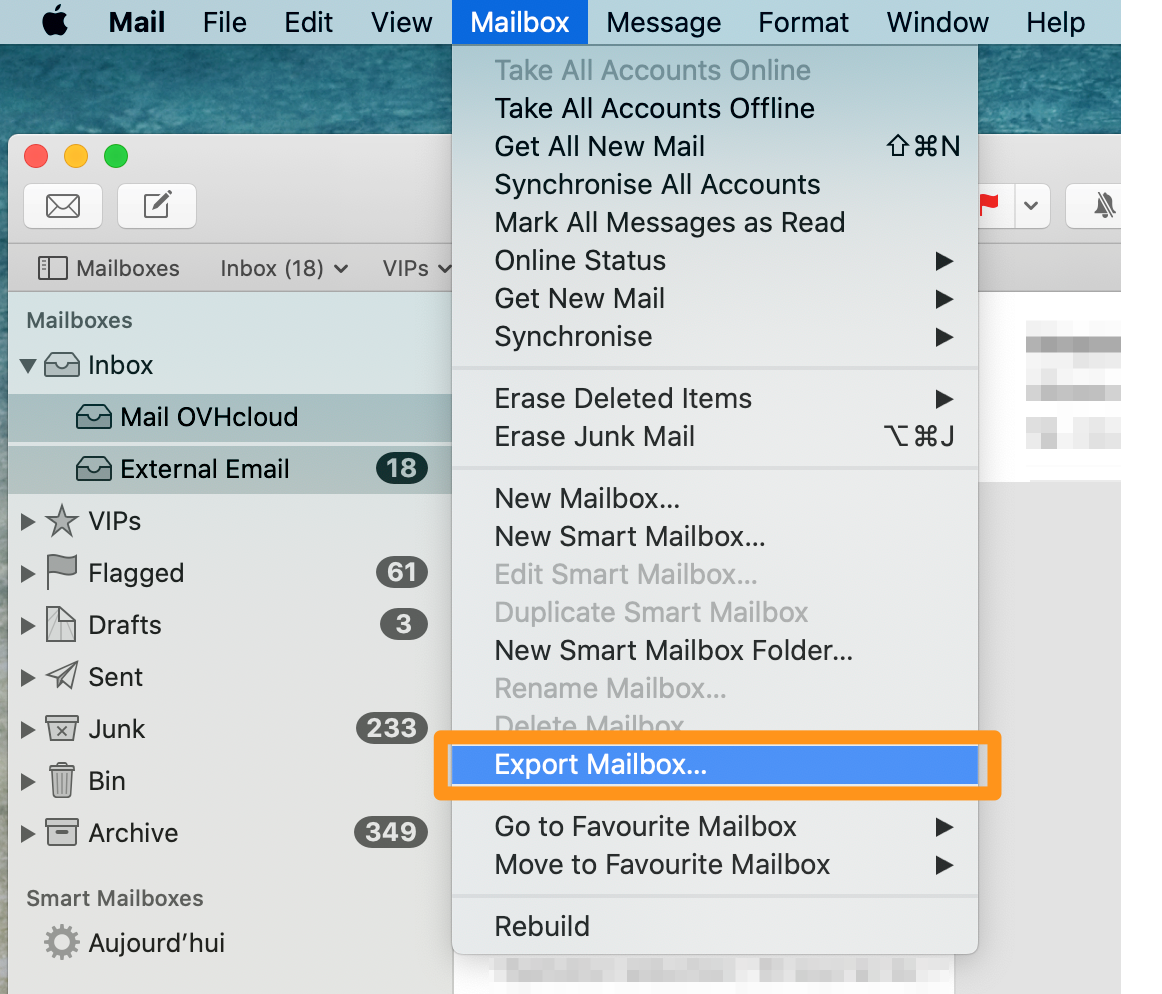
Select the folder you want, or create a new folder, and then click Choose.
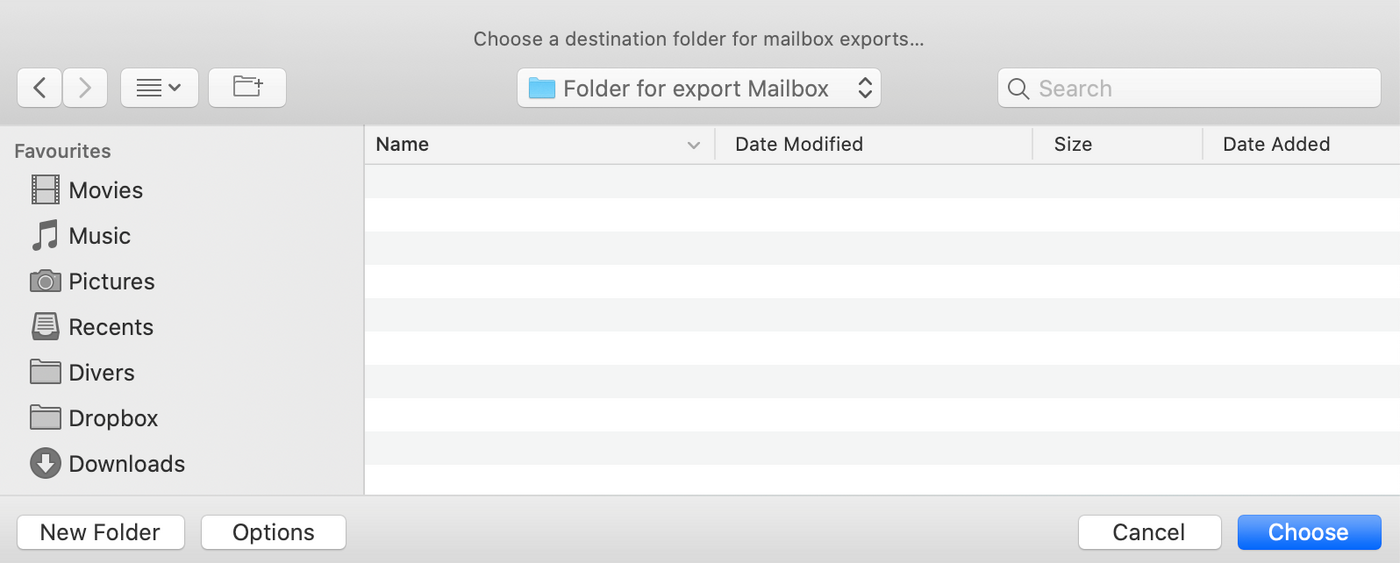
Your export is in the form of a .mbox file.
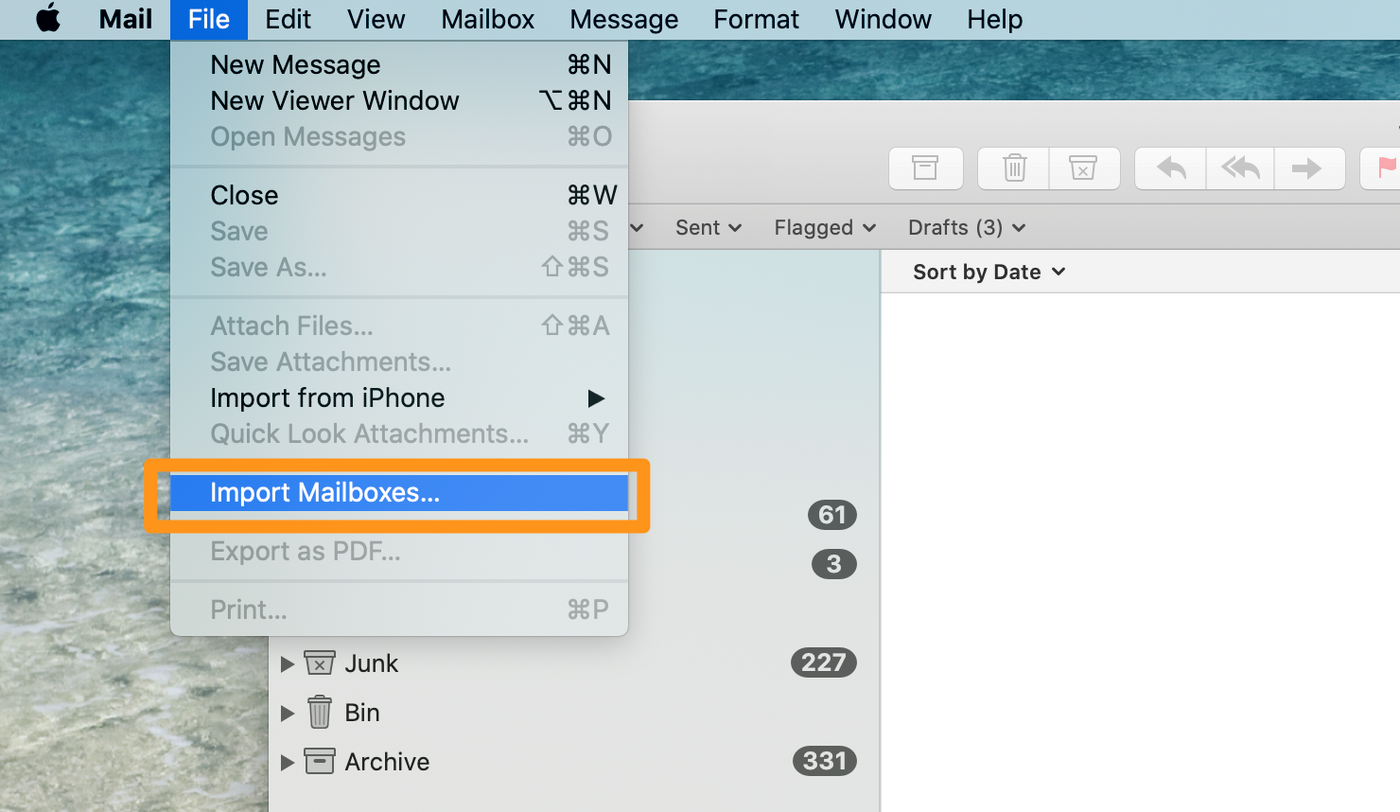
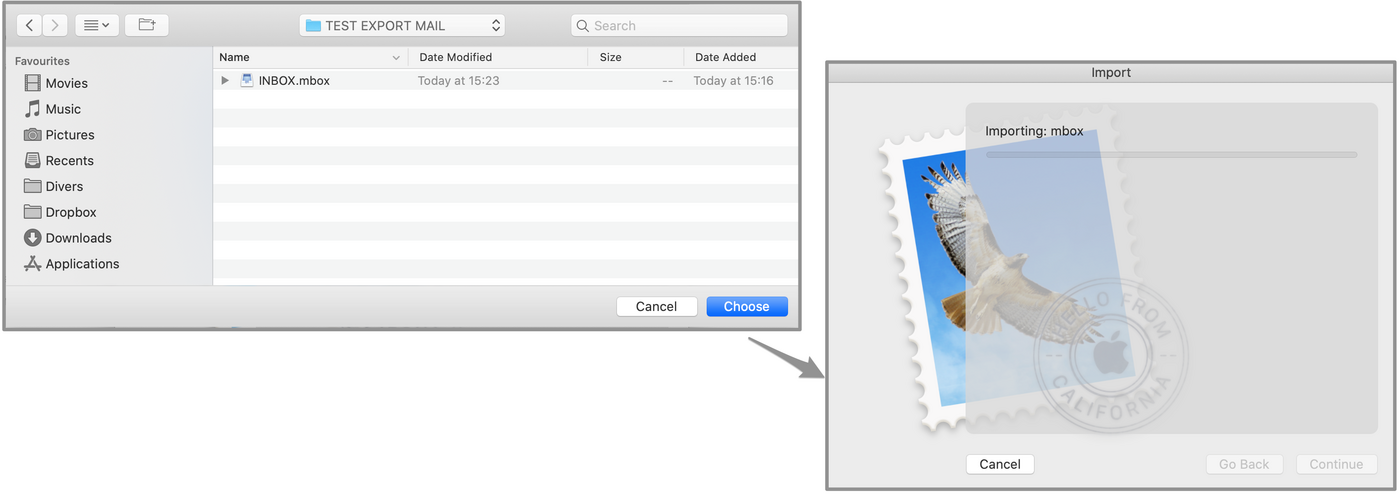
Thunderbird
There is currently no native feature to export or import an email account from Thunderbird. However, you can save a Thunderbird profile. It contains all accounts and emails locally stored on your computer. We will look at how to back up a Thunderbird profile and reintegrate it into a new Thunderbird instance.
In the main window, click on the menu in the top right-hand corner, then Help, then Troubleshooting Information.
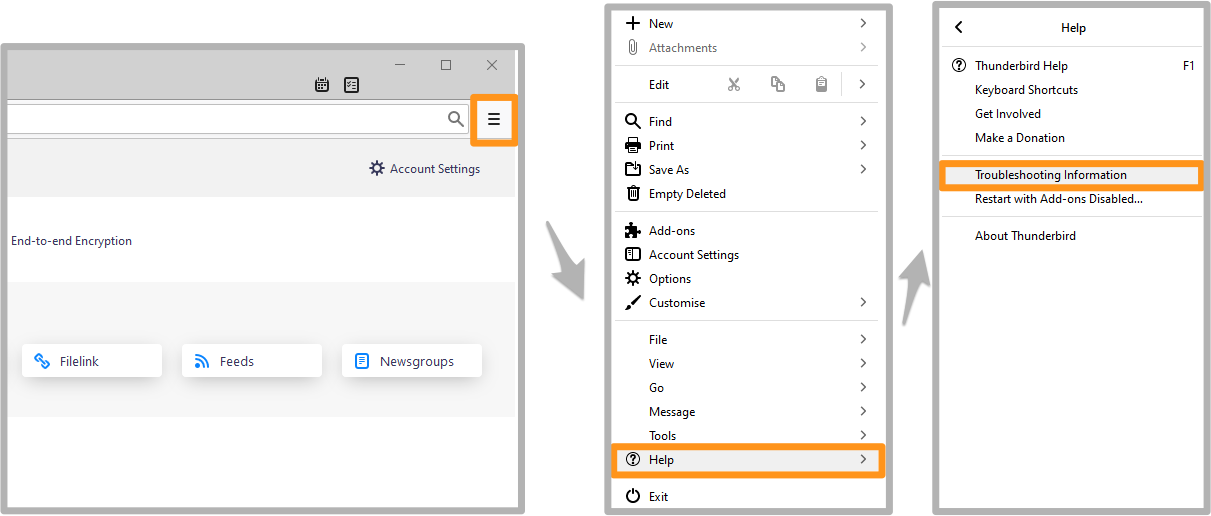
A table appears. Identify the Profile Folder line and click the Open Folder button.
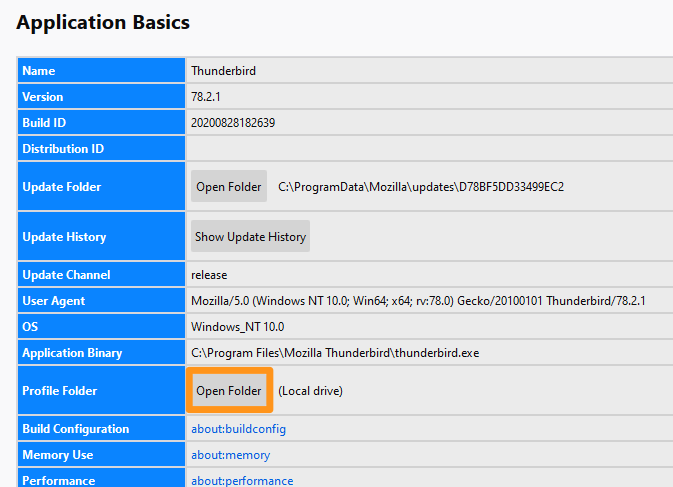
You will then be directed to the profile folder. Move up one folder in the tree.
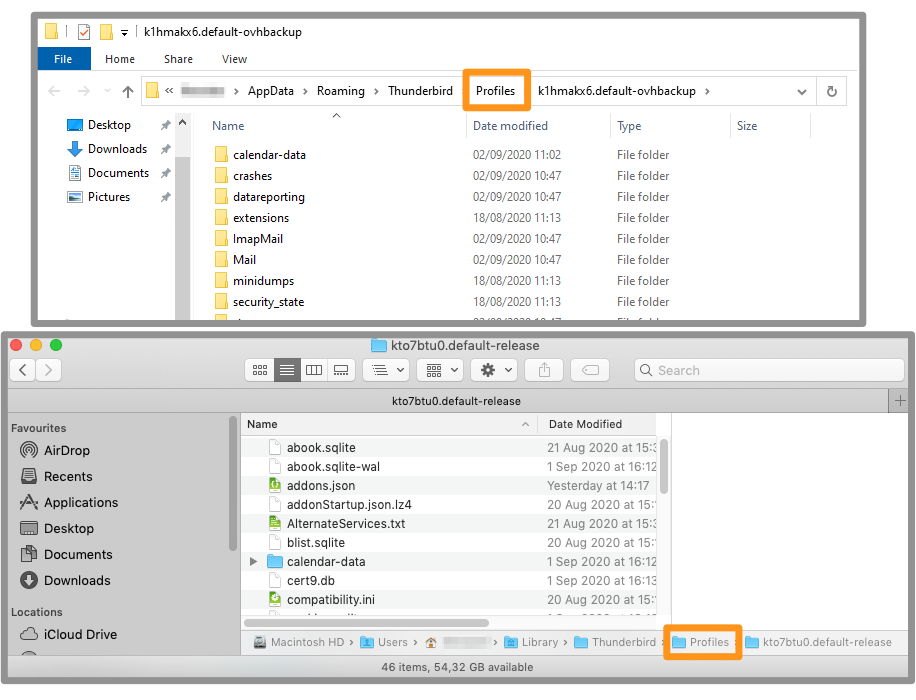
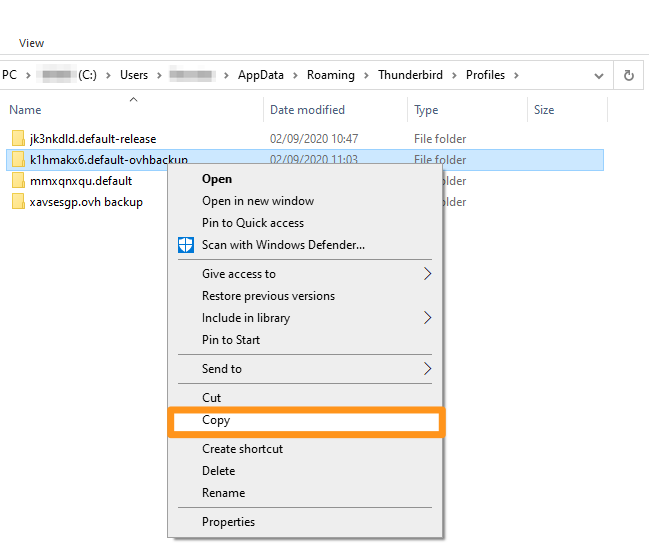
Right-click the profile folder and paste it into the folder or media of your choice.
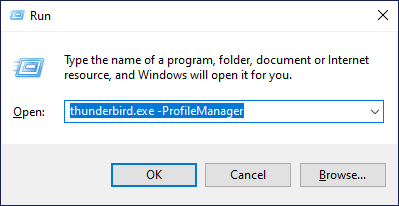

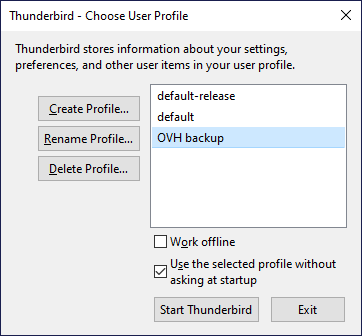
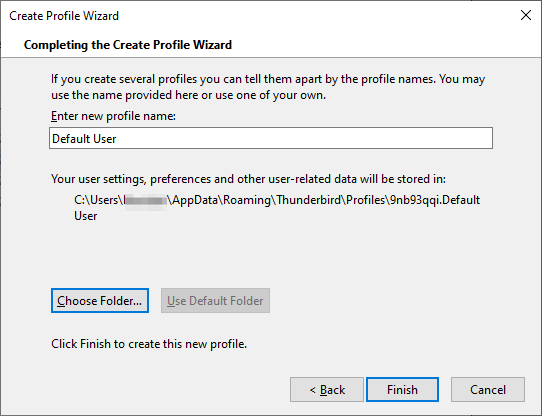
Checking the import on the new email address
When you have done the necessary steps by following the import instructions, make sure that your items are present on the server.
Log in to webmail.
In your inbox and the left-hand column, you will find the folders and emails for your saved email address.
You will need to bear in mind the delay of loading elements on your computer to the email server. This may take several minutes or several hours, depending on your internet connection.
Go further
Migrating email accounts using OVHcloud Mail Migrator
Join our community of users.