
Getting started with Valkey on Web Cloud Databases
Find out how to authorise your IP addresses, retrieve the connection parameters of your Valkey instance and test it from the command line
Objective
Valkey is an open source in-memory data store, compatible with the clients and protocols of the Redis ecosystem (RESP, REdis Serialization Protocol). It is suited to high-performance caches, sessions, lightweight queues and counters.
Find out how to connect to your Valkey instance on Web Cloud Databases: authorising IP addresses, retrieving the connection parameters and testing from a command-line client.
Secure access to your instance (authorised IPs, strong passwords) and test in a pre-production environment before going live.
Information regarding OVHcloud service administration and how to find appropriate assistance
When using OVHcloud guides, please be aware of the following conditions:
- User instructions aim to provide as many details as possible but cannot cover individual use cases. You might need to adapt the pertinent actions to your requirements.
- The OVHcloud ecosystem is built for flexibility and freedom of choice. Customers are therefore responsible for the secure and proper configuration of their services. To prevent data loss, we strongly recommend to apply backup strategies to all your important data.
- Our guides and tutorials may reference third-party software or services in combination with OVHcloud solutions. The technical support provided by OVHcloud does not include the configuration of systems or products outside of our responsibility. This includes but is not limited to:
- Operating systems and user interfaces (Windows, Debian, Plesk, etc.).
- Any other third-party software (FTP clients, email software, etc.).
- Services offered by other providers (DNS, APIs, user interfaces, etc.).
To receive the appropriate assistance for any issues you might experience, follow these guidelines:
- You seek personalized advice or you would like to discuss a topic that is not covered in detail by our documentation?
Join the OVHcloud Community to search for your topic and reach out to other users. - You need to report an incident regarding your OVHcloud service or you are experiencing difficulties in the OVHcloud Control Panel?
Create a support request in our Help Centre. - You require professional assistance for your project or you need help with tasks outside our support scope?
Visit our partner portal to search for experts who are familiar with OVHcloud solutions. - You are looking for more detailed information regarding our support levels and Professional Services?
Please visit our web pages for OVHcloud support levels and OVHcloud Professional Services.
You can participate in improving our documentation:
- You would like to share feedback to improve a guide page or you want to report insufficient information on a specific page?
Use the "Was this page helpful?" buttons at the bottom of the page to let us know. - You would like to propose a specific documentation update?
Use the "Edit this page" function, available at the bottom of the page and in the sidebar.
Requirements
- A Valkey instance on Web Cloud Databases (included with a Performance, Agency, Agency Plus or Agency Max Web Hosting plan).
OVHcloud Control Panel Access
- Direct link:
- Navigation path:
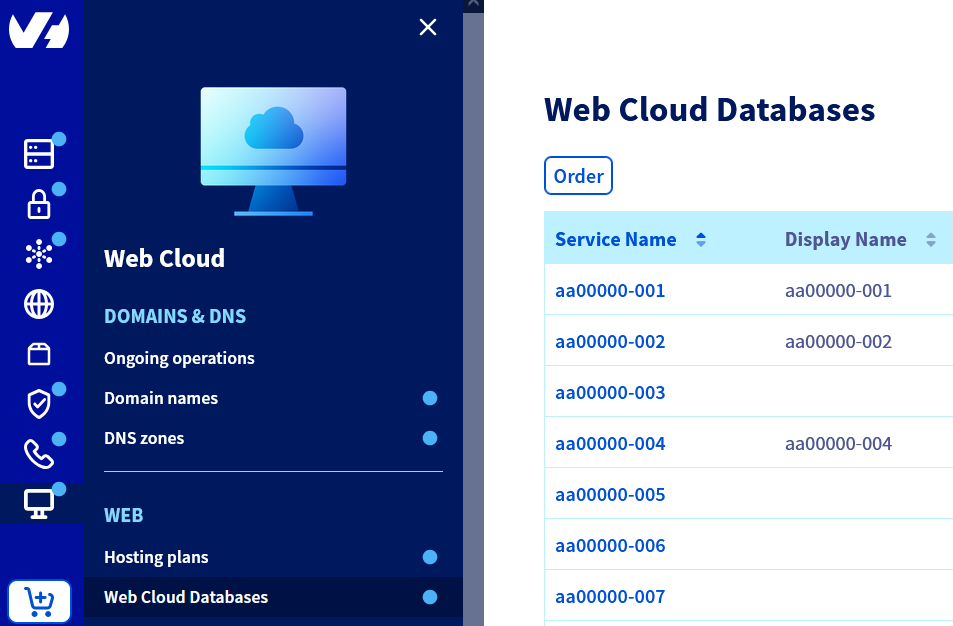
Web Cloud>Web Cloud Databases> Select your database service
Instructions
Part 1 — Authorise the access IP address
By default, your Valkey instance refuses public connections. To authorise (whitelist) the IP address you are connecting from, refer to our guide "Web Cloud Databases - How to authorise an IP address?"
Repeat the operation for every machine that needs to access your Valkey instance.
Part 2 — Prepare the connection parameters
Retrieve the connection parameters
Click on the tabs below to view each of the 2 steps.
In the list of your services, select the relevant solution.
OVHcloud does not offer a TLS-encrypted port on Redis and Valkey database servers. Communications must use the default, unencrypted port only.
Set the password of the default user
Your Valkey instance comes with a default user, the only account available: use it to connect.
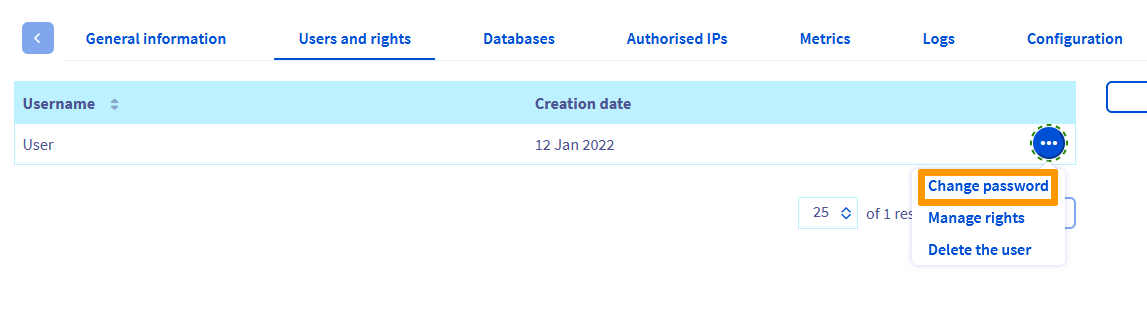
Its password is never displayed in the OVHcloud Control Panel. You must change it at least once to know it.
Click on the tabs below to view each of the 4 steps.
In the list of your services, select the relevant solution.

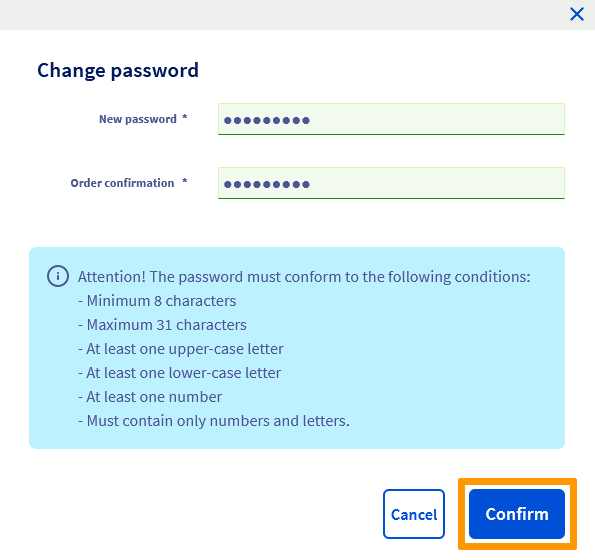
Make a note of your details
Keep the following details:
- Host name
- Port
- Password of the
defaultuser
These are required to test the connection to your instance from a Valkey client or your application.
Part 3 — Test the connection with a command-line client
To check that your Valkey instance is working, connect to it for the first time:
Install the connection client
In this example, we are using the redis-cli client, which is compatible with Valkey and easy to install. You can use the client of your choice. Open a terminal and run the command below for your operating system.
Once you have installed the client, check that it is working by running the command below:
Connect to the instance
In your terminal, run the command below:
Replace <hostname> with your hostname, and 6379 with your port if it differs. To retrieve these values, refer to the "Part 2 — Prepare the connection parameters" section.
Check that everything works
If the connection succeeds, the command prompt of your instance appears. Authenticate with the AUTH command, replacing <password> with the password of the default user:
Then check that the server responds:
The database should reply:
Also try:
You should see:
Delete the test key:
To quit, type:
If the tests above work, your Valkey instance is operational.
Go further
For specialised services (SEO, development, etc.), contact OVHcloud partners.
If you would like assistance using and configuring your OVHcloud solutions, please refer to our support offers.
Join our community of users.