Install the Game Panel on a VPS
Install the OVHcloud Game Panel on your VPS from the OVHcloud Control Panel, including operating system, domain name, and administrator account setup.
Objective
The OVHcloud Game Panel lets you deploy and manage game servers directly on your VPS. Before using it, you must install it on your server from the OVHcloud Control Panel.
This guide explains how to install the Game Panel on your VPS.
Requirements
- A VPS in your OVHcloud account.
- Access to the .
Instructions
Step 1 — Log in to the OVHcloud Control Panel
Log in to your . If you need help logging in, refer to Logging in to the OVHcloud Control Panel.
Step 2 — Switch to the Beta version of the OVHcloud Control Panel
The Game Panel installation feature is currently available in the Beta version of the OVHcloud Control Panel.
In the upper-right corner of the page, click Discover our new Manager in Beta to switch to the Beta interface.
Step 3 — Open your VPS page
From the OVHcloud Control Panel:
- Click
Bare Metal Cloud. - In the right-hand menu, select
Virtual private servers.
Step 4 — Install the Game Panel
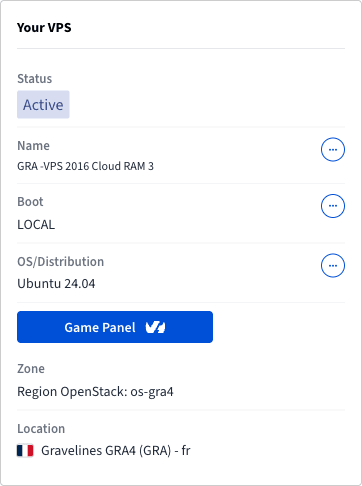
On the Dashboard page, locate the Your VPS section and click Game Panel.
The Game Panel installation form opens. Fill in the following fields, then start the installation.
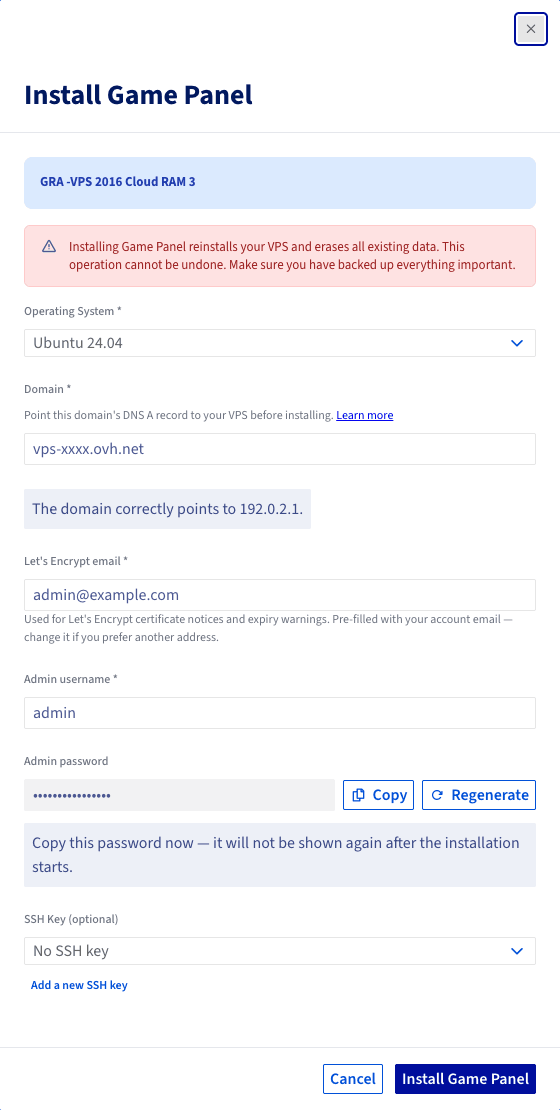
Choose an operating system
Select the operating system on which you want to install the Game Panel. All operating systems displayed in the list are fully compatible with the Game Panel.
Configure the domain name
By default, the Game Panel is installed using your server's default hostname, allowing you to access it through an address similar to https://vps-xxxx.vps.ovh.net.
If you prefer, you can use your own domain name instead. Before continuing, make sure that your domain points to your VPS public IP address.
If you do not already own a domain name or need to configure its DNS records, refer to the following resources:
Enter an email address
You are asked to provide an email address. By default, this is the email address associated with your OVHcloud account. It is used during the SSL certificate setup and may also receive occasional notifications related to the certificate if any action is ever required.
Choose the administrator account name
Enter the username for the administrator account that will be created. This account becomes the super administrator of the Game Panel and has the highest level of privileges.
Save your generated admin password
A password for the Game Panel is generated and displayed. Store this password in a safe place, as it cannot be viewed again later.
(Optional) Add an SSH key
If desired, you can add an SSH public key. This is an optional advanced configuration.
Start the installation
Click Install Game Panel to begin the installation.
Step 5 — Connect to the Game Panel
The selected operating system is installed first. Once it has been deployed, you receive an automatic email containing the SSH password for your server. Keep this password in a safe place, as you may need it later if you connect to the server directly via SSH.
A few minutes later, the Game Panel installation completes automatically.
You can then open your server's hostname in a web browser, for example https://vps-xxxx.vps.ovh.net. Sign in using the password that was generated during the installation to start using the Game Panel.
The generated admin password is shown only once during the installation. If you lose it, refer to the password recovery section of Log in to the Game Panel.
Go further
Join our community of users.