Backup Agent - Linux CLI Assistant

Objective

This guide explains how to use the ovh-ba-install.sh script provided by OVHcloud to install and manage the Veeam backup agent on your Linux server.

You will learn how to retrieve the installation URLs, run the installation in a single command, navigate the CLI assistant menu, and use the diagnostic tools.

Requirements

  • An active Backup Agent service.

OVHcloud Control Panel Access

  • Direct link:
  • Navigation path: Bare Metal Cloud > Backup Agent

On the server

ItemDetail
OSLinux compatible with Veeam Agent for Linux (see the Veeam system requirements and Backup Agent restrictions).
PrivilegesAdministrator access: installation commands generally use sudo.
NetworkThe server must be able to download the script and agent package (HTTPS) and reach the backup gateway VSPC (Veeam Service Provider Console) according to your offer's rules.
TerminalAn SSH session or server console, interactive for the menu.

Minimal vocabulary

CommandRole
curlProgram that downloads a file from a web address (https://โ€ฆ).
sudo"As administrator" โ€” required to install system software.
bashShell that runs the script you give it.

Instructions

Overview of the ovh-ba-install.sh script

The ovh-ba-install.sh script is a command-line assistant that lets you:

  • Install the Veeam Management Agent using the package URL from your Control Panel;
  • Install the global ovhbackupagent command on the server so you can open the same menu at any time (sudo ovhbackupagent);
  • Show a text menu: agent status, Veeam interface, diagnostics, help;
  • Diagnose issues (connection to the infrastructure, logs, archive for support);
  • Uninstall Veeam packages and, if you wish, the ovhbackupagent shortcut (Uninstall Wizard).
Warning

The script simplifies installation and day-to-day monitoring on the machine; it does not replace configuring your backups in the Veeam Agent interface. Cancelling the service is done in the OVHcloud Control Panel, not through this script.

Installation

Step 1 โ€” Retrieve the installation URLs

In the OVHcloud Control Panel, open your , go to the Agents tab, then click the Download button. In the window that opens, select Linux to display the command containing both URLs (script and Linux package).

Backup Agent download โ€” Linux installation commands
Info

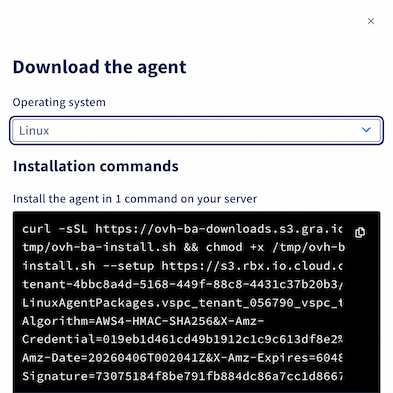
Copy and paste each URL separately into a text file before connecting over SSH.

Step 2 โ€” Connect to the server

Connect to the server over SSH with a user allowed to use sudo.

ssh <user>@<server-ip-or-hostname>

Step 3 โ€” Run the installation

Replace SCRIPT_URL (in 2 places) and AGENT_PACKAGE_URL in the command below with your URLs, then run it.

curl -sSL "SCRIPT_URL" | sudo bash -s -- --setup "AGENT_PACKAGE_URL" --script-url "SCRIPT_URL"

Example:

curl -sSL "https://ovh-ba-downloads.s3.xxx.xxx/tmp/ovh-ba-install.sh" | sudo bash -s -- --setup "https://s3.xxx.xxx.cloud.ovh.net/xxxx/LinuxAgentPackages.vspc_tenant_xxxx.sh?X-Amz-Algorithm=xxx&X-Amz-Credential=xxx&X-Amz-Date=2xxx&X-Amz-Expires=xxx&X-Amz-SignedHeaders=xxx&X-Amz-Signature=xxx" --script-url "https://ovh-ba-downloads.s3.xxx.xxx/tmp/ovh-ba-install.sh"

Step 4 โ€” Welcome screen

Read the introduction, then press Enter to start the installation.

 โ–—โ–„โ–– โ–—โ––  โ–—โ––โ–—โ–– โ–—โ–– โ–—โ–„โ–„โ––โ–—โ––    โ–—โ–„โ–– โ–—โ–– โ–—โ––โ–—โ–„โ–„โ–„     โ–—โ––  โ–—โ––    โ–—โ––  โ–—โ––โ–—โ–„โ–„โ–„โ––โ–—โ–„โ–„โ–„โ–– โ–—โ–„โ–– โ–—โ––  โ–—โ––
โ–โ–Œ โ–โ–Œโ–โ–Œ  โ–โ–Œโ–โ–Œ โ–โ–Œโ–โ–Œ   โ–โ–Œ   โ–โ–Œ โ–โ–Œโ–โ–Œ โ–โ–Œโ–โ–Œ  โ–ˆ     โ–โ–šโ–žโ–˜     โ–โ–Œ  โ–โ–Œโ–โ–Œ   โ–โ–Œ   โ–โ–Œ โ–โ–Œโ–โ–›โ–šโ–žโ–œโ–Œ
โ–โ–Œ โ–โ–Œโ–โ–Œ  โ–โ–Œโ–โ–›โ–€โ–œโ–Œโ–โ–Œ   โ–โ–Œ   โ–โ–Œ โ–โ–Œโ–โ–Œ โ–โ–Œโ–โ–Œ  โ–ˆ      โ–โ–Œ      โ–โ–Œ  โ–โ–Œโ–โ–›โ–€โ–€โ–˜โ–โ–›โ–€โ–€โ–˜โ–โ–›โ–€โ–œโ–Œโ–โ–Œ  โ–โ–Œ
โ–โ–šโ–„โ–žโ–˜ โ–โ–šโ–žโ–˜ โ–โ–Œ โ–โ–Œโ–โ–šโ–„โ–„โ––โ–โ–™โ–„โ–„โ––โ–โ–šโ–„โ–žโ–˜โ–โ–šโ–„โ–žโ–˜โ–โ–™โ–„โ–„โ–€    โ–—โ–žโ–˜โ–โ–šโ––     โ–โ–šโ–žโ–˜ โ–โ–™โ–„โ–„โ––โ–โ–™โ–„โ–„โ––โ–โ–Œ โ–โ–Œโ–โ–Œ  โ–โ–Œ


      Backup Agent โ€” CLI Assistant
  โ”€โ”€โ”€โ”€โ”€โ”€โ”€โ”€โ”€โ”€โ”€โ”€โ”€โ”€โ”€โ”€โ”€โ”€โ”€โ”€โ”€โ”€โ”€โ”€โ”€โ”€โ”€โ”€โ”€โ”€โ”€โ”€โ”€โ”€โ”€โ”€โ”€

  Backup Agent โ€” guided first-time setup

This setup will, in order:
  1) Install the **Veeam Management Agent** from the link you were given.
  2) Install the **ovhbackupagent** command on this server (under /usr/local/bin).
     That command is your permanent shortcut to this menu โ€” you will not need
     to download this script again for everyday use.
  3) Show an installation summary, wait 15 seconds, then open **Agent status** to follow Backup Agent deployment.

The Veeam Backup Agent itself is deployed by our infrastructure after the
Management Agent connects; that step can take a few minutes.

Press Enter to start the installation, or Ctrl+C to cancel...

Step 5 โ€” Installation in progress

Wait for the Veeam steps to finish; the script then installs the ovhbackupagent command.

Step 6 โ€” Summary and agent status

Review the summary displayed for 15 seconds, then watch the Agent status screen. The Backup Agent may appear after a few minutes (infrastructure-side deployment).

Installation summary

[OK] The Management Agent was installed successfully.
[OK] The **ovhbackupagent** command is now available (example: sudo ovhbackupagent).

[Info] The **Backup Agent** will be deployed shortly by our infrastructure (often within a few minutes).
Next, the **Agent status** screen opens so you can follow **`veeamconsoleconfig -s`** until the Backup Agent appears.

Main menu - reminder (available again after Agent status)

**A** - Agent status: Management / Backup Agent state (this screen refreshes every few seconds).
**V** - Open the Veeam UI on the server (once the Backup Agent is installed).
**D** - Diagnostics: VSPC connectivity test, support bundle, log issue analyzer, force-stop stuck jobs.
**I** - Install or reinstall a Management Agent package from a file or URL (advanced).
**U** - Uninstall Veeam agent packages from this server (with confirmations).
**H** - Help and README.
**Q** - Exit the assistant.

[Info] Waiting 15 seconds, then opening Agent status...

After 15 seconds, the Agent status screen opens automatically:

Agent status (veeamconsoleconfig -s)

[Info] Retrieving Veeam status (up to 45s right after install)...
Management agent
    Connection state       : Connected
    Cloud gateway          : vspc-cgw1.prod01.eu-west-rbx.backup.ovhcloud.com:6180
    Connection account     : vspc-tenant-604276/vspc-tenant-cc1-604276
Backup agent
    Version                : 13.0.1.404
    Driver version         : 13.0.1.404
    Status                 : Running

Your agents are running well.

Auto-refresh in 5s... Press Enter to return to menu.

Press Enter to access the main menu.

Reopening the assistant

To open the assistant again later:

sudo ovhbackupagent

If the command is not found, try sudo /usr/local/bin/ovhbackupagent or check that /usr/local/bin is in your PATH.

 โ–—โ–„โ–– โ–—โ––  โ–—โ––โ–—โ–– โ–—โ–– โ–—โ–„โ–„โ––โ–—โ––    โ–—โ–„โ–– โ–—โ–– โ–—โ––โ–—โ–„โ–„โ–„     โ–—โ––  โ–—โ––    โ–—โ––  โ–—โ––โ–—โ–„โ–„โ–„โ––โ–—โ–„โ–„โ–„โ–– โ–—โ–„โ–– โ–—โ––  โ–—โ––
โ–โ–Œ โ–โ–Œโ–โ–Œ  โ–โ–Œโ–โ–Œ โ–โ–Œโ–โ–Œ   โ–โ–Œ   โ–โ–Œ โ–โ–Œโ–โ–Œ โ–โ–Œโ–โ–Œ  โ–ˆ     โ–โ–šโ–žโ–˜     โ–โ–Œ  โ–โ–Œโ–โ–Œ   โ–โ–Œ   โ–โ–Œ โ–โ–Œโ–โ–›โ–šโ–žโ–œโ–Œ
โ–โ–Œ โ–โ–Œโ–โ–Œ  โ–โ–Œโ–โ–›โ–€โ–œโ–Œโ–โ–Œ   โ–โ–Œ   โ–โ–Œ โ–โ–Œโ–โ–Œ โ–โ–Œโ–โ–Œ  โ–ˆ      โ–โ–Œ      โ–โ–Œ  โ–โ–Œโ–โ–›โ–€โ–€โ–˜โ–โ–›โ–€โ–€โ–˜โ–โ–›โ–€โ–œโ–Œโ–โ–Œ  โ–โ–Œ
โ–โ–šโ–„โ–žโ–˜ โ–โ–šโ–žโ–˜ โ–โ–Œ โ–โ–Œโ–โ–šโ–„โ–„โ––โ–โ–™โ–„โ–„โ––โ–โ–šโ–„โ–žโ–˜โ–โ–šโ–„โ–žโ–˜โ–โ–™โ–„โ–„โ–€    โ–—โ–žโ–˜โ–โ–šโ––     โ–โ–šโ–žโ–˜ โ–โ–™โ–„โ–„โ––โ–โ–™โ–„โ–„โ––โ–โ–Œ โ–โ–Œโ–โ–Œ  โ–โ–Œ


      Backup Agent โ€” CLI Assistant
  โ”€โ”€โ”€โ”€โ”€โ”€โ”€โ”€โ”€โ”€โ”€โ”€โ”€โ”€โ”€โ”€โ”€โ”€โ”€โ”€โ”€โ”€โ”€โ”€โ”€โ”€โ”€โ”€โ”€โ”€โ”€โ”€โ”€โ”€โ”€โ”€โ”€

  โ”Œโ”€โ”€โ”€โ”€โ”€โ”€โ”€โ”€โ”€โ”€โ”€โ”€โ”€โ”€โ”€โ”€โ”€โ”€โ”€โ”€โ”€โ”€โ”€โ”€โ”€โ”€โ”€โ”€โ”€โ”€โ”€โ”€โ”€โ”€โ”€โ”€โ”€โ”€โ”€โ”€โ”€โ”€โ”€โ”€โ”€โ”€โ”€โ”€โ”€โ”€โ”€โ”€โ”€โ”€โ”€โ”€โ”€โ”€โ”€โ”€โ”€โ”€โ”€โ”€โ”€โ”€โ”€โ”€โ”€โ”€โ”€โ”€โ”€โ”€โ”
     Management Agent:   OK     Backup Agent:   OK     Last backup:  N/A 
  โ””โ”€โ”€โ”€โ”€โ”€โ”€โ”€โ”€โ”€โ”€โ”€โ”€โ”€โ”€โ”€โ”€โ”€โ”€โ”€โ”€โ”€โ”€โ”€โ”€โ”€โ”€โ”€โ”€โ”€โ”€โ”€โ”€โ”€โ”€โ”€โ”€โ”€โ”€โ”€โ”€โ”€โ”€โ”€โ”€โ”€โ”€โ”€โ”€โ”€โ”€โ”€โ”€โ”€โ”€โ”€โ”€โ”€โ”€โ”€โ”€โ”€โ”€โ”€โ”€โ”€โ”€โ”€โ”€โ”€โ”€โ”€โ”€โ”€โ”€โ”˜

  A  Agent status (veeamconsoleconfig -s)
  V  Open Veeam interface (veeam command)
  D  Diagnostic (test connection, support bundle, issue analyzer, job force stop)
  I  Install Management Agent (only if you want to reinstall it)
  U  Uninstall Wizard
  H  Help / README
  Q  Quit

  Your choice (A/V/D/I/U/H/Q):

The status line at the top of the menu shows OK/KO for Management (veeamma) and Backup (veeam, veeam-libs) packages, plus an indicator related to the last backup job.

KeyAction
AAgent status (automatic refresh).
VOpen the Veeam interface on the server to manage your backups and restores (once the Backup Agent is ready).
DDiagnostic submenu: VSPC test, support archive, log analysis, force-stop of a stuck backup.
IReinstall the Management Agent from a file or URL (advanced).
UUninstall Wizard: uninstall Veeam packages + optional removal of ovhbackupagent.
HBuilt-in help / README.
QQuit.

Troubleshooting and diagnostics

KeysAction
D then TConnectivity test to the VSPC gateway.
D then BGenerate an archive (logs + system information) to send to support.
D then IAnalysis of known messages in the logs (agent.log, veeaminstaller.log, etc.).
D then JForce-stop tool for a backup session (use with care).

For advanced diagnostics, see our Backup Agent troubleshooting guide.

Uninstall Wizard (key U)

  • Removes your agent according to your OS family (yum/dnf, zypper, apt-get).
  • Optional prompt to remove /usr/local/bin/ovhbackupagent and the associated README.
Warning

Uninstalling the agents does not cancel your Backup Agent subscription. The service remains active with OVHcloud until you cancel it in the Control Panel. You can reinstall the agents later from your backup interface.

FAQ

Can I run the script without sudo?
No: system-level actions are required and need administrator privileges (sudo).

The menu exits immediately after a piped install โ€” what to do?
Reopen it with sudo ovhbackupagent.

Where is the script once installed as a command?
Usually /usr/local/bin/ovhbackupagent.

The agents are already installed, how do I install only the assistant?
Use sudo bash ovh-ba-install.sh --setup-local.

I downloaded the script again, what happens if I run it with no arguments?
A short welcome screen checks whether ovhbackupagent is still present and whether the Backup Agent is detected, then can offer to reinstall only the shortcut.

How do I display the built-in help?
Use sudo bash ovh-ba-install.sh --readme.

Go further

Once your agents are up and running, configure your backups through the Veeam Agent interface on the server (key V in the assistant).

Join our community of users.

Was this page helpful?