
How to get started with a dedicated server
Find out how to manage a dedicated server in the OVHcloud Control Panel and how to start with configuring and securing a server
Objective
A dedicated server is a physical server ("bare metal") located in one of our data centres. Unlike Web Hosting plans (also referred to as "shared hosting"), which are technically managed by OVHcloud, you are fully responsible for the administration of your dedicated server.
This guide provides all the information required for your first steps with a dedicated server.
Requirements
- A dedicated server in your OVHcloud account
- Administrative access via SSH or remote desktop (Windows) to your server
- For the OVHcloud API: API credentials. If needed, refer to the guide "First Steps with the OVHcloud APIs".
- For the OVHcloud CLI: the OVHcloud CLI installed and authenticated with
ovhcloud login. If needed, refer to the guide "Getting Started with OVHcloud CLI". - For Terraform: Terraform installed and the OVHcloud provider configured. If needed, refer to the guide "How to use Terraform".
OVHcloud Control Panel Access
- Direct link:
- Navigation path:
Bare Metal Cloud>Dedicated servers> Select your server
If your server is of the Eco product line, follow the guide How to get started with a Kimsufi, So you Start or Rise dedicated server.
Instructions
Content overview
- Installing or reinstalling an operating system
- Logging on to your server
- Restarting your dedicated server
- Securing your dedicated server
- OVHcloud Monitoring
- Network configuration
- Rescue mode
- Access using IPMI
- Backup storage
Installing or reinstalling an operating system
Find more information about server operating systems on our web page.
Reinstalling the operating system will erase all data on every disk of the targeted disk group.
From your , you can install or reinstall your server's operating system.
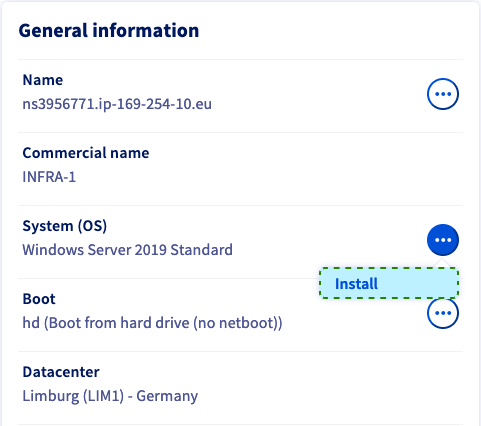
From the General information tab, click ... next to the operating system, then click Install my server or Reinstall my server.
Some proprietary operating systems or platforms such as Plesk and Windows require licences which generate additional fees. You can buy licences via OVHcloud or from an external reseller. You will then need to register your licence, in the operating system itself or by using your .
You can manage all your licences in the Bare Metal Cloud section under Licenses. In this section, you can also order licences or add existing ones via the Actions button.
Select the type of OS, then the operating system from the list.
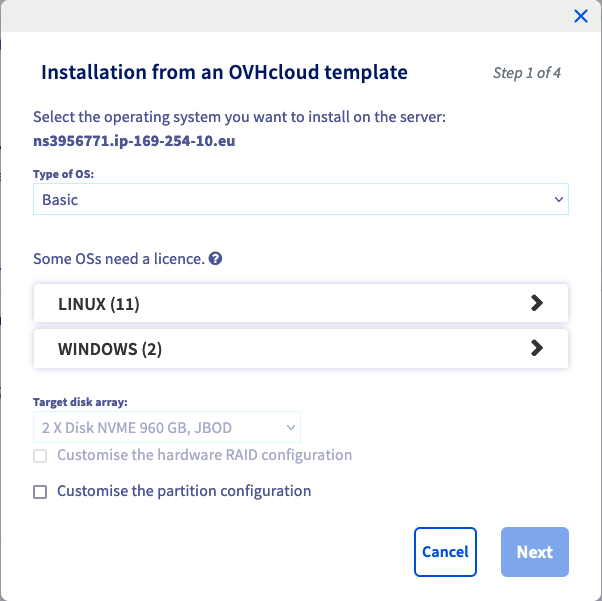
If you need to modify the partitioning scheme of your operating system, check the box Customise the partition configuration before clicking on Next.
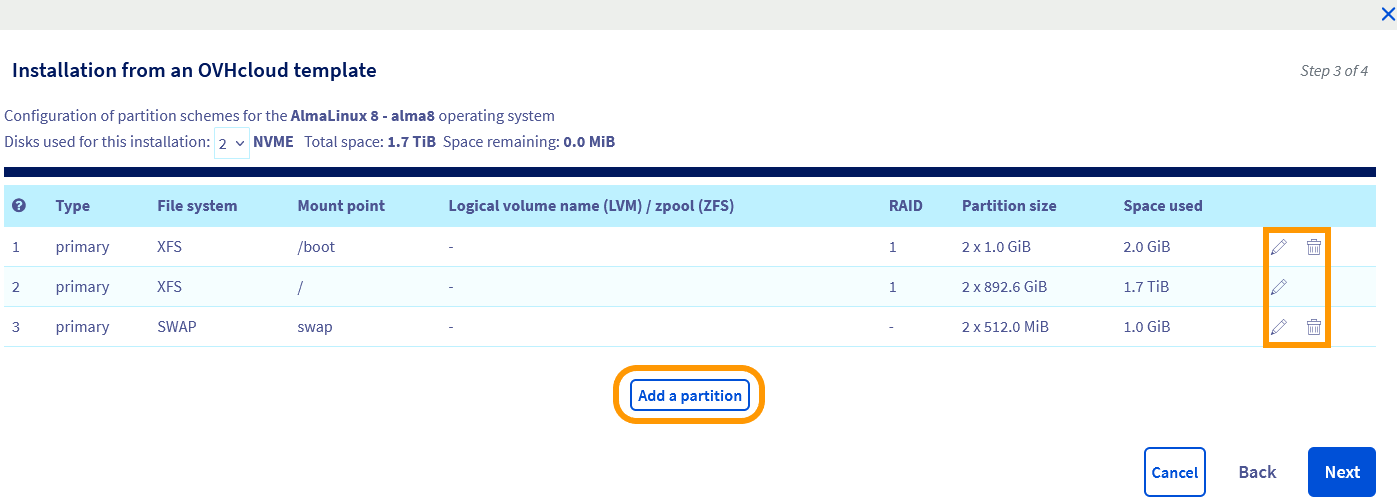
In this step, you can configure the number of disks to be used for installation, along with RAID and partitioning options, all within the constraints of the server's hardware and operating system.
By default, the operating system installation is performed on all disks of the targeted disk group. However, for Windows, this installation is limited to a maximum of two disks.
When multiple disks are selected for installation, RAID 1 (disk mirroring) is configured by default for data replication. Data is replicated across the disks, so the usable capacity is that of a single disk.
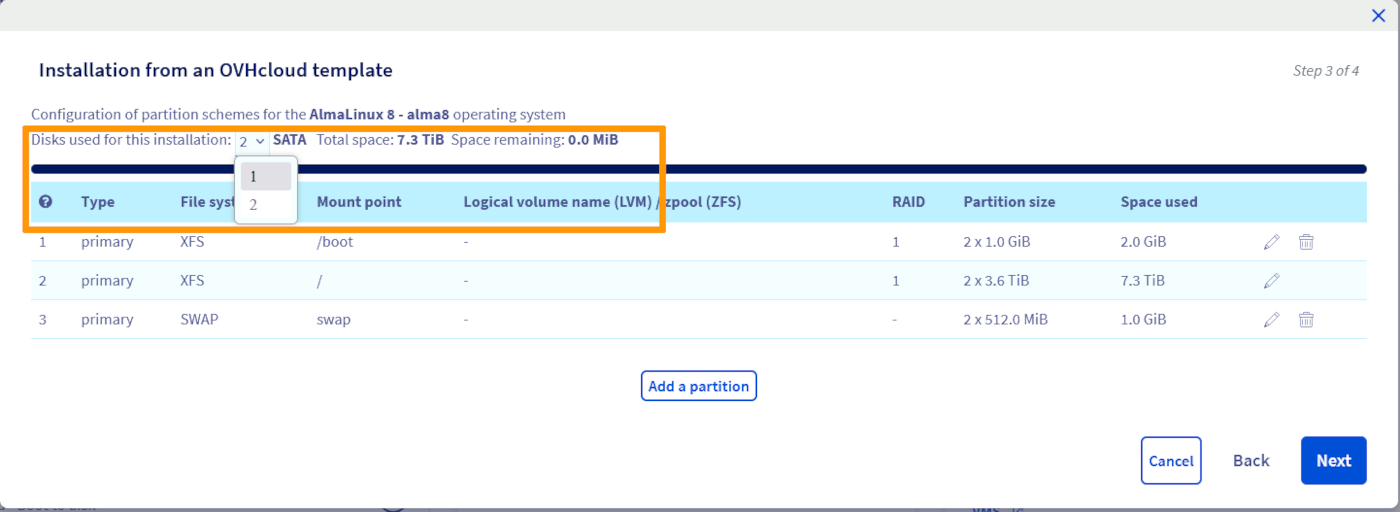
Once you have adjusted the partitions, click Next to go to the summary page.
You will find additional options that are specific to the chosen operating system.
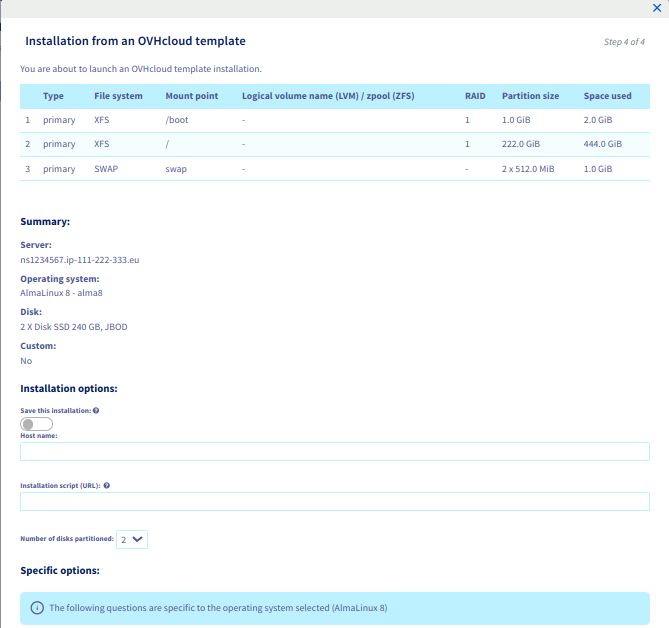
If you have selected a compatible operating system, you can provide a public SSH key that will be installed on the target OS. You have two options:
- Manually copy the key string and paste it into the
Your Public SSH keyfield. - If you have previously stored a public key in your OVHcloud Control Panel, select the desired key from the
SSH key to pre-installdrop-down menu.

To find out more about this topic, consult our guides:
- How to Create SSH Keys for Dedicated Server Access
- How to use PuTTY for SSH connections and authentication
Finally, click Confirm to trigger the operating system installation on your dedicated server.
Logging on to your server
OVHcloud is providing you with services for which you are responsible, with regard to their configuration and management. You are therefore responsible for ensuring they function correctly.
This guide is designed to assist you in common tasks as much as possible. Nevertheless, we recommend that you contact a specialist service provider if you have difficulties or doubts concerning the administration, usage or implementation of services on a server.
Linux
If you have installed an OVHcloud OS template on your server, a user with elevated permissions is created automatically. This user will be named according to the operating system, for example "ubuntu" or "rocky".
You will then receive an email containing the information needed to establish a first connection with SSH. SSH is a secure communication protocol, used to establish encrypted connections to a remote host. You can find more detailed information in our guide on How to get started with SSH connections.
Most current desktop operating systems will have an OpenSSH client natively installed. This means that your access credentials allow you to quickly establish a connection to your server in the appropriate command line application (Terminal, Command prompt, Powershell, etc.). Enter the following command:
Example:
You can use any third-party application compatible with OpenSSH as well.
Once connected, you can replace the predefined password for the current user with a better passphrase by using this command:
On a GNU/Linux distribution, a password prompt will not display your keyboard inputs.
Type your current password and press Enter. Enter the new passphrase and type it again at the next prompt to confirm it.
Activating the root user account
It is not necessary to use the "root" user account to get started with administrating your server. This account has to be enabled first in the server OS in order to use it. Moreover, SSH connections with the user "root" are disabled by default as a security measure.
Unless stated otherwise, all administrative actions described in our documentation can be accomplished by the default user account, i.e. typing sudo followed by the respective command. Learn more about this topic in our guide on How to configure user accounts and root access on a server.
Depending on your requirements for security, mobility and convenience, SSH keys can serve as an additional connection method or replace logins with username and password. Find out how to use them in our guides:
- How to Create SSH Keys for Dedicated Server Access
- How to use PuTTY for SSH connections and authentication
Windows
Once the installation is completed, you will receive an email with your Windows login credentials. You can then connect to your server via RDP (Remote Desktop Protocol). On your local Windows device, open the Remote Desktop Connection client application.

Enter the IPv4 address of your server, then your username and passphrase. Usually a warning message will appear, asking to confirm the connection because of an unknown certificate. Click on Yes to log in.
You can use also use any third-party application compatible with RDP. This is a requirement if your local device does not have Windows installed.
If you experience any issues with this procedure, verify that remote (RDP) connections are allowed on your local device by checking your system settings, firewall rules and possible network restrictions.
As a fallback option, you can use the IPMI console in your OVHcloud Control Panel to connect.
Enabling Windows boot logs (optional)
Windows boot logs can be helpful for server error diagnostics.
To activate them, follow the steps below by navigating through the tabs:
Connect to your server via RDP or IPMI.


The next time your server boots, logs will be saved into a .txt file. The file path is: C:\Windows\ntbtlog.txt.
To access the log file in rescue mode, please follow the instructions in the guide How to activate and use rescue mode.
Restarting your dedicated server
A reboot might become necessary in order to apply updated configurations or to fix an issue. Whenever feasible, perform a "soft reboot" via the command line:
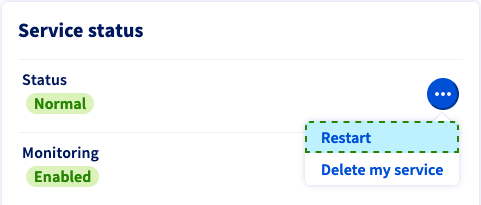
However, you can carry out a "hard reboot" at any time in your . From the General information tab, click on ... next to "Status" in the Service status box, then click Restart and Confirm the action in the popup window.
Securing your dedicated server
You can learn more about securing your server in our guide How to secure a Dedicated Server.
If your server runs Windows, use our guide Configure the Windows Firewall on a Dedicated Server instead.
OVHcloud Monitoring
You can set the monitoring status for a dedicated server from the General information tab in your (section Service status).
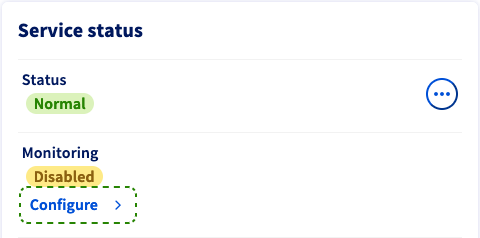
Click Enable interventions — or Disable interventions, depending on the current status. In the popup window, you have three options for the monitoring behaviour:
- Disabled: This option stops alert messages and interventions by OVHcloud. Choose this if you are executing pertinent administrative actions on the server which prevent an ICMP response.
- Enabled with proactive intervention: If the server stops responding, an alert email is sent to you and the server will be checked by a technician.
- Enabled without proactive intervention: You will receive an alert message by email in case the server stops responding. To initiate an intervention, enable your server monitoring with proactive intervention.
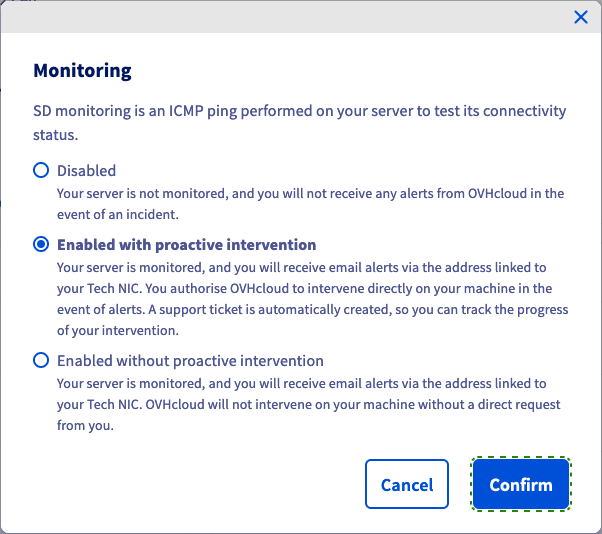
Click on Confirm to update your monitoring configuration.
You can find more information about OVHcloud Monitoring in our guide What are the IP addresses of the OVHcloud monitoring?.
Network configuration
Network bridging
Network bridging is the action taken by network equipment to create an aggregate network from either two or more communication networks, or two or more network segments. Bridging is distinct from routing, which allows the networks to communicate independently while remaining separate.
The Network Bridge configuration is most commonly used in the context of virtualisation, to allow each Virtual Machine to have its own public IP address.
For more information on network bridging, see our guide on Configuring Additional IPs in bridge mode on your virtual machines.
IP aliasing
IP aliasing is the process of associating two or more IP addresses to the same network interface. This allows your server to establish multiple connections to a network, each serving a different purpose.
For detailed instructions on how to configure IP aliasing, see our guide Configure IP Aliasing on a Dedicated Server.
IPv6 configuration
All OVHcloud dedicated servers are delivered with a /64 IPv6 block. To use the addresses in this block, you will need to make some network configuration changes. See our guide on Configuring IPv6 on dedicated servers.
Rescue mode
For any kind of issue, the first general troubleshooting step to take is rebooting your server into rescue mode from your . It is important to identify server issues in this mode to exclude software-related problems before contacting our support teams.
Please refer to the How to activate and use rescue mode.
Access using IPMI
OVHcloud deploys all dedicated servers with an IPMI (Intelligent Platform Management Interface) console which runs in your browser or from a Java applet, and enables you to connect directly to your server even if it has no network connection. This makes it a useful tool for troubleshooting issues that may have taken your server offline.
For more information, see our guide on How to use the IPMI console with a dedicated server.
Backup storage
OVHcloud dedicated servers have an access-controlled storage space as a gratuitous service option. It is best used as a complementary backup option in case the server itself suffers data loss.
To activate and use the backup storage, see our guide How to use the backup storage on a dedicated server.
Go further
How to configure user accounts and root access on a server
How to activate and use rescue mode
Install an OS via the OVHcloud API on a Dedicated Server
For training or technical assistance implementing our solutions, contact your sales representative or visit our Professional Services page to request a quote and have your project analysed by our experts.
Join our community of users.