Find out how to view and manage all of your websites via the OVHcloud Control Panel
Objective
The interface presented in this guide allows you to centrally display all of your websites, regardless of their associated hosting. It makes it easy to track which features are enabled for each website, and gives quick access to essential actions. This interface is particularly useful for agencies or web professionals who manage a large number of domains spread across several hosting plans.
Find out how to view and manage all your websites via the OVHcloud Control Panel.
Navigation path:Web Cloud > Websites > Select your website
Instructions
Click on the tabs below to view each of the 2 steps.
Step 1
Step 2
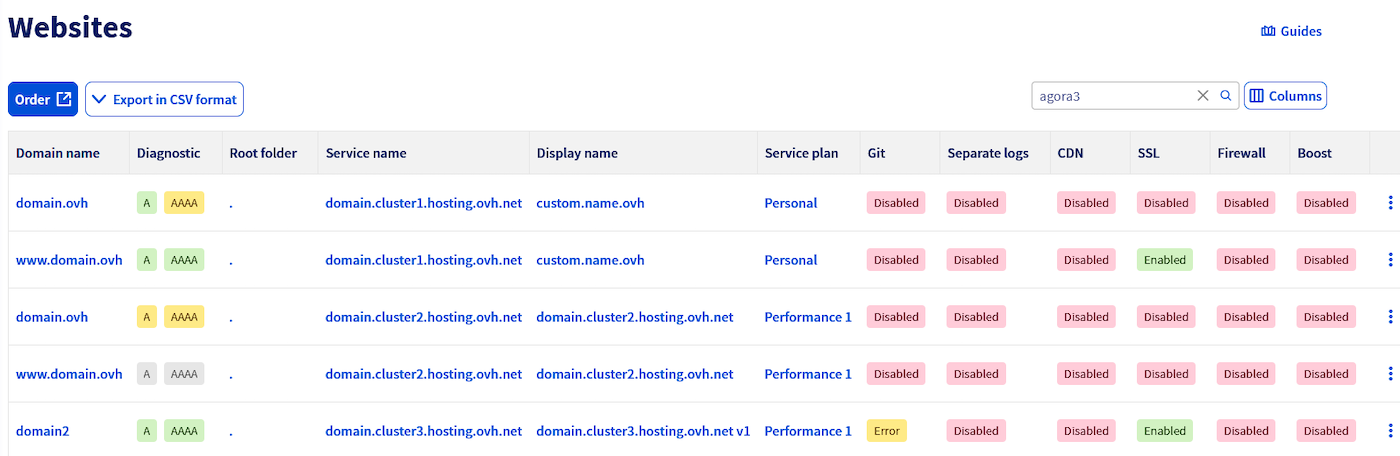
Go to the page. A table appears, listing all your websites and their main information.
The table shows the following columns:
Domain name: shows the main domain name of the website, as configured in the “Multisite” tab of your hosting plan.
Diagnostic: informs you whether your domain name is correctly pointing to the associated web hosting plan. For more details, refer to the “Diagnose your domain names” section of our guide “Hosting multiple websites on your Web Hosting plan”.
Root folder: indicates the directory on your hosting plan (www, app, public_html, etc.) to which the domain points.
Service name: technical name of the service, in the form FTPlogin.clusterXXX.hosting.ovh.net.
Display name: custom alias to identify your service in the Control Panel.
Service plan: type of solution associated with the hosting plan: Free hosting, Starter, Personal, Startup, Professional, Performance, Agency, Agency Plus or Agency Max.
Separate logs: indicates whether a log space is enabled on the domain (OVHcloud domains only). For more information, visit our page “Monitor and analyse website traffic”.
CDN: shows the CDN status: Active / Inactive / N/A (plan not compatible). For more information, visit our page “Shared CDN”.
Firewall: indicates whether the application firewall is enabled on the domain. For more information, visit our page “Essential options for your web hosting”.
Boost: indicates whether the Boost option is enabled, temporarily increasing CPU and RAM resources. For more details, refer to our guide “Web Hosting - How to change your solution”.
Clicking on an item in the table redirects you to the relevant plan. More specifically:
The Domain name, Diagnostic, Root folder, Git, Separate logs, CDN, SSL and Firewall columns redirect to the Multisite tab.
The Service name, Display name and Service plan columns redirect to the General information tab.
The Boost column redirects to the Boost my hosting plan tab.
Warning
Separate logs cannot be enabled for an external domain name. This option is only available for domains registered with OVHcloud.
Go further
For specialized services (SEO, development, etc.), contact the OVHcloud partners.
If you would like assistance with using and configuring your OVHcloud solutions, we recommend referring to our range of support solutions.