For AI agents: the complete documentation index is available at https://docs.ovhcloud.com/en/llms.txt, the full documentation bundle is available at https://docs.ovhcloud.com/en/llms-full.txt, and this page is available as Markdown at https://docs.ovhcloud.com/en/guides/public-cloud/compute/increase-the-size-of-an-additional-disk.md.
We recommend that you always maintain 20% free space on your storage volumes. This ensures optimum performance and avoids the risk of system degradation or failure when the volume reaches its maximum capacity.
To resize your disk at the right time, monitor disk usage regularly. Below are quick tutorials for both Windows and Linux to help you track disk space and anticipate when an upgrade is needed.
On Windows
On Linux
Using Command Prompt
Open Command Prompt (Win + R → cmd → Enter).
Run the following command:
wmic logicaldisk get name, size, freespace
This displays the free space and total size of each disk.
This displays disk usage in a human-readable format.
Using lsblk command
To view disk partitions and their sizes:
lsblk
Warning
Before resizing, we recommend creating a snapshot of your volume to protect your data. If something goes wrong during the resize or partition extension, you can restore from the snapshot. See Creating a volume snapshot for instructions.
Modifying the size of the disk
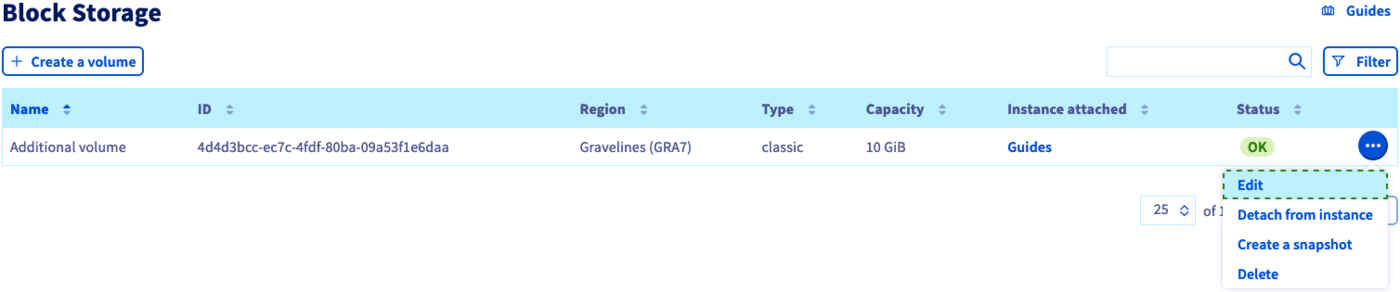
In your Public Cloud project, click on Block Storage in the left-hand menu under Storage & backup.
If the volume is attached to a Windows instance, click on ... in the row of the volume and select Detach from instance.
Click on ... in the row of the volume and select Edit.
Warning
Volume resizing is irreversible. You can only increase the size of a volume, never decrease it. Make sure the new size is correct before confirming.
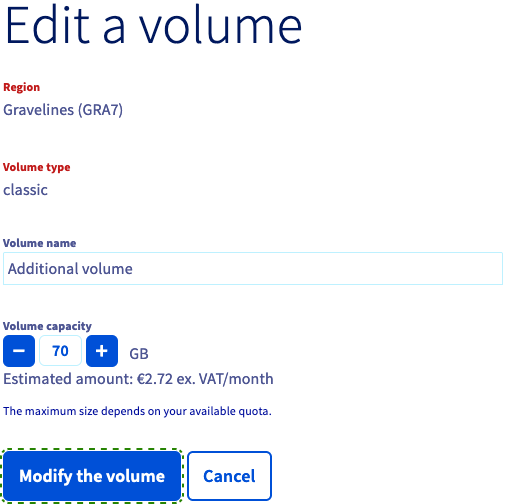
In the popup window, enter the new size for the volume and click on Modify the volume.
Extending the partition (Linux instance)
Establish an SSH connection to your instance to adjust the partition to the resized disk.
First, check the filesystem type:
admin@server:~$ lsblk -f /dev/vdb1
NAME FSTYPE LABEL UUID MOUNTPOINTvdb1 ext4 a1b2c3d4-e5f6-7890-abcd-ef1234567890
Info
The steps below apply to ext2/ext3/ext4 filesystems. Unlike ext4, XFS cannot be resized while unmounted — the xfs_growfs tool requires the filesystem to be mounted. If your filesystem is XFS, still unmount the disk and recreate the partition as described below, but skip the e2fsck and resize2fs steps: remount the disk instead, then run sudo xfs_growfs /mnt/disk.
First, unmount the disk:
admin@server:~$ sudo umount /mnt/disk
In our example:
admin@server:~$ sudo umount /mnt/vdb
For partitions up to 2TB
For partitions over 2TB
Check the current partition layout:
admin@server:~$ sudo fdisk -l /dev/vdb
Disk /dev/vdb: 70 GiB, 75161927680 bytes, 146800640 sectorsUnits: sectors of 1 * 512 = 512 bytesSector size (logical/physical): 512 bytes / 512 bytesI/O size (minimum/optimal): 512 bytes / 512 bytesDisklabel type: dosDisk identifier: 0x00000001Device Boot Start End Sectors Size Id Type/dev/vdb1 2048 104857599 104855552 50G 83 Linux
Warning
Note the Start sector value (in this example, 2048). You must re-enter this exact value when recreating the partition below. Using a different start sector will misalign the filesystem and cause data corruption or loss.
Recreate the partition using the following command. This process only rewrites the partition table — your filesystem data is preserved, provided you re-enter the exact same start sector when prompted.
admin@server:~$ sudo fdisk /dev/vdb
Welcome to fdisk (util-linux 2.25.2).Changes will remain in memory only, until you decide to write them.Be careful before using the write command
Type d to delete the partition:
Command (m for help): dSelected partition 1Partition 1 has been deleted.
Type n to recreate the partition:
Command (m for help): n Partition typep primary (0 primary, 0 extended, 4 free)e extended (container for logical partitions)
Type p to select the primary partition type:
Select (default p):Using default response p.
Type the partition number, in our example 1:
Partition number (1-4, default 1): 1
Enter the first sector value you noted earlier (2048), then accept the default last sector to extend the partition across all remaining available space on the disk:
First sector (2048-146800639, default 2048): 2048Last sector, +sectors or +size{K,M,G,T,P} (2048-146800639, default 146800639):Created a new partition 1 of type 'Linux' and of size 70 GiB.
To list the changes, type p again.
Next, type w to save the changes:
Command (m for help): wThe partition table has been altered.Calling ioctl() to re-read partition table.Syncing disks.
Run the following command to view the information about the partitions:
admin@server:~$ sudo parted /dev/vdb print
Info
Check the Partition Table field in the output below: if it shows gpt, continue as described. If it shows msdos instead, convert the label first by running the following command:
admin@server:~$ sudo parted /dev/vdb mklabel gpt
This rewrites the partition table, so make sure you take a snapshot of your volume before proceeding.
Next, run the print command again to confirm.
Since the disk was just resized, parted detects that the GPT header no longer matches the new disk size and prompts you to fix it. Answer Fix to both warnings:
Warning: Not all of the space available to /dev/vdb appears to be used, you can fixthe GPT to use all of the space (an extra 2147483648 blocks) or continue with thecurrent setting? Fix/Ignore? FixWarning: The backup GPT table is not at the end of the disk, as it should be. Thismight mean that another operating system believes the disk is smaller. Fix, bymoving the backup to the end (and removing the old backup)?Fix/Ignore/Cancel? FixModel: (virtio-blk)Disk /dev/vdb: 3299GBSector size (logical/physical): 512B/512BPartition Table: gptDisk Flags:Number Start End Size File system Name Flags 1 1049kB 1074GB 1074GB ext4
Note the partition number and Start value shown above (in this example, partition 1 starting at 1049kB).
As with the previous method, deleting and recreating the partition only rewrites the partition table. Your data is preserved, provided you enter the same Start value noted above when creating the new partition.
Next, run the following command to open parted in interactive mode:
admin@server:~$ sudo parted /dev/vdb
GNU Parted 3.2Using /dev/vdbWelcome to GNU Parted! Type 'help' to view a list of commands.(parted)
Type rm partition_number to delete the partition, replacing partition_number with the value noted above:
(parted) rm 1
Type print to confirm the partition has been removed:
(parted) printModel: (virtio-blk)Disk /dev/vdb: 3299GBSector size (logical/physical): 512B/512BPartition Table: gptDisk Flags:Number Start End Size File system Name Flags
Type mkpart, then answer the prompts to recreate the partition — enter the same Start value noted above, and 100% for the end value so the partition extends across all remaining available space:
Type print to make sure the partition has been recreated with the new size:
(parted) printModel: (virtio-blk)Disk /dev/vdb: 3299GBSector size (logical/physical): 512B/512BPartition Table: gptDisk Flags:Number Start End Size File system Name Flags 1 1049kB 3299GB 3298GB ext4 primary
Type quit to exit parted:
(parted) quitInformation: You may need to update /etc/fstab.
Recreating the partition assigns it a new partition GUID. If /etc/fstab (or any other mount configuration) references this partition using PARTUUID=, update it to the new value.
First, run the following command to find the new value:
Mounts that reference the partition by filesystem UUID (the default on most cloud images) or by device name are not affected.
Info
The commands below apply to both procedures. The file, block and size values shown correspond to the 2TB-or-smaller example (a 70 GiB disk) used earlier; for a larger partition, your output will simply show higher values, matching your resized disk.
Check the partition (for ext2/ext3/ext4 filesystems):
admin@server:~$ sudo resize2fs /dev/vdb1resize2fs 1.42.12 (29-Aug-2014)Resizing the filesystem on /dev/vdb to 18350080 (4k) blocks.The filesystem on /dev/vdb is now 18350080 (4k) blocks long.
Once this is completed, detach the volume from the instance and reattach it to ensure the updated QoS settings (IOPS and bandwidth) are properly applied.
After reattaching, you can verify the updated volume configuration in your Public Cloud project under Block Storage.
Extending the partition (Windows instance)
Before proceeding, reattach the volume to the instance. Click on ... in the row of the volume and select Attach to instance.
Establish a remote desktop (RDP) connection to your Windows instance.
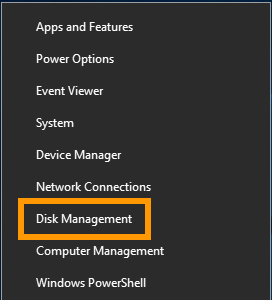
Once logged in, right-click on the Start button and open Disk Management.
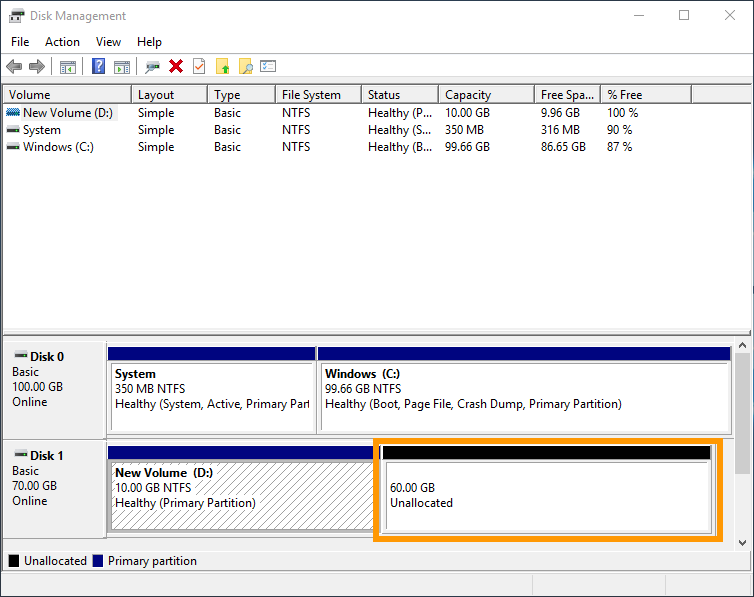
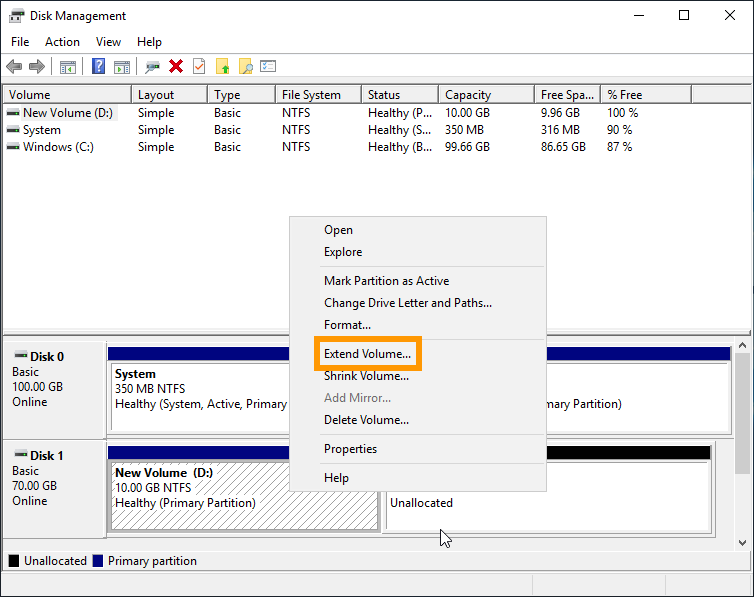
The extended disk now displays the additional capacity as unallocated space.
Right-click on the volume and select Extend Volume from the context menu.
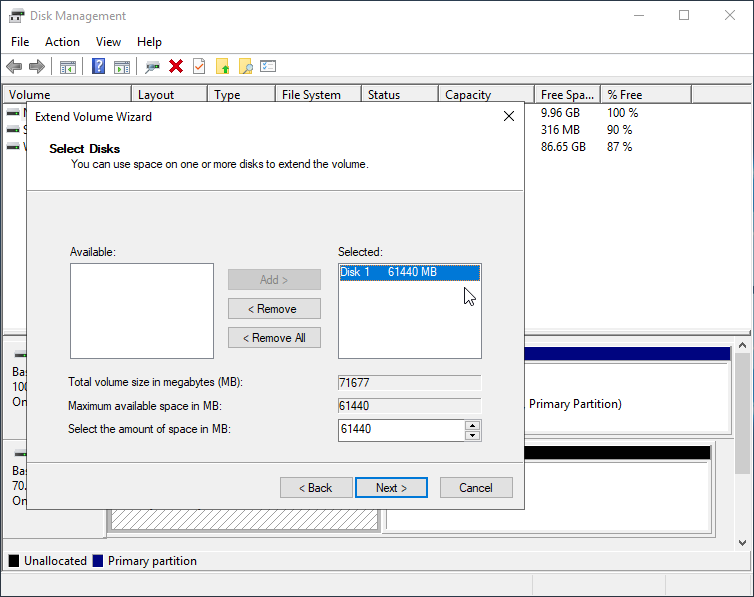
In the "Extend Volume Wizard", click Next.
You can modify the disk space in this step to add less than the full amount to the partition. Click on Next.
Click on Finish to complete the process.
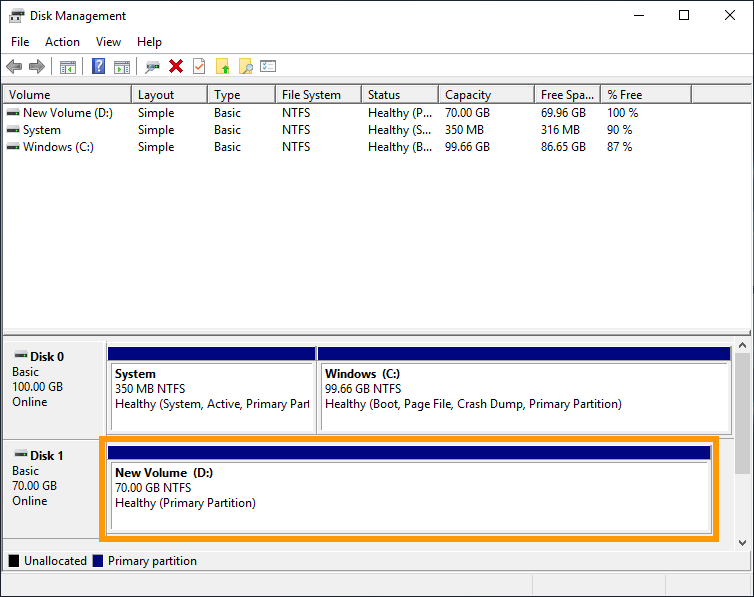
The resized volume now includes the additional disk space.
Once this is completed, detach the volume from the instance and reattach it to ensure the updated QoS settings (IOPS and bandwidth) are properly applied.
After reattaching, open Disk Management again to confirm the volume displays the correct total size. You can also verify the updated volume configuration in your Public Cloud project under Block Storage.