
How to handle the NetBox rack elevation
Find out how the rack elevation is handled in NetBox for your OPCP infrastructure
Objective
NetBox is the reference tool for the physical and logical inventory of your OVHcloud On-Prem Cloud Platform (OPCP) infrastructure. Among its features, the rack elevation provides a visual, to-scale representation of a rack and the equipment installed in it.
This guide explains how the rack elevation is handled in NetBox and what information it gives you about your OPCP rack.
The NetBox inventory is automatically populated from the OPCP control plane; the OPCP nodes are added and kept up to date without any manual action. Their position in the rack, however, is currently set manually (see section 4).
In OpenStack, a node corresponds to a physical server in the OPCP rack. In this guide, the term node therefore refers to a physical server.
Prerequisites
- Being an administrator of the OPCP infrastructure and having access to the administration interface
admin.dashboard. - Knowing how to access the NetBox inventory (see How to see the node inventory).
Instructions
1. What is a rack elevation
In NetBox, a rack represents a physical equipment enclosure inside a data centre. Its capacity is measured in rack units (U) — a standard rack is typically between 42U and 48U high.
The rack elevation is a to-scale diagram of that rack. It shows, unit by unit, which device occupies which position, so you can understand the physical layout of your OPCP infrastructure without being on site.
2. Accessing the rack elevation in NetBox
- Log in to the administration URL
admin.dashboard. - Click NetBox. The rack elevation of your OPCP rack opens directly.
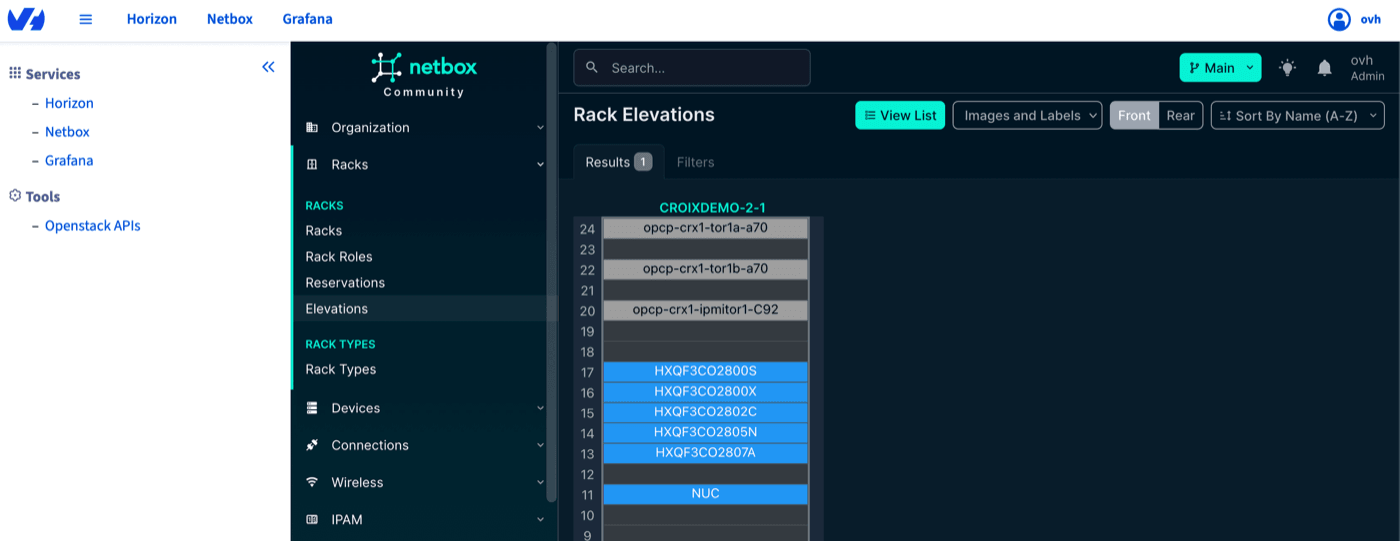
Alternative path: if you need to reach the elevation from another part of NetBox, open the DCIM section, select Racks, then select your OPCP rack to open its detail page and open the Elevation view.
3. Reading the elevation view
The elevation view conveys several pieces of information at a glance:
- Front and rear faces: the elevation can be displayed from the front or the rear of the rack, so you can see equipment that is mounted on either side.
- Device position and height: each device is drawn at the rack unit (U) where it is mounted and spans the number of units it physically occupies.
- Unit numbering: rack units are numbered along the side of the elevation. Depending on the rack configuration, numbering can run from the bottom up or from the top down.
- Role-based colouring: devices are coloured according to their role (for example servers versus network equipment), making it easy to distinguish equipment types.
- Free space: empty rack units are shown as available space, giving you a quick view of the remaining capacity.
4. How node positions are handled
Today, the position of each node in the rack elevation is set manually. This is the standard approach: an administrator sets a device's position by editing the device in NetBox and assigning it a rack and a rack unit (U). A position set this way is persistent: it is not changed automatically, and remains until you change it yourself.
You can also add custom devices to the rack elevation — equipment that is not managed as an OPCP node, such as third-party appliances you install yourself. These are created and positioned manually in NetBox in the same way. Before placing a custom device, contact OVHcloud support to confirm which rack unit(s) you may use for it, so that it does not conflict with units reserved for the platform.
Automatic positioning from templates is on the way. OVHcloud is working on automatic placement of nodes based on their cabling. Once this feature is available, OVHcloud will provide position templates that map a given set of switch-port connections to a specific rack unit (U), per rack type (which depends on how the platform was installed). During the Ironic → NetBox synchronisation, a node whose cabling matches a template entry will then be placed automatically at the corresponding rack unit, and this automatic position will take precedence over manual changes. Where no template matches the rack type, manual positioning will remain the fallback. Custom devices, which have no Ironic cabling, will always continue to be positioned manually.
5. What the rack elevation tells you
For an OPCP infrastructure, the rack elevation helps you to:
- Locate a node physically in the rack for on-site operations such as maintenance or cabling.
- Assess capacity by seeing which units are occupied and which are free.
- Map the physical and logical views together by cross-referencing a device shown in the elevation with its node inventory entry and its OpenStack/Ironic status.
To go further with the inventory and node states, see:
References
Go further
For training or technical assistance implementing our solutions, contact your sales representative or visit our Professional Services page to request a quote and have your project analysed by our experts.
Join our community of users.