Configure LACP link aggregation on your Debian 9 to 11 server using ifupdown
Objective
Link aggregation increases your server's availability and boosts the efficiency of your network connections. By bonding your network interfaces, you make your network links redundant: if one link goes down, traffic is automatically redirected to another available link. The available bandwidth is also increased thanks to aggregation.
Aggregation is based on IEEE 802.3ad, Link Aggregation Control Protocol (LACP) technology.
This guide explains how to configure LACP link aggregation on Debian 9 to 11 (ifupdown configuration).
Warning
This guide provides instructions for configuring network interface bonding specifically using ifupdown, whose configuration file is located at /etc/network/interfaces. It also applies to the rescue system.
If your system's network configuration uses Netplan instead (Debian 12 or newer, Ubuntu 24.04 or newer), please refer to this guide.
Requirements
A dedicated server with multiple network interfaces. On Scale and High Grade ranges, the public and private aggregations are enabled by default. On other ranges, you must first enable OLA to aggregate your interfaces.
OVHcloud Control Panel Access
Direct link:
Navigation path:Bare Metal Cloud > Dedicated servers > Select your server
Warning
You will need to install the ifenslave package on the server before configuring interface bonding. To do so, please use the following command:
apt install ifenslave
If you are configuring a fully-private aggregation (OLA), the server will no longer have public connectivity and you will be unable to SSH into it. In any case, your connection may drop while the bond is being configured, so we recommend using the IPMI/KVM console to access the server.
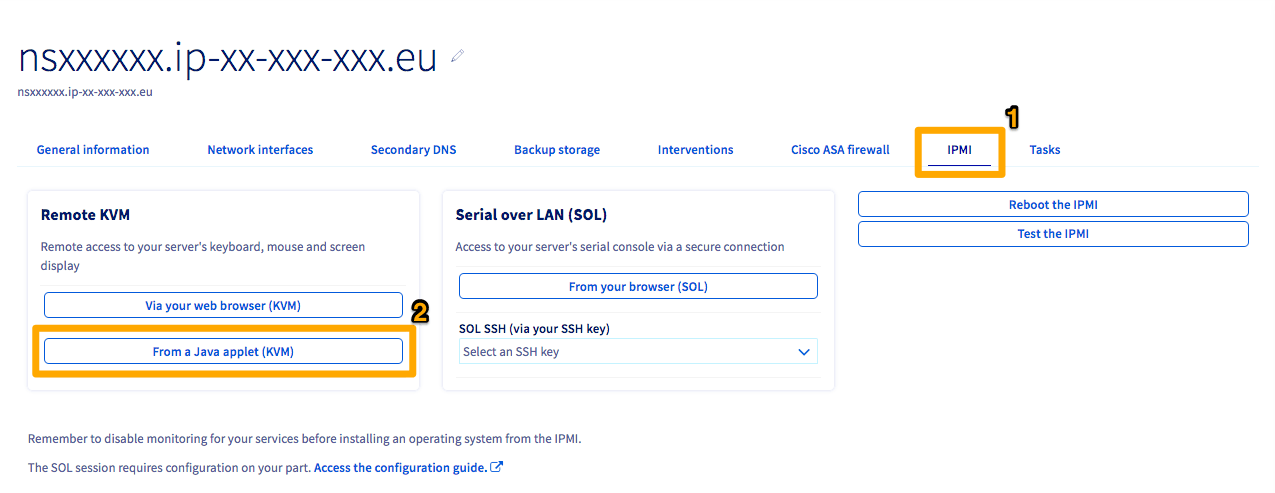
Click the IPMI tab (1).
Next, click the From a Java applet (KVM) button (2).
A JNLP program will download. Open the program to enter the IPMI. Log in using valid credentials for the server.
By default, using an OVHcloud template, the NICs will be named either ethX or enoX. If you are not using an OVHcloud template, you can find the names of your interfaces using the following command:
ip a
Info
This command will yield numerous "interfaces." If you are having trouble determining which ones are your physical NICs, the first interface will still have the server's public IP address attached to it by default.
To retrieve the names of the interfaces, execute the following command:
ip a
Info
For the hwaddress parameter, use the MAC address of the bond's LACP fallback interface. For a public bond, you can obtain it from the aggregationFallback field of the public interface returned by the following API route:
1: lo: <LOOPBACK,UP,LOWER_UP> mtu 65536 qdisc noqueue state UNKNOWN group default qlen 1000 link/loopback 00:00:00:00:00:00 brd 00:00:00:00:00:00 inet 127.0.0.1/8 scope host lo valid_lft forever preferred_lft forever inet6 ::1/128 scope host noprefixroute valid_lft forever preferred_lft forever2: ens22f0np0: <BROADCAST,MULTICAST,UP,LOWER_UP> mtu 1500 qdisc mq state UP group default qlen 1000 link/ether a1:b2:c3:d4:e5:c6 brd ff:ff:ff:ff:ff:ff inet 203.0.113.1/32 metric 100 scope global dynamic ens22f0np0 valid_lft 71613sec preferred_lft 71613sec inet6 2001:db8:1:1b00:203:0:112:0/56 scope global valid_lft forever preferred_lft forever inet6 fe80::a6b2:c3ff:fed4:e5c6/64 scope link valid_lft forever preferred_lft forever3: ens22f1np1: <BROADCAST,MULTICAST> mtu 1500 qdisc noop state DOWN group default qlen 1000 link/ether a1:b2:c3:d4:e5:c7 brd ff:ff:ff:ff:ff:ff4: ens33f0np0: <BROADCAST,MULTICAST> mtu 1500 qdisc noop state DOWN group default qlen 1000 link/ether a1:b2:c3:d4:e5:d6 brd ff:ff:ff:ff:ff:ff5: ens33f1np1: <BROADCAST,MULTICAST> mtu 1500 qdisc noop state DOWN group default qlen 1000 link/ether a1:b2:c3:d4:e5:d7 brd ff:ff:ff:ff:ff:ff
Once you have determined the names of your interfaces, you can configure interfaces bonding in the OS.
Configuring interface bonding
Select the tab below that matches your server configuration:
Two interfaces: Advance servers with two physical NICs.
Four interfaces (default): Scale and High Grade servers ship with separate public and private bonds already configured. No action in the OVHcloud Control Panel is required.
Four interfaces (fully private / OLA): all interfaces combined into a single private (vRack) bond. This requires enabling OLA in the OVHcloud Control Panel.
Two interfaces
Four interfaces (default)
Four interfaces (fully private / OLA)
Replace the content of /etc/network/interfaces with the following:
auto bond0iface bond0 inet static address 203.0.113.1/32 gateway 100.64.0.1 # MAC address of the server's main public interface hwaddress ether a1:b2:c3:d4:e5:c6 bond-mode 802.3ad bond-slaves ens22f0np0 ens22f1np1 bond-lacp-rate fast bond-xmit_hash_policy layer3+4 dns-nameservers 213.186.33.99 up ip -6 addr add 2001:db8:1:1b00:203:0:112:0/56 dev bond0 up ip -6 route add default via fe80::1 dev bond0
DHCP
auto bond0iface bond0 inet dhcp # MAC address of the server's main public interface hwaddress ether a1:b2:c3:d4:e5:c6 bond-mode 802.3ad bond-slaves ens22f0np0 ens22f1np1 bond-lacp-rate fast bond-xmit_hash_policy layer3+4 up ip -6 addr add 2001:db8:1:1b00:203:0:112:0/56 dev bond0 up ip -6 route add default via fe80::1 dev bond0
This configuration bonds public interfaces into bond0 (with public IP) and private interfaces into bond1 (for vRack).
Replace the content of /etc/network/interfaces with the following:
Static IP
auto bond0iface bond0 inet static address 203.0.113.1/32 gateway 100.64.0.1 # MAC address of the server's main public interface hwaddress ether a1:b2:c3:d4:e5:c6 bond-mode 802.3ad bond-slaves ens22f0np0 ens22f1np1 bond-lacp-rate fast bond-xmit_hash_policy layer3+4 dns-nameservers 213.186.33.99 up ip -6 addr add 2001:db8:1:1b00:203:0:112:0/56 dev bond0 up ip -6 route add default via fe80::1 dev bond0# Optional: private bond configurationauto bond1iface bond1 inet static address 10.0.0.1/24 # MAC address of the server's main private interface hwaddress ether a1:b2:c3:d4:e5:d6 bond-mode 802.3ad bond-slaves ens33f0np0 ens33f1np1 bond-lacp-rate fast bond-xmit_hash_policy layer3+4
DHCP
auto bond0iface bond0 inet dhcp # MAC address of the server's main public interface hwaddress ether a1:b2:c3:d4:e5:c6 bond-mode 802.3ad bond-slaves ens22f0np0 ens22f1np1 bond-lacp-rate fast bond-xmit_hash_policy layer3+4 up ip -6 addr add 2001:db8:1:1b00:203:0:112:0/56 dev bond0 up ip -6 route add default via fe80::1 dev bond0# Optional: private bond configurationauto bond1iface bond1 inet static address 10.0.0.1/24 # MAC address of the server's main private interface hwaddress ether a1:b2:c3:d4:e5:d6 bond-mode 802.3ad bond-slaves ens33f0np0 ens33f1np1 bond-lacp-rate fast bond-xmit_hash_policy layer3+4
This configuration aggregates all physical interfaces into a single bond for vRack use only. There is no public IP connectivity.
Warning
Once OLA (fully private) is enabled, the public IP is no longer accessible. Make sure you have an alternative means of access (e.g. through another server in the vRack, or via KVM/IPMI) before applying this configuration.
Replace the content of /etc/network/interfaces with the following:
auto bond0iface bond0 inet static address 10.0.0.1/24 # MAC address of the server's main private interface hwaddress ether a1:b2:c3:d4:e5:d6 bond-mode 802.3ad bond-slaves ens22f0np0 ens22f1np1 ens33f0np0 ens33f1np1 bond-lacp-rate fast bond-xmit_hash_policy layer3+4
Info
In the fully-private (OLA) configuration, the bond uses the MAC address of the main private interface. The address field should be set to your vRack private IP.
Applying the configuration
Apply the configuration by restarting the networking daemon:
systemctl restart networking
This restart may take several seconds since it is building the bond interface. To test that the bond is working, ping another server on the same vRack. If it works, you are all set. If it does not, double-check your configurations or try rebooting the server.