Disaster recovery plan - Implementation example
Deploy Nextcloud across two Public Cloud regions using managed services, and fail over to the recovery site when the production region goes down
Objective
Running Nextcloud on a single instance is simple, but it offers no protection: the moment that instance, or the host behind it, fails, the service is down for everyone. Making the deployment resilient inside one region solves part of the problem. It does not cover the loss of the region itself.
This guide builds a deployment that answers three requirements:
- Nextcloud is highly available, with the shortest possible downtime.
- As little infrastructure as possible is managed by hand, so managed services are used wherever they exist.
- A disaster recovery site takes over in the event of a global failure of the production site, with the lowest achievable RTO and RPO.
This guide explains how to deploy Nextcloud across two OVHcloud Public Cloud regions with managed services, keep both sites in sync, and fail over from one to the other.
Requirements
OVHcloud services
- A Public Cloud project in your OVHcloud account
- Enough quota in both regions for two Managed Kubernetes clusters, four Managed Databases clusters, two instances and two gateways
- An IP Load Balancer (Pack 2 or higher)
- A vRack containing both your Public Cloud project and your IP Load Balancer
- A domain name whose DNS zone is hosted at OVHcloud, used to expose Nextcloud and to answer the Let's Encrypt DNS-01 challenge
- OVHcloud API application keys with the DNS permissions listed further down, created as described in First steps with the OVHcloud API
Configuring the OVHcloud CLI
Most commands in this guide use the OVHcloud CLI. Install it and create your API credentials as explained in Getting started with OVHcloud CLI:
None of the commands below pass a project ID, so the CLI must know which Public Cloud project to work on. List your projects:
ovhcloud cloud project list
Then set the one you want as the default, either with the OVH_CLOUD_PROJECT_SERVICE environment variable or with the default_cloud_project key of the [ovh-cli] section of your ~/.ovh.conf file. Replace <YOUR_PROJECT_ID> with the ID returned by the command above:
export OVH_CLOUD_PROJECT_SERVICE=<YOUR_PROJECT_ID>
Configuring the OpenStack CLI
The Manila share networks are created with the OpenStack CLI, which authenticates with an OpenStack user rather than with your OVHcloud account:
- Create an OpenStack user in your project, as described in Managing OpenStack users.
- Install the client and its dependencies by following Preparing an environment for using the OpenStack API.
- Download the
openrc.sh file of your project from the OVHcloud Control Panel and load it, as described in Setting OpenStack environment variables. This is the source openrc.sh command at the beginning of the deployment.
Info
The openstack share commands used in this guide come from the Manila client, which is not always installed with the OpenStack client. If the command is not recognised, install python-manilaclient in the same environment.
Instructions
Understanding the problem
A single-instance deployment fails with its host
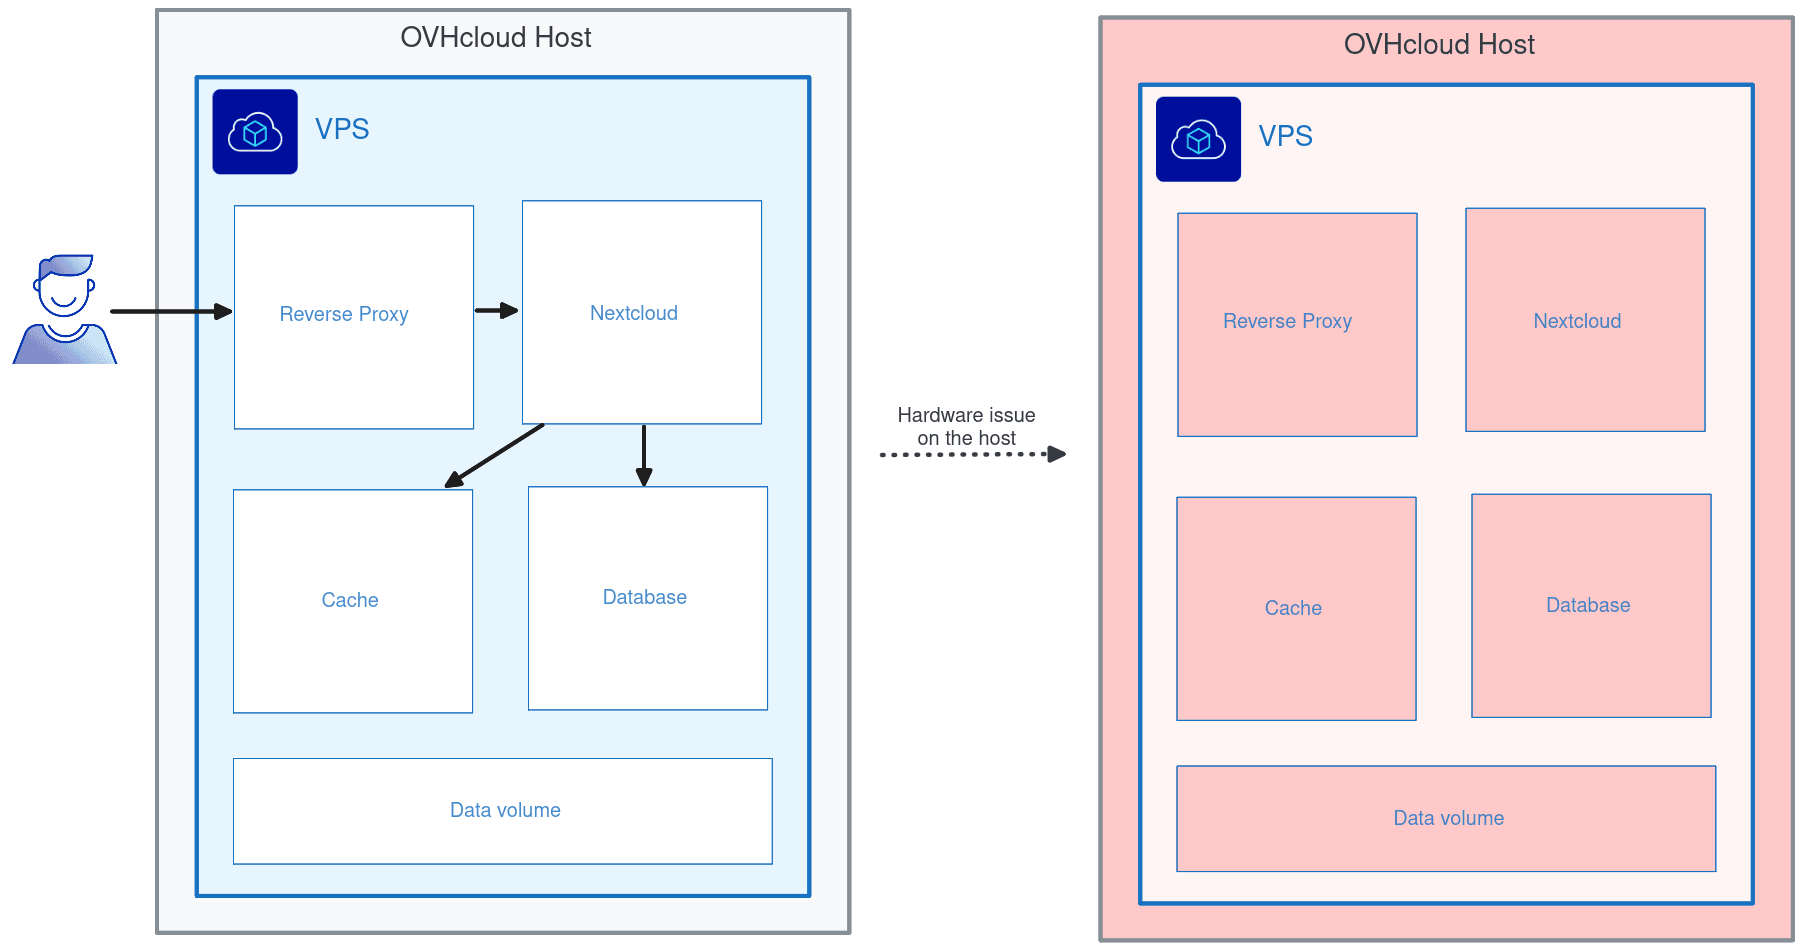
The quickest way to deploy Nextcloud is to run every component (reverse proxy, application, cache, database and data volume) on a single Public Cloud instance or VPS. If that instance, or the host running it, fails, Nextcloud goes down with it:
The instance stays unavailable until the host is repaired or the instance is restarted on another host. For the whole of that time, your end users have no access to the service.
A resilient deployment survives the loss of a node
Nextcloud can be deployed in a far more resilient way: by making each application component highly available (database, cache, Nextcloud itself), and by making the underlying infrastructure redundant as well (several instances spread over different hosts, redundant ingress).
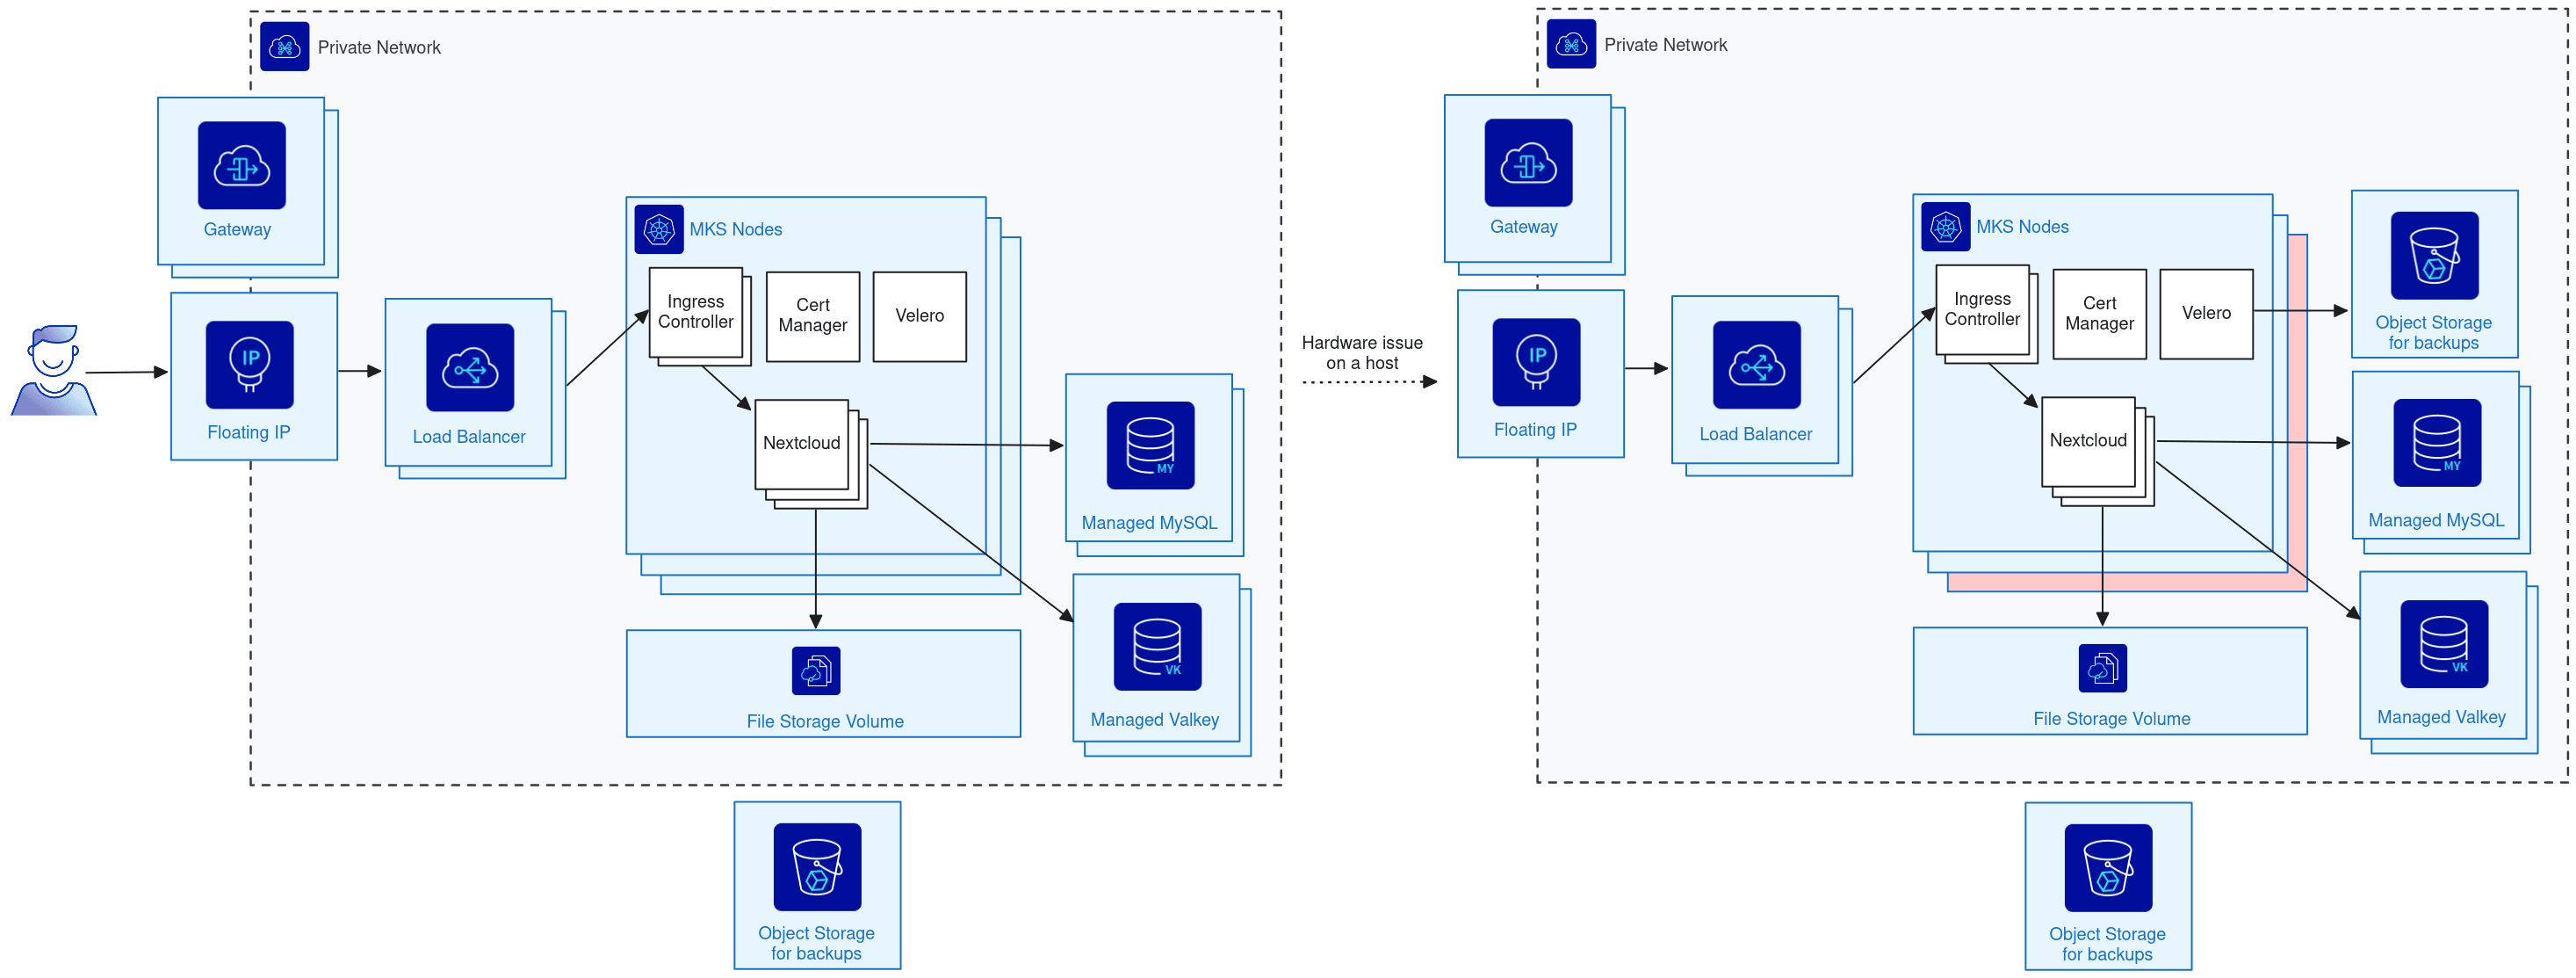
The following Public Cloud products cover these needs:
- A Managed Kubernetes Service (MKS) cluster to run Nextcloud
- A Managed Databases cluster for PostgreSQL or MySQL
- A Public Cloud File Storage volume, shared between the Nextcloud replicas
- A Public Cloud Load Balancer for the ingress traffic
- A Public Cloud Gateway to expose the load balancer publicly
The resulting infrastructure looks like this:
Here the host running one of the MKS nodes crashes. Because the infrastructure was designed for that risk, Nextcloud keeps running and end users keep working.
Surviving the loss of a region
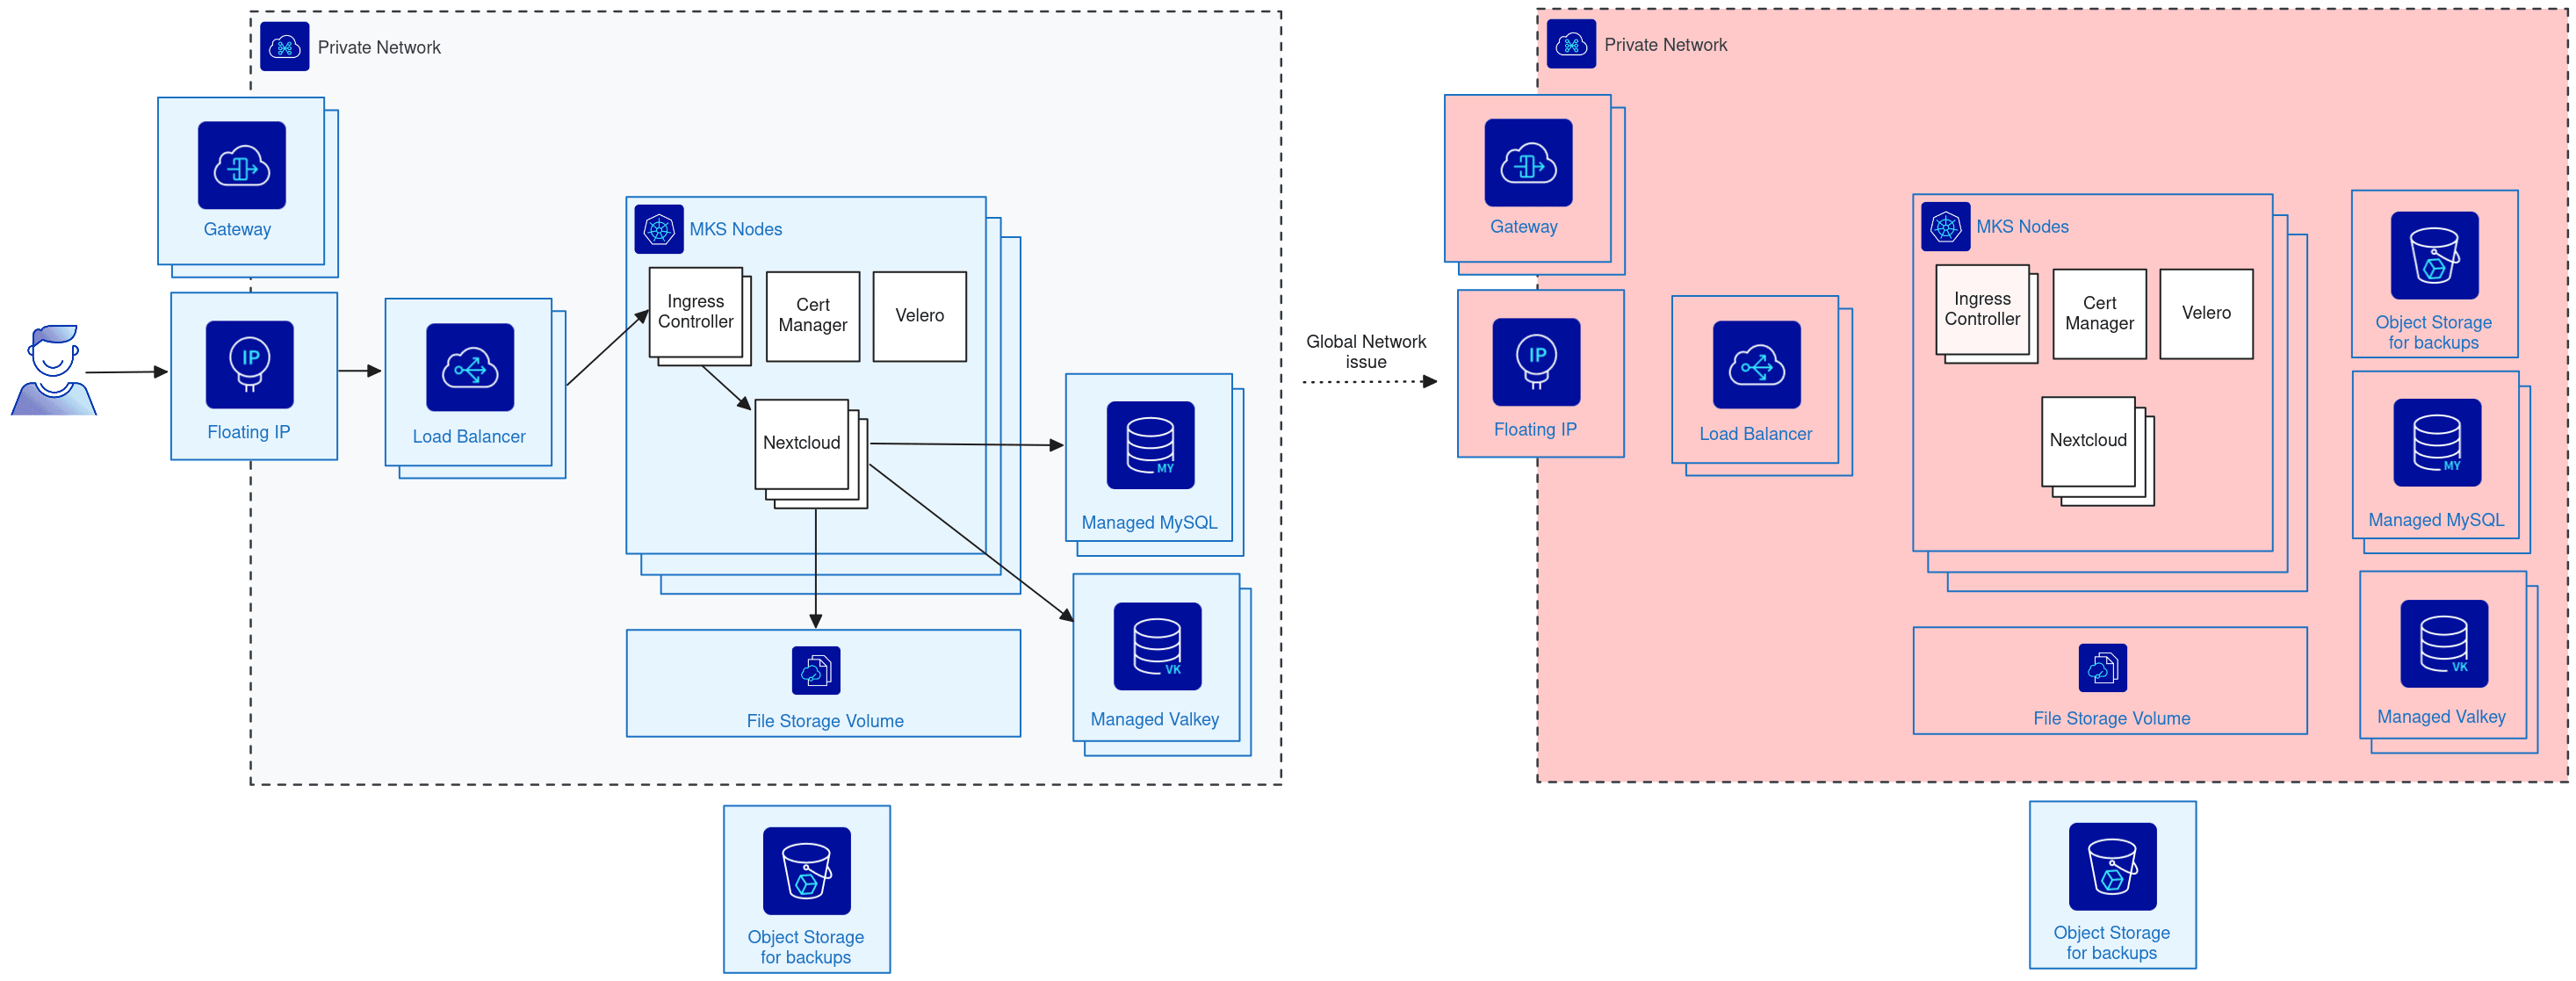
A resilient deployment still lives in a single location, and that location can fail as a whole, during a major Public Cloud network outage, for example:
Every component loses network connectivity at once and Nextcloud becomes unreachable. This is what a disaster recovery site protects against. Building one raises three questions, each answered below: how to handle ingress on two sites, how to keep the database in sync, and how to replicate the end-user files.
Ingress: IP Load Balancer
Traffic must keep flowing when a whole site disappears. The OVHcloud IP Load Balancer (IPLB) answers this: it can be attached to backends located in two different sites at the same time (Gravelines and Strasbourg, for example), so the same public IP can serve either site.
Info
The IP Load Balancer is the only OVHcloud load balancing product that can span two regions at the same time. Every other Public Cloud product used here is regional or zonal, so a dedicated resource must be created in each region.
Database: PostgreSQL logical replication
Managed Databases for MySQL does not offer cross-region data replication, which would leave backup/restore as the only option, with an RTO/RPO far from optimal. Nextcloud also supports PostgreSQL, and PostgreSQL provides a built-in logical replication mechanism, so this guide uses Managed Databases for PostgreSQL.
Warning
Logical replication does not replicate the database as a whole: it replicates table by table. You must make sure that every Nextcloud table is included in the publication, and that the schema of those tables is identical on both sites.
End-user files: Object Storage replication
File Storage cannot replicate data across regions, so the end-user files are stored in Object Storage instead, which has a built-in replication mechanism. Nextcloud can be configured to use an Object Storage bucket as its primary storage, which makes the two sites share the same file content.
Target architecture
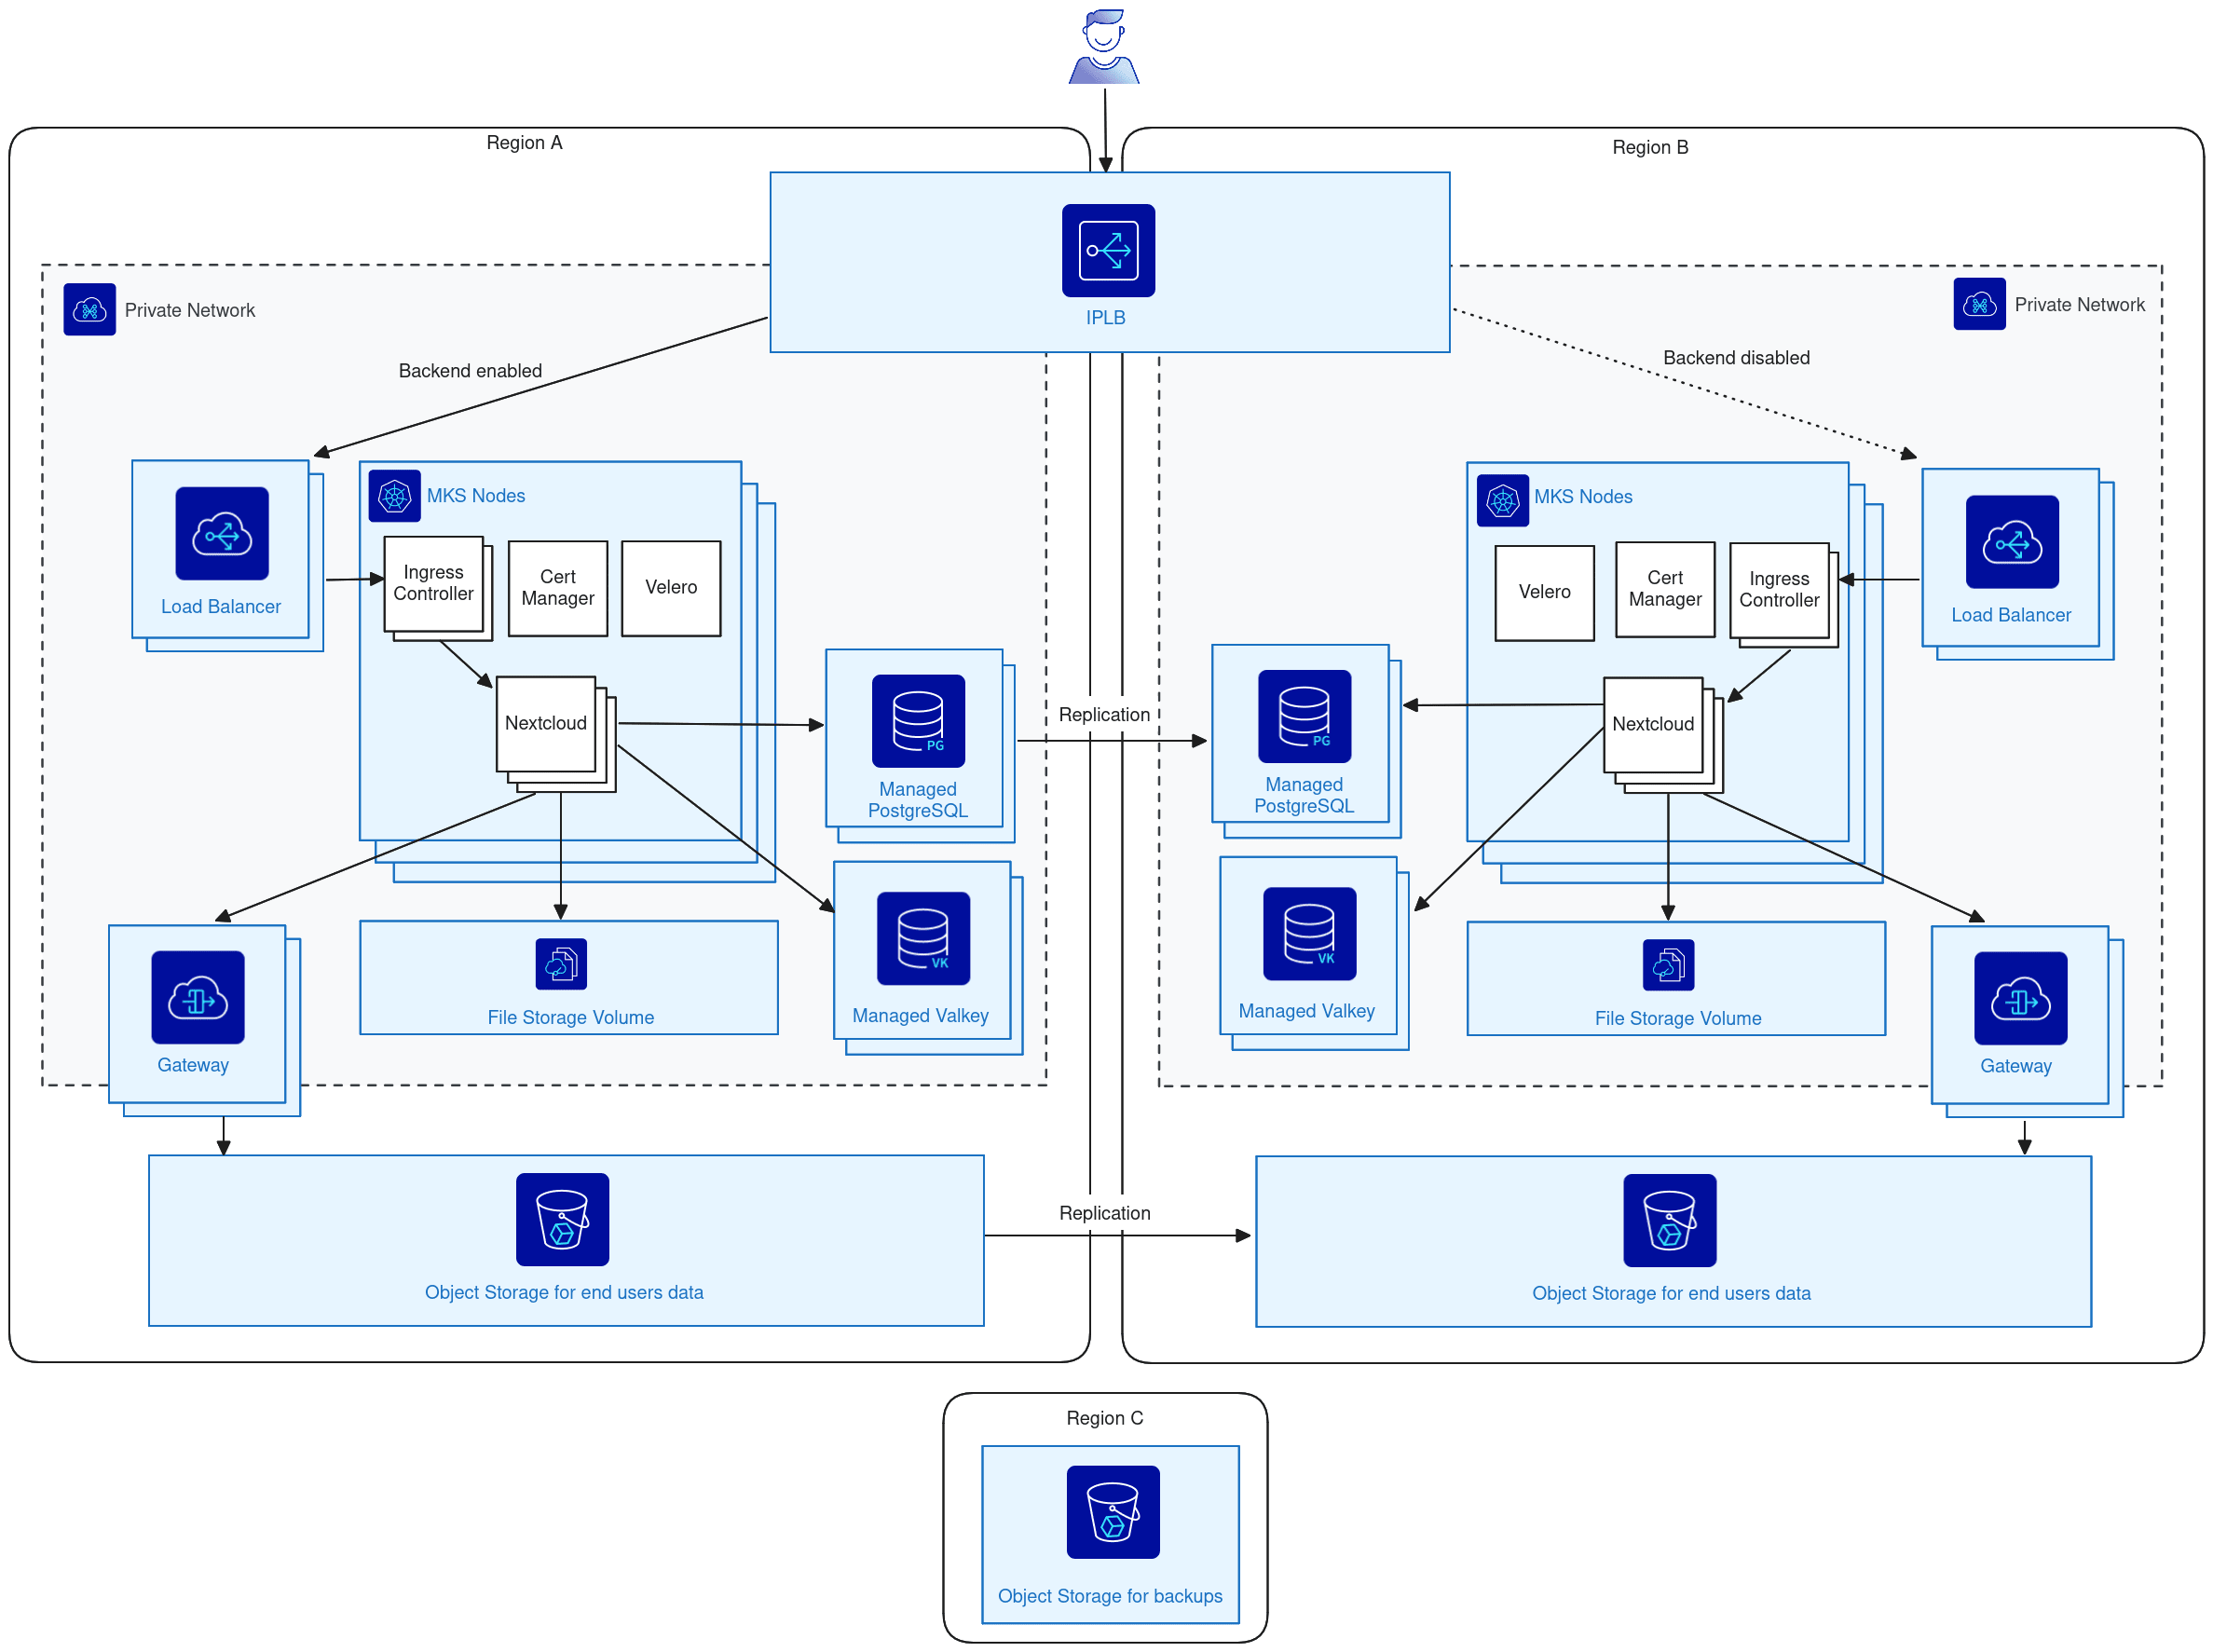
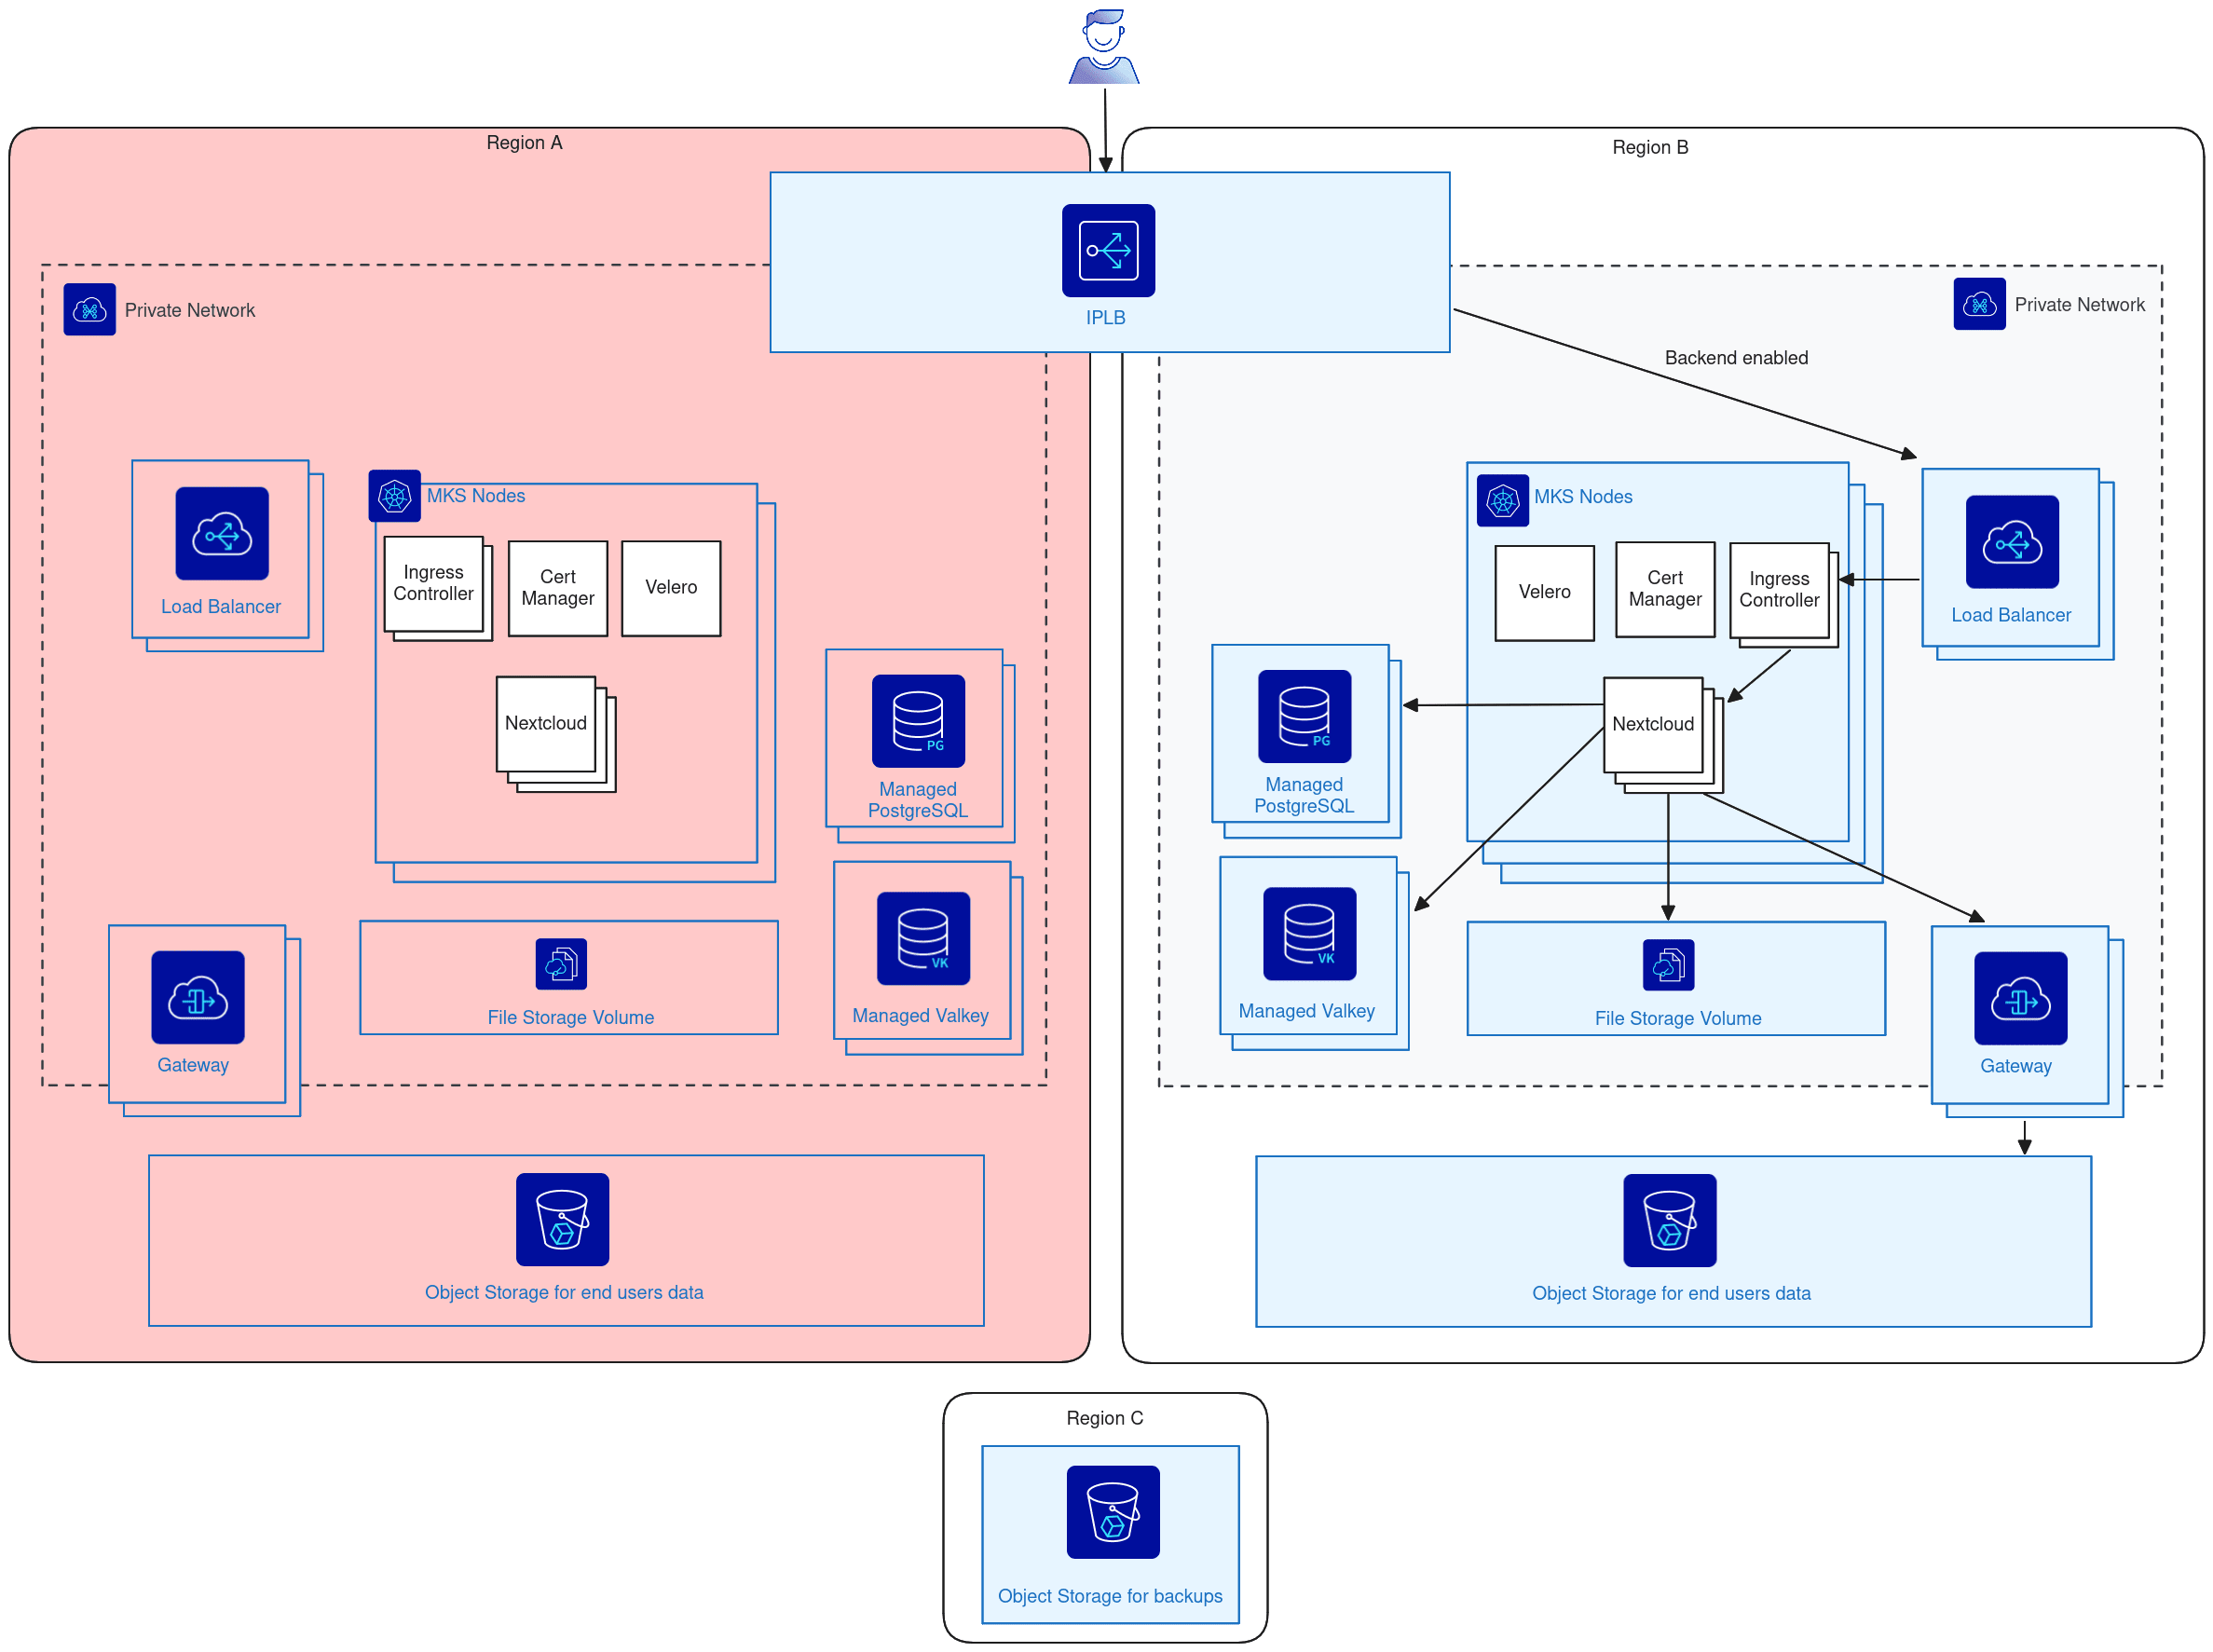
Putting it together gives the following two-region architecture. Region A serves the traffic, region B holds a fully provisioned standby, and a third region hosts the backup bucket:
If region A fails, traffic is redirected to the infrastructure already provisioned in region B:
Deploying the infrastructure
The rest of this guide deploys this architecture with GRA11 as the production region and SBG5 as the recovery region.
Start by loading your OpenStack credentials and defining the variables used throughout. Adapt the following values to your own deployment:
REGION_PROD and REGION_DRP: the production and recovery regions. If you change them, adapt the --nodes-pattern.region of the databases, the bucket regions, and the Object Storage endpoints used in the Nextcloud commands accordingly.
VLAN_ID: the VLAN of the vRack shared by both private networks.
source openrc.sh
export VLAN_ID=1
export REGION_PROD=GRA11
export REGION_DRP=SBG5
Info
Every step below is run twice, once per region. Keep the shell open from beginning to end: the variables set along the way are reused by the later commands.
Networking
Create the private networks. Both use the same VLAN ID so that they belong to the same vRack:
ovhcloud cloud network private vrack create "$REGION_PROD" \
--name "private-network-prod" \
--vlan-id "$VLAN_ID" \
--wait
ovhcloud cloud network private vrack create "$REGION_DRP" \
--name "private-network-drp" \
--vlan-id "$VLAN_ID" \
--wait
Retrieve their IDs:
NETWORK_ID_PROD=$(ovhcloud cloud network private vrack list \
--filter 'name=="private-network-prod"' \
--output json | jq -r .[0].id)
NETWORK_ID_DRP=$(ovhcloud cloud network private vrack list \
--filter 'name=="private-network-drp"' \
--output json | jq -r .[0].id)
Create the subnets. They share the same CIDR but split it into two halves, so that each region allocates addresses from its own range:
ovhcloud cloud network private vrack subnet create "$NETWORK_ID_PROD" \
--region "$REGION_PROD" \
--name "private-subnet-prod" \
--cidr 10.1.0.0/16 \
--gateway-ip 10.1.0.1 \
--enable-gateway-ip \
--enable-dhcp \
--allocation-pools 10.1.0.2:10.1.127.254 \
--dns-name-servers 213.186.33.99
ovhcloud cloud network private vrack subnet create "$NETWORK_ID_DRP" \
--region "$REGION_DRP" \
--name "private-subnet-drp" \
--cidr 10.1.0.0/16 \
--gateway-ip 10.1.128.1 \
--enable-gateway-ip \
--enable-dhcp \
--allocation-pools 10.1.128.2:10.1.253.254 \
--dns-name-servers 213.186.33.99
Retrieve the subnet IDs:
SUBNET_ID_PROD=$(ovhcloud cloud network private vrack subnet list "$NETWORK_ID_PROD" \
--region "$REGION_PROD" --output json | jq -r .[0].id)
SUBNET_ID_DRP=$(ovhcloud cloud network private vrack subnet list "$NETWORK_ID_DRP" \
--region "$REGION_DRP" --output json | jq -r .[0].id)
Create the gateways:
ovhcloud cloud network gateway create "$REGION_PROD" \
--name gateway-prod \
--model s \
--network-id "$NETWORK_ID_PROD" \
--subnet-id "$SUBNET_ID_PROD" \
--wait
ovhcloud cloud network gateway create "$REGION_DRP" \
--name gateway-drp \
--model s \
--network-id "$NETWORK_ID_DRP" \
--subnet-id "$SUBNET_ID_DRP" \
--wait
Retrieve the gateway IDs:
GATEWAY_ID_PROD=$(ovhcloud cloud network gateway list --filter 'name=="gateway-prod"' --output json | jq -r .[0].id)
GATEWAY_ID_DRP=$(ovhcloud cloud network gateway list --filter 'name=="gateway-drp"' --output json | jq -r .[0].id)
Managed Kubernetes Service clusters
Create one cluster per region, attached to the private network of that region:
ovhcloud cloud managed-kubernetes create \
--name cluster-prod \
--region "$REGION_PROD" \
--version 1.34 \
--plan free \
--kube-proxy-mode ipvs \
--private-network-id "$NETWORK_ID_PROD" \
--nodes-subnet-id "$SUBNET_ID_PROD" \
--private-network.routing-as-default
ovhcloud cloud managed-kubernetes create \
--name cluster-drp \
--region "$REGION_DRP" \
--version 1.34 \
--plan free \
--kube-proxy-mode ipvs \
--private-network-id "$NETWORK_ID_DRP" \
--nodes-subnet-id "$SUBNET_ID_DRP" \
--private-network.routing-as-default
Retrieve the cluster IDs:
CLUSTER_ID_PROD=$(ovhcloud cloud managed-kubernetes list \
--filter 'name=="cluster-prod"' --output json | jq -r .[0].id)
CLUSTER_ID_DRP=$(ovhcloud cloud managed-kubernetes list \
--filter 'name=="cluster-drp"' --output json | jq -r .[0].id)
Wait until both clusters report the READY status:
ovhcloud cloud managed-kubernetes get "$CLUSTER_ID_PROD" --output 'status'
ovhcloud cloud managed-kubernetes get "$CLUSTER_ID_DRP" --output 'status'
Create the node pools:
ovhcloud cloud managed-kubernetes nodepool create "$CLUSTER_ID_PROD" \
--name node-pool \
--flavor-name b3-8 \
--desired-nodes 3 \
--min-nodes 0 \
--max-nodes 5
ovhcloud cloud managed-kubernetes nodepool create "$CLUSTER_ID_DRP" \
--name node-pool \
--flavor-name b3-8 \
--desired-nodes 3 \
--min-nodes 0 \
--max-nodes 5
Download the kubeconfig files:
ovhcloud cloud managed-kubernetes kubeconfig generate "$CLUSTER_ID_PROD" > ~/.kube/cluster-prod.yaml
export KUBECONFIG_PROD=~/.kube/cluster-prod.yaml
ovhcloud cloud managed-kubernetes kubeconfig generate "$CLUSTER_ID_DRP" > ~/.kube/cluster-drp.yaml
export KUBECONFIG_DRP=~/.kube/cluster-drp.yaml
Check that the nodes have joined:
kubectl --kubeconfig $KUBECONFIG_PROD get node
kubectl --kubeconfig $KUBECONFIG_DRP get node
Managed Databases
PostgreSQL
Create one PostgreSQL cluster per region, reachable only from the private subnet:
ovhcloud cloud managed-database create \
--engine postgresql \
--version 17 \
--plan production \
--description postgresql-prod \
--nodes-pattern.flavor b3-8 \
--nodes-pattern.number 2 \
--nodes-pattern.region GRA \
--network-id "$NETWORK_ID_PROD" \
--subnet-id "$SUBNET_ID_PROD" \
--ip-restrictions 10.1.0.0/16
ovhcloud cloud managed-database create \
--engine postgresql \
--version 17 \
--plan production \
--description postgresql-drp \
--nodes-pattern.flavor b3-8 \
--nodes-pattern.number 2 \
--nodes-pattern.region SBG \
--network-id "$NETWORK_ID_DRP" \
--subnet-id "$SUBNET_ID_DRP" \
--ip-restrictions 10.1.0.0/16
Retrieve their IDs:
PG_ID_PROD=$(ovhcloud cloud managed-database list \
--filter 'description=="postgresql-prod"' --output json | jq -r .[0].id)
PG_ID_DRP=$(ovhcloud cloud managed-database list \
--filter 'description=="postgresql-drp"' --output json | jq -r .[0].id)
Wait until both report the READY status:
ovhcloud cloud managed-database get "$PG_ID_PROD" --output 'status'
ovhcloud cloud managed-database get "$PG_ID_DRP" --output 'status'
Create the nextcloud database on both clusters:
ovhcloud cloud managed-database database create "$PG_ID_PROD" --name nextcloud
ovhcloud cloud managed-database database create "$PG_ID_DRP" --name nextcloud
Reset the password of the avnadmin user to obtain it:
PG_USER_ID_PROD=$(ovhcloud cloud managed-database user list "$PG_ID_PROD" --output json \
| jq -r '.[] | select(.username=="avnadmin" or .name=="avnadmin") | .id')
PG_PASS_PROD=$(ovhcloud cloud managed-database user credentials-reset "$PG_ID_PROD" "$PG_USER_ID_PROD" --output json | jq -r .message | tail -n 1 | cut -d ' ' -f 2)
PG_USER_ID_DRP=$(ovhcloud cloud managed-database user list "$PG_ID_DRP" --output json \
| jq -r '.[] | select(.username=="avnadmin" or .name=="avnadmin") | .id')
PG_PASS_DRP=$(ovhcloud cloud managed-database user credentials-reset "$PG_ID_DRP" "$PG_USER_ID_DRP" --output json | jq -r .message | tail -n 1 | cut -d ' ' -f 2)
Retrieve the endpoints:
PG_HOST_PROD=$(ovhcloud cloud managed-database get "$PG_ID_PROD" --output json | jq -r '.endpoints[] | select(.component=="postgresql") | .domain')
PG_PORT_PROD=$(ovhcloud cloud managed-database get "$PG_ID_PROD" --output json | jq -r '.endpoints[] | select(.component=="postgresql") | .port')
PG_HOST_DRP=$(ovhcloud cloud managed-database get "$PG_ID_DRP" --output json | jq -r '.endpoints[] | select(.component=="postgresql") | .domain')
PG_PORT_DRP=$(ovhcloud cloud managed-database get "$PG_ID_DRP" --output json | jq -r '.endpoints[] | select(.component=="postgresql") | .port')
Valkey
Nextcloud uses Valkey as its cache. Create one cluster per region:
ovhcloud cloud managed-database create \
--engine valkey \
--version 8.1 \
--plan production \
--description valkey-prod \
--nodes-pattern.flavor b3-8 \
--nodes-pattern.number 2 \
--nodes-pattern.region GRA \
--network-id "$NETWORK_ID_PROD" \
--subnet-id "$SUBNET_ID_PROD" \
--ip-restrictions 10.1.0.0/16
ovhcloud cloud managed-database create \
--engine valkey \
--version 8.1 \
--plan production \
--description valkey-drp \
--nodes-pattern.flavor b3-8 \
--nodes-pattern.number 2 \
--nodes-pattern.region SBG \
--network-id "$NETWORK_ID_DRP" \
--subnet-id "$SUBNET_ID_DRP" \
--ip-restrictions 10.1.0.0/16
Retrieve their IDs:
VK_ID_PROD=$(ovhcloud cloud managed-database list \
--filter 'description=="valkey-prod"' --output json | jq -r .[0].id)
VK_ID_DRP=$(ovhcloud cloud managed-database list \
--filter 'description=="valkey-drp"' --output json | jq -r .[0].id)
Wait until both report the READY status:
ovhcloud cloud managed-database get "$VK_ID_PROD" --output 'status'
ovhcloud cloud managed-database get "$VK_ID_DRP" --output 'status'
Reset the password of the default user to obtain it:
VK_USER_ID_PROD=$(ovhcloud cloud managed-database user list "$VK_ID_PROD" --output json \
| jq -r '.[] | select(.username=="default" or .name=="default") | .id')
VK_PASS_PROD=$(ovhcloud cloud managed-database user credentials-reset "$VK_ID_PROD" "$VK_USER_ID_PROD" --output json | jq -r .message | tail -n 1 | cut -d ' ' -f 2)
VK_USER_ID_DRP=$(ovhcloud cloud managed-database user list "$VK_ID_DRP" --output json \
| jq -r '.[] | select(.username=="default" or .name=="default") | .id')
VK_PASS_DRP=$(ovhcloud cloud managed-database user credentials-reset "$VK_ID_DRP" "$VK_USER_ID_DRP" --output json | jq -r .message | tail -n 1 | cut -d ' ' -f 2)
Retrieve the endpoints:
VK_HOST_PROD=$(ovhcloud cloud managed-database get "$VK_ID_PROD" --output json | jq -r '.endpoints[0].domain')
VK_PORT_PROD=$(ovhcloud cloud managed-database get "$VK_ID_PROD" --output json | jq -r '.endpoints[0].port')
VK_HOST_DRP=$(ovhcloud cloud managed-database get "$VK_ID_DRP" --output json | jq -r '.endpoints[0].domain')
VK_PORT_DRP=$(ovhcloud cloud managed-database get "$VK_ID_DRP" --output json | jq -r '.endpoints[0].port')
Object Storage
Three buckets are needed: one for the production files, one for their replica on the recovery site, and one in a third region for the Velero backups. Each has its own user and S31 credentials.
Create the users and their access keys:
USER_ID_PROD=$(ovhcloud cloud user create \
--description "user-prod that is used to create S3 access key" \
--roles objectstore_operator \
--output json | jq 'select(.details.id != null) | .details.id')
sleep 1 && CRED_PROD=$(ovhcloud cloud storage object credentials create "$USER_ID_PROD" --output json)
S3_ACCESS_KEY_PROD=$(jq -r '.access' <<<"$CRED_PROD")
S3_SECRET_KEY_PROD=$(jq -r '.secret' <<<"$CRED_PROD")
USER_ID_DRP=$(ovhcloud cloud user create \
--description "user-drp that is used to create S3 access key" \
--roles objectstore_operator \
--output json | jq 'select(.details.id != null) | .details.id')
sleep 1 && CRED_DRP=$(ovhcloud cloud storage object credentials create "$USER_ID_DRP" --output json)
S3_ACCESS_KEY_DRP=$(jq -r '.access' <<<"$CRED_DRP")
S3_SECRET_KEY_DRP=$(jq -r '.secret' <<<"$CRED_DRP")
USER_ID_BACKUP=$(ovhcloud cloud user create \
--description "user-backup that is used to create S3 access key" \
--roles objectstore_operator \
--output json | jq 'select(.details.id != null) | .details.id')
sleep 1 && CRED_BACKUP=$(ovhcloud cloud storage object credentials create "$USER_ID_BACKUP" --output json)
S3_ACCESS_KEY_BACKUP=$(jq -r '.access' <<<"$CRED_BACKUP")
S3_SECRET_KEY_BACKUP=$(jq -r '.secret' <<<"$CRED_BACKUP")
Create the buckets. Versioning is enabled on the two Nextcloud buckets, as replication requires it:
SUFFIX=$(tr -dc 'a-z0-9' </dev/urandom | head -c8; echo)
ovhcloud cloud storage object create GRA \
--name "bucket-prod-${SUFFIX}" \
--owner-id "$USER_ID_PROD" \
--versioning-status enabled \
--encryption-sse-algorithm AES256
ovhcloud cloud storage object create SBG \
--name "bucket-drp-${SUFFIX}" \
--owner-id "$USER_ID_DRP" \
--versioning-status enabled \
--encryption-sse-algorithm AES256
ovhcloud cloud storage object create RBX \
--name "bucket-backup-${SUFFIX}" \
--owner-id "$USER_ID_BACKUP" \
--versioning-status disabled \
--encryption-sse-algorithm AES256
Create a replication rule on each Nextcloud bucket, as described in Object Storage - Master asynchronous replication across your buckets. Both rules are created now, but only the production one is active. The second is the return path used during a failover:
Attach an S3 policy to each user, granting it access to its own bucket only:
ovhcloud cloud user s3-policy create "$USER_ID_PROD" --policy "$(cat <<JSON
{
"Statement": [
{
"Sid": "AdminContainer",
"Effect": "Allow",
"Action": ["s3:*"],
"Resource": [
"arn:aws:s3:::bucket-prod-${SUFFIX}",
"arn:aws:s3:::bucket-prod-${SUFFIX}/*"
]
}
]
}
JSON
)"
ovhcloud cloud user s3-policy create "$USER_ID_DRP" --policy "$(cat <<JSON
{
"Statement": [
{
"Sid": "AdminContainer",
"Effect": "Allow",
"Action": ["s3:*"],
"Resource": [
"arn:aws:s3:::bucket-drp-${SUFFIX}",
"arn:aws:s3:::bucket-drp-${SUFFIX}/*"
]
}
]
}
JSON
)"
ovhcloud cloud user s3-policy create "$USER_ID_BACKUP" --policy "$(cat <<JSON
{
"Statement": [
{
"Sid": "AdminContainer",
"Effect": "Allow",
"Action": ["s3:*"],
"Resource": [
"arn:aws:s3:::bucket-backup-${SUFFIX}",
"arn:aws:s3:::bucket-backup-${SUFFIX}/*"
]
}
]
}
JSON
)"
File Storage
Nextcloud stores the end-user files in Object Storage, but its replicas still share a ReadWriteMany volume for the application data. This volume is provided by File Storage through the Manila CSI driver.
Install the driver on both clusters:
helm install csi-driver-nfs csi-driver-nfs \
--kubeconfig $KUBECONFIG_PROD \
--repo https://raw.githubusercontent.com/kubernetes-csi/csi-driver-nfs/master/charts \
-n kube-system
helm install openstack-manila-csi openstack-manila-csi \
--kubeconfig $KUBECONFIG_PROD \
--repo https://kubernetes.github.io/cloud-provider-openstack \
-n kube-system
helm install csi-driver-nfs csi-driver-nfs \
--kubeconfig $KUBECONFIG_DRP \
--repo https://raw.githubusercontent.com/kubernetes-csi/csi-driver-nfs/master/charts \
-n kube-system
helm install openstack-manila-csi openstack-manila-csi \
--kubeconfig $KUBECONFIG_DRP \
--repo https://kubernetes.github.io/cloud-provider-openstack \
-n kube-system
Create a dedicated user for the driver:
MANILA_USER=$(ovhcloud cloud user create \
--description "User for the Manila CSI driver" \
--roles share_operator \
--output json)
MANILA_USERNAME=$(jq -r 'select(.details.username != null) | .details.username' <<<"$MANILA_USER")
MANILA_PASSWORD=$(jq -r 'select(.details.password != null) | .details.password' <<<"$MANILA_USER")
Store its credentials in each cluster. Replace the following placeholder before running the commands:
<YOUR_PROJECT_ID>: the ID of your Public Cloud project, displayed in the OVHcloud Control Panel.
kubectl --kubeconfig $KUBECONFIG_PROD apply -f - <<EOF
apiVersion: v1
kind: Secret
metadata:
name: csi-manila-secrets
namespace: default
stringData:
os-authURL: "https://auth.cloud.ovh.net/v3"
os-region: "$REGION_PROD"
os-userName: "$MANILA_USERNAME"
os-password: "$MANILA_PASSWORD"
os-domainName: "default"
os-projectID: "<YOUR_PROJECT_ID>"
os-projectDomainID: "default"
EOF
kubectl --kubeconfig $KUBECONFIG_DRP apply -f - <<EOF
apiVersion: v1
kind: Secret
metadata:
name: csi-manila-secrets
namespace: default
stringData:
os-authURL: "https://auth.cloud.ovh.net/v3"
os-region: "$REGION_DRP"
os-userName: "$MANILA_USERNAME"
os-password: "$MANILA_PASSWORD"
os-domainName: "default"
os-projectID: "<YOUR_PROJECT_ID>"
os-projectDomainID: "default"
EOF
Create the share networks:
export OS_REGION_NAME=$REGION_PROD
SHARE_ID_PROD=$(openstack share network create \
--name share-network-prod \
--neutron-net-id "$NETWORK_ID_PROD" \
--neutron-subnet-id "$SUBNET_ID_PROD" \
-f value -c id)
export OS_REGION_NAME=$REGION_DRP
SHARE_ID_DRP=$(openstack share network create \
--name share-network-drp \
--neutron-net-id "$NETWORK_ID_DRP" \
--neutron-subnet-id "$SUBNET_ID_DRP" \
-f value -c id)
Create the driver ConfigMap on both clusters:
kubectl --kubeconfig $KUBECONFIG_PROD apply -f - <<EOF
apiVersion: v1
kind: ConfigMap
metadata:
name: manila-csi-runtimeconf-cm
namespace: default
annotations:
meta.helm.sh/release-name: manila-csi
meta.helm.sh/release-namespace: default
labels:
app.kubernetes.io/managed-by: Helm
data:
runtimeconfig.json: |
{
"nfs": {
"matchExportLocationAddress": "10.1.0.0/16"
}
}
EOF
kubectl --kubeconfig $KUBECONFIG_DRP apply -f - <<EOF
apiVersion: v1
kind: ConfigMap
metadata:
name: manila-csi-runtimeconf-cm
namespace: default
annotations:
meta.helm.sh/release-name: manila-csi
meta.helm.sh/release-namespace: default
labels:
app.kubernetes.io/managed-by: Helm
data:
runtimeconfig.json: |
{
"nfs": {
"matchExportLocationAddress": "10.1.0.0/16"
}
}
EOF
Create the StorageClass on both clusters:
kubectl --kubeconfig $KUBECONFIG_PROD apply -f - <<EOF
apiVersion: storage.k8s.io/v1
kind: StorageClass
metadata:
name: csi-manila-nfs
provisioner: nfs.manila.csi.openstack.org
allowVolumeExpansion: true
reclaimPolicy: Delete
parameters:
type: standard-1az
shareNetworkID: "$SHARE_ID_PROD"
nfs-shareClient: "10.1.0.0/16"
csi.storage.k8s.io/provisioner-secret-name: csi-manila-secrets
csi.storage.k8s.io/provisioner-secret-namespace: default
csi.storage.k8s.io/controller-expand-secret-name: csi-manila-secrets
csi.storage.k8s.io/controller-expand-secret-namespace: default
csi.storage.k8s.io/node-stage-secret-name: csi-manila-secrets
csi.storage.k8s.io/node-stage-secret-namespace: default
csi.storage.k8s.io/node-publish-secret-name: csi-manila-secrets
csi.storage.k8s.io/node-publish-secret-namespace: default
EOF
kubectl --kubeconfig $KUBECONFIG_DRP apply -f - <<EOF
apiVersion: storage.k8s.io/v1
kind: StorageClass
metadata:
name: csi-manila-nfs
provisioner: nfs.manila.csi.openstack.org
allowVolumeExpansion: true
reclaimPolicy: Delete
parameters:
type: standard-1az
shareNetworkID: "$SHARE_ID_DRP"
nfs-shareClient: "10.1.0.0/16"
csi.storage.k8s.io/provisioner-secret-name: csi-manila-secrets
csi.storage.k8s.io/provisioner-secret-namespace: default
csi.storage.k8s.io/controller-expand-secret-name: csi-manila-secrets
csi.storage.k8s.io/controller-expand-secret-namespace: default
csi.storage.k8s.io/node-stage-secret-name: csi-manila-secrets
csi.storage.k8s.io/node-stage-secret-namespace: default
csi.storage.k8s.io/node-publish-secret-name: csi-manila-secrets
csi.storage.k8s.io/node-publish-secret-namespace: default
EOF
HAProxy Ingress Controller
The ingress controller is exposed through an internal Public Cloud Load Balancer, which the IP Load Balancer will later use as a backend:
helm --kubeconfig $KUBECONFIG_PROD install haproxy kubernetes-ingress \
--repo https://haproxytech.github.io/helm-charts \
-n haproxy-controller --create-namespace \
--set controller.service.type=LoadBalancer \
--set controller.ingressClassResource.default=true \
--set 'controller.service.annotations.service\.beta\.kubernetes\.io/openstack-internal-load-balancer=true'
helm --kubeconfig $KUBECONFIG_DRP install haproxy kubernetes-ingress \
--repo https://haproxytech.github.io/helm-charts \
-n haproxy-controller --create-namespace \
--set controller.service.type=LoadBalancer \
--set controller.ingressClassResource.default=true \
--set 'controller.service.annotations.service\.beta\.kubernetes\.io/openstack-internal-load-balancer=true'
Cert-Manager
Install Cert-Manager on both clusters:
helm --kubeconfig $KUBECONFIG_PROD install cert-manager cert-manager \
--repo https://charts.jetstack.io \
-n cert-manager --create-namespace \
--set crds.enabled=true \
--set crds.keep=false
helm --kubeconfig $KUBECONFIG_DRP install cert-manager cert-manager \
--repo https://charts.jetstack.io \
-n cert-manager --create-namespace \
--set crds.enabled=true \
--set crds.keep=false
Because both clusters serve the same hostname, the Let's Encrypt certificates are issued through a DNS-01 challenge. Create OVHcloud API application keys with the following permissions:
GET on /domain/zone
GET on /domain/zone/*/record
GET on /domain/zone/*/record/*
POST on /domain/zone/*/record
DELETE on /domain/zone/*/record/*
POST on /domain/zone/*/refresh
Install the OVH webhook on both clusters. Replace the following placeholders before running the commands:
<YOUR_DNS_DOMAIN>: the domain name whose DNS zone is hosted at OVHcloud, for example example.com.
<APP_KEY>, <APP_SECRET> and <CONSUMER_KEY>: the application key, application secret and consumer key created above.
<YOUR_EMAIL>: the email address used for the Let's Encrypt account.
helm --kubeconfig $KUBECONFIG_PROD install cert-manager-webhook-ovh cert-manager-webhook-ovh \
--repo https://aureq.github.io/cert-manager-webhook-ovh/ \
-n cert-manager \
--set groupName=<YOUR_DNS_DOMAIN> \
--set issuers[0].name=letsencrypt-production \
--set issuers[0].create=true \
--set issuers[0].kind=ClusterIssuer \
--set issuers[0].acmeServerUrl=https://acme-v02.api.letsencrypt.org/directory \
--set issuers[0].ovhEndpointName=ovh-eu \
--set issuers[0].ovhAuthenticationMethod=application \
--set issuers[0].ovhAuthentication.applicationKey=<APP_KEY> \
--set issuers[0].ovhAuthentication.applicationSecret=<APP_SECRET> \
--set issuers[0].ovhAuthentication.applicationConsumerKey=<CONSUMER_KEY> \
--set issuers[0].email=<YOUR_EMAIL> \
--set issuers[1].name=letsencrypt-staging \
--set issuers[1].create=true \
--set issuers[1].kind=ClusterIssuer \
--set issuers[1].acmeServerUrl=https://acme-staging-v02.api.letsencrypt.org/directory \
--set issuers[1].ovhEndpointName=ovh-eu \
--set issuers[1].ovhAuthenticationMethod=application \
--set issuers[1].ovhAuthentication.applicationKey=<APP_KEY> \
--set issuers[1].ovhAuthentication.applicationSecret=<APP_SECRET> \
--set issuers[1].ovhAuthentication.applicationConsumerKey=<CONSUMER_KEY> \
--set issuers[1].email=<YOUR_EMAIL>
helm --kubeconfig $KUBECONFIG_DRP install cert-manager-webhook-ovh cert-manager-webhook-ovh \
--repo https://aureq.github.io/cert-manager-webhook-ovh/ \
-n cert-manager \
--set groupName=<YOUR_DNS_DOMAIN> \
--set issuers[0].name=letsencrypt-production \
--set issuers[0].create=true \
--set issuers[0].kind=ClusterIssuer \
--set issuers[0].acmeServerUrl=https://acme-v02.api.letsencrypt.org/directory \
--set issuers[0].ovhEndpointName=ovh-eu \
--set issuers[0].ovhAuthenticationMethod=application \
--set issuers[0].ovhAuthentication.applicationKey=<APP_KEY> \
--set issuers[0].ovhAuthentication.applicationSecret=<APP_SECRET> \
--set issuers[0].ovhAuthentication.applicationConsumerKey=<CONSUMER_KEY> \
--set issuers[0].email=<YOUR_EMAIL> \
--set issuers[1].name=letsencrypt-staging \
--set issuers[1].create=true \
--set issuers[1].kind=ClusterIssuer \
--set issuers[1].acmeServerUrl=https://acme-staging-v02.api.letsencrypt.org/directory \
--set issuers[1].ovhEndpointName=ovh-eu \
--set issuers[1].ovhAuthenticationMethod=application \
--set issuers[1].ovhAuthentication.applicationKey=<APP_KEY> \
--set issuers[1].ovhAuthentication.applicationSecret=<APP_SECRET> \
--set issuers[1].ovhAuthentication.applicationConsumerKey=<CONSUMER_KEY> \
--set issuers[1].email=<YOUR_EMAIL>
Velero
Velero copies the Kubernetes objects and volumes of the production cluster into the backup bucket, so that they can be restored on the recovery cluster:
helm --kubeconfig $KUBECONFIG_PROD install velero velero \
--repo https://vmware-tanzu.github.io/helm-charts/ \
-n velero --create-namespace \
--set deployNodeAgent=true \
--set configuration.features=EnableCSI \
--set configuration.defaultVolumesToFsBackup=true \
--set configuration.backupStorageLocation[0].provider=aws \
--set configuration.backupStorageLocation[0].bucket="bucket-backup-$SUFFIX" \
--set-string configuration.backupStorageLocation[0].config.region=rbx \
--set-string configuration.backupStorageLocation[0].config.s3ForcePathStyle=true \
--set-string configuration.backupStorageLocation[0].config.s3Url=https://s3.rbx.io.cloud.ovh.net \
--set configuration.volumeSnapshotLocation[0].provider=aws \
--set initContainers[0].name=velero-plugin-for-aws \
--set initContainers[0].image=velero/velero-plugin-for-aws:v1.12.2 \
--set initContainers[0].volumeMounts[0].name=plugins \
--set initContainers[0].volumeMounts[0].mountPath=/target \
--set-string credentials.secretContents.cloud="$(printf '[default]\naws_access_key_id=%s\naws_secret_access_key=%s' "$S3_ACCESS_KEY_BACKUP" "$S3_SECRET_KEY_BACKUP")" \
--set kubectl.image.repository=docker.io/bitnamilegacy/kubectl \
--set-string kubectl.image.tag=latest
helm --kubeconfig $KUBECONFIG_DRP install velero velero \
--repo https://vmware-tanzu.github.io/helm-charts/ \
-n velero --create-namespace \
--set deployNodeAgent=true \
--set configuration.features=EnableCSI \
--set configuration.defaultVolumesToFsBackup=true \
--set configuration.backupStorageLocation[0].provider=aws \
--set configuration.backupStorageLocation[0].bucket="bucket-backup-$SUFFIX" \
--set-string configuration.backupStorageLocation[0].config.region=rbx \
--set-string configuration.backupStorageLocation[0].config.s3ForcePathStyle=true \
--set-string configuration.backupStorageLocation[0].config.s3Url=https://s3.rbx.io.cloud.ovh.net \
--set configuration.volumeSnapshotLocation[0].provider=aws \
--set initContainers[0].name=velero-plugin-for-aws \
--set initContainers[0].image=velero/velero-plugin-for-aws:v1.12.2 \
--set initContainers[0].volumeMounts[0].name=plugins \
--set initContainers[0].volumeMounts[0].mountPath=/target \
--set-string credentials.secretContents.cloud="$(printf '[default]\naws_access_key_id=%s\naws_secret_access_key=%s' "$S3_ACCESS_KEY_BACKUP" "$S3_SECRET_KEY_BACKUP")" \
--set kubectl.image.repository=docker.io/bitnamilegacy/kubectl \
--set-string kubectl.image.tag=latest
Create the VolumeSnapshotClass used by Velero on both clusters:
kubectl --kubeconfig $KUBECONFIG_PROD apply -f - <<EOF
apiVersion: snapshot.storage.k8s.io/v1
kind: VolumeSnapshotClass
metadata:
name: csi-cinder-snapclass-in-use-v1-velero
labels:
velero.io/csi-volumesnapshot-class: "true"
deletionPolicy: Delete
driver: cinder.csi.openstack.org
parameters:
force-create: "true"
EOF
kubectl --kubeconfig $KUBECONFIG_DRP apply -f - <<EOF
apiVersion: snapshot.storage.k8s.io/v1
kind: VolumeSnapshotClass
metadata:
name: csi-cinder-snapclass-in-use-v1-velero
labels:
velero.io/csi-volumesnapshot-class: "true"
deletionPolicy: Delete
driver: cinder.csi.openstack.org
parameters:
force-create: "true"
EOF
IP Load Balancer
Order an IP Load Balancer Pack 2, then configure it from the OVHcloud Control Panel.
Serving backends located in two regions relies on a multi-zone configuration, described in How to configure the OVHcloud Load Balancer in multiple zones.
vRack configuration
Place the IP Load Balancer in the same vRack as your Public Cloud project, as described in Configuring the vRack on the load balancer, then configure its private network:
Server cluster
In the Server clusters tab, click Add a server cluster and use the following parameters:
Retrieve the external IP address of the Public Cloud Load Balancer of each cluster:
kubectl --kubeconfig $KUBECONFIG_PROD get svc -n haproxy-controller \
-o jsonpath='{.items[0].status.loadBalancer.ingress[0].ip}'
kubectl --kubeconfig $KUBECONFIG_DRP get svc -n haproxy-controller \
-o jsonpath='{.items[0].status.loadBalancer.ingress[0].ip}'
Add both as servers of the cluster, replacing <EXTERNAL_IP_PUBLIC_CLOUD_LB_PROD> and <EXTERNAL_IP_PUBLIC_CLOUD_LB_DRP> with the two addresses returned above:
Then disable the drp server with its toggle, so that only the production site receives traffic.
Front-end
In the Front-ends tab, click Add a front-end and use the following parameters:
Apply the IP Load Balancer configuration to make it effective.
DNS record
Create a nextcloud A record in your DNS zone, pointing to the public IP address of the IP Load Balancer.
Deploying Nextcloud on the production cluster
Replace the following placeholders before running the command:
<YOUR_DNS_DOMAIN>: the domain name whose DNS zone is hosted at OVHcloud. The A record created earlier makes Nextcloud available at nextcloud.<YOUR_DNS_DOMAIN>.
<YOUR_ADMIN_PASSWORD>: the password of the Nextcloud admin-demo administrator account.
54ghne6d.eu-west-par.container-registry.ovh.net: the registry hosting the Nextcloud image. Point image.registry and image.repository at your own registry, or remove both flags to pull the image from the chart's default registry.
Warning
The administrator password is passed on the command line, so it ends up in your shell history and in the Helm release values. Use a dedicated password and change it after the first connection.
helm --kubeconfig $KUBECONFIG_PROD install nextcloud nextcloud \
--repo https://nextcloud.github.io/helm/ \
--version 8.6.1 \
-n nextcloud --create-namespace \
--timeout 20m \
--set livenessProbe.initialDelaySeconds=600 \
--set image.registry=54ghne6d.eu-west-par.container-registry.ovh.net \
--set image.repository=library/nextcloud \
--set nextcloud.host="nextcloud.<YOUR_DNS_DOMAIN>" \
--set nextcloud.username=admin-demo \
--set nextcloud.password='<YOUR_ADMIN_PASSWORD>' \
--set 'nextcloud.configs.custom\.config\.php=<?php $CONFIG = array ('"'"'trusted_domains'"'"' => ['"'"'*'"'"']);' \
--set internalDatabase.enabled=false \
--set externalDatabase.enabled=true \
--set externalDatabase.type=postgresql \
--set externalDatabase.host="$PG_HOST_PROD:$PG_PORT_PROD" \
--set externalDatabase.database=nextcloud \
--set externalDatabase.user=avnadmin \
--set-string externalDatabase.password="$PG_PASS_PROD" \
--set redis.enabled=false \
--set externalRedis.enabled=true \
--set externalRedis.host="tls://$VK_HOST_PROD" \
--set externalRedis.port="$VK_PORT_PROD" \
--set-string externalRedis.password="$VK_PASS_PROD" \
--set nextcloud.extraEnv[0].name=HOME \
--set nextcloud.extraEnv[0].value=/usr/local/share/ca-certificates/ \
--set nextcloud.extraEnv[1].name=REDIS_HOST_USER \
--set nextcloud.extraEnv[1].value=default \
--set nextcloud.extraEnv[2].name=OVERWRITEPROTOCOL \
--set nextcloud.extraEnv[2].value=https \
--set nextcloud.extraEnv[3].name=OVERWRITECLIURL \
--set nextcloud.extraEnv[3].value="https://nextcloud.<YOUR_DNS_DOMAIN>" \
--set ingress.enabled=true \
--set ingress.className=haproxy \
--set ingress.path=/ \
--set 'ingress.annotations.cert-manager\.io/cluster-issuer=letsencrypt-production' \
--set 'ingress.annotations.kubernetes\.io/ingress\.class=haproxy' \
--set 'ingress.annotations.haproxy\.org/timeout-server=300s' \
--set ingress.tls[0].hosts[0]="nextcloud.<YOUR_DNS_DOMAIN>" \
--set ingress.tls[0].secretName=nextcloud-tls \
--set nextcloud.objectStore.s3.enabled=true \
--set-string nextcloud.objectStore.s3.accessKey="$S3_ACCESS_KEY_PROD" \
--set-string nextcloud.objectStore.s3.secretKey="$S3_SECRET_KEY_PROD" \
--set nextcloud.objectStore.s3.host=s3.gra.io.cloud.ovh.net \
--set nextcloud.objectStore.s3.region=gra \
--set nextcloud.objectStore.s3.bucket="bucket-prod-$SUFFIX" \
--set nextcloud.objectStore.s3.autoCreate=false \
--set persistence.enabled=true \
--set persistence.storageClass=csi-manila-nfs \
--set persistence.size=150Gi \
--set persistence.accessMode=ReadWriteMany \
--set resources.requests.cpu=250m \
--set resources.requests.memory=512Mi \
--set resources.limits.cpu=1000m \
--set resources.limits.memory=1Gi \
--set replicaCount=2 \
--set hpa.enabled=true \
--set hpa.cputhreshold=60 \
--set hpa.minPods=2 \
--set hpa.maxPods=10
Bastions and PostgreSQL replication
The databases are only reachable from the private network, so each region gets a bastion instance holding the PostgreSQL client. The production bastion also sets up the logical replication towards the recovery site through its cloud-init script: it lists the Nextcloud tables (oc_*), creates a publication for them, copies their schema to the recovery database, and creates the matching subscription.
Create an SSH key for the bastions:
ssh-keygen -t ed25519 -f ~/.ssh/bastion -N ""
Register it in both regions:
ovhcloud cloud ssh-key create \
--region "$REGION_PROD" \
--name bastion-key \
--public-key "$(cat ~/.ssh/bastion.pub)"
ovhcloud cloud ssh-key create \
--region "$REGION_DRP" \
--name bastion-key \
--public-key "$(cat ~/.ssh/bastion.pub)"
Create the production bastion, which also configures the replication:
BASTION_IMAGE_PROD=$(ovhcloud cloud reference list-images --region "$REGION_PROD" --os-type linux --filter 'name=="Ubuntu 24.04"' --output json | jq -r .[0].id)
BASTION_FLAVOR_PROD=$(ovhcloud cloud reference list-flavors --filter "region==\"$REGION_PROD\" && name==\"b3-8\"" --output json | jq -r .[0].id)
ovhcloud cloud instance create $REGION_PROD \
--name bastion-prod \
--boot-from.image "$BASTION_IMAGE_PROD" \
--flavor "$BASTION_FLAVOR_PROD" \
--billing-period hourly \
--network.private.id "$NETWORK_ID_PROD" \
--network.private.subnet-id "$SUBNET_ID_PROD" \
--network.private.gateway.id "$GATEWAY_ID_PROD" \
--network.private.floating-ip.create.description bastion-prod-fip \
--ssh-key.name "bastion-key" \
--wait \
--user-data "$(cat <<EOF
#cloud-config
package_update: true
apt:
sources:
pgdg.list:
source: deb http://apt.postgresql.org/pub/repos/apt noble-pgdg main
keyid: B97B0AFCAA1A47F044F244A07FCC7D46ACCC4CF8
packages:
- postgresql-client-17
runcmd:
- |
set -eu
echo '[INFO] discovering oc_* tables on $PG_HOST_PROD'
TABLES=\$(PGPASSWORD='$PG_PASS_PROD' psql -h '$PG_HOST_PROD' -p '$PG_PORT_PROD' -U avnadmin -d nextcloud -tAc "SELECT string_agg(quote_ident(tablename), ',' ORDER BY tablename) FROM pg_tables WHERE schemaname='public' AND tablename LIKE 'oc\\_%'")
echo '[INFO] creating publication pub_source_tables'
PGPASSWORD='$PG_PASS_PROD' psql -h '$PG_HOST_PROD' -p '$PG_PORT_PROD' -U avnadmin -d nextcloud -c "CREATE PUBLICATION pub_source_tables FOR TABLE \$TABLES WITH (publish='insert,update,delete');"
echo '[INFO] dumping schema from $PG_HOST_PROD'
PGPASSWORD='$PG_PASS_PROD' pg_dump --schema-only --no-publications -h '$PG_HOST_PROD' -p '$PG_PORT_PROD' -U avnadmin -d nextcloud -t 'oc_*' > /home/ubuntu/origin_tables.sql
echo '[INFO] preparing subscriber $PG_HOST_DRP'
PGPASSWORD='$PG_PASS_DRP' psql -h '$PG_HOST_DRP' -p '$PG_PORT_DRP' -U avnadmin -d nextcloud -c "CREATE EXTENSION IF NOT EXISTS aiven_extras CASCADE;"
PGPASSWORD='$PG_PASS_PROD' psql -h '$PG_HOST_PROD' -p '$PG_PORT_PROD' -U avnadmin -d nextcloud -c "CREATE EXTENSION IF NOT EXISTS aiven_extras CASCADE;"
PGPASSWORD='$PG_PASS_DRP' psql -h '$PG_HOST_DRP' -p '$PG_PORT_DRP' -U avnadmin -d nextcloud -a -f /home/ubuntu/origin_tables.sql
PGPASSWORD='$PG_PASS_DRP' psql -h '$PG_HOST_DRP' -p '$PG_PORT_DRP' -U avnadmin -d nextcloud -c "SELECT * FROM aiven_extras.pg_create_subscription('dest_subscription', 'host=$PG_HOST_PROD password=$PG_PASS_PROD port=$PG_PORT_PROD dbname=nextcloud user=avnadmin', 'pub_source_tables', 'dest_slot', TRUE, TRUE);"
EOF
)"
Create the recovery bastion, which only needs the PostgreSQL client:
BASTION_IMAGE_DRP=$(ovhcloud cloud reference list-images --region "$REGION_DRP" --os-type linux --filter 'name=="Ubuntu 24.04"' --output json | jq -r .[0].id)
BASTION_FLAVOR_DRP=$(ovhcloud cloud reference list-flavors --filter "region==\"$REGION_DRP\" && name==\"b3-8\"" --output json | jq -r .[0].id)
ovhcloud cloud instance create $REGION_DRP \
--name bastion-drp \
--boot-from.image "$BASTION_IMAGE_DRP" \
--flavor "$BASTION_FLAVOR_DRP" \
--billing-period hourly \
--network.private.id "$NETWORK_ID_DRP" \
--network.private.subnet-id "$SUBNET_ID_DRP" \
--network.private.gateway.id "$GATEWAY_ID_DRP" \
--network.private.floating-ip.create.description bastion-drp-fip \
--ssh-key.name "bastion-key" \
--wait \
--user-data "$(cat <<EOF
#cloud-config
package_update: true
apt:
sources:
pgdg.list:
source: deb http://apt.postgresql.org/pub/repos/apt noble-pgdg main
keyid: B97B0AFCAA1A47F044F244A07FCC7D46ACCC4CF8
packages:
- postgresql-client-17
EOF
)"
Read the public IP address of each bastion in the OVHcloud Control Panel, then store them. Replace the following placeholders before running the commands:
<BASTION_PUBLIC_IP_PROD>: the floating IP of the bastion-prod instance.
<BASTION_PUBLIC_IP_DRP>: the floating IP of the bastion-drp instance.
BASTION_IP_PROD=<BASTION_PUBLIC_IP_PROD>
BASTION_IP_DRP=<BASTION_PUBLIC_IP_DRP>
Replicating the Nextcloud configuration to the recovery cluster
Nextcloud generates its own configuration on first start. To give the recovery cluster the same configuration, back it up on the production cluster with Velero and restore it on the other side.
Create the backup:
kubectl --kubeconfig $KUBECONFIG_PROD apply -f - <<EOF
apiVersion: velero.io/v1
kind: Backup
metadata:
name: nextcloud-config
namespace: velero
annotations:
velero.io/resource-timeout: 10m0s
labels:
velero.io/storage-location: default
spec:
includedNamespaces:
- nextcloud
includedResources:
- pv
- pvc
- pod
- deployment
- cm
excludedResources:
- volumesnapshots.snapshot.storage.k8s.io
- volumesnapshotcontents.snapshot.storage.k8s.io
defaultVolumesToFsBackup: true
snapshotMoveData: false
storageLocation: default
volumeSnapshotLocations:
- default
csiSnapshotTimeout: 10m0s
itemOperationTimeout: 4h0m0s
ttl: 720h0m0s
volumeGroupSnapshotLabelKey: velero.io/volume-group
hooks: {}
metadata: {}
EOF
Wait until it reaches the Completed phase:
kubectl --kubeconfig $KUBECONFIG_PROD -n velero get backup nextcloud-config \
-o jsonpath='{.status.phase}{"\n"}' -w
Restore it on the recovery cluster:
kubectl --kubeconfig $KUBECONFIG_DRP apply -f - <<EOF
apiVersion: velero.io/v1
kind: Restore
metadata:
name: nextcloud-config
namespace: velero
spec:
backupName: nextcloud-config
includedNamespaces:
- '*'
itemOperationTimeout: 4h0m0s
hooks: {}
EOF
Wait until the restore reaches the Completed phase:
kubectl --kubeconfig $KUBECONFIG_DRP -n velero get restore nextcloud-config \
-o jsonpath='{.status.phase}{"\n"}' -w
Deploying Nextcloud on the recovery cluster
The command is the same as for production, with three differences: the DRP endpoints and credentials, the DRP bucket in Strasbourg, and --take-ownership, which lets Helm adopt the resources restored by Velero.
Replace the following placeholders before running the command, using the same values as on the production cluster:
<YOUR_DNS_DOMAIN>: the domain name whose DNS zone is hosted at OVHcloud.
<YOUR_ADMIN_PASSWORD>: the password of the Nextcloud admin-demo administrator account.
54ghne6d.eu-west-par.container-registry.ovh.net: the registry hosting the Nextcloud image.
helm --kubeconfig "$KUBECONFIG_DRP" install nextcloud nextcloud \
--repo https://nextcloud.github.io/helm/ \
--version 8.6.1 \
-n nextcloud --create-namespace \
--timeout 20m \
--take-ownership \
--set livenessProbe.initialDelaySeconds=600 \
--set image.registry=54ghne6d.eu-west-par.container-registry.ovh.net \
--set image.repository=library/nextcloud \
--set nextcloud.host="nextcloud.<YOUR_DNS_DOMAIN>" \
--set nextcloud.username=admin-demo \
--set nextcloud.password='<YOUR_ADMIN_PASSWORD>' \
--set 'nextcloud.configs.custom\.config\.php=<?php $CONFIG = array ('"'"'trusted_domains'"'"' => ['"'"'*'"'"']);' \
--set internalDatabase.enabled=false \
--set externalDatabase.enabled=true \
--set externalDatabase.type=postgresql \
--set externalDatabase.host="$PG_HOST_DRP:$PG_PORT_DRP" \
--set externalDatabase.database=nextcloud \
--set externalDatabase.user=avnadmin \
--set-string externalDatabase.password="$PG_PASS_DRP" \
--set redis.enabled=false \
--set externalRedis.enabled=true \
--set externalRedis.host="tls://$VK_HOST_DRP" \
--set externalRedis.port="$VK_PORT_DRP" \
--set-string externalRedis.password="$VK_PASS_DRP" \
--set nextcloud.extraEnv[0].name=HOME \
--set nextcloud.extraEnv[0].value=/usr/local/share/ca-certificates/ \
--set nextcloud.extraEnv[1].name=REDIS_HOST_USER \
--set nextcloud.extraEnv[1].value=default \
--set nextcloud.extraEnv[2].name=OVERWRITEPROTOCOL \
--set nextcloud.extraEnv[2].value=https \
--set nextcloud.extraEnv[3].name=OVERWRITECLIURL \
--set nextcloud.extraEnv[3].value="https://nextcloud.<YOUR_DNS_DOMAIN>" \
--set ingress.enabled=true \
--set ingress.className=haproxy \
--set ingress.path=/ \
--set 'ingress.annotations.cert-manager\.io/cluster-issuer=letsencrypt-production' \
--set 'ingress.annotations.kubernetes\.io/ingress\.class=haproxy' \
--set 'ingress.annotations.haproxy\.org/timeout-server=300s' \
--set ingress.tls[0].hosts[0]="nextcloud.<YOUR_DNS_DOMAIN>" \
--set ingress.tls[0].secretName=nextcloud-tls \
--set nextcloud.objectStore.s3.enabled=true \
--set-string nextcloud.objectStore.s3.accessKey="$S3_ACCESS_KEY_DRP" \
--set-string nextcloud.objectStore.s3.secretKey="$S3_SECRET_KEY_DRP" \
--set nextcloud.objectStore.s3.host=s3.sbg.io.cloud.ovh.net \
--set nextcloud.objectStore.s3.region=sbg \
--set nextcloud.objectStore.s3.bucket="bucket-drp-$SUFFIX" \
--set nextcloud.objectStore.s3.autoCreate=false \
--set persistence.enabled=true \
--set persistence.storageClass=csi-manila-nfs \
--set persistence.size=150Gi \
--set persistence.accessMode=ReadWriteMany \
--set resources.requests.cpu=250m \
--set resources.requests.memory=512Mi \
--set resources.limits.cpu=1000m \
--set resources.limits.memory=1Gi \
--set replicaCount=2 \
--set hpa.enabled=true \
--set hpa.cputhreshold=60 \
--set hpa.minPods=2 \
--set hpa.maxPods=10
Failing over from GRA11 to SBG5
The recovery site is now fully provisioned and kept in sync. Failing over means reversing the direction of the two replications and switching the IP Load Balancer backend.
Failover
Simulate an incident by scaling the production deployment down to zero:
kubectl --kubeconfig $KUBECONFIG_PROD scale deploy/nextcloud --replicas=0 -n nextcloud
Stop the replication from the production database to the recovery database, through the recovery bastion:
ssh ubuntu@$BASTION_IP_DRP "PGPASSWORD=$PG_PASS_DRP psql -h $PG_HOST_DRP -p $PG_PORT_DRP -U avnadmin -d nextcloud -c \"SELECT * FROM aiven_extras.pg_drop_subscription('dest_subscription', FALSE);\""
Start the replication in the opposite direction, from the recovery database to the production one:
ssh ubuntu@$BASTION_IP_DRP "PGPASSWORD='$PG_PASS_PROD' psql -h '$PG_HOST_PROD' -p '$PG_PORT_PROD' -U avnadmin -d nextcloud -c \"SELECT * FROM aiven_extras.pg_create_subscription('dest_subscription', 'host=$PG_HOST_DRP password=$PG_PASS_DRP port=$PG_PORT_DRP dbname=nextcloud user=avnadmin', 'pub_source_tables', 'dest_slot', TRUE, TRUE);\""
Then, in the OVHcloud Control Panel:
- Disable the replication rule on the production Object Storage bucket.
- Enable the replication rule on the DRP Object Storage bucket.
- Disable the
prod backend server in the IP Load Balancer.
- Enable the
drp backend server in the IP Load Balancer.
Nextcloud is now served from SBG5, on the same URL.
Failback
Once the production region is available again, reverse the same four operations.
Bring the production deployment back up:
kubectl --kubeconfig $KUBECONFIG_PROD scale deploy/nextcloud --replicas=2 -n nextcloud
Stop the replication from the recovery database to the production one, through the production bastion:
ssh ubuntu@$BASTION_IP_PROD "PGPASSWORD=$PG_PASS_PROD psql -h $PG_HOST_PROD -p $PG_PORT_PROD -U avnadmin -d nextcloud -c \"SELECT * FROM aiven_extras.pg_drop_subscription('dest_subscription', FALSE);\""
Restart the replication from the production database to the recovery one:
ssh ubuntu@$BASTION_IP_PROD "PGPASSWORD='$PG_PASS_DRP' psql -h '$PG_HOST_DRP' -p '$PG_PORT_DRP' -U avnadmin -d nextcloud -c \"SELECT * FROM aiven_extras.pg_create_subscription('dest_subscription', 'host=$PG_HOST_PROD password=$PG_PASS_PROD port=$PG_PORT_PROD dbname=nextcloud user=avnadmin', 'pub_source_tables', 'dest_slot', TRUE, TRUE);\""
Then, in the OVHcloud Control Panel:
- Disable the replication rule on the DRP Object Storage bucket.
- Enable the replication rule on the production Object Storage bucket.
- Disable the
drp backend server in the IP Load Balancer.
- Enable the
prod backend server in the IP Load Balancer.
Go further
For training or technical assistance implementing our solutions, contact your sales representative or visit our Professional Services page to request a quote and have your project analyzed by our experts.
Feedback
Please send us your questions, feedback, and suggestions to improve the service:
1: S3 is a trademark of Amazon Technologies, Inc. OVHcloud's service is not sponsored by, endorsed by, or otherwise affiliated with Amazon Technologies, Inc.