Bring Your Own Image (BYOI)
Find out how to easily deploy your own images on dedicated servers
Objective
The Bring Your Own Image feature (BYOI) enables you to deploy cloudready images directly on your dedicated server. You can therefore use the bare metal service as a resource for your deployments.
What does cloudready mean?
The cloudready standard generally means being agnostic of the infrastructure on which the image is deployed. In addition to the requirements and limitations mentioned below, you must ensure that the image (downloaded or generated) meets the technical expectations of a cloudready image.
This guide explains how to use Bring Your Own Image (BYOI) on your OVHcloud dedicated server.
Requirements
- A dedicated server in your OVHcloud account
- Access to the OVHcloud API (for the "Deployment via API" section of this guide)
- Your image must be smaller than the server RAM minus 3GiB
To apply OVHcloud customizations at first boot, your image must include cloud-init or a compatible alternative (such as FreeBSD's nuageinit).
OVHcloud Control Panel Access
- Direct link:
- Navigation path:
Bare Metal Cloud>Dedicated servers> Select your server
As with any classical OS installation, a new installation with BYOI will erase all the data on the server.
Instructions
Technical limitations:
There are some technical limitations linked to the use of physical products such as dedicated servers. Here is a non-exhaustive list, to keep in mind during your deployment preparation:
- Boot type: uefi or legacy
- Partition type: MBR or GPT
- Image format: qcow2 or raw
About RAID:
-
Bring Your Own Image (BYOI) does not support software RAID configuration at install-time, but you can use the service Bring Your Own Linux (BYOLinux) for that. Choose the custom image method that fits your needs: Bring Your Own Image (BYOI) / Bring Your Own Linux (BYOLinux), a comparison sheet.
-
BYOI deploys the image to a single disk: the first disk of the target disk group.
-
Hardware RAID works on servers with a RAID controller, because it presents the array to the operating system as a single virtual disk.
Deployment methods:
- Deployment via the Control Panel: allows you to deploy your image using the OVHcloud Control Panel.
- Deployment via API: you can use the OVHcloud API to integrate images into your own scripts to automate deployments.
Deploy your image via the Control Panel
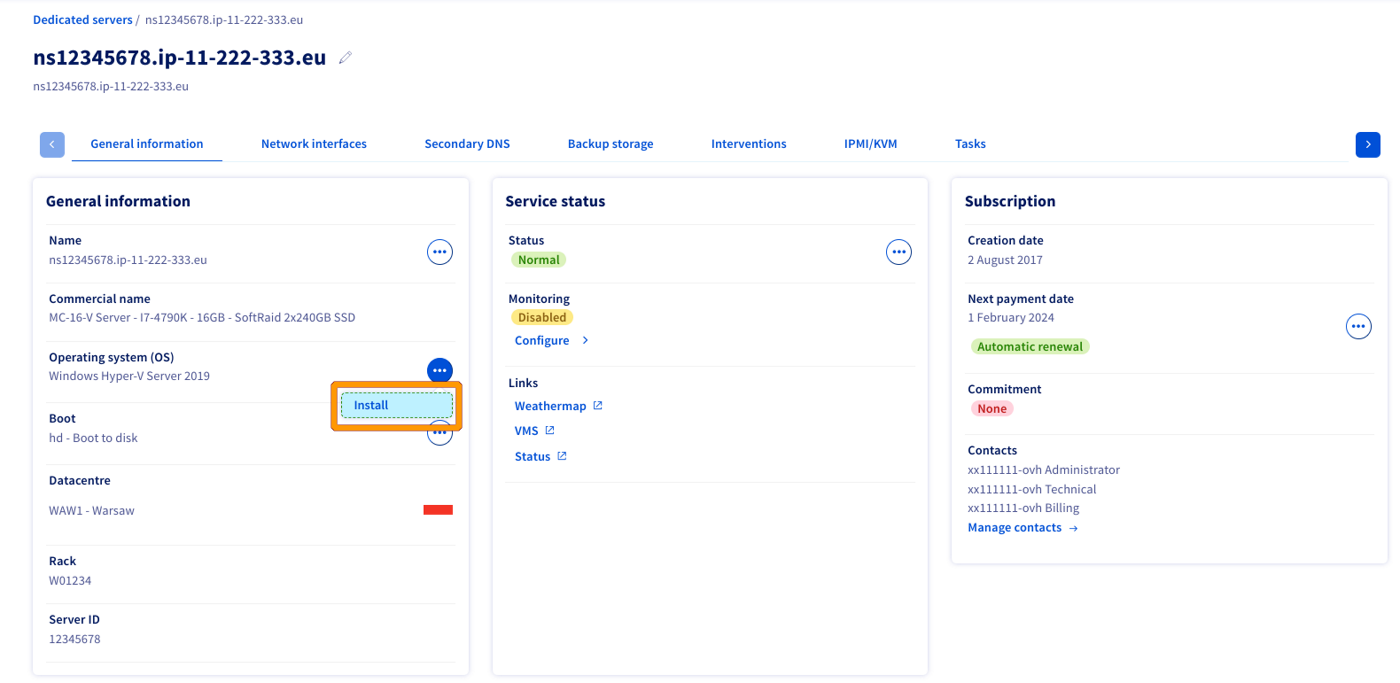
In the General information tab, click the ... button next to "System (OS)" then click Install.
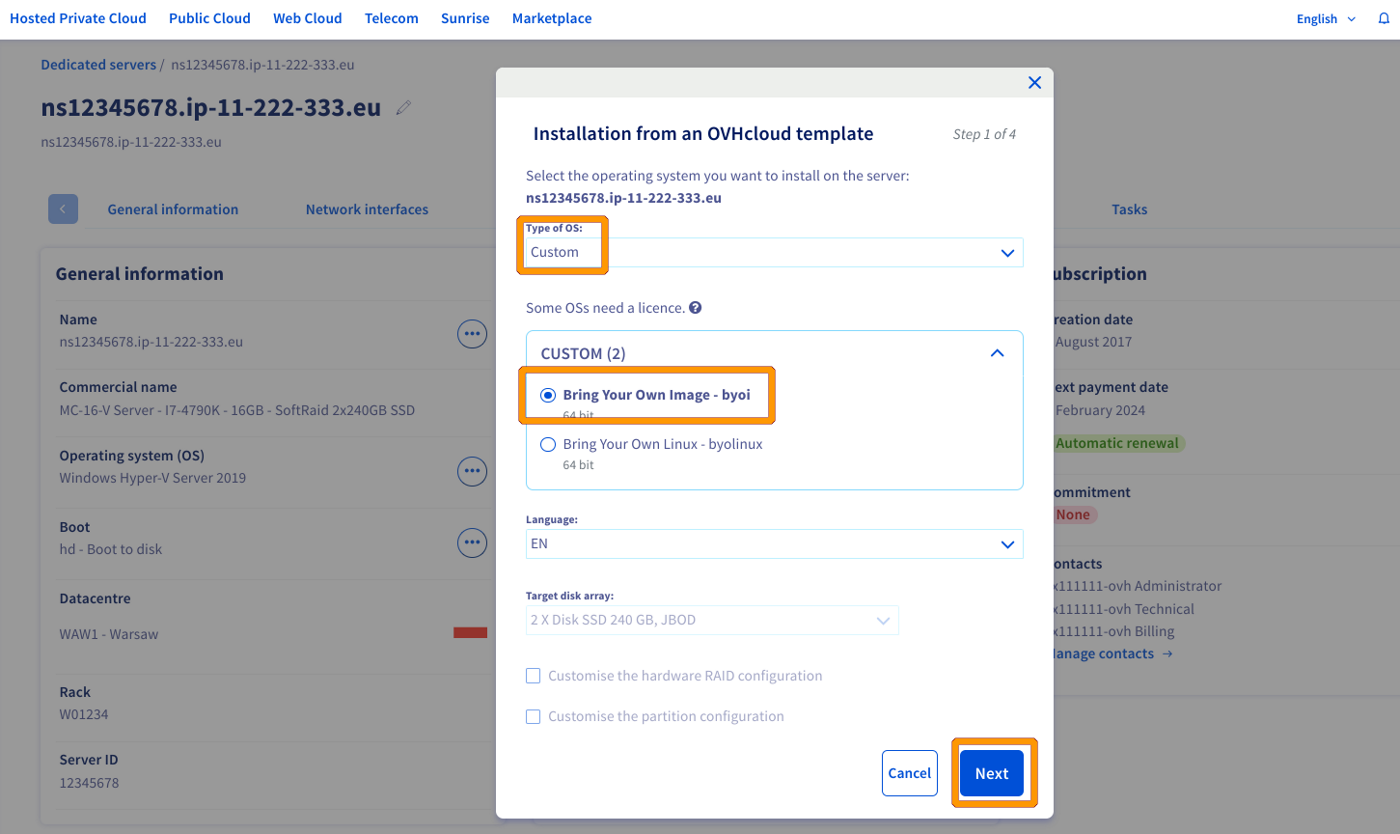
In the window that appears, select Custom in the menu, then Bring Your Own Image - byoi, and click Next.
You will be redirected to the configuration page. Make sure your image URL is in the correct format. Fill in the rest of the required fields on this page. Once you have confirmed that the information is correct, click Confirm.
You can find more details on the options in the deployment options section below.

Deploy your image via the API
Log in to the API console and go to the /dedicated/server section.
The Bring Your Own Image (BYOI) payload should be similar to the following:
In the customizations section, only imageURL, imageType and efiBootloaderPath are mandatory.
Even though configDriveUserData could be sent to the API directly in clear text by escaping special characters, it is recommended to send a base64-encoded script to the API. You can use the following UNIX/Linux command to encode your data:
Here is the clear-text version of configDriveUserData from the example above:
Once you have filled in the fields, start the deployment by clicking Execute.
Deployment options
¹ Standard cloud-init user-data — typically a #cloud-config document or a script (see the official cloud-init examples). Equivalent to OpenStack's server create --user-data <file>. Its JSON representation must be on a single line with \n for line breaks, as JSON strings cannot contain literal newlines.
² Use only if you need HTTP Headers, such as Basic Auth
³ The EFI bootloader path is used by iPXE to boot your operating system. For more information, see Understanding the dedicated server boot process. Examples:
The paths below use JSON escaping: \\ represents a single backslash. For example, \\efi\\debian\\grubx64.efi is the path \efi\debian\grubx64.efi.
⁴ JSON object of arbitrary key/value pairs, equivalent to OpenStack's server create --property key=value. The pairs are written to the config drive's meta_data.json under the meta key, where cloud-init can read them. Example: "configDriveMetadata": {"role": "webserver", "env": "prod"} becomes "meta": {"role": "webserver", "env": "prod"} in meta_data.json. See the OpenStack metadata service documentation for the full schema.
When you set any customization on this page, OVHcloud adds a small config drive partition during installation; otherwise no config drive is created. Cloud-init reads it at first boot. Set configDriveUserData to add your own cloud-init user-data.
Common customer errors
The following table gives an overview of well-known customer errors and how to fix them.
Go further
OVHcloud API & OS installation
Bring Your Own Linux (BYOLinux)
Bring Your Own Image (BYOI) / Bring Your Own Linux (BYOLinux), a comparison sheet
Understanding the dedicated server boot process
Join our community of users.