
Configuring the OVHcloud Web Application Firewall
Find out how to set up the OVHcloud Web Application Firewall to inspect, filter, and block malicious HTTP/HTTPS traffic before it reaches your backend
Important: The OVHcloud Web Application Firewall is currently in closed alpha. The feature set, limits, and WAF Console described in this guide may change before general availability. Access is granted on a case-by-case basis via the OVHcloud Labs page.
Objective
This guide presents the capabilities and walks you through the end-to-end setup of the OVHcloud Web Application Firewall (OWAF) during the alpha programme, from requesting access to tuning protection and monitoring live traffic in the WAF Console. It also describes the most common configuration scenarios and best practices.
Requirements
- An active
- Approved access to the OVHcloud Web Application Firewall alpha programme (see Step 1: Join the alpha)
- An account access token issued by OVHcloud during onboarding, used to sign in to the WAF Console
- A reachable backend (origin) server addressable over HTTP or HTTPS that will receive proxied traffic
- The ability to point a domain (DNS
Arecord) at the WAF instance and to allow the WAF egress IPs on your origin's firewall - A modern browser — Chrome, Firefox, Edge, or Safari (latest two versions)
- Knowledge of HTTP/HTTPS traffic, web application security concepts, and the OWASP Core Rule Set
Introduction to the OVHcloud Web Application Firewall
The OWAF is a high-performance Web Application Firewall that inspects, filters, and blocks malicious HTTP/HTTPS traffic before it reaches your backend applications, with no code changes required on the protected service. Its rules engine is based on the OWASP Core Rule Set (CRS), covering common attack vectors such as SQL injection (SQLi), cross-site scripting (XSS), remote code execution (RCE), local file inclusion (LFI), server-side template injection (SSTI), and scanner detection. The WAF is operated through the WAF Console, a web application for real-time configuration and monitoring.
Client traffic is sent to the WAF instance on port 443 (HTTPS), where each request is inspected against the active rule set and scored against the anomaly threshold. Requests that pass the inspection are forwarded to the backend defined as the Origin URL; requests that exceed the threshold in Blocking mode are rejected with a 403 Forbidden response. Operators configure the engine and view live metrics through the WAF Console, which is fully independent from the data path.
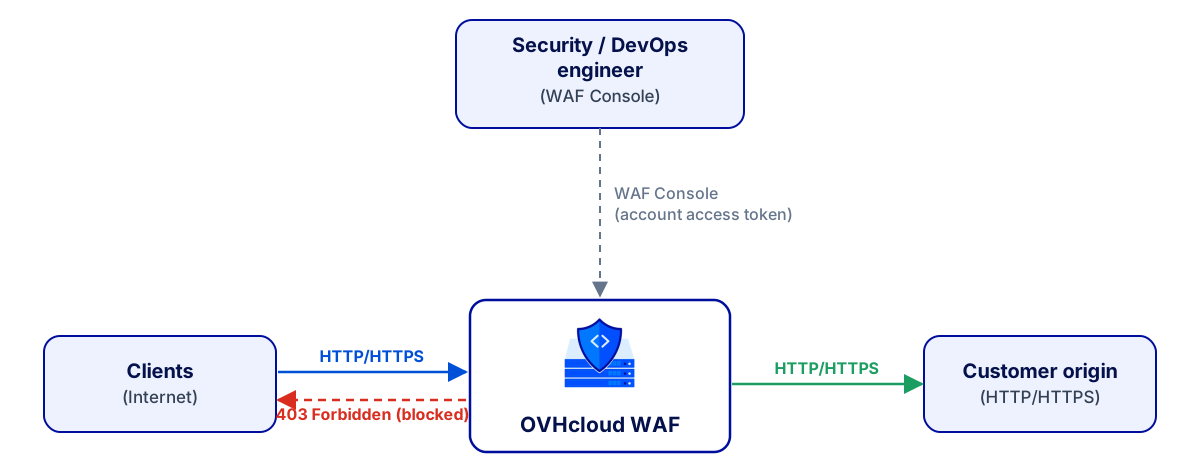
For a more detailed overview of the OWAF, see the OVHcloud Labs page.
Use cases
The following use cases will be supported at general availability:
Service capabilities and limits
Before configuring the OWAF, be aware of the following capabilities and constraints.
What the OWAF can do
- Full request inspection of inbound HTTP/HTTPS traffic, including headers, body, URI, cookies, and query parameters.
- OWASP Core Rule Set coverage with managed rules detecting SQLi, XSS, RCE, LFI, SSTI, scanner detection, and other common attack categories.
- Per-rule control from the
Rulestab — browse the active rule set, filter by category or type, and enable or disable individual rules. - IP allow and block lists managed from the
Advancedtab, enforced as custom rules evaluated before the managed rule set. - Three operating modes — Blocking (matched requests receive a
403 Forbidden), Detection (rules are evaluated and logged but traffic is allowed through), and Disabled (traffic is forwarded without inspection). - Anomaly scoring that aggregates the scores of all matching rules and blocks the request only when the total reaches the configured threshold, which helps reduce false positives.
- Paranoia Levels 1 to 4 to tune how aggressively the engine flags suspicious traffic.
- Live security-event logs in the
Logstab and a real-time traffic dashboard in theMetricstab. - Immediate updates — configuration changes are applied immediately, without a restart.
Current limits (alpha)
These limits apply to the alpha release and will evolve before general availability. Your feedback during the alpha is essential — report issues, false positives, or feature requests directly to your OVHcloud contact.
Instructions
Step 1: Join the alpha
The OWAF is currently available as a closed alpha. To request access, fill in the form on the OVHcloud Labs page with the following information:
- Your OVHcloud NIC handle (customer identifier)
- A brief description of your use case
- The URL of the application you want to protect
- The domain name that points to the OWAF
Once your request is approved, the OVHcloud team will create your WAF configuration and send you an account access token to sign in to the console.
Important: During the alpha phase, OVHcloud cannot commit to a specific delivery time. Onboarding can take up to a few days.
Step 2: Sign in to the WAF Console
Sign in with your account access token to reach your WAF configuration.
- Open your browser and go to the WAF Console.
- On the Control Plane Access card, paste your account access token in the Access token field (a leading
Bearerprefix is stripped automatically). - Click
Sign In.
You are redirected to the My Web Application Firewall page, which shows your WAF configuration.
Your token is stored locally in your browser so you stay signed in. Clicking Sign out clears it and returns you to the sign-in page.
Step 3: Open your WAF configuration
The My Web Application Firewall page shows your WAF configuration and a summary of its live state.
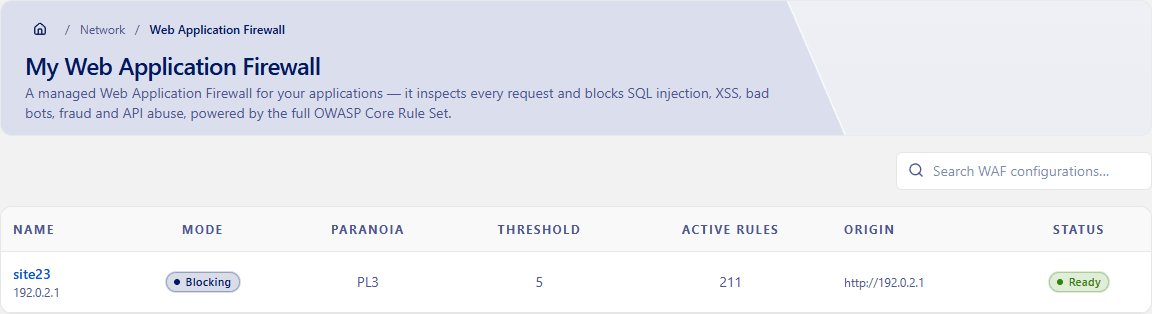
The summary shows:
Click your configuration to open its detail page.
The detail page organises the configuration into six tabs:
General Information— see where the WAF sits and where it forwards traffic, so you can point your domain at it.Protection— control how aggressively the WAF blocks, and switch between Detection and Blocking.Rules— review the active rule set and turn individual rules on or off.Advanced— allow or block clients by IP.Logs— investigate the requests the WAF has blocked or detected.Metrics— monitor traffic volume, block rate, and where attacks come from.
Step 4: Review the general information and wire up DNS
The General Information tab shows where the WAF sits and where it forwards clean traffic. Use it to point your domain at the WAF and to allow the WAF's egress on your origin.
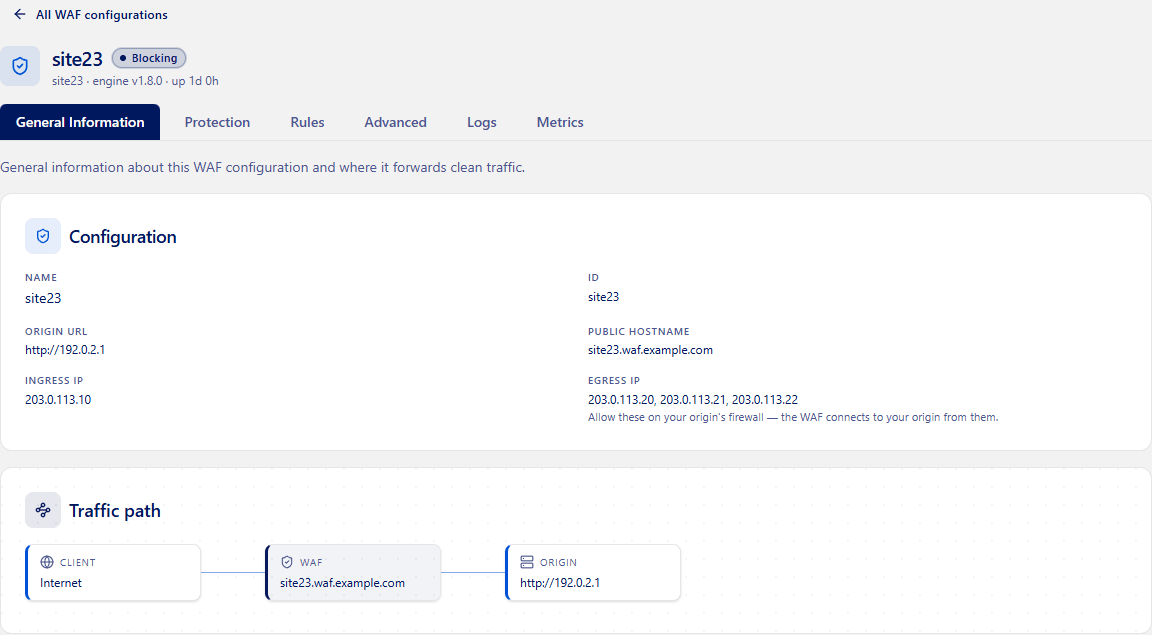
The Configuration card lists:
The Traffic path diagram illustrates the flow: Client (Internet) → WAF → Origin.
To route your domain through the WAF:
-
Log in to your DNS provider's management console (for example, the OVHcloud Control Panel, Cloudflare, or Route 53).
-
Locate the DNS zone for the domain you want to protect.
-
Create or update an
Arecord pointing your domain (or subdomain) to the Ingress IP shown on theGeneral Informationtab: -
On your origin server's firewall, allow inbound connections from the Egress IP addresses listed on the tab.
-
Save the DNS record and wait for propagation. You can verify with
dig +short your-domain.example.com; the response must return the WAF ingress IP.
DNS propagation can take from a few minutes up to 24 hours depending on the TTL of any previous record. Wait until the new IP is returned globally before sending production traffic, as TLS certificate issuance relies on the domain resolving to the WAF instance.
Step 5: Set the protection profile
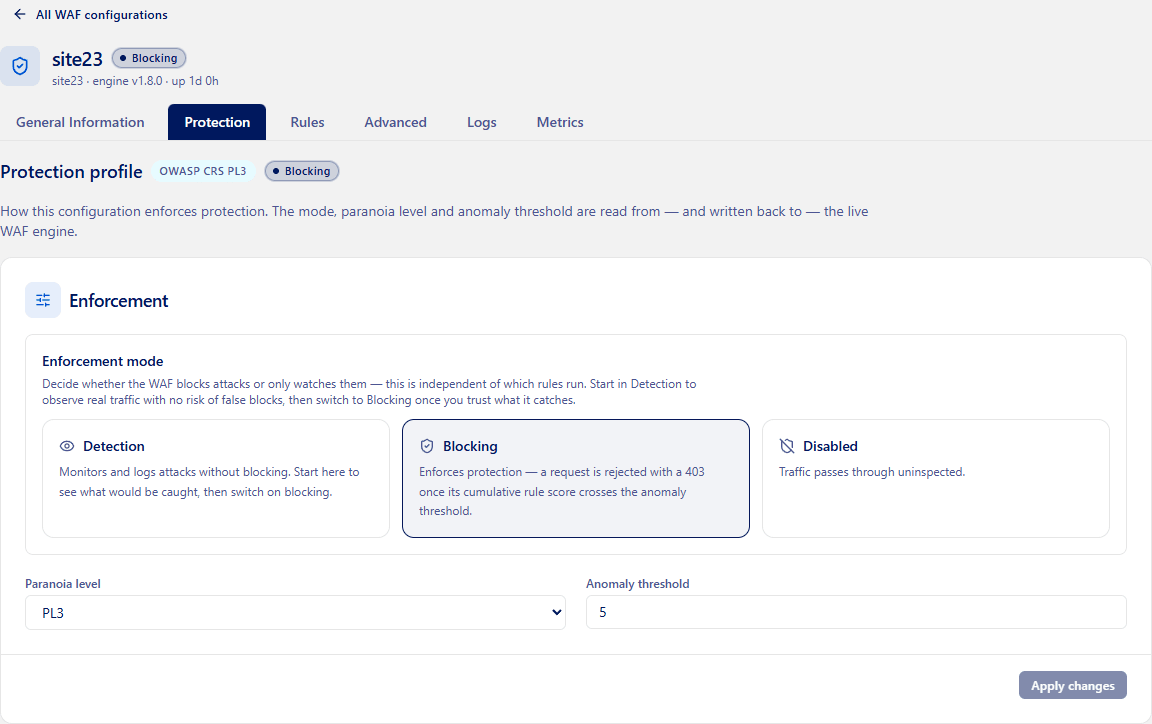
The Protection tab controls how aggressively the WAF enforces the rule set. For a first deployment, start in Detection mode to observe what would be blocked before enforcing anything.
-
Open the
Protectiontab. -
Under Enforcement mode, click the card for the mode you want to apply:
-
Under Paranoia level, select the level from the dropdown (
PL1toPL4): -
Optionally, adjust the Anomaly threshold. This is the score at which a request is blocked. Each matching rule adds its score (5 by default) to the request's total; if the total reaches or exceeds the threshold, the request is blocked. A lower value is stricter; a higher value is more permissive.
-
Click
Apply changes.
The Apply changes button is enabled only when your draft differs from the loaded configuration. Changes are applied immediately.
How Paranoia Levels work: each rule has an assigned Paranoia Level. Only rules at or below the global Paranoia Level are active. For example, at PL1 only level 1 rules are active; at PL3, level 1, 2, and 3 rules are all active.
Step 6: Verify the setup
After Steps 4 and 5, validate that the WAF is processing traffic as expected:
- From a client, send a normal request to your protected domain over HTTPS and confirm the response is served by your backend.
- Send a known-malicious request, for example a path-traversal probe (
GET /.env) or a basic SQL injection probe in a query parameter (?id=1' OR '1'='1). - Open the
Logstab and confirm the request appears as a security event. In Detection mode the malicious request is logged but allowed through; in Blocking mode it is rejected with a403 Forbidden. - Open the
Metricstab and confirm the Total requests and Blocked counters increase.
During the alpha, do not rely on the OWAF as the sole protection layer for a production workload until general availability.
TLS management
TLS is fully managed by OVHcloud. You do not need to provision certificates, configure a reverse proxy, or handle renewals.
- Send your traffic to the WAF instance over HTTPS on port
443. Plain HTTP is redirected to HTTPS automatically. - Certificates are automatically issued and renewed for the WAF's public hostname via Let's Encrypt, provided your domain resolves to the WAF ingress IP (see Step 4).
- No TLS configuration is required on your side. Certificate provisioning, renewal, and TLS termination are handled entirely by OVHcloud.
The real client IP is preserved and forwarded to the WAF engine via the X-Real-IP and X-Forwarded-For headers. IP-based rules on the Advanced tab, which match the client REMOTE_ADDR, work correctly without any additional configuration.
Reviewing the rule set
The Rules tab lets you browse the OWASP Core Rule Set and any managed rules shipped with your configuration, and enable or disable individual rules.
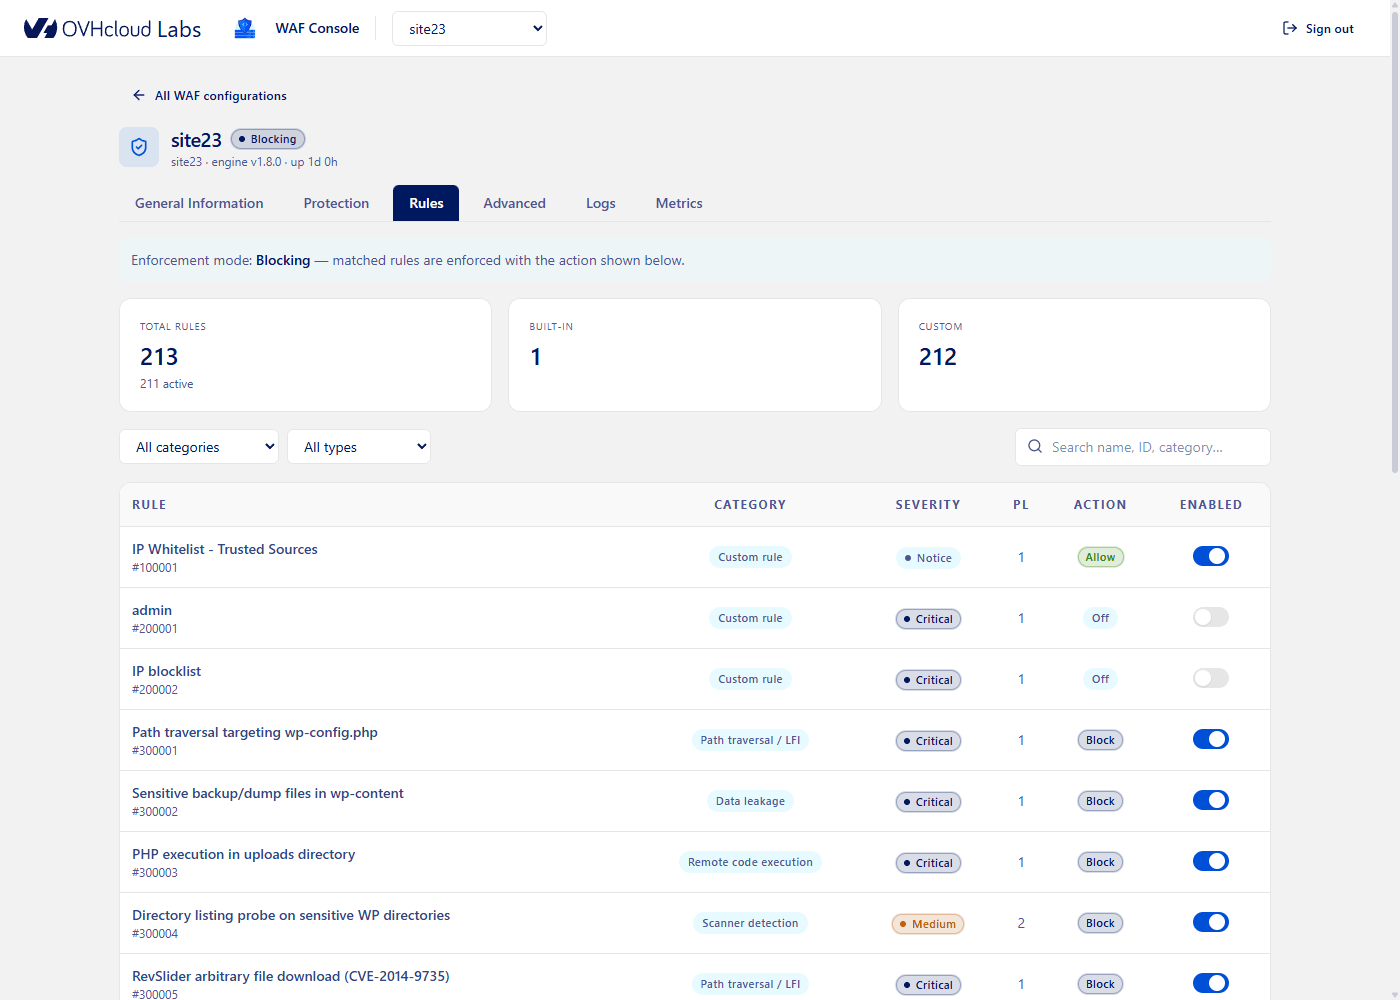
A note at the top of the tab states the current enforcement mode and its effect: in Blocking mode matched rules are enforced with the action shown; in Detection mode they are logged only; in Disabled mode nothing runs.
Summary cards
Three cards summarise the rule set:
- Total rules — the total number of rules, with the number of active rules beneath.
- Built-in — rules explicitly flagged as built-in.
- Custom — the remaining rules, including the managed Core Rule Set entries.
Rules table
Each rule is displayed as a row with the following columns:
Rule actions
The Action column shows what the WAF does when a rule matches, once the current enforcement mode is taken into account:
During the alpha, a rule's action is fixed by the managed rule set and cannot be changed from the console; you can only enable or disable each rule (see below). The overall enforcement behaviour (Detection, Blocking, or Disabled) is set globally on the Protection tab.
Searching and filtering rules
Use the filters above the table to narrow the list:
- The
categorydropdown restricts the view to a single attack type. - The
typedropdown filters byAll,Built-in, orCustom. - The search box filters by rule name, ID, or category.
The table is paginated (25 rules per page); use the Prev and Next buttons to move between pages.
Enabling and disabling a rule
- Locate the rule in the table, using the filters or search if needed.
- Click the
Enabledtoggle on the rule's row to disable it, or click it again to re-enable it.
The change takes effect immediately. Disabling a rule silences it without affecting the rest of the rule set.
Custom-rule authoring is not available in the WAF Console during the alpha. You can enable or disable any rule in the managed set, and manage client IP lists from the Advanced tab (see below).
Managing IP allow and block lists
The Advanced tab lets you allow or block clients by IP. These lists are enforced as custom rules on the WAF instance (matching the client IP), evaluated before the managed rule set.
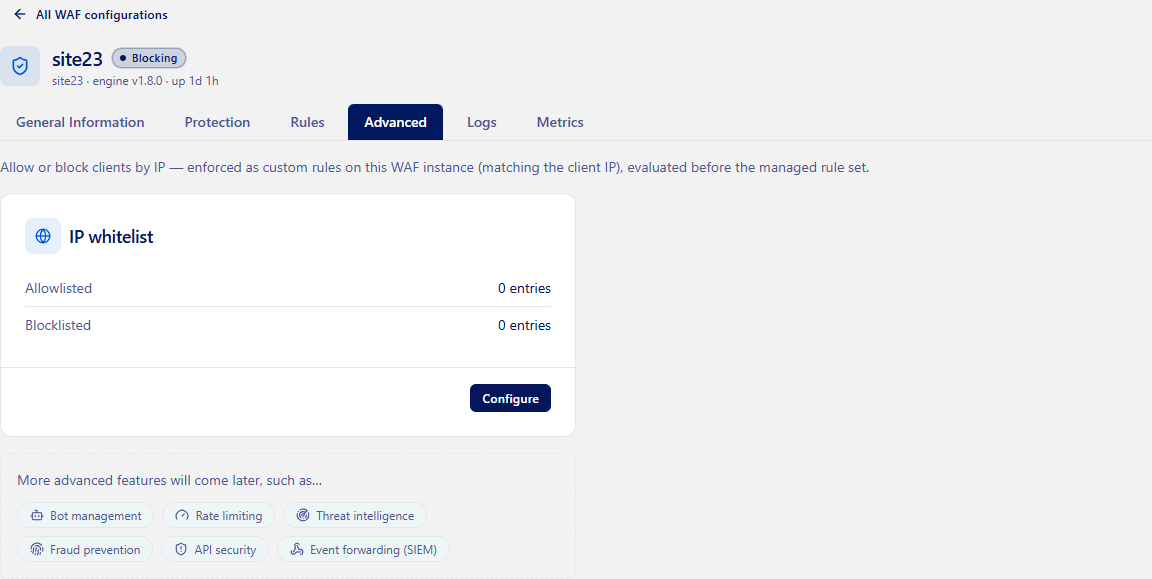
The IP whitelist card shows the current number of allowlisted and blocklisted entries, with a Configure button.
Edit the allow and block lists
- On the
Advancedtab, clickConfigure. A panel opens on the right side of the screen. - In the Allowlist field, enter one IPv4/IPv6 address or CIDR range per line. Allowlisted addresses are let through.
- In the Blocklist field, enter one IPv4/IPv6 address or CIDR range per line. Blocklisted addresses are blocked.
- Click
Saveto apply, orCancelto discard.
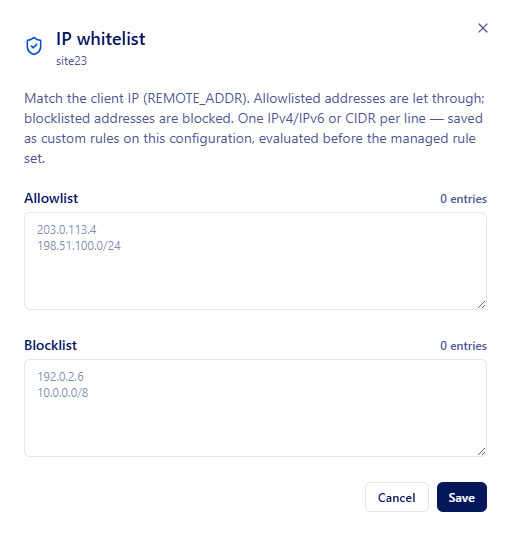
The lists are saved as two dedicated custom rules on the configuration and take effect immediately. Emptying a list disables its rule.
Additional protection modules — Bot management, Rate limiting, Threat intelligence, Fraud prevention, API security, and Event forwarding (SIEM) — are listed on the Advanced tab as upcoming features. They are not yet available during the alpha.
Investigating security events
The Logs tab provides a searchable, time-ranged stream of the requests the WAF has blocked or detected, so you can investigate attacks and understand why each request was actioned.
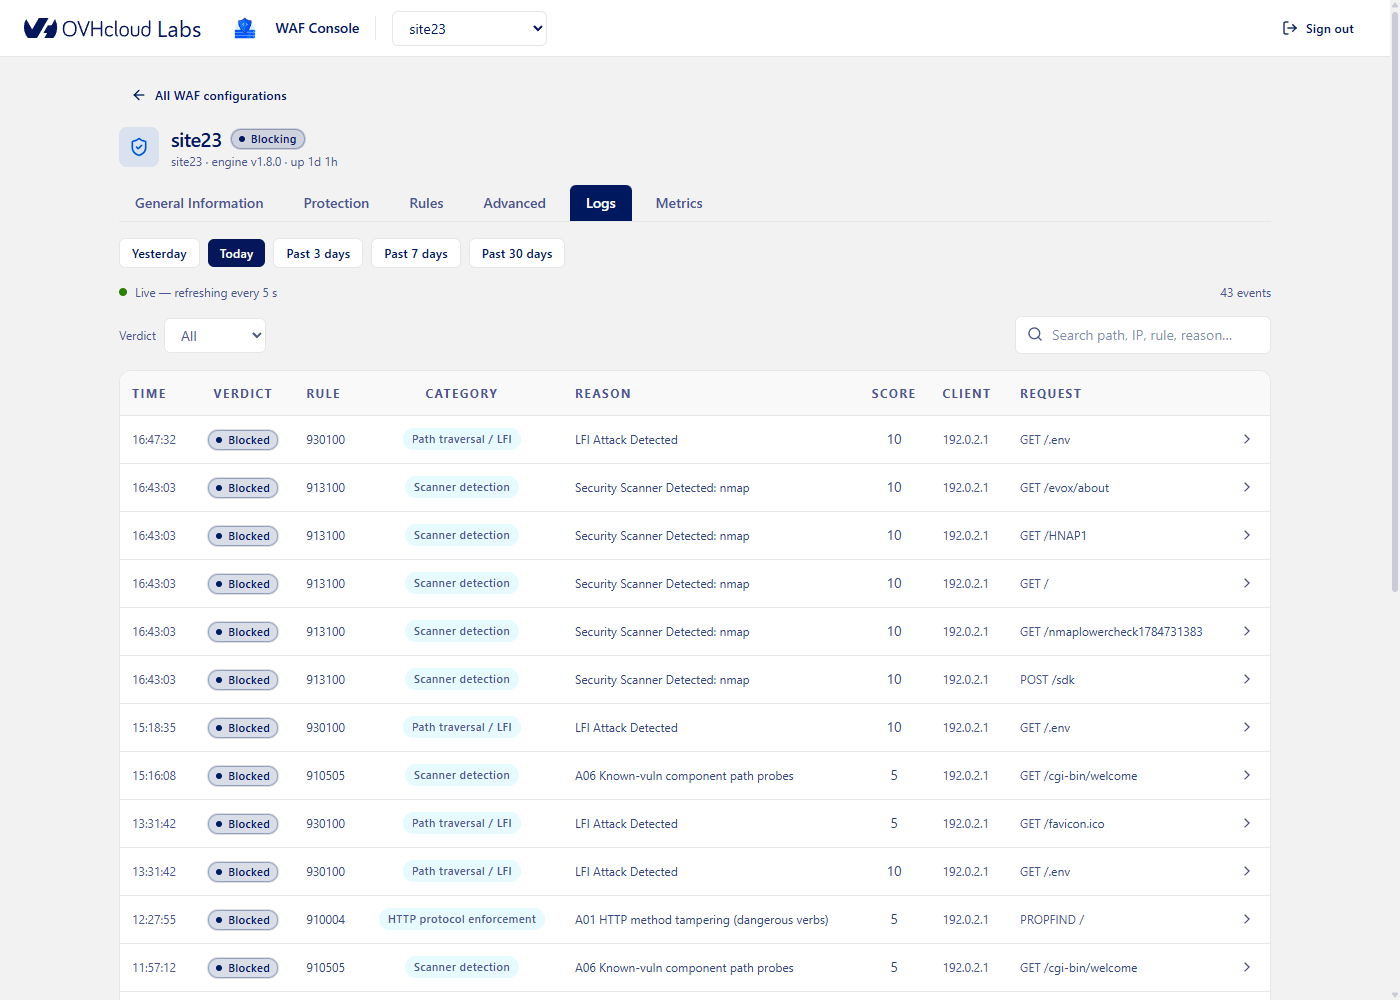
- Use the time-range pills —
Yesterday,Today,Past 3 days,Past 7 days,Past 30 days— to scope the stream. The default isToday. - The list refreshes automatically every few seconds; a live indicator and the event count are shown above the table.
- Use the
Verdictdropdown (All,Blocked,Detected) and the Search path, IP, rule, reason… box to narrow the results.
Each event is a row with the following columns:
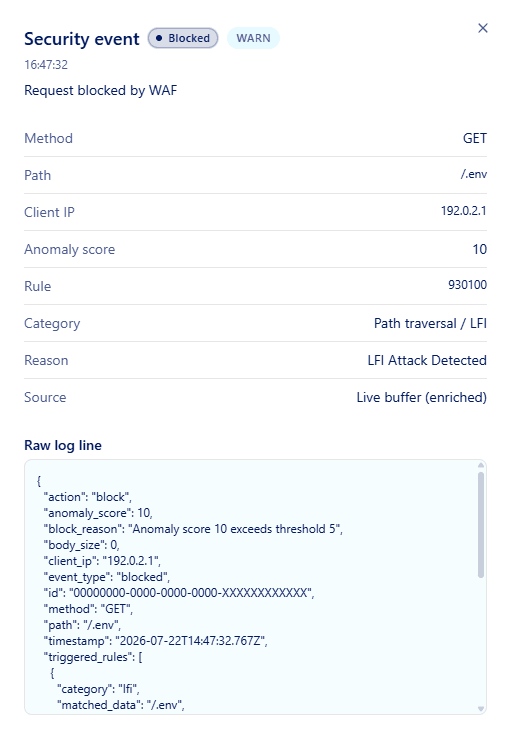
Click a row to open the Security event panel, which shows the full request details, including the matching rule and reason, plus the raw log line.
Monitoring traffic and attacks
The Metrics tab is a real-time dashboard of traffic volume, blocking, and where attacks come from.
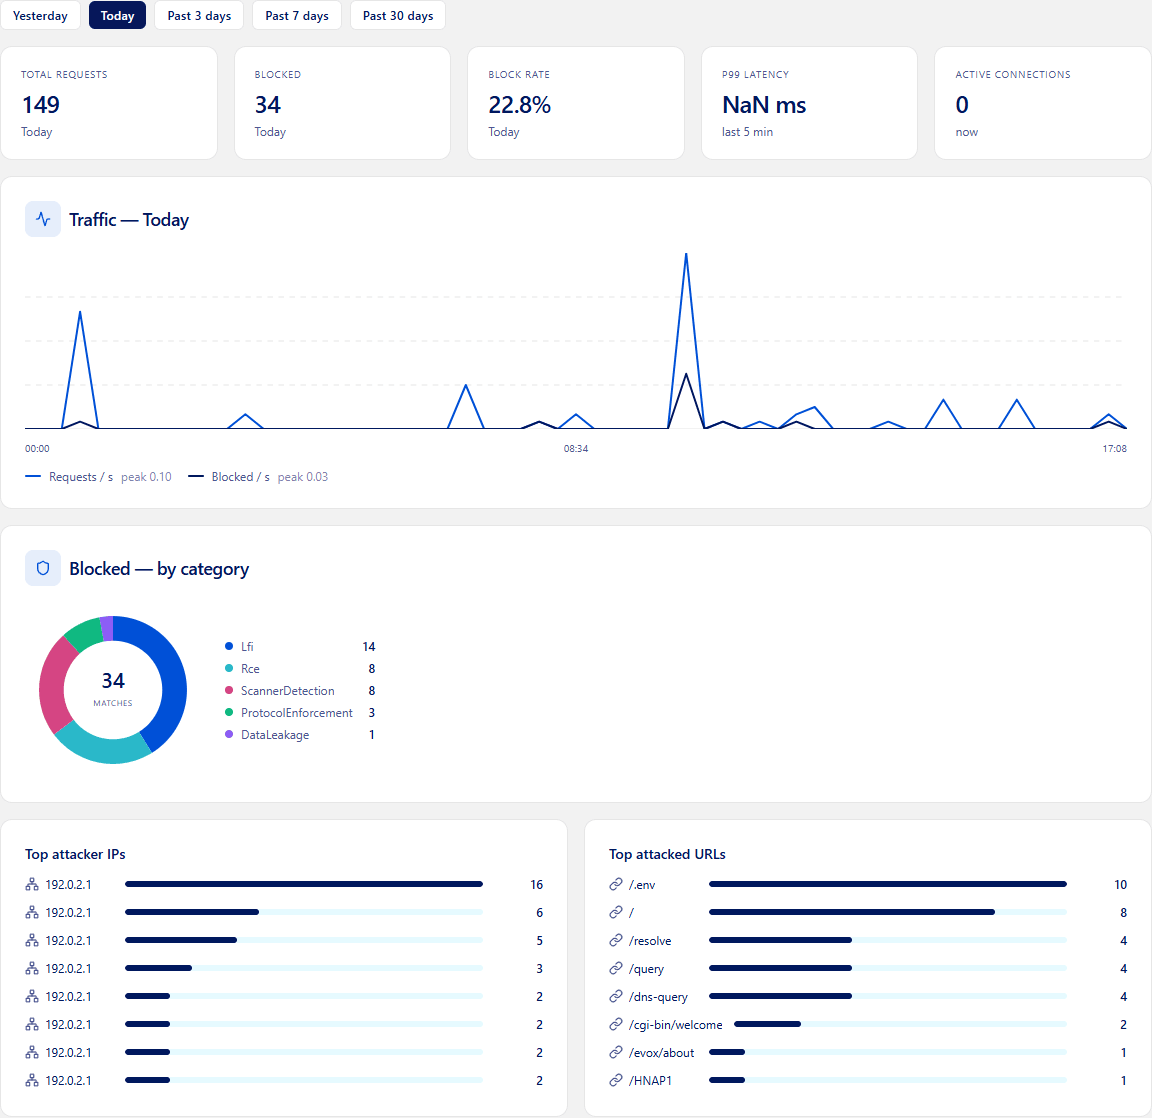
Use the same time-range pills as the Logs tab to scope the dashboard. It refreshes automatically.
- KPI cards — Total requests, Blocked, Block rate, P99 latency (last 5 minutes), and Active connections (now), each captioned with the selected range.
- Traffic — an area chart plotting requests per second and blocked per second over the range, with peak labels.
- Blocked — by category — a donut chart summing blocked requests by attack category (for example,
Lfi,Rce,ScannerDetection,DataLeakage), with the total in the centre. - Top attacker IPs and Top attacked URLs — bar lists derived from the security events in range.
Some metrics rely on a backend service that is not always available during the alpha; when it is unavailable, the affected values are shown as —.
Best practices
The recipes below cover the most common operational tasks during the alpha. Each builds on the steps in the Instructions section above.
Onboard a new website safely
To start protecting a new website without risking downtime:
- On the
General Informationtab, confirm the Origin URL points to your backend and that DNS resolves to the ingress IP (see Step 4). - On the
Protectiontab, set the enforcement mode toDetectionand apply. - Send representative traffic through the WAF for a few hours (manual traffic or shadow traffic from a load balancer).
- Open the
LogsandMetricstabs and review the blocked categories and rule matches. - Tune any noisy rules on the
Rulestab (disable them or rely on the anomaly threshold). - When the false-positive rate is acceptable, switch the enforcement mode to
Blockingon theProtectiontab and apply.
Reduce false positives
- On the
MetricsandLogstabs, identify which categories or rules are actioning legitimate traffic. - Choose one of the following remediations:
- Disable the offending rule on the
Rulestab if it is not relevant to your application. - Lower the Paranoia Level on the
Protectiontab to deactivate stricter rules. - Increase the Anomaly threshold on the
Protectiontab to require more rule matches before blocking.
- Disable the offending rule on the
Test changes without impacting users
- On the
Protectiontab, switch the enforcement mode toDetectionand apply. - Apply the rule or threshold change you want to evaluate.
- Monitor the
LogsandMetricstabs to review what would have been blocked. - When the change is validated, switch back to
Blocking.
Restrict access by IP
Use the Advanced tab to allow only trusted client IPs, or to block known malicious ranges. Because these lists are evaluated before the managed rule set, they are an effective first line of defence for restricting access to sensitive applications.
Troubleshooting
If you encounter issues with the OWAF, work through the checks below.
If the steps above do not resolve the issue, gather:
- The exact request that fails (method, path, headers, body sample).
- The matching rule ID and category from the
Logstab, if known. - A screenshot of the
Metricstab when the issue occurs.
Then report the issue to your OVHcloud contact.
Glossary
Go further
Join our community of users.