Configuring an OVHcloud Load Balancer with ProxyProtocol
Integrate your TCP services behind a Load Balancer with ProxyProtocol
Objective
The OVHcloud Load Balancer acts as a proxy. Like a human proxy, it acts as an intermediary, so the client addresses the proxy and the proxy addresses the service provider, on behalf of the client. In this configuration, only the proxy knows both the true client (the user of your service) and the true service provider (one of your servers).
For the visitor, this isn't an issue. They don't need to know the exact server responding to their request; that's an implementation detail. However, for statistical and security reasons, it's sometimes essential for the final server to know the client's true address. By default, it only sees the proxy (in this case, your OVHcloud Load Balancer service).
If you are using an HTTP frontend, we recommend the guide "Configuring an OVHcloud Load Balancer service - HTTP Headers" which describes the standard way to use HTTP headers to retrieve the IP address, port, and source protocol.
If you are using a TCP frontend, then this guide is for you.
Legal Obligations
You may be required to retain logs and certain traffic data under applicable laws and regulations. It is your responsibility to comply with these obligations.
For example:
- Investigatory Powers Act 2016 (IPA), Section 87: This section notably empowers the Secretary of State, with Judicial Commissioner approval, to require telecommunications operators to retain "relevant communications data" for up to 12 months. This data is broadly defined but includes information to identify the source and destination of a communication, its date, time, and duration, and specifically covers Internet Connection Records (ICRs), which log website visits and app usage. This requirement is for purposes such as national security and preventing/detecting serious crime.
Prerequisites
This is an advanced guide. It assumes you're already familiar with the main features of your OVHcloud Load Balancer service, especially frontends and clusters. If you're not, we recommend checking out the guide "Configure an OVHcloud Load Balancer HTTP/HTTPS service." While this guide focuses more on TCP services, the general principles are the same.
You need:
- an OVHcloud Load Balancer service with a functional TCP frontend and farm;
- Nginx or Apache with mod_proxyprotocol on an OVHcloud server.
Since ProxyProtocol fields can be forged by a malicious client, they should only be considered if they come from a trusted source.
Therefore, it's essential to limit their use to trusted IP addresses, specifically the outbound IP addresses of your OVHcloud Load Balancer service. Major servers like Nginx and Apache have modules capable of managing this security and trust aspect.
In Practice
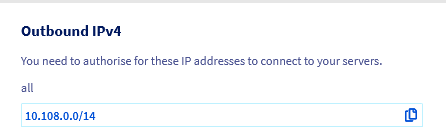
Obtaining the list of your outbound IP addresses
From the OVHcloud Control Panel
The list of IPv4 outbound addresses potentially used by your OVHcloud Load Balancer service can be found on the homepage of your OVHcloud Load Balancer service under "Outbound IPv4".
From the OVHcloud API
- List of IP addresses used by your OVHcloud Load Balancer service:
Introduction to ProxyProtocol
ProxyProtocol was developed by the HAProxy Load Balancer team as the TCP counterpart to standard HTTP headers like X-Forwarded-For. It was designed to forward at minimum:
- the L4 protocol name used (TCP4 for IPv4 or TCP6 for IPv6);
- the source IPv4 or IPv6 address;
- the source port.
When ProxyProtocol is enabled for one of your servers, the OVHcloud Load Balancer service adds a prefix with the ProxyProtocol before sending the rest of the request. Since this modification is intrusive, it is essential to ensure that the server is compatible with this protocol, and if so, which versions are supported.
Indeed, this protocol exists in 2 versions:
- version 1, in text format;
- version 2, in optimized and extensible binary format.
Version 1 is largely sufficient for most uses (although less optimized) and is often the only version supported by compatible software. Version 2, being a binary format, is faster to parse. It also adds the ability to indicate whether the original connection was encrypted (the equivalent of the X-Forwarded-Proto header) as well as the domain specified in the Common Name field of the certificate used, if applicable.
To learn more about ProxyProtocol, please consult the ProxyProtocol specification.
Activating ProxyProtocol for one of your servers
ProxyProtocol must be enabled for each server registered in a server farm. Since this feature is intrusive and cannot be activated transparently, this allows you to test it on a particular machine and then progressively deploy the configuration to an active farm.
Your OVHcloud Load Balancer service supports 4 ProxyProtocol modes:
When ProxyProtocol is enabled for one of your servers, probes automatically insert this header unless a specific port has been specified for the probes. In this case, the probe will connect normally to the probe port.
From the OVHcloud Control Panel
In the Clusters section, select the farm containing the server on which to enable ProxyProtocol, then click the edit button for the relevant server.
ProxyProtocol is configured via the ProxyProtocol version option. You will find the 4 modes described above.
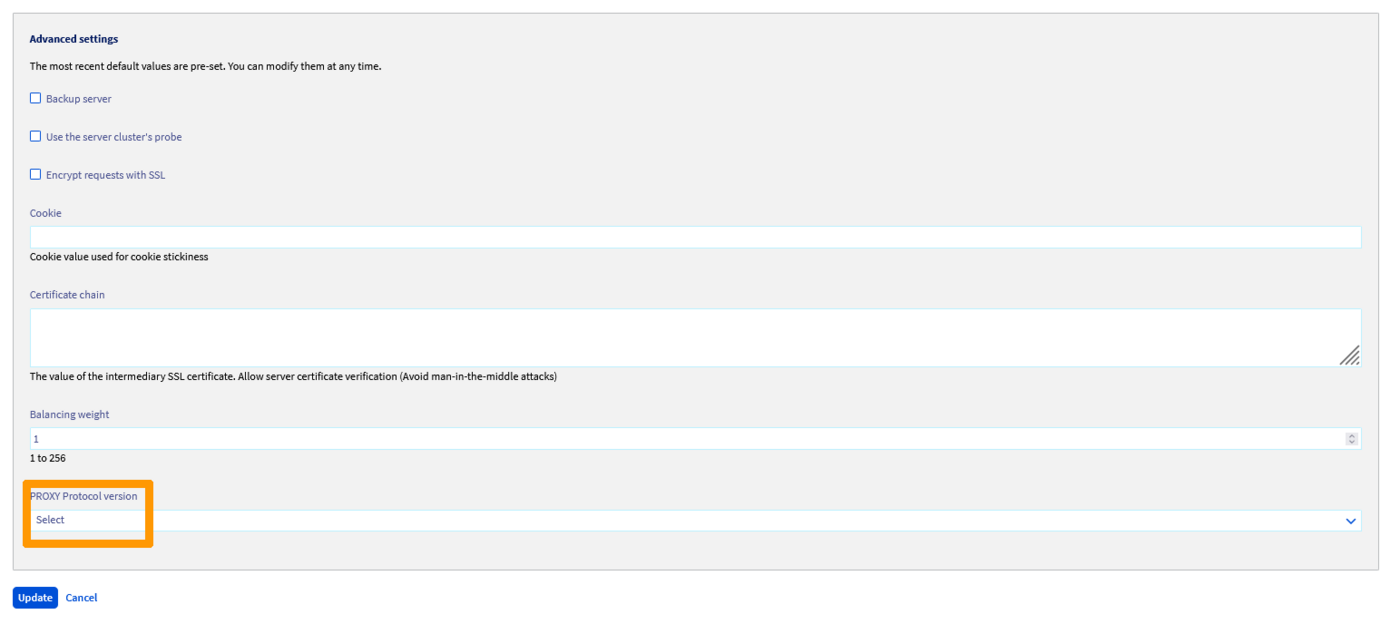
Once the desired mode is selected, click Update, then Deploy zone: YOUR ZONE to apply your changes in the relevant zone.
From the OVHcloud API
Activating ProxyProtocol via the API is done in the same way as from the OVHcloud Control Panel. The corresponding API field in the server is proxyProtocolVersion.
- Modify an existing
Server:
- Apply changes:
Server-side ProxyProtocol configuration
Nginx
Nginx supports ProxyProtocol version 1. It can extract the main information from it, namely the client's IP address and source port as seen by your OVHcloud Load Balancer service. In Nginx, this information is exposed through the proxy_protocol_addr variable. Similar to its HTTP counterpart X-Forwarded-For, Nginx will use this variable to take the correct source address into account in the logs with the ngx_http_realip module.
To use ProxyProtocol with Nginx, you can configure the server section of your configuration with:
Once configured, you can reload the configuration:
This example uses the HTTP protocol for more simplicity. If you are using HTTP, we strongly recommend using HTTP headers instead of ProxyProtocol, unless your OVHcloud Load Balancer service is configured in TCP. This can happen in the case of SSL termination for HTTP/2, for example.
For more information on configuring ProxyProtocol in Nginx, please consult the project's official documentation.
Apache
The management of ProxyProtocol in Apache is still young. An unofficial implementation compatible with Apache 2.4 is available on Github (https://github.com/roadrunner2/mod-proxy-protocol) but has not been maintained since 2014. An official implementation is found in the mod_remoteip module which is also used to manage headers from the X-Forwarded-For family.
mod-proxy-protocol supports ProxyProtocol versions 1 and 2. However, it does not allow specifying a list of source IP addresses authorized to use ProxyProtocol, although this is mentioned in the module's projects.
mod_remoteip also supports ProxyProtocol versions 1 and 2. It also adds the ability to specify a list of addresses for which ProxyProtocol should not be enabled. This remains limiting from a configuration perspective. This module is only available in the experimental Apache 2.5 version, although the documentation mentions availability from Apache 2.4.26.
Regardless of the approach chosen, we strongly recommend restricting connections to your servers to the outbound addresses of your OVHcloud Load Balancer service.
This can be easily configured with iptables:
With mod-proxy-protocol
- Since this module is unofficial, you will first need to download the sources, compile, and install it:
- Then configure Apache:
- Replace
%hvariables with%ain theLogFormatdirectives of the Apache configuration. - Finally, activate the new configuration with:
To learn more about configuring the mod-proxy-protocol module, please consult its documentation.
With mod_remoteip
- Since the module is experimental, you will first need to install an experimental version of Apache, which is not recommended in a production environment unless you know exactly what you're doing!
- Then configure Apache:
- Replace
%hvariables with%ain theLogFormatdirectives of the Apache configuration. - Finally, activate the new configuration with:
To learn more about configuring the mod_remoteip module, please consult its documentation.
HAProxy
ProxyProtocol was designed by the HAProxy team, making it the software that best manages this protocol. This can be useful in a scenario where tracking the client's true source IP address is essential, but the target software does not support this protocol. This would be the case, for example, for MySQL and PostgreSQL, to name just two.
In this case, a trick is to place a local HAProxy instance in front of the software and ensure logging of requests and their advanced filtering in the local HAProxy instance.
This guide provides an example of a possible configuration for TCP port 3306 used by MySQL. This configuration is not intended to be a complete example but rather to serve as a basis for a functional setup.
- Install HAProxy:
- Configure your proxy:
- Finally, activate the new configuration with:
Go Further
Join our community of users.