How to install Django CMS on your Cloud Web hosting
Learn how to install Django CMS with Python on your OVHcloud Cloud Web hosting
Objective
Django CMS is a content management system (CMS) written in Python and based on the Django web framework.
OVHcloud Cloud Web hosting lets you use Python as a runtime for your websites. You can therefore install and host Django CMS on it, as well as any other web application designed in this language.
In this tutorial, we will install a website with Django CMS on an OVHcloud Cloud Web hosting plan. We will then make it available behind your domain name.
Requirements
- An OVHcloud Cloud Web hosting plan.
- Being logged in to your , in the
Web Cloudsection. - What you need to know:
- The basics of the Python ecosystem.
- How to connect via SSH.
- How to edit a file from the command line, using Vim, Emacs or Nano for example.
Instructions
Step 1: enable Python as a runtime
To access the runtimes of your Cloud Web hosting, log in to your . Click Hostings in the services bar on the left, then choose the name of the relevant Cloud Web hosting. Finally, go to the Runtimes tab.
The table that appears displays the runtimes currently added. Make sure that the Python runtime is enabled. If so, proceed to Step 2: “Associate Python with a multisite”.
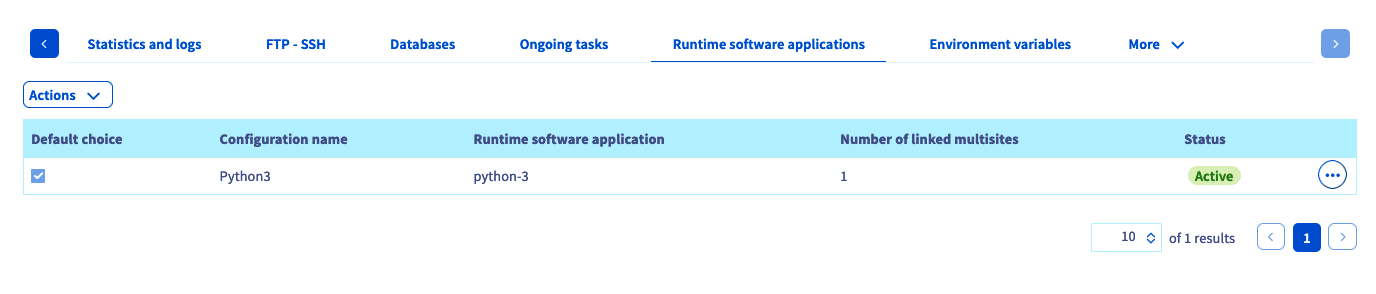
If it is not, add a new one (if your plan allows it) or modify the existing runtime.
- If you want to add a runtime: click
Actionsabove the table, thenAdd a runtime. - If you want to modify a runtime: click the
...button to the right of the relevant runtime, thenModify.
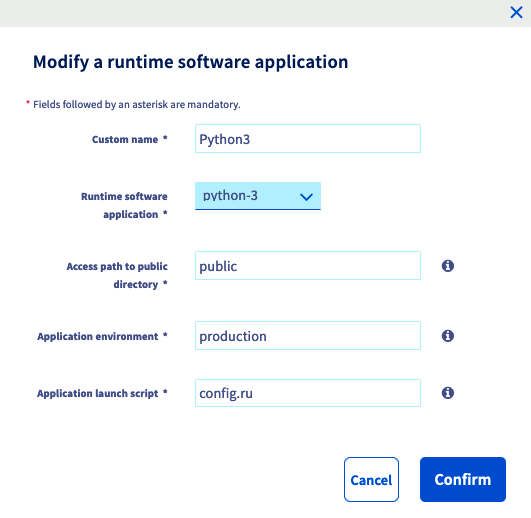
In the window that appears, fill in the requested information with the following values from our example, or adapt them to your situation.
Once the information is filled in, click Confirm. If you want more information about managing runtimes, refer to our guide “Managing Cloud Web runtimes”.
Step 2: associate Python with a multisite
Now that Python is enabled as a runtime, you need to associate it with one of your multisites. To do this, go to the Multisite tab. The table that appears contains all the domain names that have been added as a multisite.
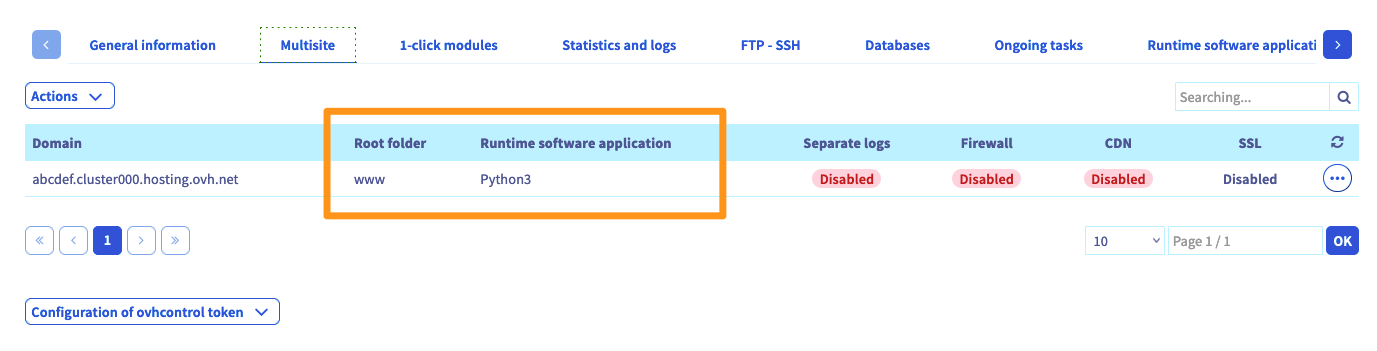
Two columns in the table above deserve your attention. Check that the Python runtime is properly linked to the relevant domains and that the root folder is correct; use the information below if necessary. If so, proceed to Step 3: “Connect to your Cloud Web via SSH”.
If it is not, add a new multisite or modify the existing one.
- If you want to add a multisite**: click
Add a domain or subdomainto the right of the table. - If you want to modify a multisite**: click the
...button to the right of the relevant domain name, thenModify.
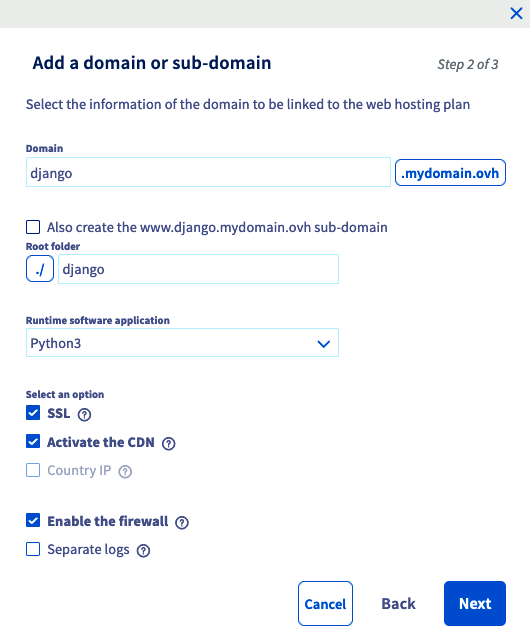
In the window that appears, fill in the requested information according to your own situation. The table below shows the values used for this tutorial.
As for the additional options, choose the ones you want to enable. Once the information is filled in, click Next, then complete the operation. This addition can take up to one hour. However, changing the DNS configuration can take up to 24 hours to become fully effective. If you want more information about managing multisites, refer to our guide “Sharing your hosting between several websites”.
Step 3: connect to your Cloud Web via SSH
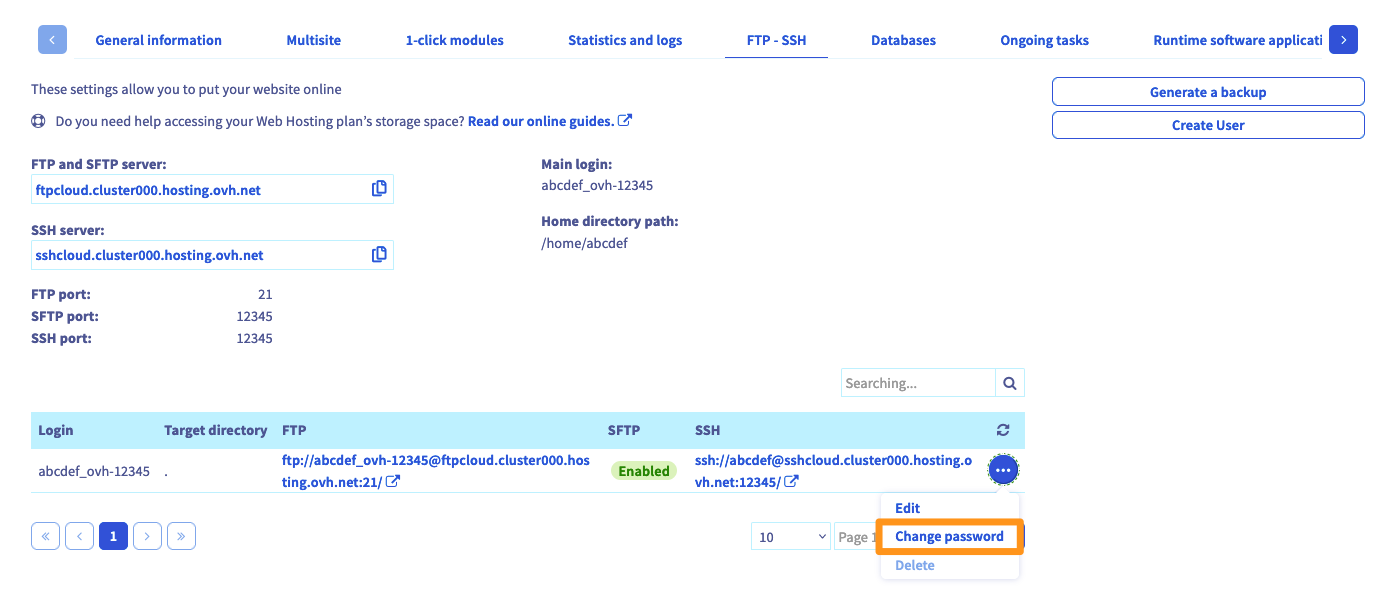
First, retrieve the information that lets you connect. To do this, go to the FTP - SSH tab. If it does not appear in the list, first click the button with three bars. The information related to your storage space is then displayed. Locate the items mentioned next to the following elements:
If you no longer know the password of the SSH user, click the ... button to the right of the relevant user in the table, then Change password.
Now, to connect via SSH, you need to use a terminal. This tool is installed by default on macOS or Linux. A Windows environment will require installing software such as PuTTY or adding the “OpenSSH” feature. As this procedure is specific to the operating system you use, we cannot detail it in this documentation.
Here is an example of a command line you can use. Replace the elements “sshlogin”, “sshserver” and “connectionport” with the ones suited to your own situation. Once the command is sent, you will be prompted to enter the password of the SSH user.
Step 4: prepare the Python environment
We will now prepare the Python environment needed to host our Django CMS application. The goal is to isolate the Python files and the dependencies of our application from the rest of the Python files and libraries present on the system. In the Python ecosystem, this isolation is easy to set up thanks to the virtualenv utility.
From the SSH connection open on your Cloud Web, install virtualenv via pip (it is the most widely used package manager for the Python language):
Modify the PATH environment variable to add the freshly installed “virtualenv” command:
You can make this change to your “PATH” persistent by adding the export to the “~/.profile” file:
You can now move into the “django” folder and create a virtualenv, which we will name “venv” for this tutorial.
Now that your virtualenv is in place, you can access it via the command “source < virtualenv name >bin/activate”. Once inside your virtualenv, all the packages and libraries you install will be installed only here.
When your virtualenv is activated, you see in your terminal your prompt preceded by “(venv)” (or another name, if you chose a different one when creating the virtualenv). You can exit this virtualenv at any time, using the “deactivate” command.
Step 5: install and configure Django CMS
Django CMS provides a utility named “djangocms-installer” to ease its installation.
Still from within your virtualenv, install this utility with pip:
Now that this utility is installed, we will use it to create our Django CMS application. Still from within your virtualenv and placed in the root directory of your site (django in this tutorial), run the following command:
Here is some information about the meaning of the options (you can find all the available options via the command “djangocms --help”):
- -f: installs and configures the “django-filer” plugins;
- -p . : uses the current folder as the parent folder of our new Django CMS project;
- mysite: name of your new project;
- -s: do not check whether the current folder is empty.
Step 6: link Django CMS to your Cloud Web runtime
Django CMS is now installed on your Cloud Web.
The “manage.py” file was created automatically during this operation. Modify it with the following content:
When configuring the Python runtime (see Step 1), we defined the launch script of our application as “server.py”. However, Django CMS uses a file named “manage.py”. To link Django CMS to your runtime, create a symbolic link between “server.py” and “manage.py”:
Modify the “mysite/settings.py” file with the following command, replacing “django.demo-cloudweb.ovh” with the address of your multisite (configured in Step 2):
Step 7: restart the Python daemon
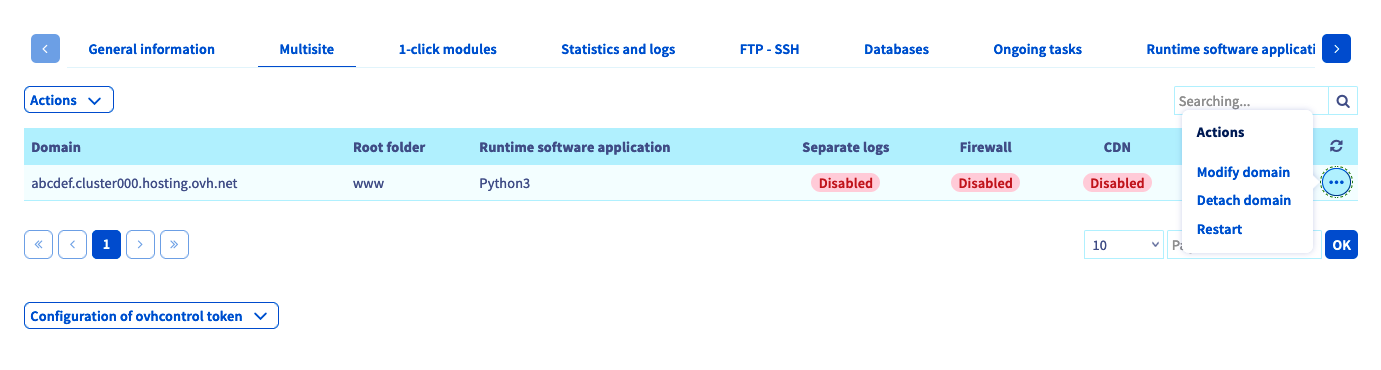
To restart the Python daemon, return to your . Go to the Multisite tab, click the ... button to the right of the relevant domain name, then choose Restart.
Once this is done, the application will be accessible via the domain name chosen in your multisite configuration.
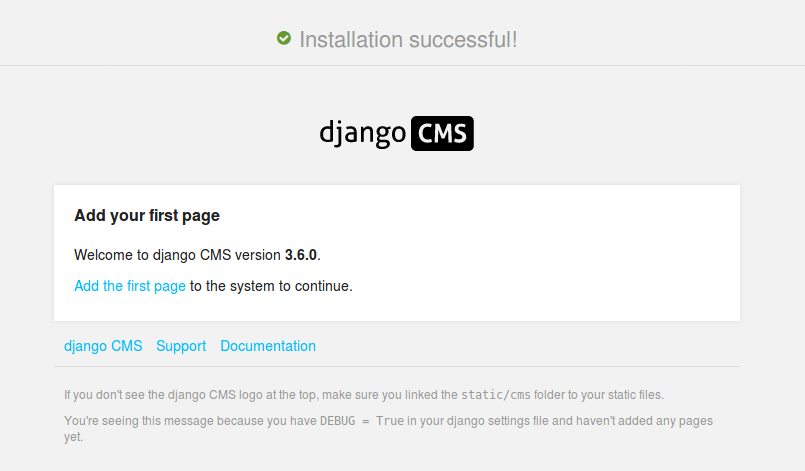
Congratulations, your website using Django CMS is now available! An administrator account has been created by default, with “admin”/“admin” as the login/password. Remember to change this password.
Step 8: use HTTPS
For added security on your site, you can set up an automatic redirect from HTTP to HTTPS. To do this, while still in the django folder, create a .htaccess file with the following content:
Conclusion
We have seen how to install a Python application on a Cloud Web hosting plan, following the various steps. All that remains is to use Django CMS and publish your first content!
You will find more information about Django CMS and its features in the official project documentation.
Go further
Migrating my website to OVHcloud
Installing your website with the 1-click modules
Sharing your hosting between several websites
For specialised services (SEO, development, etc.), contact the OVHcloud partners.
If you would like assistance using and configuring your OVHcloud solutions, we invite you to consult our various support offers.
Join our community of users.