Getting started with Load Balancer on Public Cloud
Discover how to launch a Load Balancer on Public Cloud
Objective
Our Public Cloud Load Balancer is based on OpenStack Octavia and is fully integrated into the Public Cloud universe.
Learn how to configure an OVHcloud Load Balancer with the help of this guide.
Requirements
- A Public Cloud project in your OVHcloud account
- Understanding the Load Balancer concepts
- Understanding the Public Cloud Networking concepts
- A Load Balancer requires a subnet, read the Getting started with vRack guide for more information
- (Optional): This guide explains the load balancer configuration through Graphical Interface & Command Line Interface. If you want to use the latter, then install the OpenStack Command Line environment
Instructions
OVHcloud Control Panel Access
- Direct link:
- Navigation path:
Public Cloud> Select your project
Creating the Load Balancer
Click Load Balancer (under Network) in the left menu, then click the Create a Load Balancer button.
The configuration page will open.
Step 1: Region choice
-
Select the zone type:
- 1AZ: Deployment in a single availability zone.
- 3AZ: Deployment spread across three availability zones for high availability.
-
Choose the region: Only regions where you have a private network and at least one subnet can be selected. Select the region and click
Next.
Step 2: Size choice
The interface contains a link to the website on which the characteristics / benchmark of all size are provided. Once you have chosen your size, click Next.
Step 3: Attach a public IP (or not)
At this stage, you need to know if your Load Balancer will be receiving public traffic or not (for more details, read our Public Cloud Networking concepts page).
If your Load Balancer is processing public traffic, you have 2 options:
New Public IP: This option will create a new Floating IP for your Load Balancer.- If you already have a Floating IP, the interface will offer you to pick one.
If your Load Balancer is processing private traffic, choose No Public IP.
Step 4: Select the private network and the subnet where the Load Balancer will be spawned
The interface will inform you if the private network / subnet is not compliant with the prerequisites (see Public Cloud Networking concepts).
Step 5 (optional): Define the listener(s) and the members
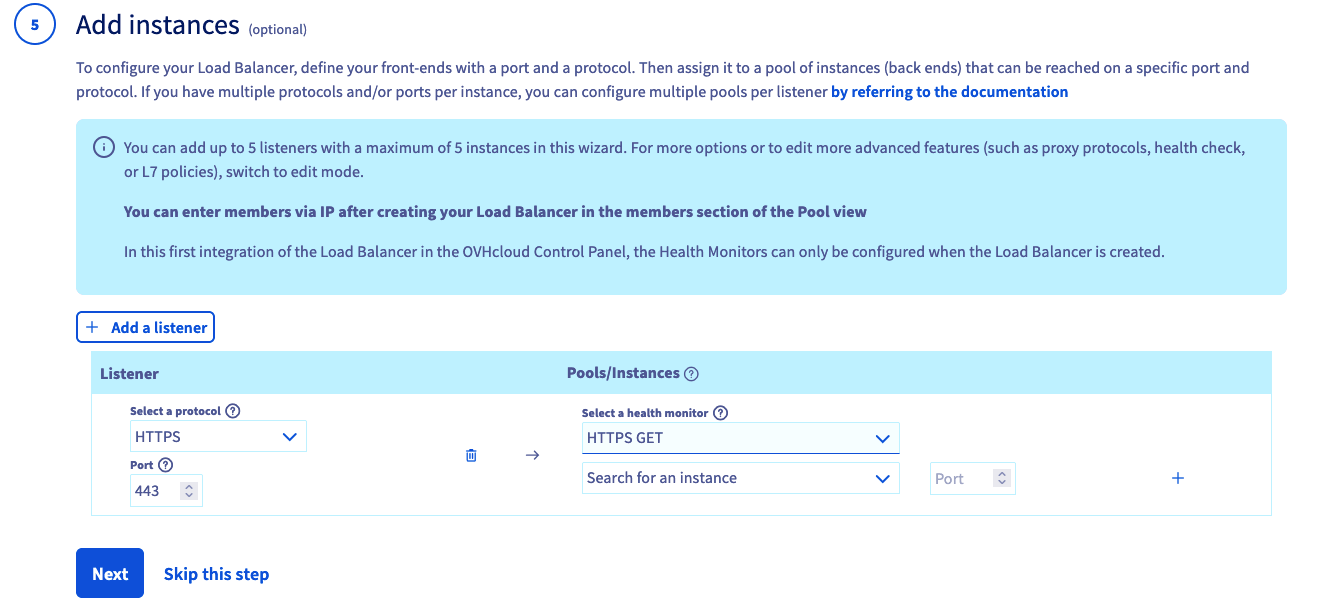
- First, choose the listener protocol & the port according to the traffic you will receive. Note that a specific listener called
Prometheusis available to monitor your Load Balancer. In that case, it is not possible to add members. For more information on this listener, read the Load Balancer monitoring with Prometheus guide. - Then, choose the Health Monitor type. Note that since some health monitor types are not compatible with some protocols, the user interface filters those types so that you can only choose compatible items. For more information on the health monitor compatibility, read the Public Cloud Networking concepts guide.
- Finally, from the instances of your region, choose the member IP & port that will be part of the pool. Note that in order to simplify the configuration workflow, it is only possible to have a pool with the same protocol as the listener, and that the member can only be chosen from the instance. Those limitations can be bypassed by skipping this part of configuration and use the pool / member configuration once the Load Balancer is created.
In order to simplify the Load Balancer configuration workflow, it is only possible to have a pool with the same protocol as the listener and the member can only be chosen from the instance. Furthermore the pool load balancing algorithm is by default set to ROUND_ROBIN.
Those limitations can be bypassed by skipping this part of configuration and use the pool / member configuration once the Load Balancer is created.
Step 6: Define the name of Load Balancer
You can update the name according to your choice and click on Create a Load Balancer.
You will be redirected to the Load Balancer listing page. Among the attributes that are displayed, the Operating status and Provisioning status provide information on the state of your load balancer. Find more information on the "Load Balancer concepts" page.
Go further
Official documentation of OpenStack Octavia
For training or technical assistance, contact your sales representative or request a quote from our Professional Services team.
Join our community of users.