Descubra cómo desplegar la stack de infraestructura NetApp Trident CSI con Enterprise File Storage y Managed Kubernetes Service mediante Terraform.
Objetivo
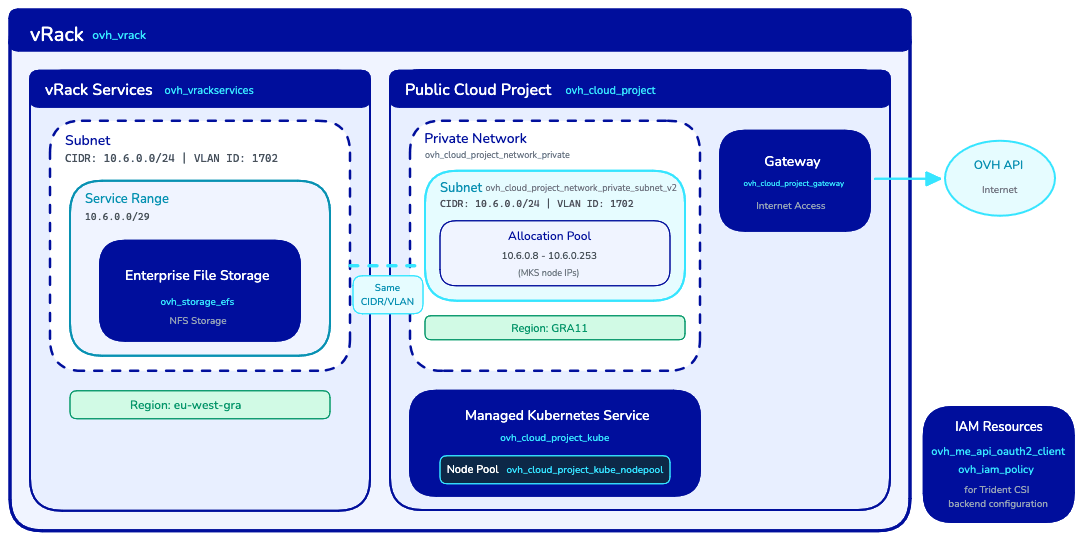
Esta guía explica cómo utilizar un módulo Terraform de OVHcloud llamado efs-trident para aprovisionar la stack de infraestructura completa necesaria para utilizar NetApp Trident CSI con Enterprise File Storage (EFS).
El módulo automatiza la creación de:
- Un servicio Enterprise File Storage (EFS)
- Un clúster Managed Kubernetes Service (MKS)
- Un vRack y un vRack Services, así como su configuración
- Un Public Cloud Project con una configuración para la red privada
- Una política IAM e identificadores OAuth2 para la autenticación del backend de almacenamiento Trident CSI
- Una pasarela de red para la conectividad de los nodos del clúster MKS con la API de OVHcloud
Descubra cómo desplegar y configurar la infraestructura de OVHcloud con Terraform para aprovisionar volúmenes EFS con NetApp Trident CSI.
Requisitos
Arquitectura
El módulo Terraform crea la siguiente infraestructura:
Restricciones de red
El módulo aplica las siguientes restricciones:
Procedimiento
Generar los identificadores de la API
El provider Terraform OVHcloud debe configurarse con un token de API para realizar llamadas a la API de OVHcloud.
Su token de API debe disponer de los siguientes permisos:
- GET, POST, PUT, DELETE en
/storage/netapp/*
- GET, POST, PUT, DELETE en
/vrack/*
- GET, POST, PUT, DELETE en
/cloud/project/*
- GET, POST, PUT, DELETE en
/me/*
- GET, POST, PUT, DELETE en
/iam/*
- POST en
/order/*
Siga la guía Primeros pasos con las API de OVHcloud para generar su token de API.
Una vez generado el token, conserve su información para utilizarla a continuación con el provider Terraform OVHcloud.
Configurar los parámetros del provider
Cree un fichero provider.tf con la configuración del provider OVHcloud:
terraform {
  required_providers {
    ovh = {
      source  = "ovh/ovh"
      version = ">= 2.12.0"
    }
  }

  required_version = ">= 1.7.0"
}

provider "ovh" {
  endpoint           = var.ovh.endpoint
  application_key    = var.ovh.application_key
  application_secret = var.ovh.application_secret
  consumer_key       = var.ovh.consumer_key
}
Cree a continuación un fichero variables.tf que defina las variables que se utilizarán en sus ficheros .tf:
variable "ovh" {
  type = map(string)
  default = {
    endpoint           = "ovh-eu"
    application_key    = ""
    application_secret = ""
    consumer_key       = ""
  }
}
Info
Acerca de la variable ovh.endpoint: por defecto, está definido ovh-eu, ya que realizamos llamadas a las API de OVHcloud Europa.
Existen otros endpoints, en función de sus necesidades:
ovh-eu para las API de OVHcloud Europaovh-ca para las API de OVHcloud América / Asia
Cree un fichero secrets.tfvars con sus identificadores:
Warning
No olvide sustituir <application_key>, <application_secret> y <consumer_key> por la información de su token de API obtenido anteriormente.
ovh = {
  endpoint           = "ovh-eu"
  application_key    = "<application_key>"
  application_secret = "<application_secret>"
  consumer_key       = "<consumer_key>"
}
Configuración mínima
Cree un fichero main.tf que utilice el módulo con los parámetros mínimos requeridos:
module "ovh_efs_trident" {
  source = "ovh/efs/ovh//modules/efs-trident"

  # Region Configuration (required)
  region              = "eu-west-gra"
  public_cloud_region = "GRA9"

  # Network Configuration (required)
  vlan_id = 1234

  # Set to false and terraform apply the configuration before destroying to detach vRack Services service endpoint
  vrackservices_attach_to_efs = true
}
Esta configuración mínima crea todos los recursos desde cero con los parámetros por defecto.
Info
Recomendamos elegir una region EFS y una región public_cloud_region MKS lo más cercanas posible.
La latencia entre regiones puede afectar al rendimiento de sus cargas de trabajo de almacenamiento.
Mantenga su almacenamiento y sus recursos de cálculo lo más cerca posible.
Por ejemplo:
eu-west-gra y GRA9eu-west-sbg y SBG5
Consulte la documentación de las regiones de OVHcloud para el mapeo completo.
Ejemplo de configuración completa
Para un control total sobre todos los recursos, utilice la configuración completa:
module "ovh_efs_trident" {
  source = "ovh/efs/ovh//modules/efs-trident"

  # Region Configuration
  region              = "eu-west-gra"
  public_cloud_region = "GRA9"

  # Network Configuration
  vlan_id = 1234

  # Set to false and terraform apply the configuration before destroying to detach vRack Services service endpoint
  vrackservices_attach_to_efs = true

  # OAuth2 and IAM
  oauth2_client_name        = "efs-trident-client"
  oauth2_client_description = "OAuth2 client for EFS Trident integration"
  iam_policy_name           = "efs-trident-policy"
  iam_policy_description    = "IAM policy for EFS Trident access"

  # EFS
  storage_efs_name      = "my-efs-storage"
  storage_efs_plan_code = "enterprise-file-storage-premium-1tb"

  # vRack
  vrack_name        = "my-vrack"
  vrack_description = "vRack for EFS connectivity"

  # MKS Cluster
  mks_cluster_name                    = "my-mks-cluster"
  mks_cluster_node_pool_name          = "default-pool"
  mks_cluster_node_pool_flavor        = "b3-8"
  mks_cluster_node_pool_desired_nodes = 3

  # Network Configuration
  private_network_subnet_cidr             = "10.6.0.0/24"
  private_network_gateway                 = "10.6.0.254"
  vrackservices_subnet_name               = "efs-subnet"
  vrackservices_subnet_service_range_cidr = "10.6.0.0/29"

  # Public Cloud Private Network
  public_cloud_private_network_name        = "mks-private-network"
  public_cloud_private_network_subnet_name = "mks-subnet"
  public_cloud_private_network_subnet_allocation_pools = {
    start = "10.6.0.8"
    end   = "10.6.0.253"
  }

  # Gateway
  public_cloud_gateway_name  = "mks-gateway"
  public_cloud_gateway_model = "s"

  # Cloud Project
  cloud_project_description = "EFS Trident Project"
}
Utilizar recursos existentes
El módulo está diseñado para ser compatible con su infraestructura existente. Puede utilizar sus recursos OVHcloud en lugar de crear otros nuevos.
Utilizar un EFS y un vRack Services existentes vinculados a un vRack
module "ovh_efs_trident" {
  source = "ovh/efs/ovh//modules/efs-trident"

  region              = "eu-west-gra"
  public_cloud_region = "GRA9"
  vlan_id             = 1234

  # Use existing EFS
  create_efs = false
  efs_id     = "xxxxxxxx-xxxx-xxxx-xxxx-xxxxxxxxxxxx"

  # Use existing vRack Services
  create_vrack_services = false
  vrack_services_id     = "vrs-xyz-789"

  # Use existing vRack
  create_vrack       = false
  vrack_service_name = "pn-1234567"

  # Network Configuration
  # Adjust subnet allocation pool and gateway address if your network configuration differs from example.
  # public_cloud_private_network_subnet_allocation_pools = {
  #   start = "10.7.0.8"
  #   end   = "10.7.0.253"
  # }
  # private_network_gateway = "10.7.0.254"

  # Skip binding since vRack Services is already configured
  bind_vrack_to_vrack_services = false
}
Utilizar un clúster MKS existente
Este ejemplo supone que solo existen productos Public Cloud: un clúster MKS con conectividad sobre red privada
y una pasarela para acceder a Internet, pero ningún vRack, EFS u otros recursos.
module "ovh_efs_trident" {
  source = "ovh/efs/ovh//modules/efs-trident"

  region              = "eu-west-gra"
  public_cloud_region = "GRA9"
  vlan_id             = 1234

  # Use existing Cloud Project
  create_cloud_project = false
  cloud_project_id     = "abc123"

  # Use existing Private Network
  create_private_network = false
  private_network_id     = "network-openstack-id"

  # Use existing Subnet
  create_private_subnet = false
  private_subnet_id     = "subnet-id"

  # Skip gateway creation (existing network already has a gateway)
  create_gateway = false

  # Use existing MKS Cluster
  create_mks_cluster = false
  mks_cluster_id     = "cluster-id"

  # Don't create a node pool for MKS cluster
  create_node_pool = false
}
Desplegar la infraestructura
Cree un fichero outputs.tf que agrupe todas las salidas del módulo:
# OAuth2 Credentials for Trident
output "client_id" {
  description = "OAuth2 client ID for EFS access"
  value       = module.ovh_efs_trident.client_id
}

output "client_secret" {
  description = "OAuth2 client secret for EFS access"
  value       = module.ovh_efs_trident.client_secret
  sensitive   = true
}

# Kubernetes Configuration
output "kubeconfig" {
  description = "Kubernetes configuration file for MKS cluster"
  value       = module.ovh_efs_trident.kubeconfig
  sensitive   = true
}

# Resource Identifiers
output "efs_id" {
  description = "EFS service name"
  value       = module.ovh_efs_trident.efs_id
}

output "vrack_service_name" {
  description = "vRack service name"
  value       = module.ovh_efs_trident.vrack_service_name
}

output "cloud_project_id" {
  description = "Cloud Project ID"
  value       = module.ovh_efs_trident.cloud_project_id
}

output "mks_cluster_id" {
  description = "MKS cluster ID"
  value       = module.ovh_efs_trident.mks_cluster_id
}

# Network Information
output "private_network_id" {
  description = "Private network OpenStack ID"
  value       = module.ovh_efs_trident.private_network_id
}

output "vlan_id" {
  description = "VLAN ID used"
  value       = module.ovh_efs_trident.vlan_id
}

# Summary
output "resources_created" {
  description = "Summary of resources that were created vs used"
  value       = module.ovh_efs_trident.resources_created
}
Inicialice Terraform para descargar los providers requeridos:
Cree un plan de ejecución para examinar los cambios:
terraform plan -var-file=secrets.tfvars -out main.tfplan
Examine la salida del plan para verificar los recursos que se crearán:
Terraform will perform the following actions:

  # module.ovh_efs_trident.null_resource.config_validation will be created
  # module.ovh_efs_trident.ovh_cloud_project.cloud_project[0] will be created
  # module.ovh_efs_trident.ovh_cloud_project_gateway.gateway[0] will be created
  # module.ovh_efs_trident.ovh_cloud_project_kube.mks_cluster[0] will be created
  # module.ovh_efs_trident.ovh_cloud_project_kube_nodepool.node_pool[0] will be created
  # module.ovh_efs_trident.ovh_cloud_project_network_private.network[0] will be created
  # module.ovh_efs_trident.ovh_cloud_project_network_private_subnet_v2.subnet[0] will be created
  # module.ovh_efs_trident.ovh_iam_policy.iam_policy will be created
  # module.ovh_efs_trident.ovh_me_api_oauth2_client.api_oauth2_client will be created
  # module.ovh_efs_trident.ovh_storage_efs.efs[0] will be created
  # module.ovh_efs_trident.ovh_vrack.vrack[0] will be created
  # module.ovh_efs_trident.ovh_vrack_cloudproject.vrack-cloudproject-binding[0] will be created
  # module.ovh_efs_trident.ovh_vrack_vrackservices.vrack-vrackservices-binding[0] will be created
  # module.ovh_efs_trident.ovh_vrackservices.vrackservices[0] will be created

Plan: 14 to add, 0 to change, 0 to destroy.
Aplique la configuración para crear los recursos:
terraform apply main.tfplan
module.ovh_efs_trident.null_resource.config_validation: Creation complete after 0s [id=xxx]
module.ovh_efs_trident.ovh_me_api_oauth2_client.api_oauth2_client: Creation complete after 0s [id=EU.xxx]
module.ovh_efs_trident.ovh_cloud_project.cloud_project[0]: Creation complete after 26s [id=xxx]
module.ovh_efs_trident.ovh_vrack.vrack[0]: Creation complete after 54s [id=pn-xxx]
module.ovh_efs_trident.ovh_vrack_cloudproject.vrack-cloudproject-binding[0]: Creation complete after 52s [id=vrack_pn-xxx-cloudproject_xxx]
module.ovh_efs_trident.ovh_cloud_project_network_private.network[0]: Creation complete after 14s [id=pn-xxx]
module.ovh_efs_trident.ovh_cloud_project_network_private_subnet_v2.subnet[0]: Creation complete after 1s [id=x-x-x-x-x]
module.ovh_efs_trident.ovh_cloud_project_gateway.gateway[0]: Creation complete after 32s [id=x-x-x-x-x]
module.ovh_efs_trident.ovh_storage_efs.efs[0]: Creation complete after 3m58s [id=x-x-x-x-x]
module.ovh_efs_trident.ovh_iam_policy.iam_policy: Creation complete after 0s [id=x-x-x-x-x]
module.ovh_efs_trident.ovh_vrackservices.vrackservices[0]: Creation complete after 56s [id=vrs-x-x-x-x]
module.ovh_efs_trident.ovh_vrack_vrackservices.vrack-vrackservices-binding[0]: Creation complete after 1m11s [id=vrack_pn-xxx-vrackServices_vrs-x-x-x-x]
module.ovh_efs_trident.ovh_cloud_project_kube.mks_cluster[0]: Creation complete after 4m11s [id=x-x-x-x-x]
module.ovh_efs_trident.ovh_cloud_project_kube_nodepool.node_pool[0]: Creation complete after 5m23s [id=x-x-x-x-x]

Apply complete! Resources: 14 added, 0 changed, 0 destroyed.
Warning
La creación de los recursos puede tardar varios minutos. La creación del clúster MKS suele ser la más larga.
Recuperar los outputs
Tras un despliegue correcto, recupere los outputs necesarios para la configuración de Trident:
Las salidas clave incluyen:
Para recuperar los valores sensibles:
terraform output -raw client_secret
terraform output -raw kubeconfig > kubeconfig.yaml
Configurar Trident CSI
Tras desplegar la infraestructura con este módulo, configure Trident CSI para utilizar Enterprise File Storage. Siga la guía Primeros pasos con Trident CSI para obtener instrucciones detalladas.
Utilice las salidas del módulo para configurar el backend Trident.
Recupere los identificadores OAuth2:
export CLIENT_ID=$(terraform output -raw client_id)
export CLIENT_SECRET=$(terraform output -raw client_secret)
Cree el secreto Kubernetes:
Warning
Si el namespace trident no existe todavía, créelo con kubectl --kubeconfig kubeconfig.yaml create ns trident
kubectl --kubeconfig kubeconfig.yaml create secret generic tbc-ovh-efs-secret \
  --namespace trident \
  --from-literal=clientID="$CLIENT_ID" \
  --from-literal=clientSecret="$CLIENT_SECRET"
Destruir la infraestructura
Antes de eliminar los recursos, si la vinculación del vRack Services al EFS se ha realizado con Terraform, elimínela primero definiendo vrackservices_attach_to_efs = false y aplicando la nueva configuración.
module "ovh_efs_trident" {
  [...]
  # Set to false and terraform apply the configuration before destroying to detach vRack Services service endpoint
  vrackservices_attach_to_efs = false
  [...]
}
terraform apply -var-file=secrets.tfvars
Una vez desvinculado el vRack Services del EFS, todos los recursos pueden eliminarse.
Para eliminar todos los recursos creados por el módulo:
Warning
Esto eliminará definitivamente todos los recursos, incluidos el clúster MKS y el almacenamiento EFS. Asegúrese de haber realizado una copia de seguridad de todos los datos importantes antes de proceder.
terraform destroy -var-file=secrets.tfvars
Para recibir formación o asistencia técnica en la implementación de nuestras soluciones, póngase en contacto con su representante comercial o consulte la página Professional Services para solicitar un presupuesto y que nuestros expertos analicen su proyecto.
Interactúe con nuestra comunidad de usuarios.
