Scopri come distribuire lo stack di infrastruttura NetApp Trident CSI con Enterprise File Storage e Managed Kubernetes Service tramite Terraform.
Obiettivo
Questa guida spiega come utilizzare un modulo Terraform OVHcloud denominato efs-trident per effettuare il provisioning dello stack di infrastruttura completo necessario all'utilizzo di NetApp Trident CSI con Enterprise File Storage (EFS).
Il modulo automatizza la creazione di:
- Un servizio Enterprise File Storage (EFS)
- Un cluster Managed Kubernetes Service (MKS)
- Un vRack e un vRack Services, oltre alla relativa configurazione
- Un Public Cloud Project con una configurazione per la rete privata
- Una policy IAM e delle credenziali OAuth2 per l'autenticazione del backend di storage Trident CSI
- Un gateway di rete per la connettività dei nodi del cluster MKS all'API OVHcloud
Scopri come distribuire e configurare un insieme di servizi OVHcloud con Terraform per effettuare il provisioning di volumi EFS con NetApp Trident CSI.
Prerequisiti
Architettura
Il modulo Terraform crea la seguente infrastruttura:
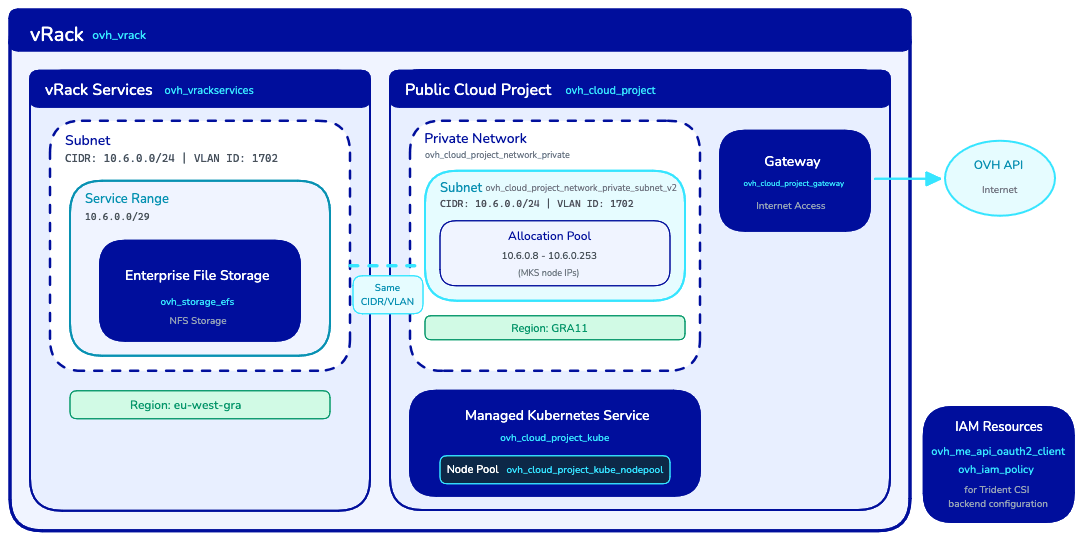
Vincoli di rete
Il modulo applica i seguenti vincoli:
Procedura
Generare le credenziali API
Il provider Terraform OVHcloud deve essere configurato con un token API per effettuare le chiamate alle API OVHcloud.
Il tuo token API deve disporre dei seguenti diritti:
- GET, POST, PUT, DELETE su
/storage/netapp/*
- GET, POST, PUT, DELETE su
/vrack/*
- GET, POST, PUT, DELETE su
/cloud/project/*
- GET, POST, PUT, DELETE su
/me/*
- GET, POST, PUT, DELETE su
/iam/*
- POST su
/order/*
Segui la guida Primi passi con le API OVHcloud per generare il tuo token API.
Una volta generato il token, conserva le sue informazioni per utilizzarle successivamente con il provider Terraform OVHcloud.
Configurare i parametri del provider
Crea un file provider.tf con la configurazione del provider OVHcloud:
terraform {
  required_providers {
    ovh = {
      source  = "ovh/ovh"
      version = ">= 2.12.0"
    }
  }

  required_version = ">= 1.7.0"
}

provider "ovh" {
  endpoint           = var.ovh.endpoint
  application_key    = var.ovh.application_key
  application_secret = var.ovh.application_secret
  consumer_key       = var.ovh.consumer_key
}
Crea quindi un file variables.tf che definisce le variabili da utilizzare nei tuoi file .tf:
variable "ovh" {
  type = map(string)
  default = {
    endpoint           = "ovh-eu"
    application_key    = ""
    application_secret = ""
    consumer_key       = ""
  }
}
Info
A proposito della variabile ovh.endpoint: per impostazione predefinita è definito ovh-eu, poiché effettuiamo chiamate alle API OVHcloud Europa.
Esistono altri endpoint, in base alle tue esigenze:
ovh-eu per le API OVHcloud Europaovh-ca per le API OVHcloud America / Asia
Crea un file secrets.tfvars con le tue credenziali:
Warning
Non dimenticare di sostituire <application_key>, <application_secret> e <consumer_key> con le informazioni del token API ottenuto in precedenza.
ovh = {
  endpoint           = "ovh-eu"
  application_key    = "<application_key>"
  application_secret = "<application_secret>"
  consumer_key       = "<consumer_key>"
}
Configurazione minima
Crea un file main.tf che utilizza il modulo con i parametri minimi richiesti:
module "ovh_efs_trident" {
  source = "ovh/efs/ovh//modules/efs-trident"

  # Region Configuration (required)
  region              = "eu-west-gra"
  public_cloud_region = "GRA9"

  # Network Configuration (required)
  vlan_id = 1234

  # Set to false and terraform apply the configuration before destroying to detach vRack Services service endpoint
  vrackservices_attach_to_efs = true
}
Questa configurazione minima crea tutte le risorse da zero con i parametri predefiniti.
Info
Consigliamo di scegliere una region EFS e una regione public_cloud_region MKS il più vicine possibile.
La latenza tra regioni può influire sulle prestazioni dei tuoi carichi di lavoro di storage.
Mantieni il tuo storage e le tue risorse di calcolo il più vicini possibile.
Ad esempio:
eu-west-gra e GRA9eu-west-sbg e SBG5
Consulta la documentazione delle regioni OVHcloud per la mappatura completa.
Esempio di configurazione completa
Per un controllo totale su tutte le risorse, utilizza la configurazione completa:
module "ovh_efs_trident" {
  source = "ovh/efs/ovh//modules/efs-trident"

  # Region Configuration
  region              = "eu-west-gra"
  public_cloud_region = "GRA9"

  # Network Configuration
  vlan_id = 1234

  # Set to false and terraform apply the configuration before destroying to detach vRack Services service endpoint
  vrackservices_attach_to_efs = true

  # OAuth2 and IAM
  oauth2_client_name        = "efs-trident-client"
  oauth2_client_description = "OAuth2 client for EFS Trident integration"
  iam_policy_name           = "efs-trident-policy"
  iam_policy_description    = "IAM policy for EFS Trident access"

  # EFS
  storage_efs_name      = "my-efs-storage"
  storage_efs_plan_code = "enterprise-file-storage-premium-1tb"

  # vRack
  vrack_name        = "my-vrack"
  vrack_description = "vRack for EFS connectivity"

  # MKS Cluster
  mks_cluster_name                    = "my-mks-cluster"
  mks_cluster_node_pool_name          = "default-pool"
  mks_cluster_node_pool_flavor        = "b3-8"
  mks_cluster_node_pool_desired_nodes = 3

  # Network Configuration
  private_network_subnet_cidr             = "10.6.0.0/24"
  private_network_gateway                 = "10.6.0.254"
  vrackservices_subnet_name               = "efs-subnet"
  vrackservices_subnet_service_range_cidr = "10.6.0.0/29"

  # Public Cloud Private Network
  public_cloud_private_network_name        = "mks-private-network"
  public_cloud_private_network_subnet_name = "mks-subnet"
  public_cloud_private_network_subnet_allocation_pools = {
    start = "10.6.0.8"
    end   = "10.6.0.253"
  }

  # Gateway
  public_cloud_gateway_name  = "mks-gateway"
  public_cloud_gateway_model = "s"

  # Cloud Project
  cloud_project_description = "EFS Trident Project"
}
Utilizzare risorse esistenti
Il modulo è progettato per essere compatibile con la tua infrastruttura esistente. Puoi utilizzare le tue risorse OVHcloud invece di crearne di nuove.
Utilizzare un EFS e un vRack Services esistenti collegati a un vRack
module "ovh_efs_trident" {
  source = "ovh/efs/ovh//modules/efs-trident"

  region              = "eu-west-gra"
  public_cloud_region = "GRA9"
  vlan_id             = 1234

  # Use existing EFS
  create_efs = false
  efs_id     = "xxxxxxxx-xxxx-xxxx-xxxx-xxxxxxxxxxxx"

  # Use existing vRack Services
  create_vrack_services = false
  vrack_services_id     = "vrs-xyz-789"

  # Use existing vRack
  create_vrack       = false
  vrack_service_name = "pn-1234567"

  # Network Configuration
  # Adjust subnet allocation pool and gateway address if your network configuration differs from example.
  # public_cloud_private_network_subnet_allocation_pools = {
  #   start = "10.7.0.8"
  #   end   = "10.7.0.253"
  # }
  # private_network_gateway = "10.7.0.254"

  # Skip binding since vRack Services is already configured
  bind_vrack_to_vrack_services = false
}
Utilizzare un cluster MKS esistente
Questo esempio presuppone che esistano già solo prodotti Public Cloud: un cluster MKS con connettività su rete privata
e un gateway per raggiungere Internet, ma nessun vRack, EFS né altre risorse.
module "ovh_efs_trident" {
  source = "ovh/efs/ovh//modules/efs-trident"

  region              = "eu-west-gra"
  public_cloud_region = "GRA9"
  vlan_id             = 1234

  # Use existing Cloud Project
  create_cloud_project = false
  cloud_project_id     = "abc123"

  # Use existing Private Network
  create_private_network = false
  private_network_id     = "network-openstack-id"

  # Use existing Subnet
  create_private_subnet = false
  private_subnet_id     = "subnet-id"

  # Skip gateway creation (existing network already has a gateway)
  create_gateway = false

  # Use existing MKS Cluster
  create_mks_cluster = false
  mks_cluster_id     = "cluster-id"

  # Don't create a node pool for MKS cluster
  create_node_pool = false
}
Distribuire l'infrastruttura
Crea un file outputs.tf che raggrupperà tutti gli output del modulo:
# OAuth2 Credentials for Trident
output "client_id" {
  description = "OAuth2 client ID for EFS access"
  value       = module.ovh_efs_trident.client_id
}

output "client_secret" {
  description = "OAuth2 client secret for EFS access"
  value       = module.ovh_efs_trident.client_secret
  sensitive   = true
}

# Kubernetes Configuration
output "kubeconfig" {
  description = "Kubernetes configuration file for MKS cluster"
  value       = module.ovh_efs_trident.kubeconfig
  sensitive   = true
}

# Resource Identifiers
output "efs_id" {
  description = "EFS service name"
  value       = module.ovh_efs_trident.efs_id
}

output "vrack_service_name" {
  description = "vRack service name"
  value       = module.ovh_efs_trident.vrack_service_name
}

output "cloud_project_id" {
  description = "Cloud Project ID"
  value       = module.ovh_efs_trident.cloud_project_id
}

output "mks_cluster_id" {
  description = "MKS cluster ID"
  value       = module.ovh_efs_trident.mks_cluster_id
}

# Network Information
output "private_network_id" {
  description = "Private network OpenStack ID"
  value       = module.ovh_efs_trident.private_network_id
}

output "vlan_id" {
  description = "VLAN ID used"
  value       = module.ovh_efs_trident.vlan_id
}

# Summary
output "resources_created" {
  description = "Summary of resources that were created vs used"
  value       = module.ovh_efs_trident.resources_created
}
Inizializza Terraform per scaricare i provider richiesti:
Crea un piano di esecuzione per esaminare le modifiche:
terraform plan -var-file=secrets.tfvars -out main.tfplan
Esamina l'output del piano per verificare le risorse che verranno create:
Terraform will perform the following actions:

  # module.ovh_efs_trident.null_resource.config_validation will be created
  # module.ovh_efs_trident.ovh_cloud_project.cloud_project[0] will be created
  # module.ovh_efs_trident.ovh_cloud_project_gateway.gateway[0] will be created
  # module.ovh_efs_trident.ovh_cloud_project_kube.mks_cluster[0] will be created
  # module.ovh_efs_trident.ovh_cloud_project_kube_nodepool.node_pool[0] will be created
  # module.ovh_efs_trident.ovh_cloud_project_network_private.network[0] will be created
  # module.ovh_efs_trident.ovh_cloud_project_network_private_subnet_v2.subnet[0] will be created
  # module.ovh_efs_trident.ovh_iam_policy.iam_policy will be created
  # module.ovh_efs_trident.ovh_me_api_oauth2_client.api_oauth2_client will be created
  # module.ovh_efs_trident.ovh_storage_efs.efs[0] will be created
  # module.ovh_efs_trident.ovh_vrack.vrack[0] will be created
  # module.ovh_efs_trident.ovh_vrack_cloudproject.vrack-cloudproject-binding[0] will be created
  # module.ovh_efs_trident.ovh_vrack_vrackservices.vrack-vrackservices-binding[0] will be created
  # module.ovh_efs_trident.ovh_vrackservices.vrackservices[0] will be created

Plan: 14 to add, 0 to change, 0 to destroy.
Applica la configurazione per creare le risorse:
terraform apply main.tfplan
module.ovh_efs_trident.null_resource.config_validation: Creation complete after 0s [id=xxx]
module.ovh_efs_trident.ovh_me_api_oauth2_client.api_oauth2_client: Creation complete after 0s [id=EU.xxx]
module.ovh_efs_trident.ovh_cloud_project.cloud_project[0]: Creation complete after 26s [id=xxx]
module.ovh_efs_trident.ovh_vrack.vrack[0]: Creation complete after 54s [id=pn-xxx]
module.ovh_efs_trident.ovh_vrack_cloudproject.vrack-cloudproject-binding[0]: Creation complete after 52s [id=vrack_pn-xxx-cloudproject_xxx]
module.ovh_efs_trident.ovh_cloud_project_network_private.network[0]: Creation complete after 14s [id=pn-xxx]
module.ovh_efs_trident.ovh_cloud_project_network_private_subnet_v2.subnet[0]: Creation complete after 1s [id=x-x-x-x-x]
module.ovh_efs_trident.ovh_cloud_project_gateway.gateway[0]: Creation complete after 32s [id=x-x-x-x-x]
module.ovh_efs_trident.ovh_storage_efs.efs[0]: Creation complete after 3m58s [id=x-x-x-x-x]
module.ovh_efs_trident.ovh_iam_policy.iam_policy: Creation complete after 0s [id=x-x-x-x-x]
module.ovh_efs_trident.ovh_vrackservices.vrackservices[0]: Creation complete after 56s [id=vrs-x-x-x-x]
module.ovh_efs_trident.ovh_vrack_vrackservices.vrack-vrackservices-binding[0]: Creation complete after 1m11s [id=vrack_pn-xxx-vrackServices_vrs-x-x-x-x]
module.ovh_efs_trident.ovh_cloud_project_kube.mks_cluster[0]: Creation complete after 4m11s [id=x-x-x-x-x]
module.ovh_efs_trident.ovh_cloud_project_kube_nodepool.node_pool[0]: Creation complete after 5m23s [id=x-x-x-x-x]

Apply complete! Resources: 14 added, 0 changed, 0 destroyed.
Warning
La creazione delle risorse può richiedere alcuni minuti. La creazione del cluster MKS è generalmente la più lunga.
Recuperare gli output
Dopo aver distribuito correttamente l'infrastruttura, recupera gli output necessari alla configurazione di Trident:
Gli output chiave includono:
Per recuperare i valori sensibili:
terraform output -raw client_secret
terraform output -raw kubeconfig > kubeconfig.yaml
Configurare Trident CSI
Dopo aver distribuito l'infrastruttura con questo modulo, configura Trident CSI per utilizzare Enterprise File Storage. Segui la guida Primi passi con Trident CSI per istruzioni dettagliate.
Utilizza gli output del modulo per configurare il backend Trident.
Recupera le credenziali OAuth2:
export CLIENT_ID=$(terraform output -raw client_id)
export CLIENT_SECRET=$(terraform output -raw client_secret)
Crea il secret Kubernetes:
Warning
Se il namespace trident non esiste ancora, crealo con kubectl --kubeconfig kubeconfig.yaml create ns trident
kubectl --kubeconfig kubeconfig.yaml create secret generic tbc-ovh-efs-secret \
  --namespace trident \
  --from-literal=clientID="$CLIENT_ID" \
  --from-literal=clientSecret="$CLIENT_SECRET"
Distruggere l'infrastruttura
Prima di eliminare le risorse, se il collegamento del vRack Services all'EFS è stato effettuato con Terraform, eliminalo per primo impostando vrackservices_attach_to_efs = false e applicando la nuova configurazione.
module "ovh_efs_trident" {
  [...]
  # Set to false and terraform apply the configuration before destroying to detach vRack Services service endpoint
  vrackservices_attach_to_efs = false
  [...]
}
terraform apply -var-file=secrets.tfvars
Una volta scollegato il vRack Services dall'EFS, è possibile eliminare tutte le risorse.
Per eliminare tutte le risorse create dal modulo:
Warning
Questa operazione eliminerà definitivamente tutte le risorse, compreso il cluster MKS e lo storage EFS. Assicurati di aver salvato tutti i dati importanti prima di procedere.
terraform destroy -var-file=secrets.tfvars
Per saperne di più
Per una formazione o un'assistenza tecnica nell'implementazione delle nostre soluzioni, contatta il tuo referente commerciale o consulta la pagina Professional Services per ottenere un preventivo e far analizzare il tuo progetto dai nostri esperti.
Contatta la nostra Community di utenti.
