Expose your app deployed on an OVHcloud Managed Kubernetes Service
Find out how to use and expose your app deployed on an OVHcloud Managed Kubernetes Service
The Loadbalancer section of this documentation is about "LoadBalancer for Managed Kubernetes Service. If you want to benefit from the new MKS LoadBalancing solution "Public Cloud LoadBalancer" based on Octavia LoadBalancer, please refer to this page.
To force the usage of "LoadBalancer for Managed Kubernetes" in your MKS cluster, add this annotation loadbalancer.ovhcloud.com/class: iolb to your Kubernetes Service.
Note: Starting from MKS Kubernetes version 1.31, "LoadBalancer for Managed Kubernetes" is no longer the default loadbalancer solution and will be replaced by Public Cloud Loadbalancer.
Objective
In this tutorial we are explaining how to use services on OVHcloud Managed Kubernetes service to expose your app by getting external traffic into your cluster. We will begin by listing the main methods to expose Kubernetes services outside the cluster, with their advantages and disadvantages. Then we will see a complete example of LoadBalancer service deployment.
Before you begin
This tutorial presupposes that you already have a working OVHcloud Managed Kubernetes cluster and some basic knowledge of how to operate it. If you want to know more on those topics, please look at the OVHcloud Managed Kubernetes Service Quickstart.
When a LoadBalancer Service resource is created inside a Managed Kubernetes cluster, a Load Balancer for a Managed Kubernetes Service is automatically created, allowing public access to your Kubernetes application. The Load Balancer for a Managed Kubernetes Service is hourly charged and will appear in your Public Cloud project. For more information, please refer to the following page.
Some concepts: ClusterIP, NodePort, Ingress and LoadBalancer
When you begin to use Kubernetes for real applications, one of the first questions is how to get external traffic into your cluster. The official doc gives you a good but rather dry explanation of the topic, but here we are trying to explain the concepts in a minimal, need-to-know way.
There are several ways to route the external traffic into your cluster:
-
Using Kubernetes proxy and
ClusterIP: The default KubernetesServiceTypeisClusterIP, which exposes theServiceon a cluster-internal IP. To reach theClusterIPfrom an external source, you can open a Kubernetes proxy between the external source and the cluster. It is usually only used for development. -
Exposing services as
NodePort: Declaring aServiceof typeNodePortexposes the service on each Node’s IP at a static port (theNodePort). You can then access theServicefrom the outside of the cluster by requesting<NodeIp>:<NodePort>. It can be used for production, with some limitations. -
Exposing services as
LoadBalancer: Declaring aServiceof typeLoadBalancerexposes it externally using a cloud provider’s load balancer. The cloud provider will provision a load balancer for theService, and map it to its automatically assignedNodePort. It is the most widely used method in production environments.
Using Kubernetes proxy and ClusterIP
The default Kubernetes ServiceType is ClusterIP, which exposes the Service on a cluster-internal IP. To reach the ClusterIP from an external computer, you can open a Kubernetes proxy between the external computer and the cluster.
You can use kubectl to create such a proxy. When the proxy is up, you're directly connected to the cluster, and you can use the Services internal IP (ClusterIP).
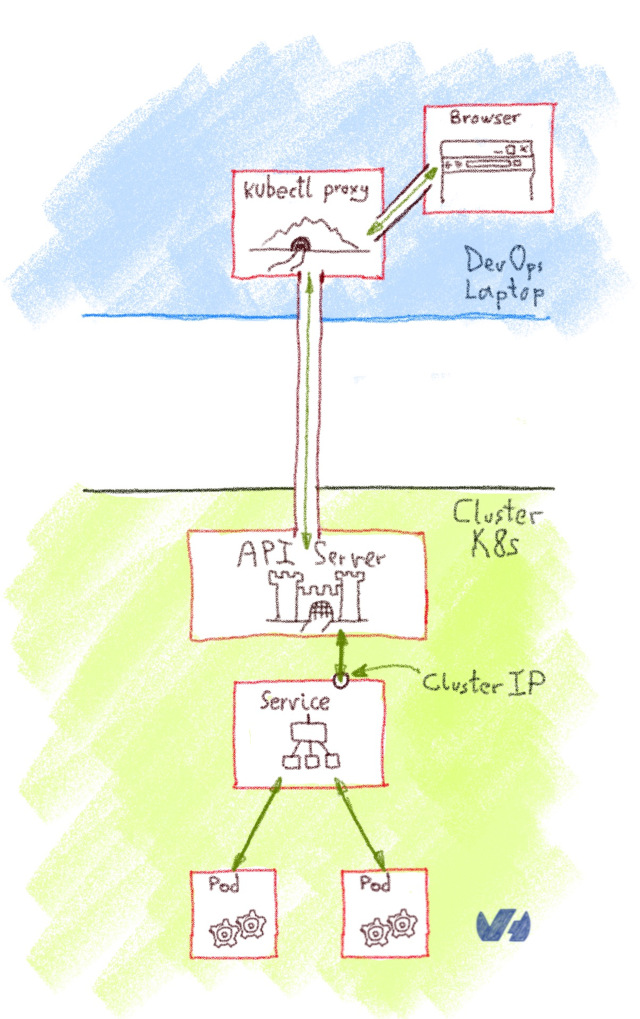
This method isn't suited for a production environment, but it's interesting for development, debugging or other quick-and-dirty operations.
Exposing services as NodePort
Declaring a service of type NodePort exposes the Service on each Node’s IP at a static port, the NodePort (a fixed port for that Service, in the default range of 30000-32767). You can then access the Service from the outside of the cluster by requesting <NodeIp>:<NodePort>. Every service you deploy as NodePort will be exposed in its own port, on every Node.
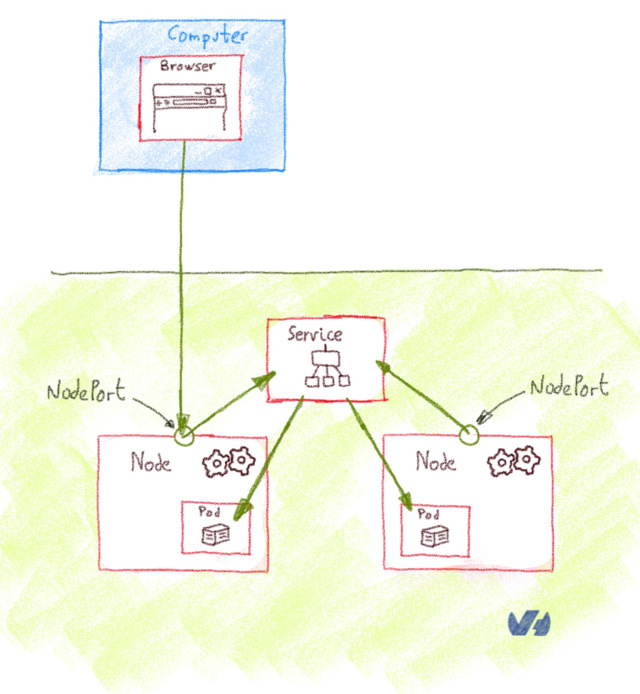
It's rather cumbersome to use NodePort Services in production. As you are using non-standard ports, you often need to set up an external load balancer that listens on standard ports and redirects the traffic to the <NodeIp>:<NodePort>.
In our OVHcloud Managed Kubernetes you have an easy way to access NodePort services. You need to get the nodes URL, a URL solving via round-robin DNS to one random node of your cluster. As NodePort services are exposed in the same port on every Node, you can use this nodes URL to access them.
In order to get the nodes URL, you get the control plane URL (the one given on kubectl cluster-info) and add the nodes element between the first and the second element of the URL
Example:
In this case, the nodes URL will be https://xxxxxx.nodes.c1.gra9.k8s.ovh.net and a service deployed on NodePort 30123 can be accessed on https://xxxxxx.nodes.c1.gra9.k8s.ovh.net:30123.
If your OVHcloud Managed Kubernetes is connected to a vRack, the NodePort is only exposed on your private subnet. So you have to check your private IPs on your nodes in your Nodepool and connect via one of these private IPs.
Exposing services as LoadBalancer
Declaring a service of type LoadBalancer exposes it externally using a cloud provider’s load balancer. The cloud provider will provision a load balancer for the Service, and map it to its automatically assigned NodePort. How the traffic from that external load balancer is routed to the Service pods depends on the cluster provider.
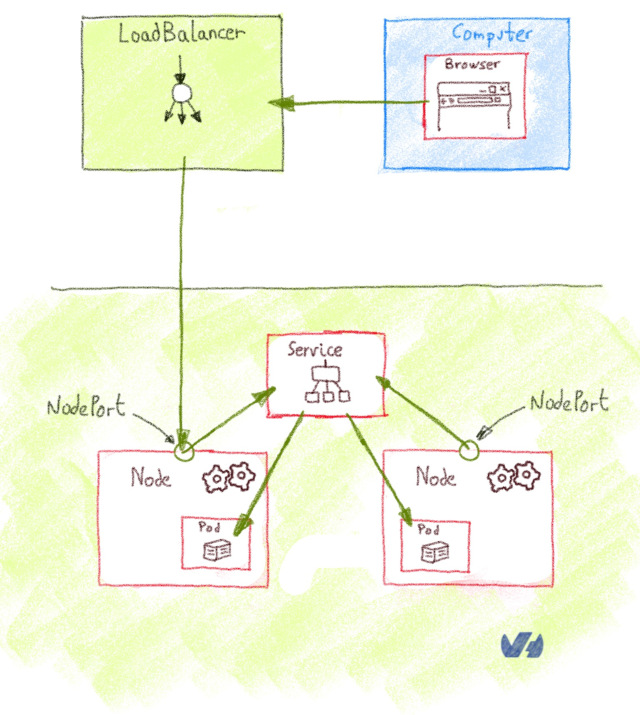
The LoadBalancer is the best option for a production environment, with two caveats:
- Every
Serviceof typeLoadBalanceryou deploy will get its own IP. - The
LoadBalanceris usually billed by the number of exposed services, it can be expensive.
There is a limit of 200 active LoadBalancer per Openstack project (also named Openstack tenant). This limit can be exceptionally raised upon request through our support team.
Supported Load Balancers
OVHcloud currently provides two types of load balancers that can be used with Managed Kubernetes Services:
- Load Balancer for Managed Kubernetes, this load balancer type can only be used to expose resources of a Managed Kubernetes Service. It supports up to 2000 requests/second and a 200Mbits/s bandwidth. Please note that this Loadbalancer will be depracated from MKS Kubernetes version 1.32 and upwards.
- Public Load Balancer, based on the OpenStack Octavia project, this load balancer type can also be used with standard OVHcloud instances. You can choose between three Load Balancer sizes (S,M,L), providing up to 40k requests/second and a 2 Gbits/second bandwidth. Other advantages are the capability to expose your Load Balancer privately (private-to-private) or publicly (public-to-private or public-to-public) using Floating IPs, the possibility to collect metrics and TCP/UDP protocols.
Supported annotations
This part of the documentation applies to Load Balancer for Managed Kubernetes.
A dedicated documentation for Public Load Balancer is available, please look at the Expose your applications using a load balancer.
There are several annotations available to customize your load balancer:
service.beta.kubernetes.io/ovh-loadbalancer-proxy-protocol: Used on the service to enable the proxy protocol on all backends. Supported values:v1,v2,v2_ssl,v2_ssl_cn.
OVHcloud Load Balancer services handle 4 ProxyProtocol modes:
-
service.beta.kubernetes.io/ovh-loadbalancer-allowed-sources: Used on the service to specify allowed client IP source ranges. Value: comma separated list of CIDRs. For example:10.0.0.0/24,172.10.0.1. Deprecated, please useloadBalancerSourceRangesspec instead, see Restrict Access For LoadBalancer Service. -
service.beta.kubernetes.io/ovh-loadbalancer-balance: Used on the service to set the algorithm to use for load balancing. Supported values:first,leastconn,roundrobin,source. Default:roundrobin.
What about Ingress
According to the official documentation, an Ingress is an API object that manages external access to the services in a cluster, typically HTTP. What is the difference with the LoadBalancer or NodePort?
Ingress isn't a type of Service, but an object that acts as a reverse proxy, and single entrypoint to your cluster that routes the request to the different services. The most basic Ingress is the NGINX Ingress Controller, where the NGINX take the role of reverse proxy, but also functions as SSL.
An Ingress is exposed to the outside of the cluster either via ClusterIP and Kubernetes proxy, NodePort or LoadBalancer, and it routes incoming traffic according to configured rules.
The main advantage of using an Ingress behind a LoadBalancer is the cost: you can have lots of services behind a single LoadBalancer.
Deploying LoadBalancer Services on OVHcloud Managed Kubernetes clusters
In our OVHcloud Managed Kubernetes we propose a load balancing service enabling you to use LoadBalancer ServiceType.
Deploying a Hello World LoadBalancer service
Create a hello.yml file for our ovhplatform/hello Docker image, defining the service type as LoadBalancer:
And apply the file:
After applying the YAML file, a new hello-world service and the corresponding hello-world-deployment deployment are created:
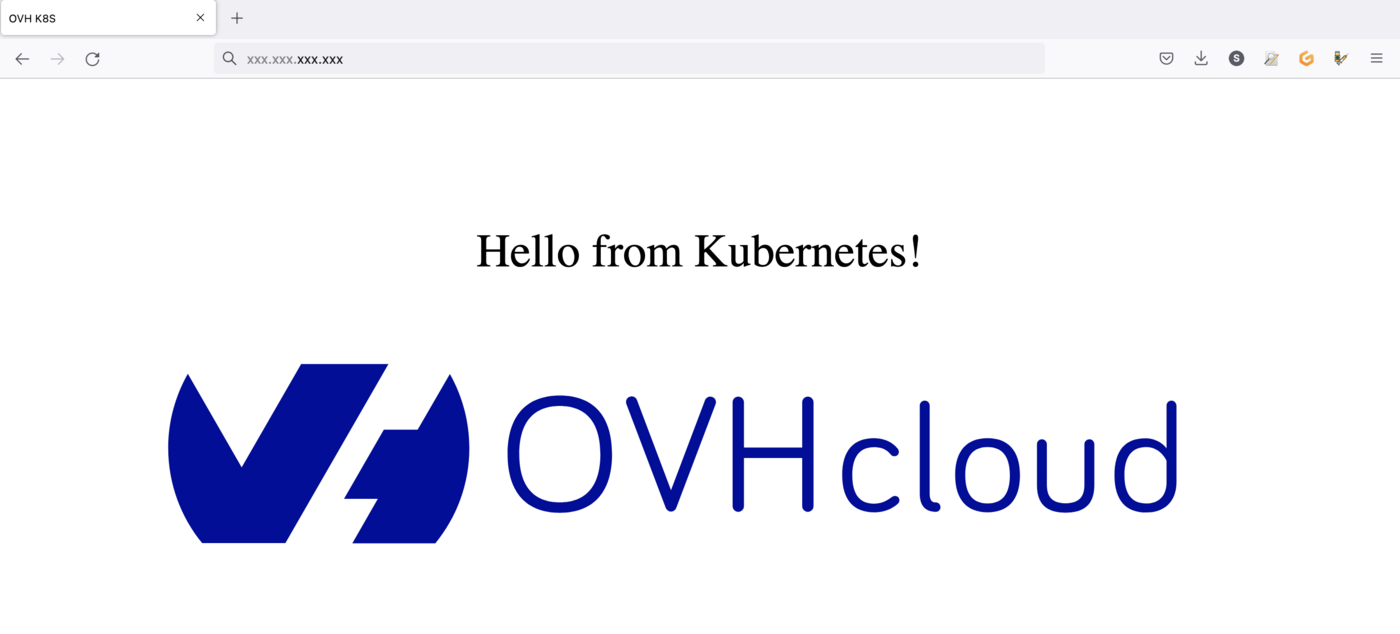
The application you have just deployed is a simple Nginx server with a single static Hello World page.
Basically it just deploys the Docker image ovhplatform/hello
List the services
And now you're going to use kubectl to see your service:
You should see your newly created service:
As the LoadBalancer creation is asynchronous, and the provisioning of the load balancer can take several minutes, you will surely get a <pending> EXTERNAL-IP.
If you try again in a few minutes you should get an EXTERNAL-IP:
For each service you deploy with LoadBalancer type, you will get a new IPv4 with the xxx.xxx.xxx.xxx format to access the service.
Testing your service
If you point your web browser to the EXTERNAL-IP value, the hello-world service will answer you:
Cleaning up
At the end you can proceed to clean up by deleting the service and the deployment.
Let's begin by deleting the service:
If you list the services you will see that hello-world doesn't exist anymore:
Then, you can delete the deployment:
And now if you list your deployment you will find no resource:
If now you list the pods:
You will see that the pod created for hello-world has been deleted too:
Go further
-
If you need training or technical assistance to implement our solutions, contact your sales representative or click on this link to get a quote and ask our Professional Services experts for assisting you on your specific use case of your project.
-
Join our community of users.