For AI agents: the complete documentation index is available at https://docs.ovhcloud.com/pt/llms.txt, the full documentation bundle is available at https://docs.ovhcloud.com/pt/llms-full.txt, and this page is available as Markdown at https://docs.ovhcloud.com/pt/guides/public-cloud/cross-functional/disaster-recovery-plan-implementation.md.
Deploy Nextcloud across two Public Cloud regions using managed services, and fail over to the recovery site when the production region goes down
Objective
Running Nextcloud on a single instance is simple, but it offers no protection: the moment that instance, or the host behind it, fails, the service is down for everyone. Making the deployment resilient inside one region solves part of the problem. It does not cover the loss of the region itself.
This guide builds a deployment that answers three requirements:
Nextcloud is highly available, with the shortest possible downtime.
As little infrastructure as possible is managed by hand, so managed services are used wherever they exist.
A disaster recovery site takes over in the event of a global failure of the production site, with the lowest achievable RTO and RPO.
This guide explains how to deploy Nextcloud across two OVHcloud Public Cloud regions with managed services, keep both sites in sync, and fail over from one to the other.
Most commands in this guide use the OVHcloud CLI. Install it and create your API credentials as explained in Getting started with OVHcloud CLI:
ovhcloud login
None of the commands below pass a project ID, so the CLI must know which Public Cloud project to work on. List your projects:
ovhcloud cloud project list
Then set the one you want as the default, either with the OVH_CLOUD_PROJECT_SERVICE environment variable or with the default_cloud_project key of the [ovh-cli] section of your ~/.ovh.conf file. Replace <YOUR_PROJECT_ID> with the ID returned by the command above:
Download the openrc.sh file of your project from the OVHcloud Control Panel and load it, as described in Setting OpenStack environment variables. This is the source openrc.sh command at the beginning of the deployment.
Info
The openstack share commands used in this guide come from the Manila client, which is not always installed with the OpenStack client. If the command is not recognised, install python-manilaclient in the same environment.
OVHcloud Control Panel Access
Direct link:
Navigation path:Network > Load Balancer > Select your service
Instructions
Understanding the problem
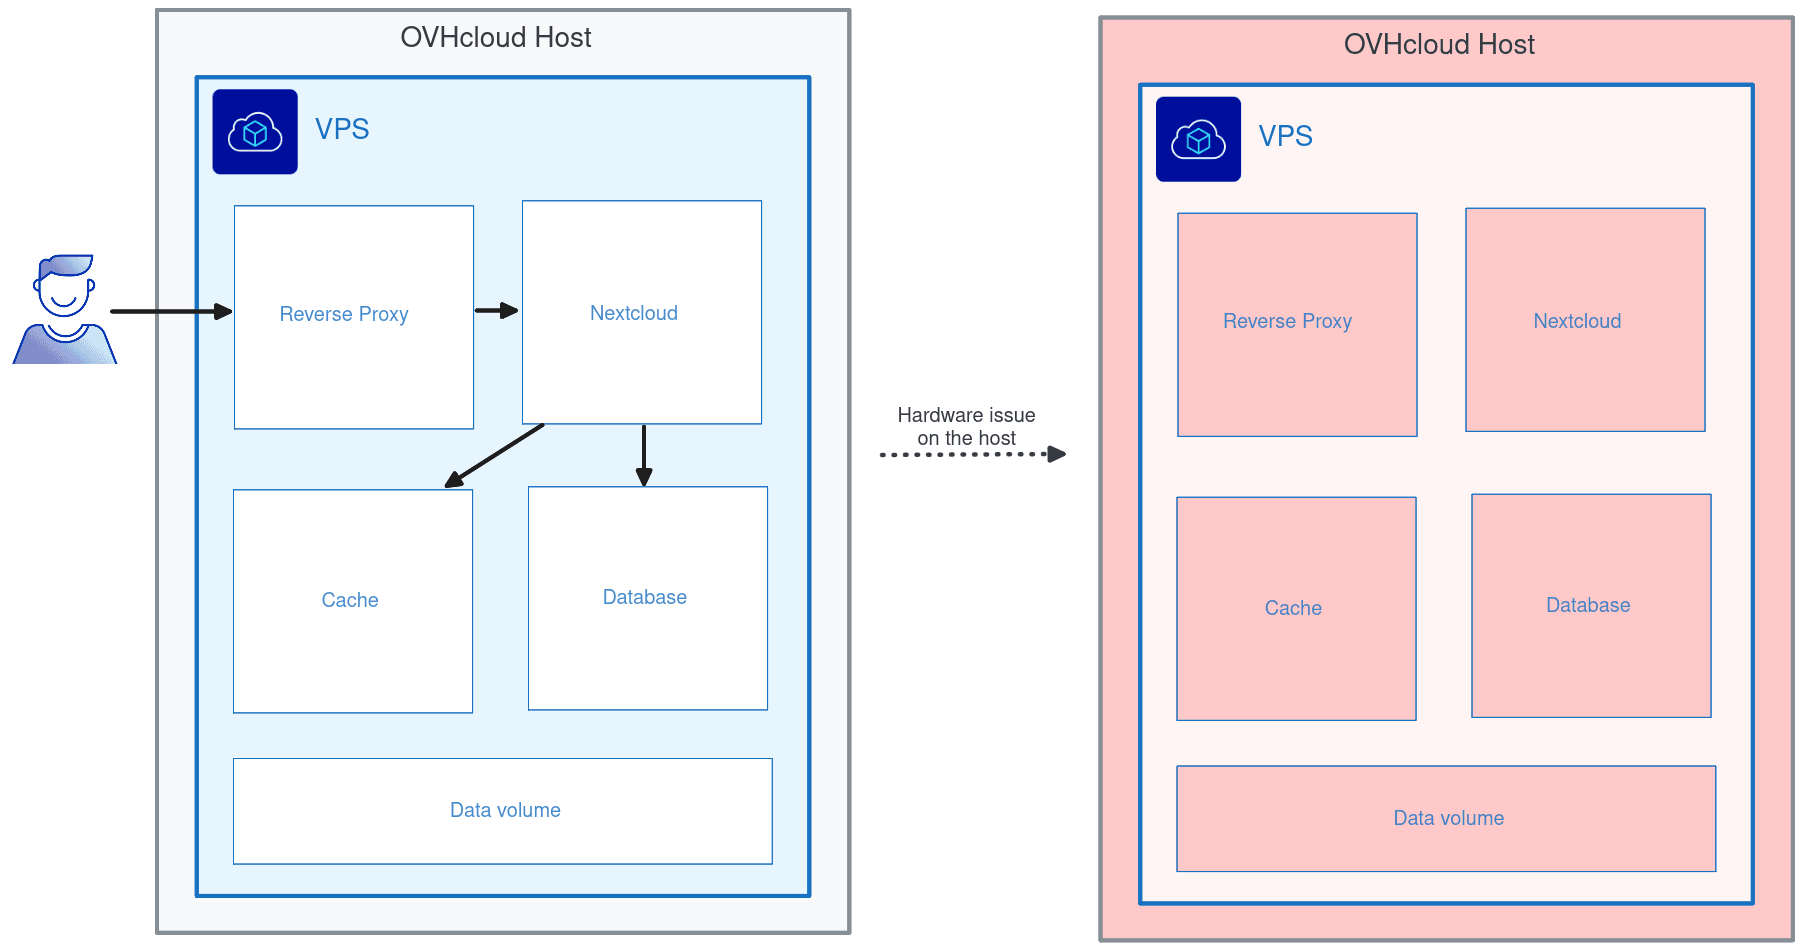
A single-instance deployment fails with its host
The quickest way to deploy Nextcloud is to run every component (reverse proxy, application, cache, database and data volume) on a single Public Cloud instance or VPS. If that instance, or the host running it, fails, Nextcloud goes down with it:
The instance stays unavailable until the host is repaired or the instance is restarted on another host. For the whole of that time, your end users have no access to the service.
A resilient deployment survives the loss of a node
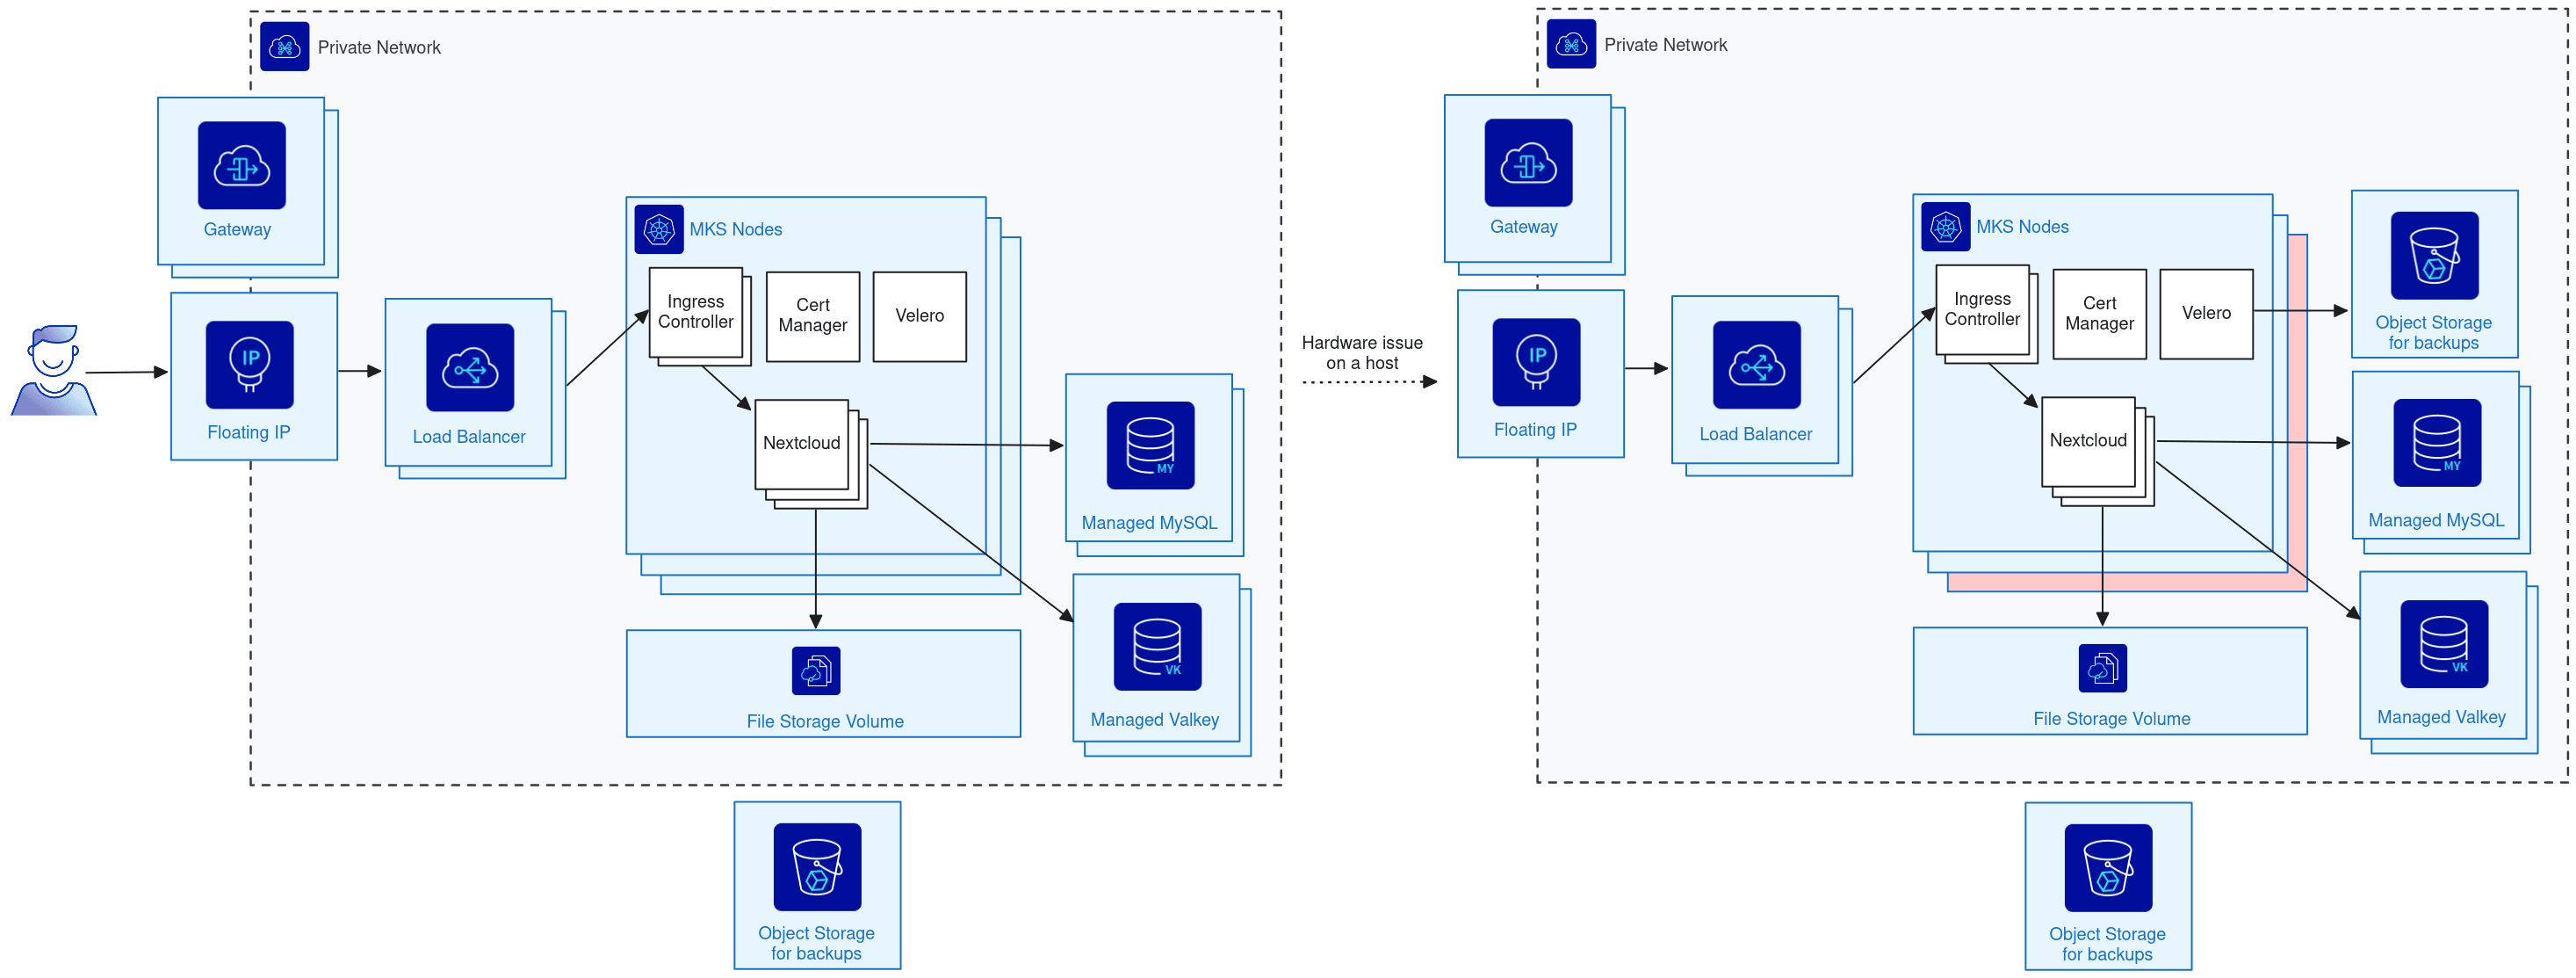
Nextcloud can be deployed in a far more resilient way: by making each application component highly available (database, cache, Nextcloud itself), and by making the underlying infrastructure redundant as well (several instances spread over different hosts, redundant ingress).
The following Public Cloud products cover these needs:
A Managed Kubernetes Service (MKS) cluster to run Nextcloud
A Managed Databases cluster for PostgreSQL or MySQL
A Public Cloud File Storage volume, shared between the Nextcloud replicas
A Public Cloud Load Balancer for the ingress traffic
A Public Cloud Gateway to expose the load balancer publicly
The resulting infrastructure looks like this:
Here the host running one of the MKS nodes crashes. Because the infrastructure was designed for that risk, Nextcloud keeps running and end users keep working.
Surviving the loss of a region
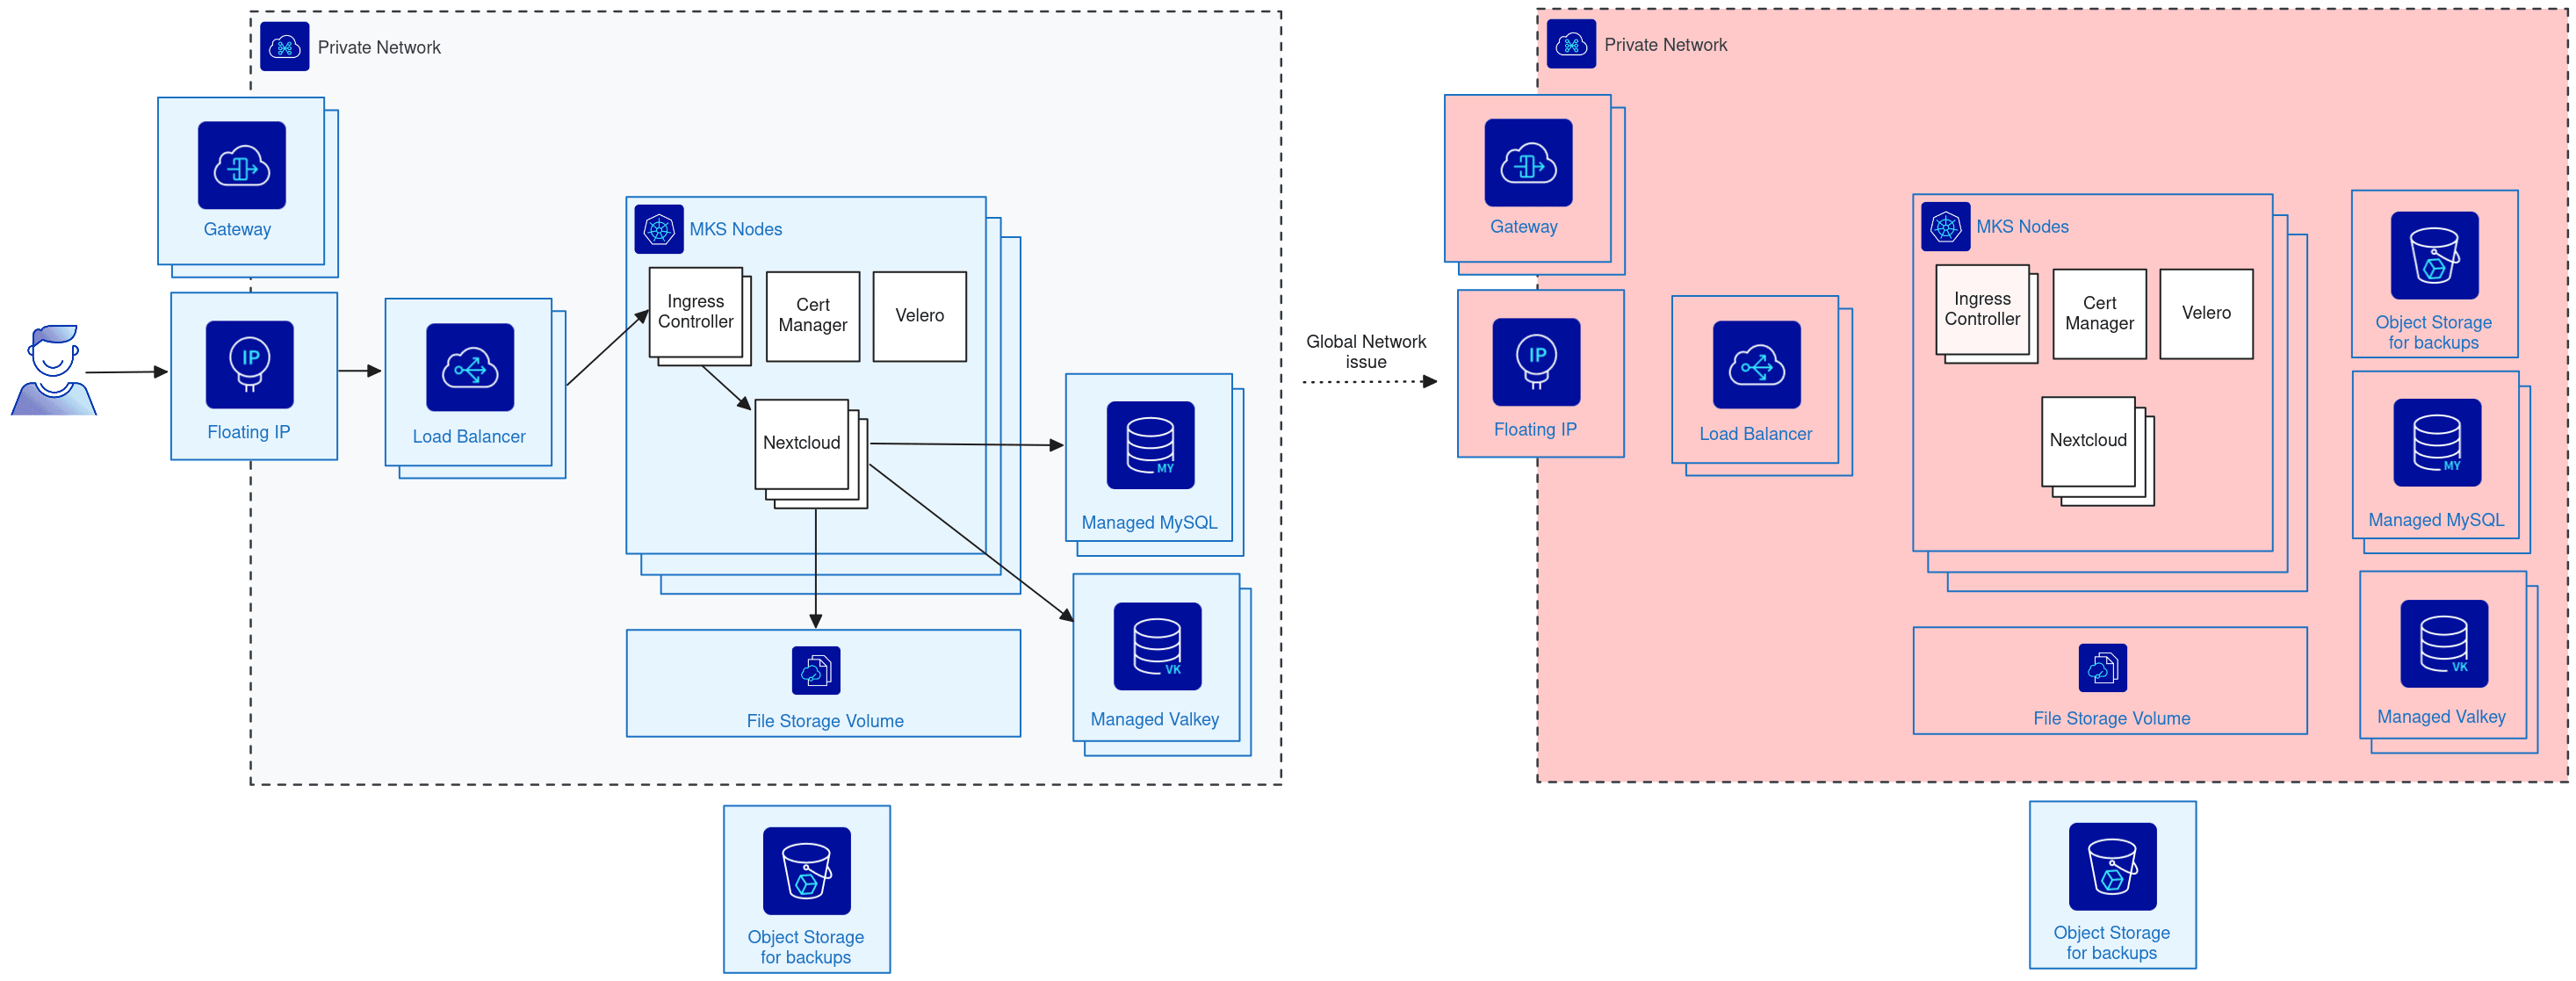
A resilient deployment still lives in a single location, and that location can fail as a whole, during a major Public Cloud network outage, for example:
Every component loses network connectivity at once and Nextcloud becomes unreachable. This is what a disaster recovery site protects against. Building one raises three questions, each answered below: how to handle ingress on two sites, how to keep the database in sync, and how to replicate the end-user files.
Ingress: IP Load Balancer
Traffic must keep flowing when a whole site disappears. The OVHcloud IP Load Balancer (IPLB) answers this: it can be attached to backends located in two different sites at the same time (Gravelines and Strasbourg, for example), so the same public IP can serve either site.
Info
The IP Load Balancer is the only OVHcloud load balancing product that can span two regions at the same time. Every other Public Cloud product used here is regional or zonal, so a dedicated resource must be created in each region.
Database: PostgreSQL logical replication
Managed Databases for MySQL does not offer cross-region data replication, which would leave backup/restore as the only option, with an RTO/RPO far from optimal. Nextcloud also supports PostgreSQL, and PostgreSQL provides a built-in logical replication mechanism, so this guide uses Managed Databases for PostgreSQL.
Warning
Logical replication does not replicate the database as a whole: it replicates table by table. You must make sure that every Nextcloud table is included in the publication, and that the schema of those tables is identical on both sites.
End-user files: Object Storage replication
File Storage cannot replicate data across regions, so the end-user files are stored in Object Storage instead, which has a built-in replication mechanism. Nextcloud can be configured to use an Object Storage bucket as its primary storage, which makes the two sites share the same file content.
Target architecture
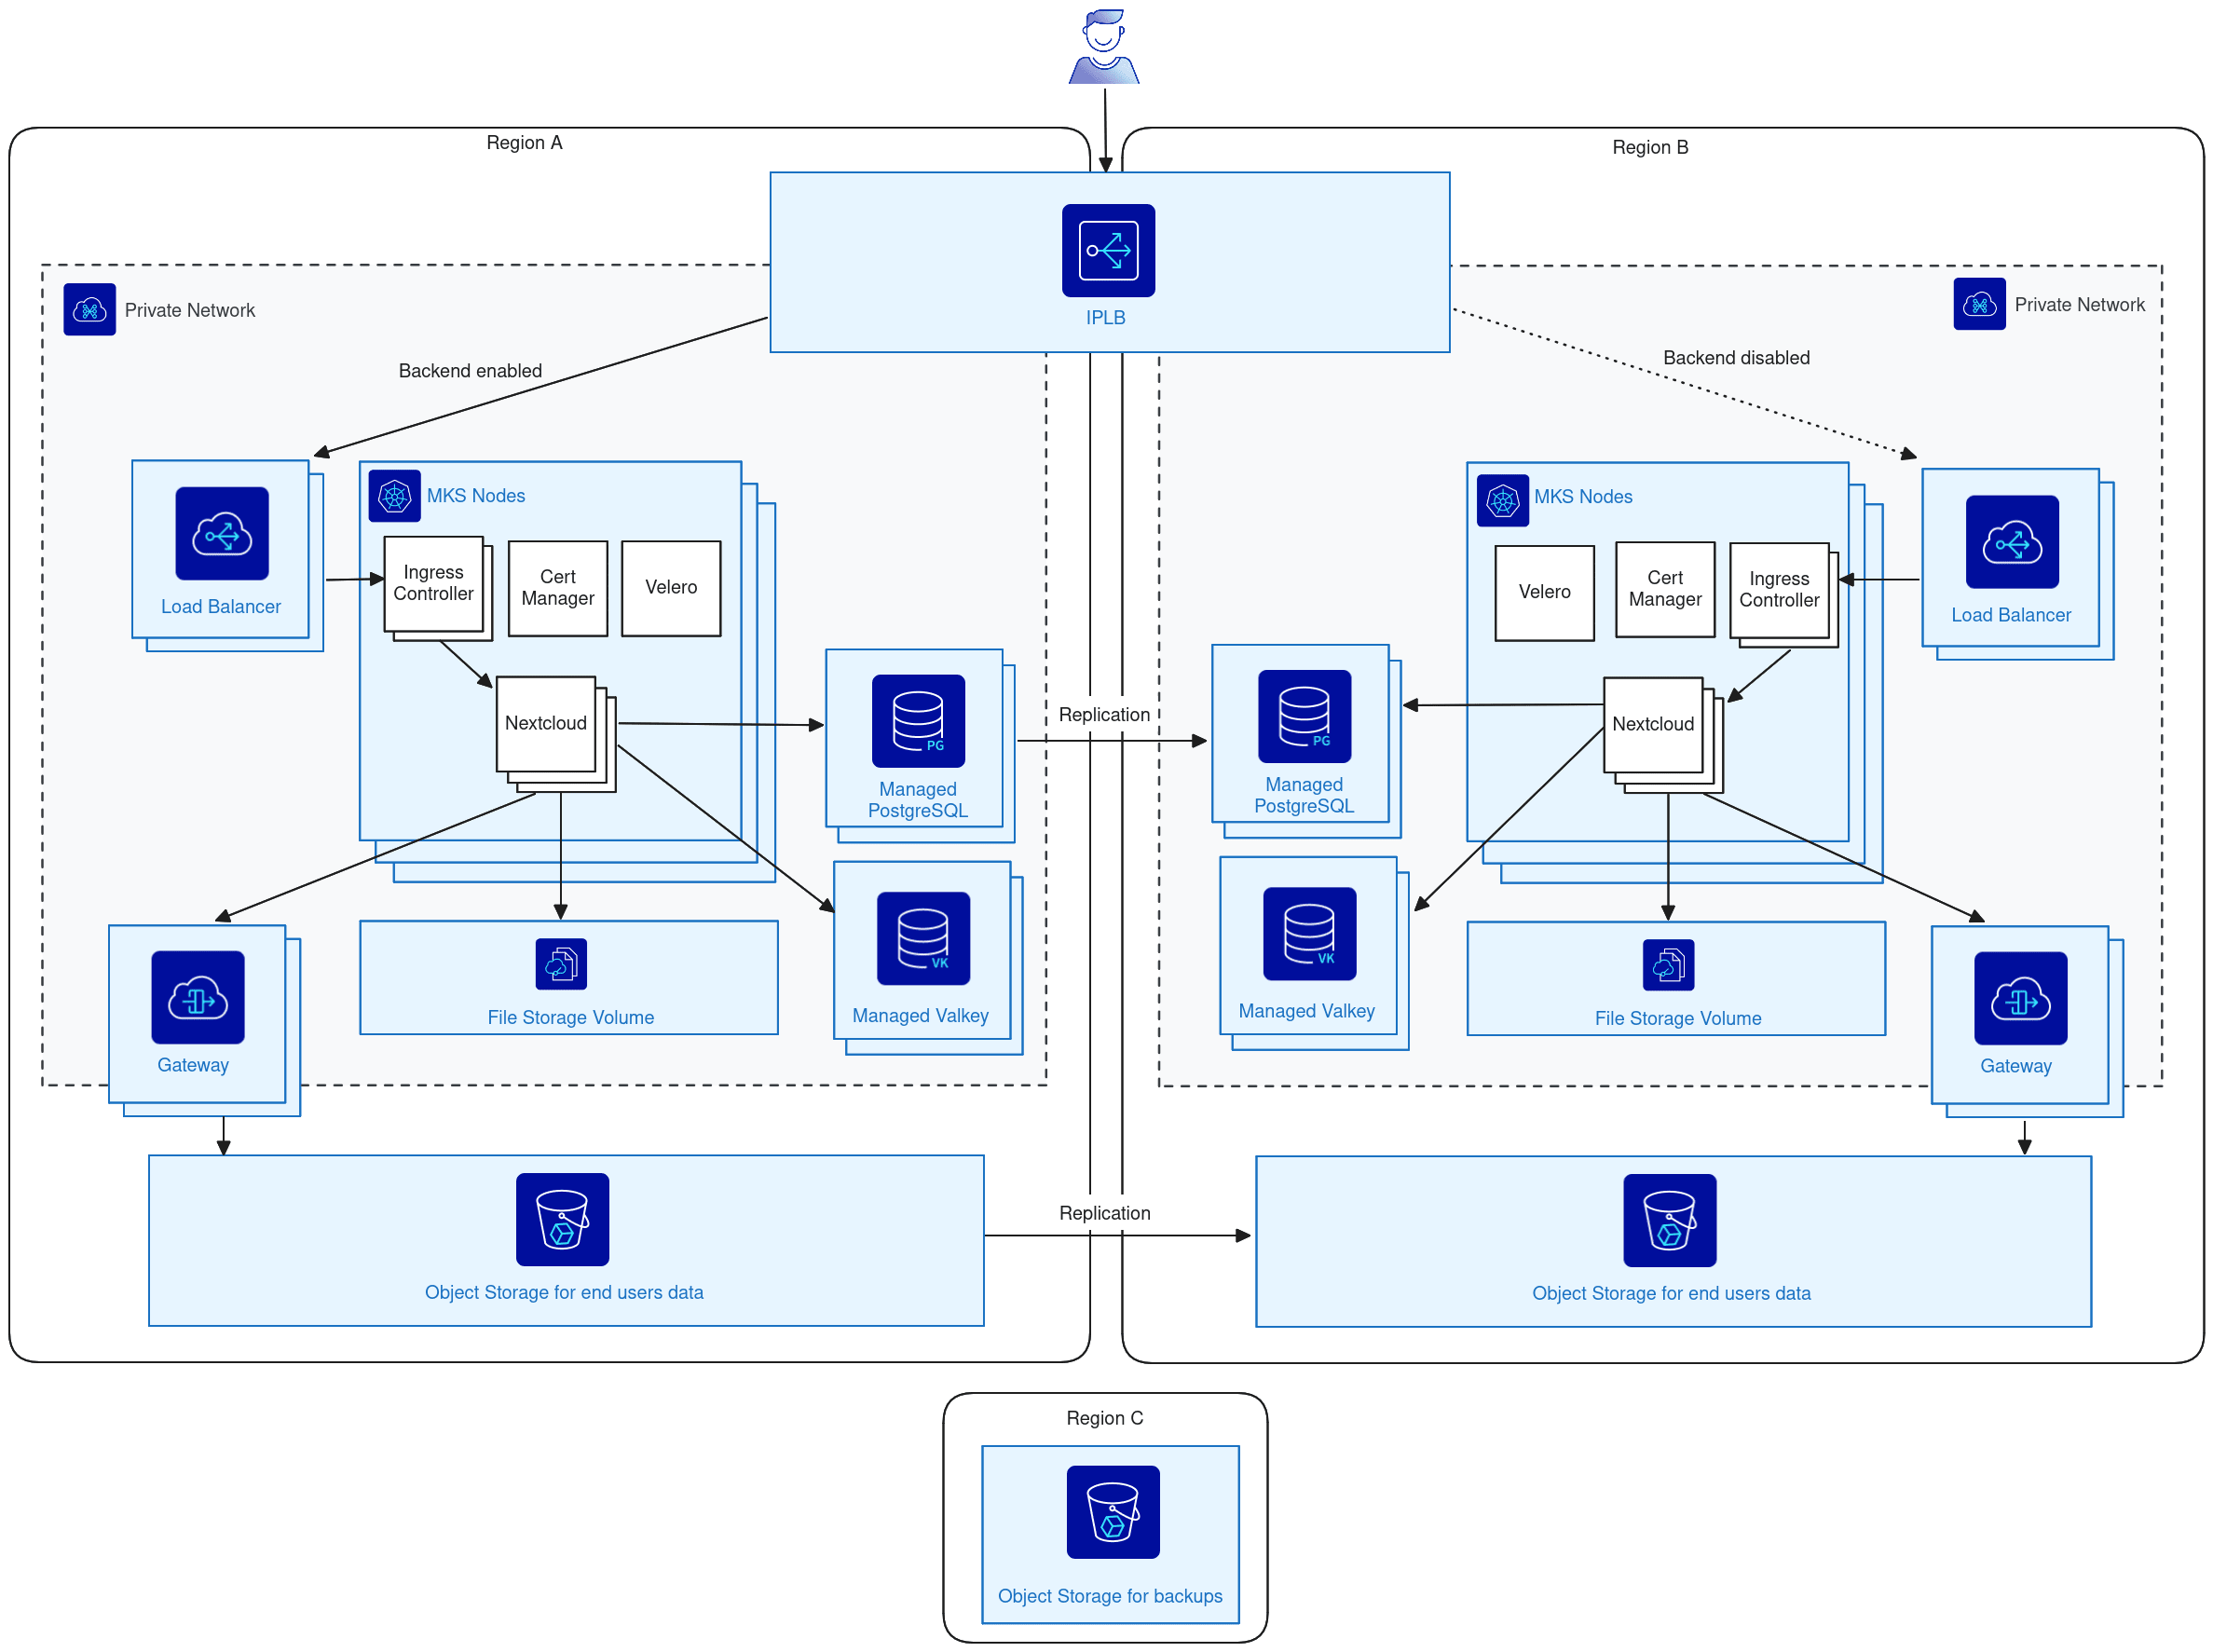
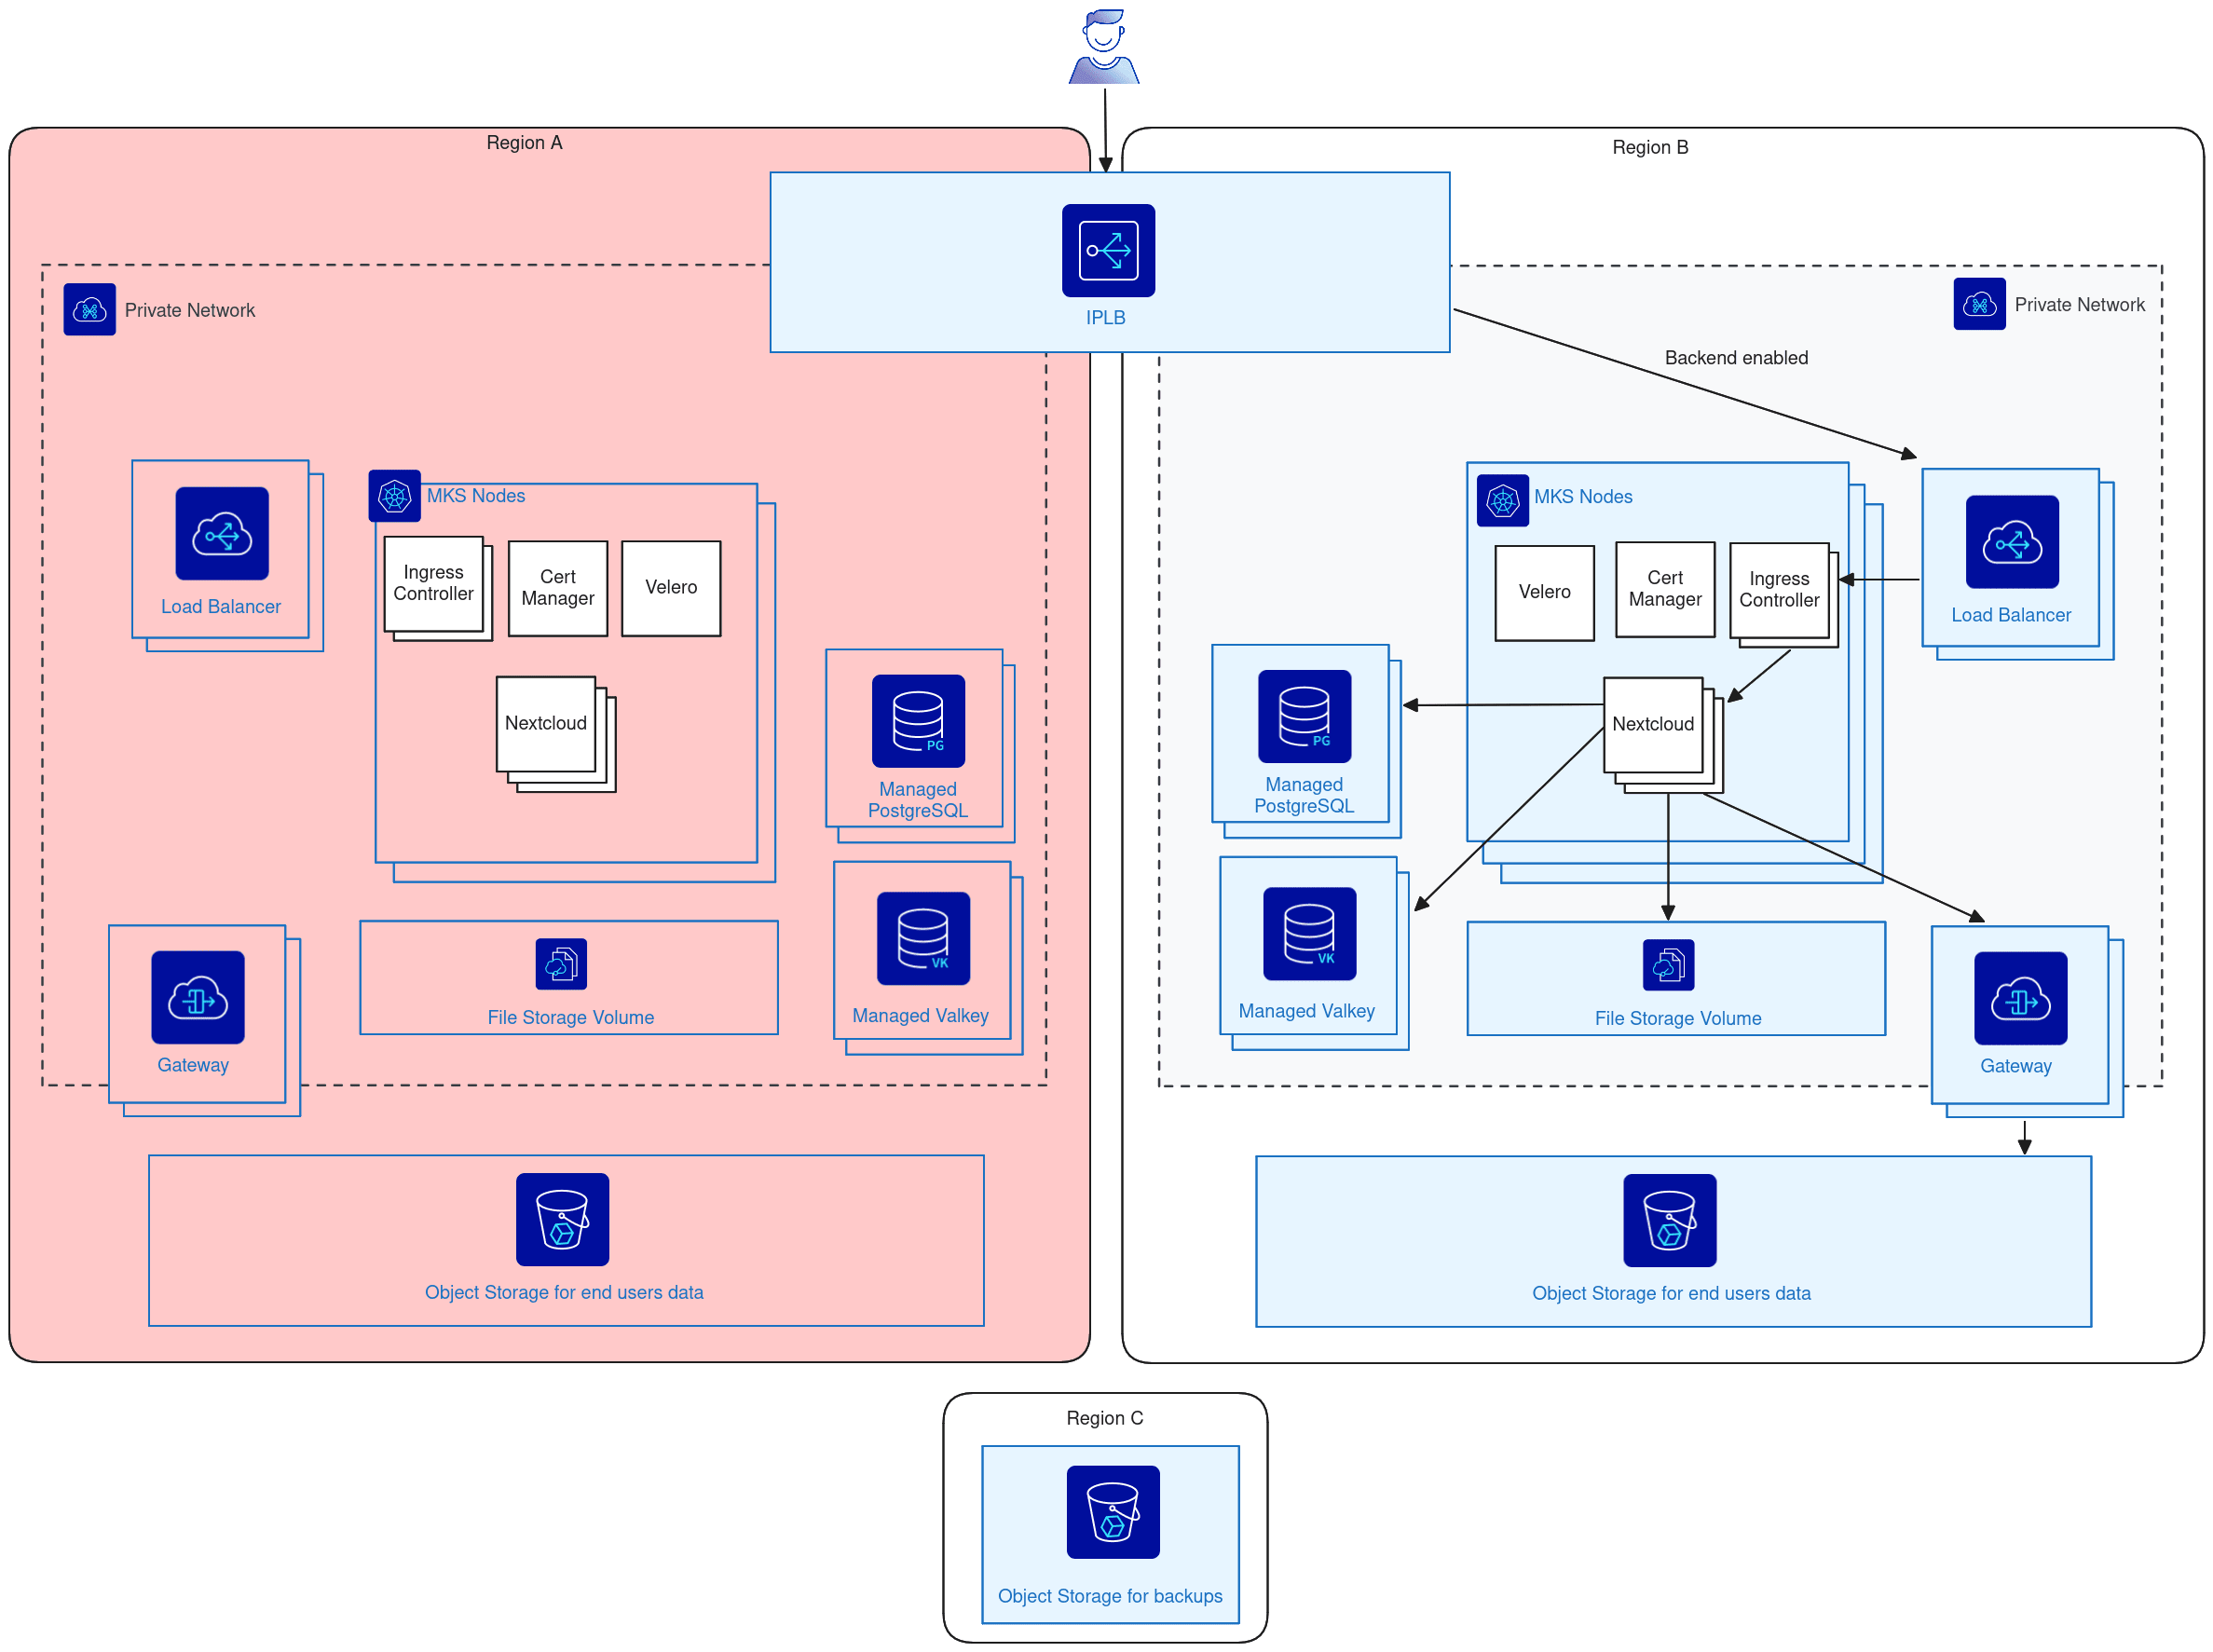
Putting it together gives the following two-region architecture. Region A serves the traffic, region B holds a fully provisioned standby, and a third region hosts the backup bucket:
If region A fails, traffic is redirected to the infrastructure already provisioned in region B:
Deploying the infrastructure
The rest of this guide deploys this architecture with GRA11 as the production region and SBG5 as the recovery region.
Start by loading your OpenStack credentials and defining the variables used throughout. Adapt the following values to your own deployment:
REGION_PROD and REGION_DRP: the production and recovery regions. If you change them, adapt the --nodes-pattern.region of the databases, the bucket regions, and the Object Storage endpoints used in the Nextcloud commands accordingly.
VLAN_ID: the VLAN of the vRack shared by both private networks.
Every step below is run twice, once per region. Keep the shell open from beginning to end: the variables set along the way are reused by the later commands.
Networking
Create the private networks. Both use the same VLAN ID so that they belong to the same vRack:
Three buckets are needed: one for the production files, one for their replica on the recovery site, and one in a third region for the Velero backups. Each has its own user and S31 credentials.
Create the users and their access keys:
USER_ID_PROD=$(ovhcloud cloud user create \ --description "user-prod that is used to create S3 access key" \ --roles objectstore_operator \ --output json | jq 'select(.details.id != null) | .details.id')sleep 1 && CRED_PROD=$(ovhcloud cloud storage object credentials create "$USER_ID_PROD" --output json)S3_ACCESS_KEY_PROD=$(jq -r '.access' <<<"$CRED_PROD")S3_SECRET_KEY_PROD=$(jq -r '.secret' <<<"$CRED_PROD")USER_ID_DRP=$(ovhcloud cloud user create \ --description "user-drp that is used to create S3 access key" \ --roles objectstore_operator \ --output json | jq 'select(.details.id != null) | .details.id')sleep 1 && CRED_DRP=$(ovhcloud cloud storage object credentials create "$USER_ID_DRP" --output json)S3_ACCESS_KEY_DRP=$(jq -r '.access' <<<"$CRED_DRP")S3_SECRET_KEY_DRP=$(jq -r '.secret' <<<"$CRED_DRP")USER_ID_BACKUP=$(ovhcloud cloud user create \ --description "user-backup that is used to create S3 access key" \ --roles objectstore_operator \ --output json | jq 'select(.details.id != null) | .details.id')sleep 1 && CRED_BACKUP=$(ovhcloud cloud storage object credentials create "$USER_ID_BACKUP" --output json)S3_ACCESS_KEY_BACKUP=$(jq -r '.access' <<<"$CRED_BACKUP")S3_SECRET_KEY_BACKUP=$(jq -r '.secret' <<<"$CRED_BACKUP")
Create the buckets. Versioning is enabled on the two Nextcloud buckets, as replication requires it:
Nextcloud stores the end-user files in Object Storage, but its replicas still share a ReadWriteMany volume for the application data. This volume is provided by File Storage through the Manila CSI driver.
Because both clusters serve the same hostname, the Let's Encrypt certificates are issued through a DNS-01 challenge. Create OVHcloud API application keys with the following permissions:
GET on /domain/zone
GET on /domain/zone/*/record
GET on /domain/zone/*/record/*
POST on /domain/zone/*/record
DELETE on /domain/zone/*/record/*
POST on /domain/zone/*/refresh
Install the OVH webhook on both clusters. Replace the following placeholders before running the commands:
<YOUR_DNS_DOMAIN>: the domain name whose DNS zone is hosted at OVHcloud, for example example.com.
<APP_KEY>, <APP_SECRET> and <CONSUMER_KEY>: the application key, application secret and consumer key created above.
<YOUR_EMAIL>: the email address used for the Let's Encrypt account.
Velero copies the Kubernetes objects and volumes of the production cluster into the backup bucket, so that they can be restored on the recovery cluster:
Place the IP Load Balancer in the same vRack as your Public Cloud project, as described in Configuring the vRack on the load balancer, then configure its private network:
Parameter
Value
VLAN
1
Subnet
10.1.0.0/16
NAT IP range
10.1.254.0/24
Server cluster
In the Server clusters tab, click Add a server cluster and use the following parameters:
Parameter
Value
Protocol
TCP
Port
443
Datacenter
ALL
Private network
ID of your private network
Retrieve the external IP address of the Public Cloud Load Balancer of each cluster:
kubectl --kubeconfig $KUBECONFIG_PROD get svc -n haproxy-controller \ -o jsonpath='{.items[0].status.loadBalancer.ingress[0].ip}'kubectl --kubeconfig $KUBECONFIG_DRP get svc -n haproxy-controller \ -o jsonpath='{.items[0].status.loadBalancer.ingress[0].ip}'
Add both as servers of the cluster, replacing <EXTERNAL_IP_PUBLIC_CLOUD_LB_PROD> and <EXTERNAL_IP_PUBLIC_CLOUD_LB_DRP> with the two addresses returned above:
Name
IPv4 address
Port
prod
<EXTERNAL_IP_PUBLIC_CLOUD_LB_PROD>
443
drp
<EXTERNAL_IP_PUBLIC_CLOUD_LB_DRP>
443
Then disable the drp server with its toggle, so that only the production site receives traffic.
Front-end
In the Front-ends tab, click Add a front-end and use the following parameters:
Parameter
Value
Protocol
TCP
Port
443
Datacenter
ALL
Default server cluster
ID of the server cluster created above
Apply the IP Load Balancer configuration to make it effective.
DNS record
Create a nextcloud A record in your DNS zone, pointing to the public IP address of the IP Load Balancer.
Deploying Nextcloud on the production cluster
Replace the following placeholders before running the command:
<YOUR_DNS_DOMAIN>: the domain name whose DNS zone is hosted at OVHcloud. The A record created earlier makes Nextcloud available at nextcloud.<YOUR_DNS_DOMAIN>.
<YOUR_ADMIN_PASSWORD>: the password of the Nextcloud admin-demo administrator account.
54ghne6d.eu-west-par.container-registry.ovh.net: the registry hosting the Nextcloud image. Point image.registry and image.repository at your own registry, or remove both flags to pull the image from the chart's default registry.
Warning
The administrator password is passed on the command line, so it ends up in your shell history and in the Helm release values. Use a dedicated password and change it after the first connection.
The databases are only reachable from the private network, so each region gets a bastion instance holding the PostgreSQL client. The production bastion also sets up the logical replication towards the recovery site through its cloud-init script: it lists the Nextcloud tables (oc_*), creates a publication for them, copies their schema to the recovery database, and creates the matching subscription.
Read the public IP address of each bastion in the OVHcloud Control Panel, then store them. Replace the following placeholders before running the commands:
<BASTION_PUBLIC_IP_PROD>: the floating IP of the bastion-prod instance.
<BASTION_PUBLIC_IP_DRP>: the floating IP of the bastion-drp instance.
Replicating the Nextcloud configuration to the recovery cluster
Nextcloud generates its own configuration on first start. To give the recovery cluster the same configuration, back it up on the production cluster with Velero and restore it on the other side.
The command is the same as for production, with three differences: the DRP endpoints and credentials, the DRP bucket in Strasbourg, and --take-ownership, which lets Helm adopt the resources restored by Velero.
Replace the following placeholders before running the command, using the same values as on the production cluster:
<YOUR_DNS_DOMAIN>: the domain name whose DNS zone is hosted at OVHcloud.
<YOUR_ADMIN_PASSWORD>: the password of the Nextcloud admin-demo administrator account.
54ghne6d.eu-west-par.container-registry.ovh.net: the registry hosting the Nextcloud image.
The recovery site is now fully provisioned and kept in sync. Failing over means reversing the direction of the two replications and switching the IP Load Balancer backend.
Failover
Simulate an incident by scaling the production deployment down to zero:
For training or technical assistance implementing our solutions, contact your sales representative or visit our Professional Services page to request a quote and have your project analysed by our experts.
Feedback
Please send us your questions, feedback, and suggestions to improve the service:
1: S3 is a trademark of Amazon Technologies, Inc. OVHcloud's service is not sponsored by, endorsed by, or otherwise affiliated with Amazon Technologies, Inc.