
How to install WordPress with WP-CLI on a VPS or a dedicated server
Find out how to install WordPress with WP-CLI on a VPS or an OVHcloud dedicated server
Objective
Installing WordPress on a VPS or dedicated server has several advantages, such as full customization of the environment, performance optimization, and enhanced security. Whether you are an experienced developer or a beginner looking to launch your first website, this guide will show you step by step how to install WordPress on an OVHcloud VPS with WP-CLI. WP-CLI is a command-line interface for manually installing WordPress on your OVHcloud VPS.
Find out how to install WordPress with WP-CLI on a VPS or an OVHcloud dedicated server.
Information regarding OVHcloud service administration and how to find appropriate assistance
When using OVHcloud guides, please be aware of the following conditions:
- User instructions aim to provide as many details as possible but cannot cover individual use cases. You might need to adapt the pertinent actions to your requirements.
- The OVHcloud ecosystem is built for flexibility and freedom of choice. Customers are therefore responsible for the secure and proper configuration of their services. To prevent data loss, we strongly recommend to apply backup strategies to all your important data.
- Our guides and tutorials may reference third-party software or services in combination with OVHcloud solutions. The technical support provided by OVHcloud does not include the configuration of systems or products outside of our responsibility. This includes but is not limited to:
- Operating systems and user interfaces (Windows, Debian, Plesk, etc.).
- Any other third-party software (FTP clients, email software, etc.).
- Services offered by other providers (DNS, APIs, user interfaces, etc.).
To receive the appropriate assistance for any issues you might experience, follow these guidelines:
- You seek personalized advice or you would like to discuss a topic that is not covered in detail by our documentation?
Join the OVHcloud Community to search for your topic and reach out to other users. - You need to report an incident regarding your OVHcloud service or you are experiencing difficulties in the OVHcloud Control Panel?
Create a support request in our Help Centre. - You require professional assistance for your project or you need help with tasks outside our support scope?
Visit our partner portal to search for experts who are familiar with OVHcloud solutions. - You are looking for more detailed information regarding our support levels and Professional Services?
Please visit our web pages for OVHcloud support levels and OVHcloud Professional Services.
You can participate in improving our documentation:
- You would like to share feedback to improve a guide page or you want to report insufficient information on a specific page?
Use the "Was this page helpful?" buttons at the bottom of the page to let us know. - You would like to propose a specific documentation update?
Use the "Edit this page" function, available at the bottom of the page and in the sidebar.
Requirements
- A VPS solution or a dedicated server in your
- Administrative (sudo) access to your server via SSH
- A web development environment configured on your VPS or your dedicated server
- A domain name (registered with OVHcloud or another registrar)
Instructions
As detailed in the Requirements, we assume that you already have a web development environment configured on your VPS or dedicated server. For this guide, the following components are already installed on the VPS:
- PHP (version 8.2.7)
- Nginx web server
- MariaDB DBMS
Log in to your VPS via SSH with your username and password.
Install WP-CLI
Download WP-CLI using curl or wget:
Make the downloaded file executable:
Move the executable file to use it as a 'wp' command:
Test the installation of WP-CLI by running the command:
If WP-CLI has installed successfully, a message like this will appear:
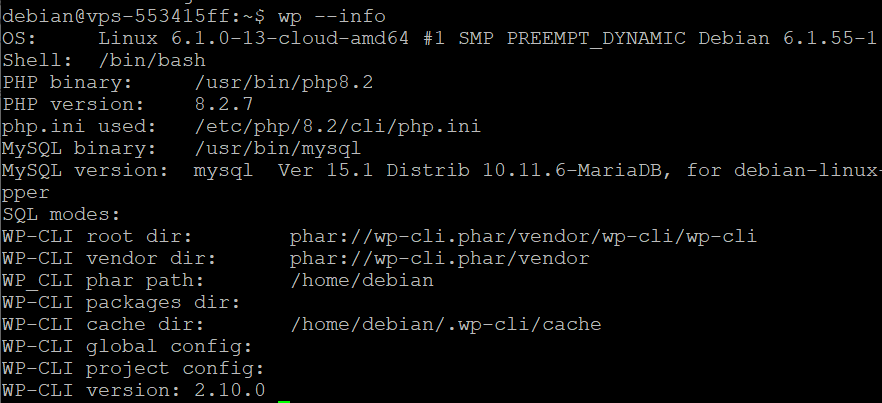
Install WordPress with WP-CLI
Create the WordPress database
Log in to MariaDB:
Create the database for your WordPress website:
Create a new MariaDB user and assign database privileges:
Install WordPress
Navigate to the directory where you want to install WordPress, for example:
Download WordPress with WP-CLI:
The following error may occur:
This means that your user (the one on your OVHcloud VPS) does not have permission to write to the directory /var/www/html. A simple and secure way to fix this problem is to change the owner of the directory /var/www/html to match your user.
To grant permissions, enter the following command:
Replace your_user and your_group with your current user name and user group. On many Linux systems, the default user group for a user is the same as the user name. You can find your username with the command whoami and your group with groups.
Try downloading WordPress again:
If the WordPress download was successful, you should see the following message:

Create the configuration file "wp-config.php":
Replace wordpress_db, wordpress_user, and strong_password with the values you previously set.
If everything went smoothly, the following message should appear:

Launch the WordPress installation:
If the WordPress installation is successful, you should see the following message:

Configure Nginx
Create a configuration file for your website
Browse to the directory of available Nginx sites:
Create a new configuration file for your WordPress website. This must be your domain name:
In the file you have just created, add the following configuration (this configuration is a basic example for a WordPress website):
If you are using a PHP version other than 8.2.X, replace the line:
with the line:
To have Nginx load your website's configuration, create a symbolic link to your configuration file in the directory /etc/nginx/sites-available/:
Test the Nginx configuration
Before restarting Nginx to apply the changes, it is important to test your configuration to ensure that there are no errors:
If no errors were detected, the following message is displayed:

Restart Nginx
Once the configuration has been tested and validated, restart Nginx to apply the changes:
Access your website
Link the domain name to the IP address of the VPS or dedicated server
To access your website from a browser, first link the domain name of your WordPress website to the IP address of your VPS or dedicated server. To do this, edit the A record of the active DNS zone so that it targets that IP address, as described in our guide on "Editing an OVHcloud DNS zone".
Conclusion
You have just installed WordPress on your OVHcloud VPS or dedicated server with WP-CLI. You can now access your WordPress website from a browser.
Go further
How to install a web development environment on a VPS or a dedicated server
How to install WordPress with Docker on VPS or a dedicated server
For specialised services (SEO, development, etc.), contact OVHcloud partners.
Join our community of users.