Using a custom gateway on an OVHcloud Managed Kubernetes cluster
Objectives
In this tutorial we are going to use a custom gateway deployed in vRack with a Managed Kubernetes cluster.
Why?
By default, in a Kubernetes cluster, the Pods you deploy take the Node's output IP.
So we have as many output IPs as Nodes. This can be a problem when you are in a situation where you need to manage a whitelist and you have a cluster with AutoScaling (creating and deleting Nodes on the fly).
One solution is to use a custom gateway which will allow you to have a single output IP (your gateway).
You will:
- create a private network
- create subnets
- create an OpenStack router (in every regions) and link them to the external provider network and the subnets
- create an OVHcloud Managed Kubernetes cluster with the private gateway
- test the Pod's output IP
At the end of this tutorial you should have the following flow:
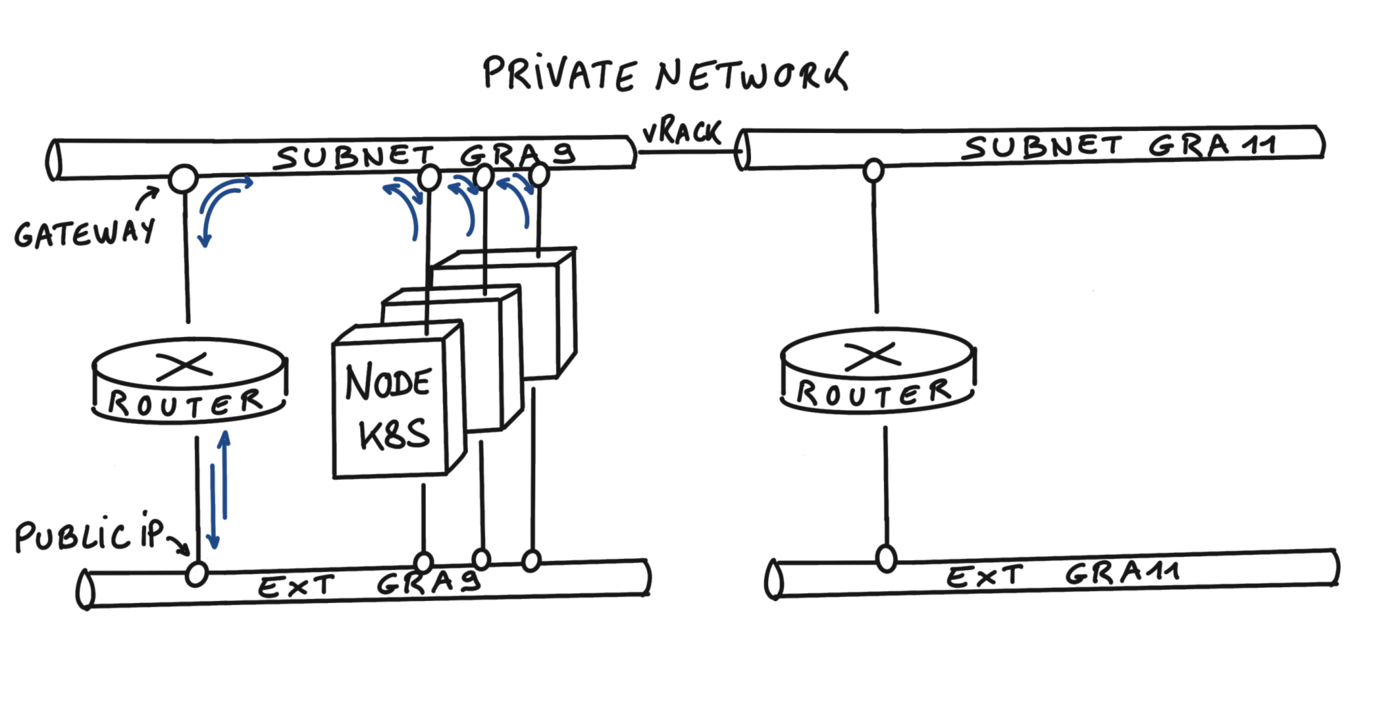
Info
In this tutorial we guide you on how to create the private network in two regions but you can use only one region if you want, GRA9 for example.
Pre-requisites
OVHcloud Control Panel Access
Initialization
To setup a functional environment, you have to load the OpenStack and the OVHcloud API credentials.
To help you we also created for you several useful scripts and templates.
First, create a utils folder in your environment/local machine.
Then, download the ovhAPI.sh script into it.
And then add execution rights to the ovhAPI.sh script:
You have to load the content of the given utils/openrc file, to manage OpenStack, and variables contained in the utils/ovhAPI.properties file to manage the OVHcloud API.
Create the utils/openrc, or download it from your Openstack provider. It must be like:
export OS_AUTH_URL=https://auth.cloud.ovh.net/v3
export OS_IDENTITY_API_VERSION=3
export OS_USER_DOMAIN_NAME=${OS_USER_DOMAIN_NAME:-"Default"}
export OS_PROJECT_DOMAIN_NAME=${OS_PROJECT_DOMAIN_NAME:-"Default"}
export OS_TENANT_ID=xxxxxxxxxxxxxxxxxxxxx
export OS_TENANT_NAME="xxxxxxxxxxxxxxxxxx"
export OS_USERNAME="user-xxxxxxxxxxxxx"
export OS_PASSWORD="xxxxxxxxxxxxxxxxxx"
export OS_REGION_NAME="xxxx"
if [ -z "$OS_REGION_NAME" ]; then unset OS_REGION_NAME; fi
Create the utils/ovhAPI.properties with your generated keys and secret:
OVH_API_URL="https://api.ovh.com/1.0"
OVH_ENDPOINT="ovh-eu"
OVH_APPLICATION_KEY="xxxxxxxxxxxxxxxxx"
OVH_APPLICATION_SECRET="xxxxxxxxxxxxxxxxx"
OVH_CONSUMER_KEY="xxxxxxxxxxxxxxxxxxxxx"
You should have a utils folder with three files:
.
└── utils
    ├── openrc
    ├── ovhAPI.properties
    └── ovhAPI.sh
Load variables:
. utils/openrc
. utils/ovhAPI.properties
Get your OpenStack Tenant ID and store it into the serviceName variable.
export serviceName=$(utils/ovhAPI.sh GET /cloud/project/$OS_TENANT_ID | jq -r .description) && echo $serviceName
You should have a result like this:
$ export serviceName=$(utils/ovhAPI.sh GET /cloud/project/$OS_TENANT_ID | jq -r .description) && echo $serviceName
EXAMPLE
Create Private Network
Important: Assuming that your PCI project is added to your vRack.
We are using the OVHcloud API to create the private network. For this tutorial, we are using the two regions GRA9 and GRA11.
Create a folder tpl next to utils folder and create inside the data-pvnw.json file with the following content:
{
"name": "demo-pvnw",
"vlanId": 20,
"regions": ["GRA9","GRA11"]
}
Create the private network named demo-pvnw in GRA9 and GRA11 regions and get the VLAN ID.
export vlanId="$(utils/ovhAPI.sh POST /cloud/project/$OS_TENANT_ID/network/private "$(cat tpl/data-pvnw.json)" | jq -r .id)" && echo $vlanId
> @api {v1} /cloud GET /cloud/project/{serviceName}/network/private
You should have a result like this:
$ export vlanId="$(utils/ovhAPI.sh POST /cloud/project/$OS_TENANT_ID/network/private "$(cat tpl/data-pvnw.json)" | jq -r .id)" && echo $vlanId
pn-1083678_20
At this point, your private network is created and its ID is pn-1083678_20.
Create subnets
For this tutorial, we are splitting a /24 subnet, to obtain two /25 subnets.
Ref: https://www.davidc.net/sites/default/subnets/subnets.html
Create these two data files in the tpl folder:
data-subnetGRA9.json file:
{
"start": "192.168.0.2",
"end": "192.168.0.126",
"region": "GRA9",
"dhcp": false,
"network": "192.168.0.0/25",
"noGateway": false
}
data-subnetGRA11.json file:
{
"start": "192.168.0.130",
"end": "192.168.0.254",
"region": "GRA11",
"dhcp": false,
"network": "192.168.0.128/25",
"noGateway": false
}
Note: To be clear, the parameter "noGateway": false means "Gateway": true. We want the subnet to explicitly use the first IP address of the CIDR range.
Then create subnets with appropriate routes, and finally get IDs (subnGRA9 & subnGRA11):
export subnGRA9="$(utils/ovhAPI.sh POST /cloud/project/$OS_TENANT_ID/network/private/$vlanId/subnet "$(cat tpl/data-subnetGRA9.json)" | jq -r .id)" && echo $subnGRA9

export subnGRA11="$(utils/ovhAPI.sh POST /cloud/project/$OS_TENANT_ID/network/private/$vlanId/subnet "$(cat tpl/data-subnetGRA11.json)" | jq -r .id)" && echo $subnGRA11
You should have a result like this:
$ export subnGRA9="$(utils/ovhAPI.sh POST /cloud/project/$OS_TENANT_ID/network/private/$vlanId/subnet "$(cat tpl/data-subnetGRA9.json)" | jq -r .id)" && echo $subnGRA9
668fd889-5477-445b-b4e1-b30432e39045

$ export subnGRA11="$(utils/ovhAPI.sh POST /cloud/project/$OS_TENANT_ID/network/private/$vlanId/subnet "$(cat tpl/data-subnetGRA11.json)" | jq -r .id)" && echo $subnGRA11
e76f2b49-2b9f-4248-98ae-179d596d6e45
For now, it's not possible to add routes to the subnet via the API, so we must use the OpenStack CLI instead.
openstack --os-region-name=GRA9 subnet set ${subnGRA9} --host-route destination=192.168.0.0/25,gateway=192.168.0.1

openstack --os-region-name=GRA11 subnet set ${subnGRA11} --host-route destination=192.168.0.128/25,gateway=192.168.0.129
OpenStack router
Create the routers
We have the ability to create OpenStack virtual routers. To do this, we need to use the OpenStack CLI.
Create routers and get their IDs (rtrGRA9Id & rtrGRA11Id):
export rtrGRA9Id="$(openstack --os-region-name=GRA9 router create rtr-GRA9 -f json | jq -r .id)" && echo $rtrGRA9Id
export rtrGRA11Id="$(openstack --os-region-name=GRA11 router create rtr-GRA11 -f json | jq -r .id)" && echo $rtrGRA11Id
You should have a result like this:
$ export rtrGRA9Id="$(openstack --os-region-name=GRA9 router create rtr-GRA9 -f json | jq -r .id)" && echo $rtrGRA9Id
26bf99c8-d6fa-4c5a-9d42-1358776ee0a2

$ export rtrGRA11Id="$(openstack --os-region-name=GRA11 router create rtr-GRA11 -f json | jq -r .id)" && echo $rtrGRA11Id
ResourceNotFound: 404: Client Error for url: https://network.compute.gra11.cloud.ovh.net/v2.0/routers, The resource could not be found.
Info
For the moment you can only create a virtual router in the GRA9 and GRA11 regions, but this feature will be released in other regions in the coming weeks and months.
Now, you can display the information of your new virtual router on GRA9 in order to display its IP:
$ openstack --os-region-name=GRA9 router show $rtrGRA9Id -c id -c name -c status -c created_at -c external_gateway_info
+-----------------------+-------------------------------------------------------------------------------------------------------------------------------------------------------------------------------------------------------------------------------------------------------------------------------------------+
| Field                 | Value                                                                                                                                                                                                                                                                                     |
+-----------------------+-------------------------------------------------------------------------------------------------------------------------------------------------------------------------------------------------------------------------------------------------------------------------------------------+
| created_at            | 2022-07-25T07:32:06Z                                                                                                                                                                                                                                                                      |
| external_gateway_info | {"network_id": "b2c02fdc-ffdf-40f6-9722-533bd7058c06", "external_fixed_ips": [{"subnet_id": "0f11270c-1113-4d4f-98de-eba83445d962", "ip_address": "141.94.209.244"}, {"subnet_id": "4aa6cac1-d5cd-4e25-b14b-7573aeabcab1", "ip_address": "2001:41d0:304:400::917"}], "enable_snat": true} |
| id                    | 26bf99c8-d6fa-4c5a-9d42-1358776ee0a2                                                                                                                                                                                                                                                      |
| name                  | rtr-GRA9                                                                                                                                                                                                                                                                                  |
| status                | ACTIVE                                                                                                                                                                                                                                                                                    |
+-----------------------+-------------------------------------------------------------------------------------------------------------------------------------------------------------------------------------------------------------------------------------------------------------------------------------------+
As you can see, in this example, the IP of the gateway will be 141.94.209.244.
Link the router to the external provider network
First, get the regional external network ID (extNwGRA9Id & extNwGRA11Id), then link the router to it:
# GRA9
export extNwGRA9Id="$(openstack --os-region-name=GRA9 network list -f json | jq -r '.[] | select(.Name=="Ext-Net") | .ID')" && echo $extNwGRA9Id
openstack --os-region-name=GRA9 router set $rtrGRA9Id --external-gateway $extNwGRA9Id
# GRA11
export extNwGRA11Id="$(openstack --os-region-name=GRA11 network list -f json | jq -r '.[] | select(.Name=="Ext-Net") | .ID')" && echo $extNwGRA11Id
openstack --os-region-name=GRA11 router set $rtrGRA11Id --external-gateway $extNwGRA11Id
You should have a result like this:
$ export extNwGRA9Id="$(openstack --os-region-name=GRA9 network list -f json | jq -r '.[] | select(.Name=="Ext-Net") | .ID')" && echo $extNwGRA9Id
b2c02fdc-ffdf-40f6-9722-533bd7058c06
$ openstack --os-region-name=GRA9 router set $rtrGRA9Id --external-gateway $extNwGRA9Id

$ export extNwGRA11Id="$(openstack --os-region-name=GRA11 network list -f json | jq -r '.[] | select(.Name=="Ext-Net") | .ID')" && echo $extNwGRA11Id
bcf59eb2-9d83-41cc-b4f5-0435ed594833
$ openstack --os-region-name=GRA11 router set $rtrGRA11Id --external-gateway $extNwGRA11Id
Link the router to the subnet
Do the same with the regional subnets:
# GRA9
openstack --os-region-name=GRA9 router add subnet $rtrGRA9Id $subnGRA9
# GRA11
openstack --os-region-name=GRA11 router add subnet $rtrGRA11Id $subnGRA11
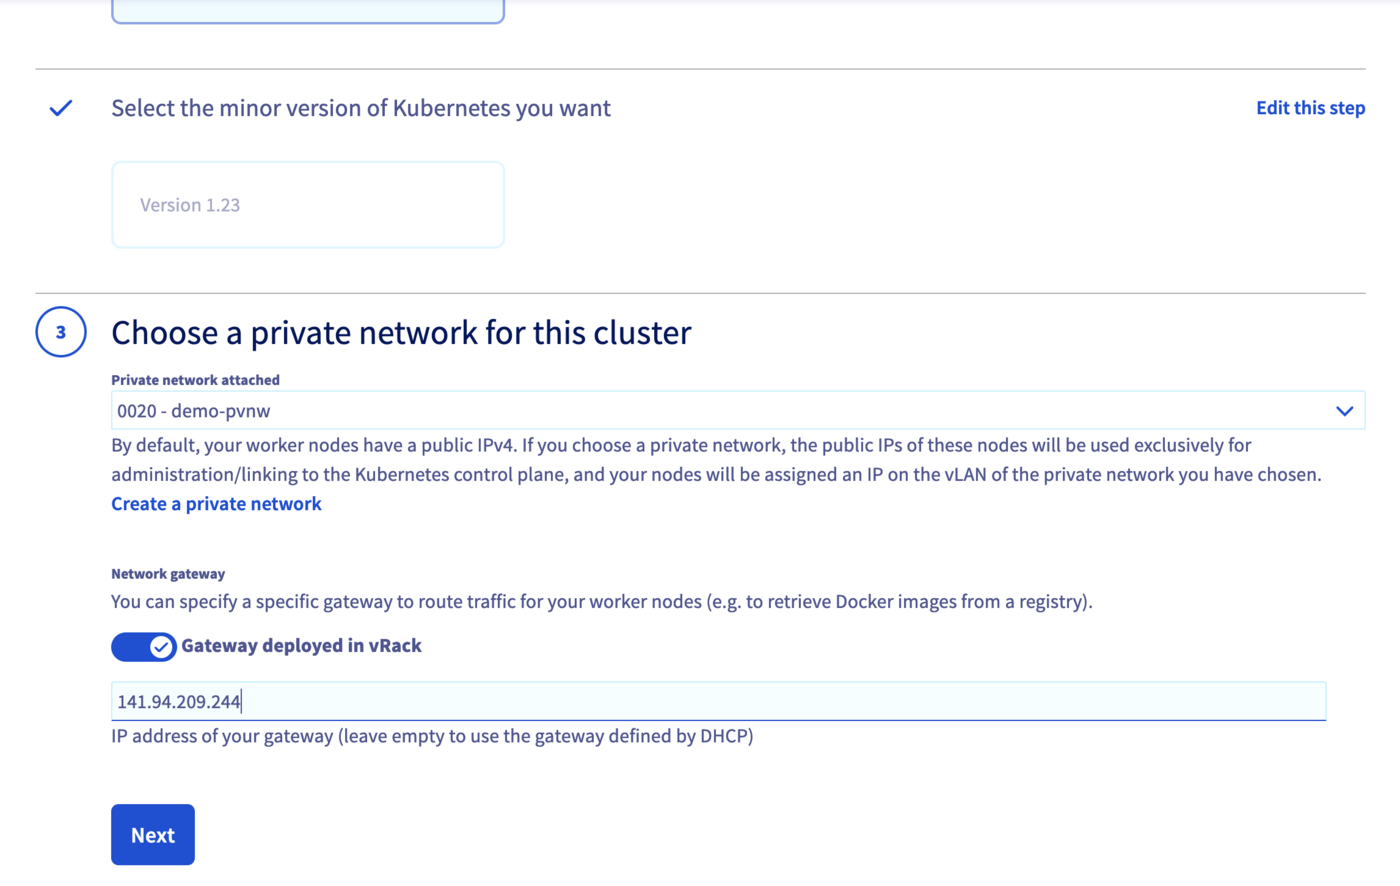
Create a Kubernetes cluster with private gateway
Now the network is ready. Create an OVHcloud Managed Kubernetes cluster, specifying the use of the gateway defined on each subnet.
Note: until the end of this tutorial, we are only using the GRA9 region, but you can repeat the exact same steps to create a cluster on the GRA11 region.
Info
In this guide we defined 1.34 version for the Kubernetes cluster but you can use another supported version.
First, get the private network IDs (pvnwGRA9Id & pvnwGRA11Id), then create the OVHcloud Managed Kubernetes Cluster, and finally get the cluster ID (kubeId):
Create a tpl/data-kube.json.tpl file as data and add the right parameters. The files should be like:
{
"region": "GRA9",
"name": "demo",
"version": "1.34",
"nodepool": {
  "flavorName": "b2-7",
  "antiAffinity": false,
  "monthlyBilled": false,
  "autoscale": false,
  "desiredNodes": 3
},
"privateNetworkId": "@privateNetworkId@",
"privateNetworkConfiguration" :{
      "privateNetworkRoutingAsDefault": true,
      "defaultVrackGateway": "192.168.0.1"
}
}
# Get the GRA9 private network Id
export pvnwGRA9Id="$(utils/ovhAPI.sh GET /cloud/project/$OS_TENANT_ID/network/private/${vlanId} | jq '.regions[] | select(.region=="GRA9")' | jq -r .openstackId)" && echo $pvnwGRA9Id
# Create the kube payload file
cat tpl/data-kube.json.tpl | sed -e "s|@privateNetworkId@|$pvnwGRA9Id|g" > tpl/data-kube.json
# Create the kube cluster
export kubeId="$(utils/ovhAPI.sh POST /cloud/project/$OS_TENANT_ID/kube "$(cat tpl/data-kube.json)" | jq -r .id)" && echo $kubeId
You should have a result like this:
$ export pvnwGRA9Id="$(utils/ovhAPI.sh GET /cloud/project/$OS_TENANT_ID/network/private/${vlanId} | jq '.regions[] | select(.region=="GRA9")' | jq -r .openstackId)" && echo >> $pvnwGRA9Id
d9775b7c-c267-44b4-b758-6e827b0a69bb

$ cat tpl/data-kube.json.tpl | sed -e "s|@privateNetworkId@|$pvnwGRA9Id|g" > tpl/data-kube.json

$ cat tpl/data-kube.json
{
  "region": "GRA9",
  "name": "demo",
  "version": "1.34",
  "nodepool": {
    "flavorName": "b2-7",
    "antiAffinity": false,
    "monthlyBilled": false,
    "autoscale": false,
    "desiredNodes": 3
  },
  "privateNetworkId": "d9775b7c-c267-44b4-b758-6e827b0a69bb",
  "privateNetworkConfiguration" :{
        "privateNetworkRoutingAsDefault": true,
        "defaultVrackGateway": "192.168.0.1"
  }
}

$ export kubeId="$(utils/ovhAPI.sh POST /cloud/project/$OS_TENANT_ID/kube "$(cat tpl/data-kube.json)" | jq -r .id)" && echo $kubeId
6bc9c71a-e570-4ed6-848b-de212fbab7da
> @api {v1} /cloud POST /cloud/project/{serviceName}/kube
@api {v1} /cloud GET /cloud/project/{serviceName}/kube
Access the administration UI for your OVHcloud Managed Kubernetes clusters by clicking on Managed Kubernetes Service in the left-hand menu:
Info
You can create your networks and subnets using Terraform by following this guide.
You need to create a file, let's name it kubernetes-cluster-test.tf with this content:
# Create your Kubernetes cluster
resource "ovh_cloud_project_kube" "cluster_terraform" {
  service_name  = "my_service_name" # Replace with your OVHcloud project ID
  name          = "cluster_terraform"
  region        = "GRA9"

  private_network_id = "my_private_network_id" # Replace with your private network id
  private_network_configuration {
    private_network_routing_as_default = true
    default_vrack_gateway              = "192.168.0.1"
  }
}

# Create your node pool and assign it to your cluster
resource "ovh_cloud_project_kube_nodepool" "node_pool" {
  service_name  = "my_service_name" # Replace with your OVHcloud project ID
  kube_id       = ovh_cloud_project_kube.cluster_terraform.id
  name          = "node-pool-terraform"
  flavor_name   = "b3-8" # Replace with the desired instance flavour
  desired_nodes = 3
  max_nodes     = 3
  min_nodes     = 3
}
You can create your resources by entering the following command:
Now wait until your OVHcloud Managed Kubernetes cluster is READY.
For that, you can check its status in the OVHcloud Control Panel:
Access the administration UI for your OVHcloud Managed Kubernetes clusters by clicking on Managed Kubernetes Service in the left-hand menu:

As you can see, your new cluster is attached to demo-pvnw network.
And now click in your demo created Kubernetes cluster in order to see its status:
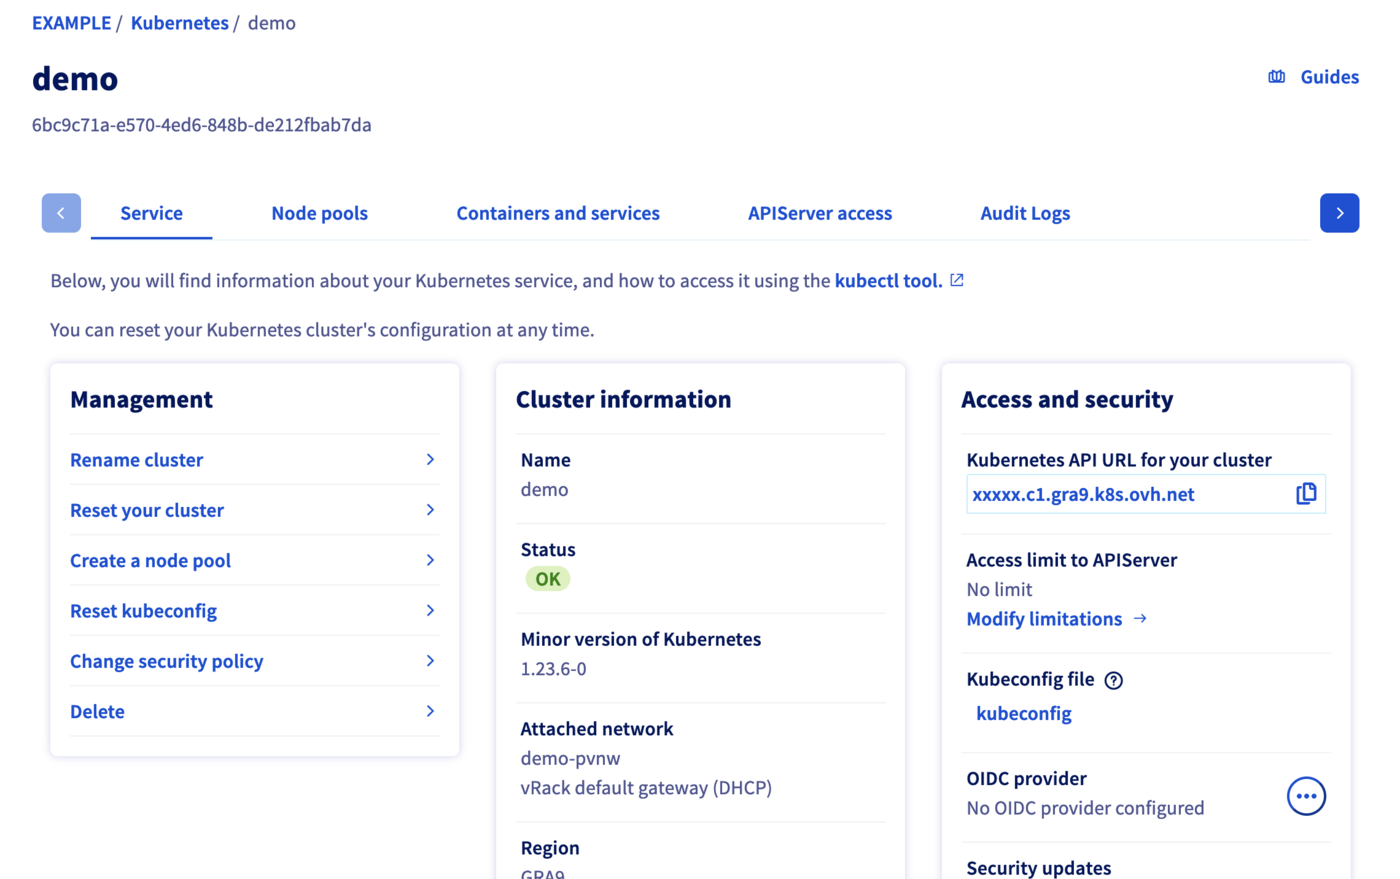
When your cluster's status is OK, you can go to the next section.
Get Kubeconfig file
To proceed with the freshly created Kubernetes cluster, you must get the Kubeconfig file.
utils/ovhAPI.sh POST /cloud/project/$OS_TENANT_ID/kube/$kubeId/kubeconfig | jq -r .content > kubeconfig-demo
To use this kubeconfig file and access to your cluster, you can follow our configuring kubectl tutorial, or simply add the --kubeconfig flag in your kubectl commands.
Test
List the running nodes in your cluster:
kubectl --kubeconfig=kubeconfig-demo get no -o wide
You should obtain a result like this:
$ kubectl --kubeconfig=kubeconfig-demo get no -o wide
NAME                                         STATUS   ROLES    AGE   VERSION   INTERNAL-IP    EXTERNAL-IP      OS-IMAGE             KERNEL-VERSION       CONTAINER-RUNTIME
nodepool-8f0b4d98-874a-4cfd-b8-node-c74f26   Ready    <none>   56m   v1.34.0   192.168.0.71   141.94.215.23    Ubuntu 18.04.6 LTS   4.15.0-189-generic   containerd://1.4.6
nodepool-8f0b4d98-874a-4cfd-b8-node-c9bf60   Ready    <none>   57m   v1.34.0   192.168.0.96   141.94.208.78    Ubuntu 18.04.6 LTS   4.15.0-189-generic   containerd://1.4.6
nodepool-8f0b4d98-874a-4cfd-b8-node-e666f5   Ready    <none>   56m   v1.34.0   192.168.0.31   141.94.212.214   Ubuntu 18.04.6 LTS   4.15.0-189-generic   containerd://1.4.6
Now test the cluster by running a simple container that requests its published IP address.
kubectl --kubeconfig=kubeconfig-demo run --image=debian debian -it -- bash
apt update
apt install -y curl
curl ifconfig.me
You should obtain a result like this:
$ kubectl --kubeconfig=kubeconfig-demo run --image=debian debian  -it -- bash
If you don't see a command prompt, try pressing enter.
root@debian:/# apt update
Get:1 http://deb.debian.org/debian bullseye InRelease [116 kB]
Get:2 http://deb.debian.org/debian-security bullseye-security InRelease [48.4 kB]
Get:3 http://deb.debian.org/debian bullseye-updates InRelease [44.1 kB]
Get:4 http://deb.debian.org/debian bullseye/main amd64 Packages [8182 kB]
Get:5 http://deb.debian.org/debian-security bullseye-security/main amd64 Packages [167 kB]
Get:6 http://deb.debian.org/debian bullseye-updates/main amd64 Packages [2592 B]
...

root@debian:/# apt install -y curl
Reading package lists... Done
Building dependency tree... Done
Reading state information... Done
The following additional packages will be installed:
  ca-certificates libbrotli1 libcurl4 libldap-2.4-2 libldap-common libnghttp2-14 libpsl5 librtmp1 libsasl2-2 libsasl2-modules libsasl2-modules-db libssh2-1 openssl publicsuffix
Suggested packages:
...

root@debian:/# curl ifconfig.me
141.94.209.244
The IP address of our Pod is indeed that of our gateway!
Cleanup
To delete created resources, please follow these instructions:
Kubernetes cluster
utils/ovhAPI.sh DELETE /cloud/project/$OS_TENANT_ID/kube/$kubeId
Routers
To delete an Openstack router, you must first remove the linked ports.
# Get the routers subnets attached ports Ids
export portIdGRA9="$(openstack --os-region-name=GRA9 port list | grep -w "192.168.0.1" | awk '{print $2}')" && echo $portIdGRA9
export portIdGRA11="$(openstack --os-region-name=GRA11 port list | grep -w "192.168.0.129" | awk '{print $2}')" && echo $portIdGRA11
# Get the routers Ids
export rtrIdGRA9="$(openstack --os-region-name=GRA9 router list -f json | jq -r '.[] | select(.Name=="rtr-GRA9") | .ID')" && echo $rtrIdGRA9
export rtrIdGRA11="$(openstack --os-region-name=GRA11 router list -f json | jq -r '.[] | select(.Name=="rtr-GRA11") | .ID')" && echo $rtrIdGRA11
# Remove ports from routers
openstack --os-region-name=GRA9 router remove port $rtrIdGRA9 $portIdGRA9
openstack --os-region-name=GRA11 router remove port $rtrIdGRA11 $portIdGRA11
# Delete routers
openstack router delete rtr-GRA9
openstack router delete rtr-GRA11
Subnets
utils/ovhAPI.sh DELETE /cloud/project/$OS_TENANT_ID/network/private/$vlanId/subnet/$subnGRA9
utils/ovhAPI.sh DELETE /cloud/project/$OS_TENANT_ID/network/private/$vlanId/subnet/$subnGRA11
Private Network
utils/ovhAPI.sh DELETE /cloud/project/$OS_TENANT_ID/network/private/$vlanId
Go further
- If you need training or technical assistance to implement our solutions, contact your sales representative or click on this link to get a quote and ask our Professional Services experts for assisting you on your specific use case of your project.
Join our community of users.