HA-NAS - Connect a Public Cloud instance to a HA-NAS volume via vRack (Beta)
Find out how to mount a HA-NAS volume on a Public Cloud instance through a vRack private network, with no exposure of your data traffic to the Internet
This feature is currently in beta phase. This guide can be updated in the future with the advances of our teams in charge of this product.
Objective
Mount a HA-NAS volume from a Public Cloud instance using a private vRack network.
This ensures that all data traffic remains on the private network, with no Internet exposure.
The HA-NAS volume and the Public Cloud instance must be located in the same region (e.g. RBX, GRA, or SBG), as OpenStack private networks are regional.
Requirements
- A HA-NAS service in your OVHcloud account.
- An OVHcloud Public Cloud instance in the same region.
- An active vRack private network in the same region.
Overview
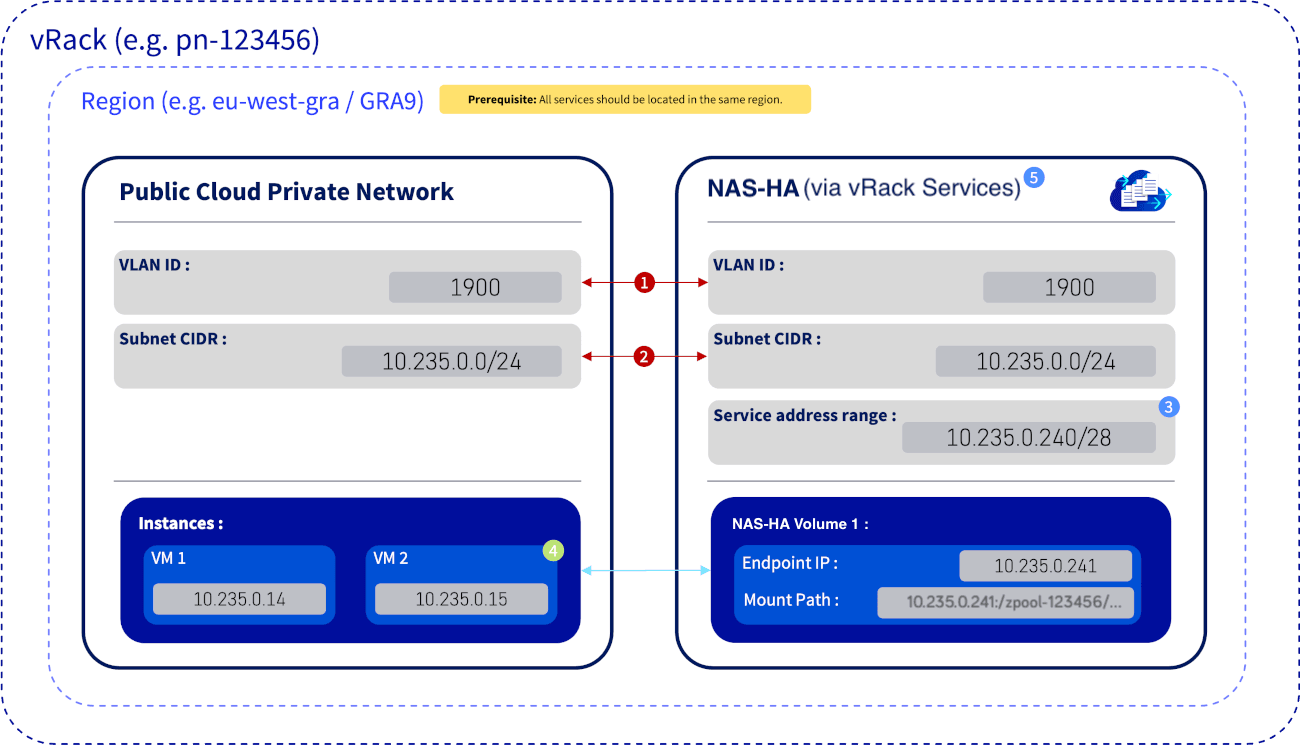
The diagram below illustrates how a HA-NAS volume connects to a Public Cloud instance through a private vRack network.
-
Critical Match — VLAN ID
The VLAN ID (e.g.
1900) must be identical in both the Public Cloud private network and the vRack Services configuration. -
Critical Match — Subnet CIDR
The subnet CIDR (e.g.
10.235.0.0/24) must also match across both services to ensure they operate within the same logical network in the vRack. -
Info — Service address range
The service address range (e.g.
10.235.0.240/28) is a reserved subset of the main subnet. These IPs are exclusively used by HA-NAS service endpoints (e.g.10.235.0.241) and must not be assigned to instances. -
Security — ACL Rule
The HA-NAS volume's Access Control List (ACL) must explicitly authorise the private IP of any instance requiring access (e.g.
10.235.0.15). -
Concept — vRack Services
vRack Services acts as a secure network bridge, allowing managed services such as HA-NAS outside your Public Cloud project to connect seamlessly to your private vRack network.
OVHcloud Console Access
- Direct link:
- Navigation path:
Bare Metal Cloud>Storage>NAS-HA>Private NAS-HA> Select your NAS-HA
Instructions
Step 1 - Associating the Public Cloud project with the vRack
Before deploying your HA-NAS volume through a private vRack network, first associate your Public Cloud project with a vRack.
This association enables private networking between your Public Cloud instances and OVHcloud managed services such as HA-NAS.
Follow step 1: activating and managing a vRack in our guide "Configuring vRack for Public Cloud".
Step 2 - Creating a private network in your Public Cloud project
To connect your Public Cloud instance to a HA-NAS volume via vRack, first provision a dedicated private network within your project.
This isolated network enables secure communication between your instances and OVHcloud storage resources through the vRack architecture.
Follow step 2: creating a private network in the vRack in our guide "Configuring vRack for Public Cloud".
Step 3 — Launching the instance on the private network
Deploy your Public Cloud instance within the private network you created. Ensure it is connected to the correct subnet to enable secure communication over the vRack.
Follow step 3: integrating an instance into vRack in our guide "Configuring vRack for Public Cloud".
Ensure that an IP address is assigned to the instance in the selected subnet (e.g. 10.235.0.15).
Step 4 - Creating a vRack Service resource for HA-NAS
There are two ways to create a vRack Service resource for your HA-NAS volume.
Both methods achieve the same goal: securely connecting your HA-NAS service to your vRack and Public Cloud instances.
First method: creating via vRack Services
A vRack Service resource acts as a network adapter, connecting managed services like HA-NAS to your vRack and its private subnet.
For detailed guidance, see OVHcloud's official documentation: vRack Services - Exposing a Managed Service on your vRack.
-
In the OVHcloud Console, open
Bare Metal Cloud, then clickvRack Servicesunder Network in the left-hand menu. -
Click
Order a vRack Service. -
Select the same Region as your vRack, Public Cloud instance and HA-NAS service. Then click
Order a vRack Service. -
Click
No thanks, I already have a vRack, tick the box to accept the terms and conditions, then clickConfirm. -
Locate your newly created vRack Services in the list and click its name.
-
Configure the vRack Services as follows:
-
vRack: in the General information tile of the
Overviewtab, clickAttach a vRack, select the same vRack used for your Public Cloud project, then clickAttach. -
Create a subnet: in the
Subnetstab, clickAdd a subnetand fill in the form.InfoEnsure the CIDR matches your Public Cloud private network.
- CIDR: e.g.
10.235.0.0/24. - Service range: e.g.
10.235.0.240/28.- Reserved subset of the private subnet for assigning IPs to managed HA-NAS services within the vRack.
- VLAN: select
Use a VLANand enter the same VLAN number as your Public Cloud private network (see Step 2). - Click
Add a subnet.
- CIDR: e.g.
-
Create a Service Endpoint: in the
Endpointstab, clickCreate an endpoint. SelectNAS-HAas the Service type, select your HA-NAS service in Managed service and your Subnet, then clickCreate an endpoint.
-
Second method: creating via the NAS-HA section
-
Click the name of your HA-NAS service in the list.
-
In the Network configuration tile of the
Overviewtab, clickConfigure network. -
Select your vRack in the vRack field.
-
If no vRack Services have been created yet, click
Activate vRack Servicesand follow the first method: creating via vRack Services from step 3. -
If you have already created a vRack Services, select it in the vRack Services field, select your Subnet, then click
Configure network.
Step 5 — Connecting the HA-NAS volume to the vRack
Once the previous steps are completed successfully, all volumes created in your HA-NAS service automatically reside within your vRack and its dedicated subnet, making them immediately accessible to your Public Cloud instances.
Step 6 — Configuring access control (ACLs)
In the ACL tab of your HA-NAS volume, click Add a rule:
-
In IP address, add the IP or CIDR range authorised to mount the volume:
- To allow a single instance, enter the instance's IP address, for example:
10.235.0.15. - To allow all instances within the subnet, enter the subnet address, for example:
10.235.0.0/24.
- To allow a single instance, enter the instance's IP address, for example:
-
Set the desired Access level:
Read/WriteorRead only, then clickAdd a rule.
Recommendation: Use individual IPs whenever possible to enhance security.
After applying the ACLs, verify network connectivity from your Public Cloud instance:
Step 7 — Mounting the volume
You can mount your HA-NAS volume via NFS or via CIFS. You will need the following values:
The NFS user is root and the SMB/CIFS user is nobody. Changing permissions with one of these users may generate conflicts with the permissions set by the other protocol.
Mounting via NFS
-
Install the NFS client on your Public Cloud instance:
-
Mount the HA-NAS volume:
Example:
HA-NAS supports NFSv3 and NFSv4. If no version is specified, your NFS client uses the latest version it supports. To force a version, add the -o vers=3 (or vers=4, vers=4.1, vers=4.2) option. For more information, and for the instructions for other operating systems, see our guide "Mounting HA-NAS via NFS share".
Mounting via CIFS
From a Linux instance
-
Install the CIFS utilities on your Public Cloud instance:
-
Mount the HA-NAS volume:
From a Windows instance
Open Windows PowerShell and run the following command:
Example:
For more information, including how to resolve the Windows errors System error 1272 and System error 3227320323, see our guide "Mount your HA-NAS via a CIFS share".
Step 8 — Enabling automatic NFS mount on boot (optional)
To mount your HA-NAS volume automatically at startup via NFS, add the following entry to the /etc/fstab file:
Then test the configuration:
If no errors occur, the HA-NAS volume will now automatically mount on boot.
Expected Result
- The instance can access the HA-NAS volume via
<YOUR-HA-NAS-SERVICE-IP>. - All communication occurs privately within the vRack.
- The NFS or CIFS mount is fully functional, and the NFS mount is persistent across reboots.
Troubleshooting
Go further
Getting started with a HA-NAS solution
HA-NAS - Private network configuration (Beta)
Mount your HA-NAS via a CIFS share
For training or technical assistance implementing our solutions, contact your sales representative or visit our Professional Services page to request a quote and have your project analysed by our experts.
Join our community of users.