Find out how a Floating IP address functions and how to configure it
Objective
Floating IPs are public IP addresses for Public Cloud, used to expose a private instance or a private network service to the public network. You can read more about it on our dedicated concepts page.
This guide explains how to attach Floating IP addresses to your instances.
Floating IP is one of the services delivered by the OpenStack DVR (Distributed Virtual Router) services of the OVHcloud Public Cloud.
Floating IP lets you create a public IP address for your private-network-based VMs, handling both incoming and outgoing traffic. Floating IP addresses can be attached and detached from your VMs at any time.
You can hold Floating IP addresses without attaching them to any service. They remain available for your resources until they are manually deleted.
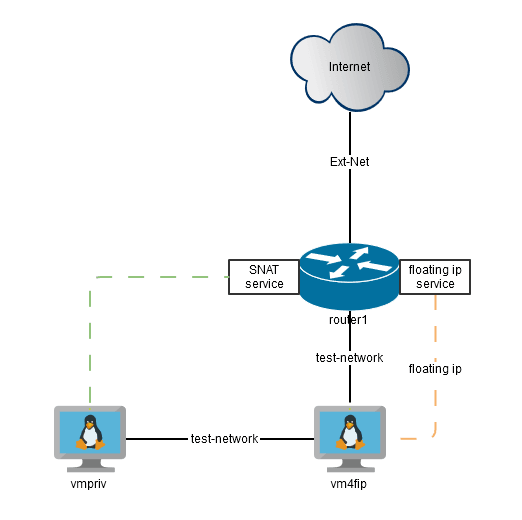
Target configuration architecture
The goal of this exercise is to create a VM (vm4fip) with a private local network (test-network) only, and use a router (router1) to set up a Floating IP.
Next, we will use this Floating IP to connect to the instance (VM) from the outside and check its access to the Internet.
Instructions
OVHcloud Control Panel Access
Direct link:
Navigation path:Public Cloud > Select your project
Attaching a Floating IP to an instance
Via the OVHcloud Control Panel
Tip
Click one of the two tabs below depending on whether you want to attach a Floating IP to a new instance (Option 1) or an existing instance (Option 2).
Option 1
Option 2
In case of a new instance
If you wish to attach a Floating IP to an existing instance, please skip to Option 2 (second tab above).
To create a new instance, follow this guide if necessary.
Warning
Not all regions support this feature. Make sure to create an instance in a valid region. For more information, please refer to our regions availability page.
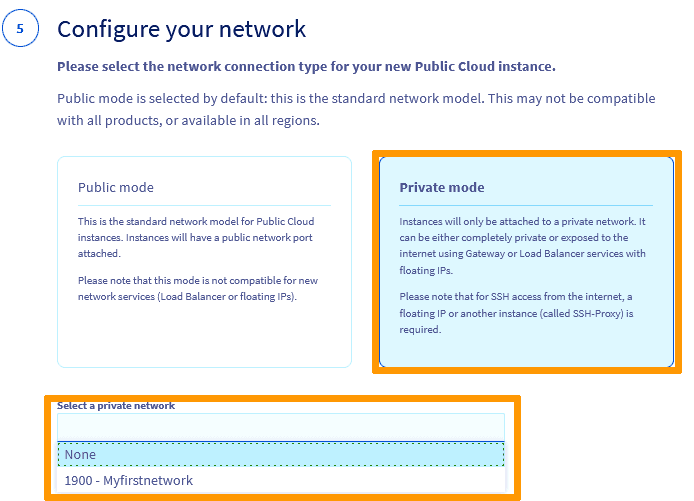
In Step 5, you can choose a networking mode for your instance: Public or Private.
By default, the public mode is selected, but since we are creating an instance to which we will attach a Floating IP, we need to create an instance with a private network ONLY.
Select the Private mode and click on the drop down list to select a private network of your choice (the network must have been previously created with a Gateway or linked to a Gateway).
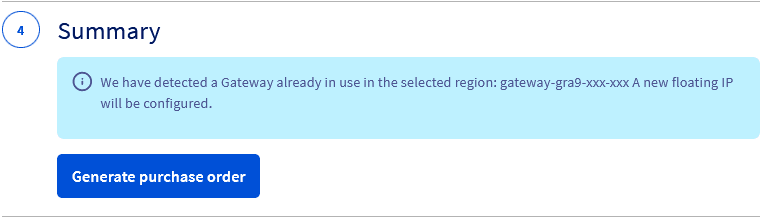
If you select a private network that is not linked to a Gateway, the system will automatically create a Gateway of size "S" by default and attach it to your network.
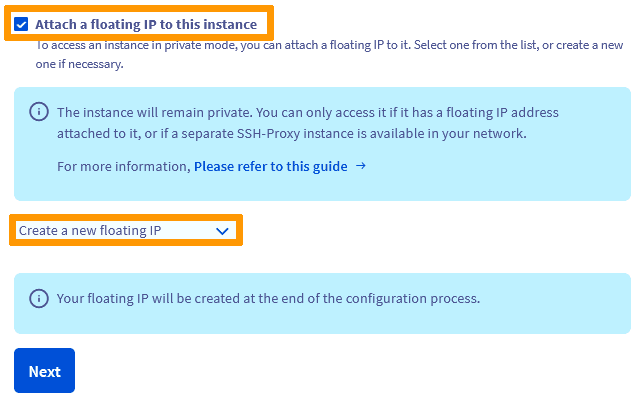
In the next step, check the box next to Attach a Floating IP to this Instance, and select Create a new Floating IP.
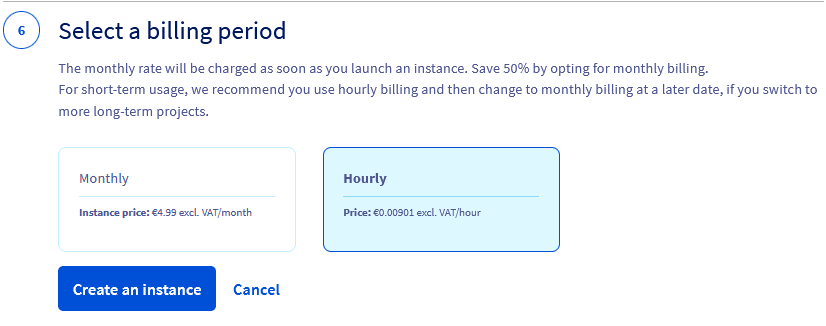
When you have applied your choices, click Next to proceed to the final step and decide on a billing method.
Choose hourly billing if you are unsure about the usage period — you cannot switch to it after delivery. You will have the option to switch to a monthly subscription as soon as the instance is available on the “Instances” page.
Warning
If you choose to be billed hourly, you will continue to be billed as long as the instance is not deleted. It does not matter if the instance is not actually used during this time.
Verify your configuration, then click Create an instance. It may take a few minutes until your service is delivered.
In case of an existing instance (created with a private network only).
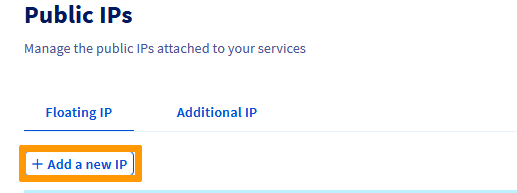
Click on Public IPs in the left-hand menu under Network.
Click on Floating IP, then on Add a new IP.
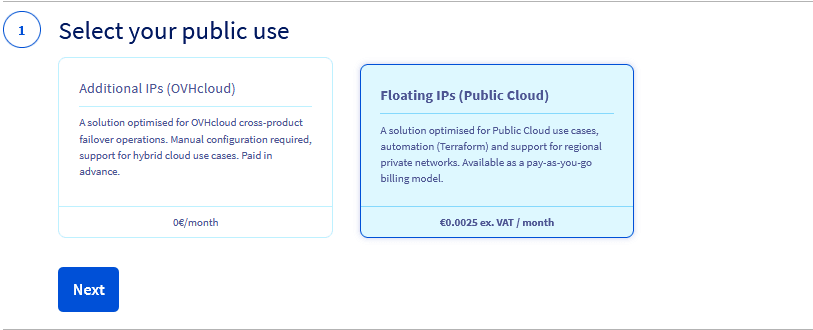
Underneath "Select your public use", select the Floating IPs (Public Cloud).
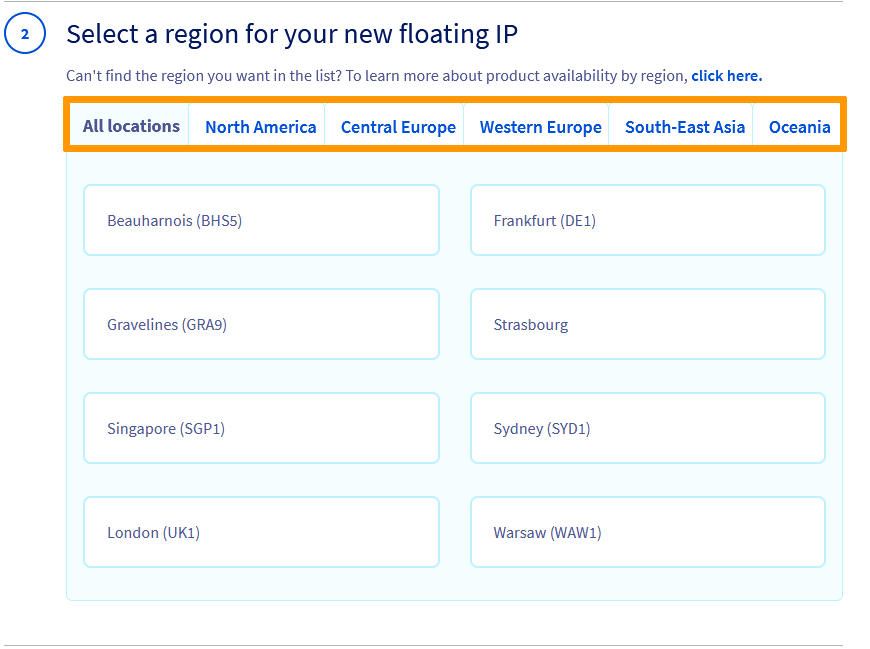
In the next step, choose a region for your Floating IPs. The region must be the same as that of the instance you wish to attach the Floating IP to.
Info
Please note that only regions in which this service is available will be displayed.
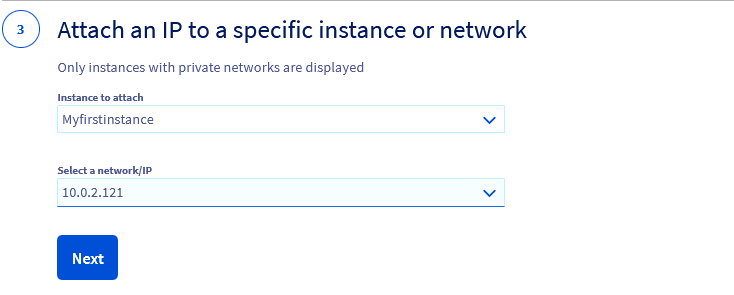
Next, click on the drop down list to select the instance to attach the Floating IP to, then select the network/IP (this will be in the default range selected when creating the private network of the instance).
Info
In case your instance is attached to two or more private networks, you will be presented with an equal amount of private IPs to select from, select the private IP of your choice.
Once done, click on Generate purchase order. It may take a few minutes until your service is delivered.
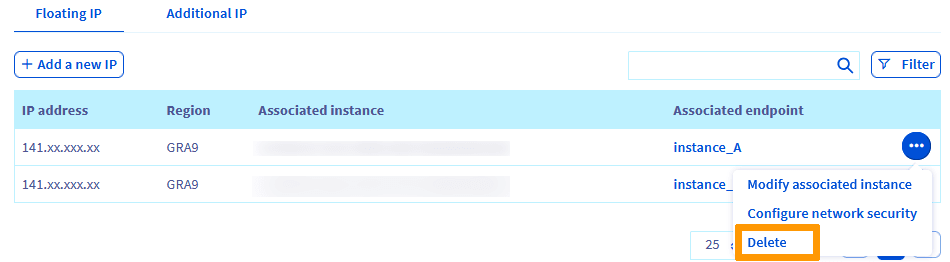
Click on Public IPs in the left-hand menu under Network.
In the Floating IP tab, click on the ... next to the corresponding IP and select Delete.
In the pop-up window, proceed with the deletion of the IP by clicking on Confirm.
Via the OpenStack API
Unfold this section
Tip
Click on the tabs below to view each of the 9 steps in turn.
Step 1
Step 2
Step 3
Step 4
Step 5
Step 6
Step 7
Step 8
Step 9
Create a router
$ openstack router create router1$ openstack router show router1 -c id -c status+--------+--------------------------------------+| Field | Value |+--------+--------------------------------------+| id | d2370b2f-18ba-4a23-886d-35c01ba2a957 || status | ACTIVE |+--------+--------------------------------------+
Create a private network if needed. If you have one already, you can skip this step.
$ openstack network create test-network$ openstack network show test-network -c id -c status+--------+--------------------------------------+| Field | Value |+--------+--------------------------------------+| id | a9753f63-889a-43b7-b3ea-258bd5008207 || status | ACTIVE |+--------+--------------------------------------+
Create a subnet for your test-network. If you have one already, you can skip this step.
The subnet should have the DHCP service enabled and a gateway IP configured.
$ openstack subnet create --subnet-range 192.168.0.1/24 --network test-network --dhcp --gateway 192.168.0.1 test-subnet$ openstack subnet show test-subnet -c id -c gateway_ip -c enable_dhcp -c name+-------------+--------------------------------------+| Field | Value |+-------------+--------------------------------------+| enable_dhcp | True || gateway_ip | 192.168.0.1 || id | c23df163-0d46-4928-91d6-956794c4de16 || name | test-subnet |+-------------+--------------------------------------+
Add subnet to the router1.
$ openstack router add subnet router1 test-subnet$ openstack router show router1 -c interfaces_info -c name+-----------------+-----------------------------------------------------------------------------------------------------------------------------------------+| Field | Value |+-----------------+-----------------------------------------------------------------------------------------------------------------------------------------+| interfaces_info | [{"port_id": "ec872f31-cfe5-4326-9aa2-30d2e5c60d20", "ip_address": "192.168.0.1", "subnet_id": "c23df163-0d46-4928-91d6-956794c4de16"}] || name | router1 |+-----------------+-----------------------------------------------------------------------------------------------------------------------------------------+
Add a gateway to router1 from the public shared network Ext-Net.
$ openstack router set --external-gateway Ext-Net router1$ openstack router show router1 -c external_gateway_info -c name+-----------------------+------------------------------------------------------------------------------------------------------------------------------------------------------------------------------------------------------------------------------------------------------------------------------------------+| Field | Value |+-----------------------+------------------------------------------------------------------------------------------------------------------------------------------------------------------------------------------------------------------------------------------------------------------------------------------+| external_gateway_info | {"network_id": "b2c02fdc-ffdf-40f6-9722-533bd7058c06", "external_fixed_ips": [{"subnet_id": "0f11270c-1113-4d4f-98de-eba83445d962", "ip_address": "141.94.208.45"}, {"subnet_id": "4aa6cac1-d5cd-4e25-b14b-7573aeabcab1", "ip_address": "2001:41d0:304:400::7dc"}], "enable_snat": true} || name | router1 |+-----------------------+------------------------------------------------------------------------------------------------------------------------------------------------------------------------------------------------------------------------------------------------------------------------------------------+
Create a test-keypair for SSH connection to your VM (do not forget to limit accesses to the private key file using the chmod command).
$ openstack keypair create --private-key ./test-key.rsa test-key+-------------+-------------------------------------------------+| Field | Value |+-------------+-------------------------------------------------+| fingerprint | 02:54:10:33:e4:b0:fb:4b:ec:4b:06:e8:0d:38:90:25 || name | test-key || user_id | 0a3ef9fd2ea748e8935accf19d0278a8 |+-------------+-------------------------------------------------+$ chmod 600 ./test-key.rsa
Spawn a VM with the test-network interface only.
$ openstack server create --image 'Ubuntu 22.04' --flavor s1-8 --key-name test-key --net test-network vm4fip$ openstack server show vm4fip -c name -c status+--------+--------+| Field | Value |+--------+--------+| name | vm4fip || status | ACTIVE |+--------+--------+
Now we have a VM named vm4fip with a private interface only. This VM has no access outside test-network.
Create a Floating IP from Ext-Net network.
$ openstack floating ip create Ext-Net$ openstack floating ip list+--------------------------------------+---------------------+------------------+------+--------------------------------------+----------------------------------+| ID | Floating IP Address | Fixed IP Address | Port | Floating Network | Project |+--------------------------------------+---------------------+------------------+------+--------------------------------------+----------------------------------+| 7b646f78-9344-440e-83c1-57c828a03718 | 169.254.10.25 | None | None | b2c02fdc-ffdf-40f6-9722-533bd7058c06 | 25a9e81103504980809e3f7573d93da3 |+--------------------------------------+---------------------+------------------+------+--------------------------------------+----------------------------------+
Attach the Floating IP to VM vm4fip.
$ openstack server add floating ip vm4fip 169.254.10.25$ openstack floating ip list+--------------------------------------+---------------------+------------------+--------------------------------------+--------------------------------------+----------------------------------+| ID | Floating IP Address | Fixed IP Address | Port | Floating Network | Project |+--------------------------------------+---------------------+------------------+--------------------------------------+--------------------------------------+----------------------------------+| 7b646f78-9344-440e-83c1-57c828a03718 | 169.254.10.25 | 192.168.0.201 | 1230869c-7116-4ee9-b688-8b6ebc153855 | b2c02fdc-ffdf-40f6-9722-533bd7058c06 | 25a9e81103504980809e3f7573d93da3 |+--------------------------------------+---------------------+------------------+--------------------------------------+--------------------------------------+----------------------------------+
Your VM now pings via the Floating IP:
$ ping 169.254.10.25PING 169.254.10.25 (169.254.10.25) 56(84) bytes of data.64 bytes from 169.254.10.25: icmp_seq=1 ttl=52 time=0.641 ms64 bytes from 169.254.10.25: icmp_seq=2 ttl=52 time=1.06 ms64 bytes from 169.254.10.25: icmp_seq=3 ttl=52 time=0.744 ms^C--- 169.254.10.25 ping statistics ---3 packets transmitted, 3 received, 0% packet loss, time 2024msrtt min/avg/max/mdev = 0.641/0.817/1.067/0.182 ms
You can connect to the vm4fip VM:
$ ssh ubuntu@169.254.10.25 -i ./test-key.rsaWelcome to Ubuntu 22.04 LTS (GNU/Linux 5.15.0-25-generic x86_64)* Documentation: https://help.ubuntu.com* Management: https://landscape.canonical.com* Support: https://ubuntu.com/advantageubuntu@vm4fip:~$ ip a1: lo: <LOOPBACK,UP,LOWER_UP> mtu 65536 qdisc noqueue state UNKNOWN group default qlen 1000link/loopback 00:00:00:00:00:00 brd 00:00:00:00:00:00inet 127.0.0.1/8 scope host lovalid_lft forever preferred_lft foreverinet6 ::1/128 scope hostvalid_lft forever preferred_lft forever2: ens3: <BROADCAST,MULTICAST,UP,LOWER_UP> mtu 9000 qdisc fq_codel state UP group default qlen 1000link/ether fa:16:3e:24:b9:c2 brd ff:ff:ff:ff:ff:ffaltname enp0s3inet 192.168.0.201/24 metric 100 brd 192.168.0.255 scope global dynamic ens3valid_lft 85929sec preferred_lft 85929secinet6 fe80::f816:3eff:fe24:b9c2/64 scope linkvalid_lft forever preferred_lft forever
As you can see, the VM only has a private IP but it is available from the Internet via the Floating IP.
ubuntu@vm4fip:~$ sudo resolvectl dns ens3 213.186.33.99ubuntu@vm4fip:~$ curl ifconfig.me/ip169.254.10.25
Warning
Once a Floating IP is attached to a VM, it is exposed to the Internet. Always ensure that your VM and its services are properly protected by security groups or a VM firewall.
Adding a DNS to a Floating IP
Info
Complete the 9 steps above before starting this procedure.
To add a DNS to a Floating IP, run the following command from the command line.
$ openstack floating ip set --dns-domain <DOMAIN_NAME> <IP_ADDRESS_ID>
Detaching a Floating IP
You can detach a Floating IP from your VM at any time.
$ openstack server remove floating ip vm4fip 169.254.10.25$ openstack floating ip list+--------------------------------------+---------------------+------------------+------+--------------------------------------+----------------------------------+| ID | Floating IP Address | Fixed IP Address | Port | Floating Network | Project |+--------------------------------------+---------------------+------------------+------+--------------------------------------+----------------------------------+| 7b646f78-9344-440e-83c1-57c828a03718 | 169.254.10.25 | None | None | b2c02fdc-ffdf-40f6-9722-533bd7058c06 | 25a9e81103504980809e3f7573d93da3 |+--------------------------------------+---------------------+------------------+------+--------------------------------------+----------------------------------+$ ping 169.254.10.25PING 169.254.10.25 (169.254.10.25) 56(84) bytes of data.^C--- 169.254.10.25 ping statistics ---2 packets transmitted, 0 received, 100% packet loss, time 1019ms
Warning
Once a Floating IP is detached, it goes back to your pool of Floating IPs. The Floating IP can be reattached to the same VM or any other VMs in your VMs pool. Detaching a Floating IP does not delete it.
Deleting a Floating IP
To delete a Floating IP, you must do it explicitly:
$ openstack floating ip delete 169.254.10.25$ openstack floating ip list
Via the Horizon interface
Unfold this section
The following steps describe how to attach a Floating IP to an existing instance.
Info
Before you proceed, make sure your instance is linked to a private network only and that the private network is linked to a Gateway.
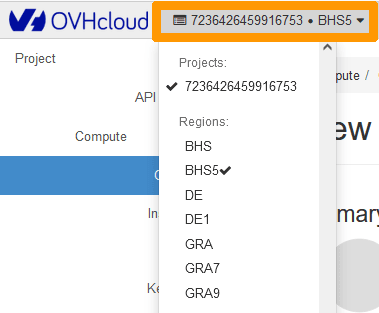
Log into the Horizon interface, and ensure that you are in the correct region. You can verify this on the top left corner.
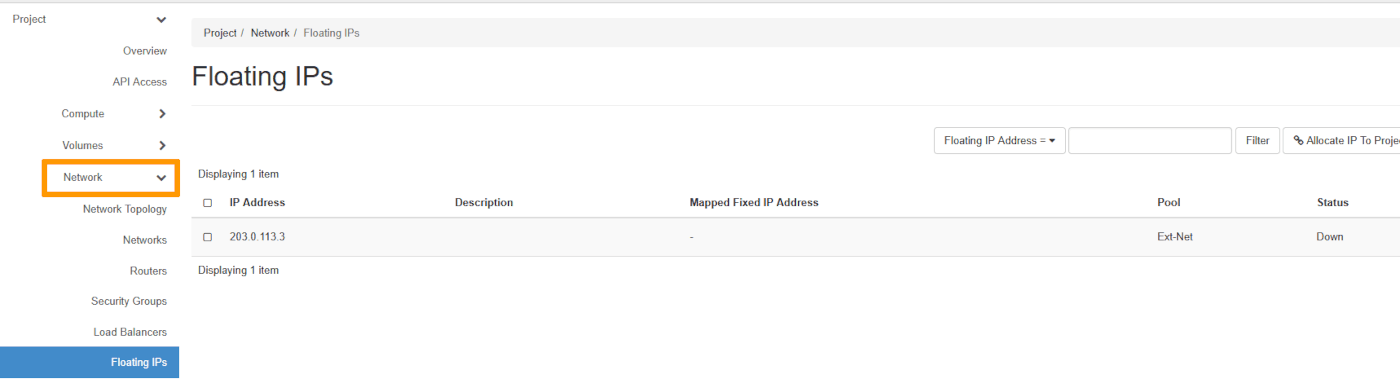
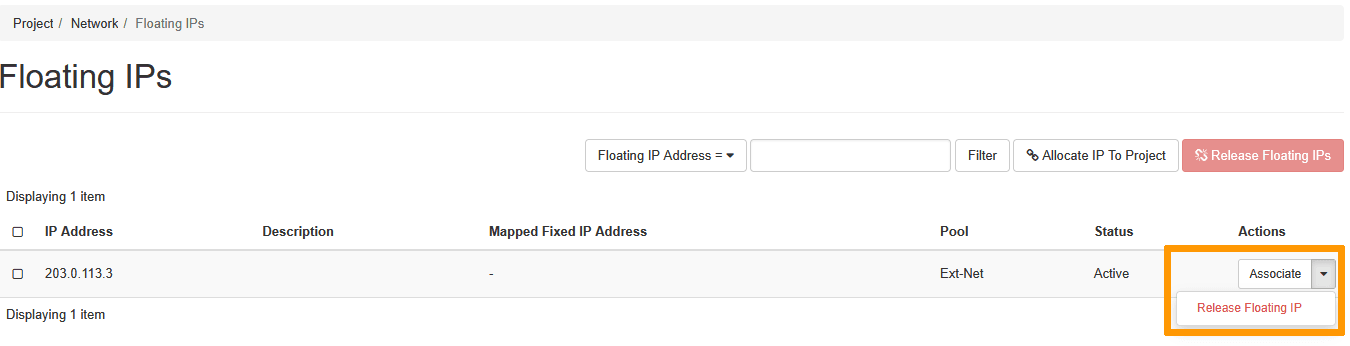
In the left-hand menu, click on Network then on Floating IPs.
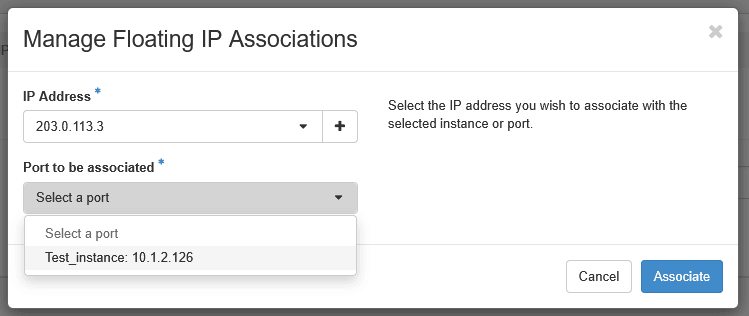
Click on Associate next to the corresponding instance.
A pop-up window will appear. Click on the drop-down arrow underneath Port to be associated and select the port or instance to attach the Floating IP to.
Next, click on Associate.
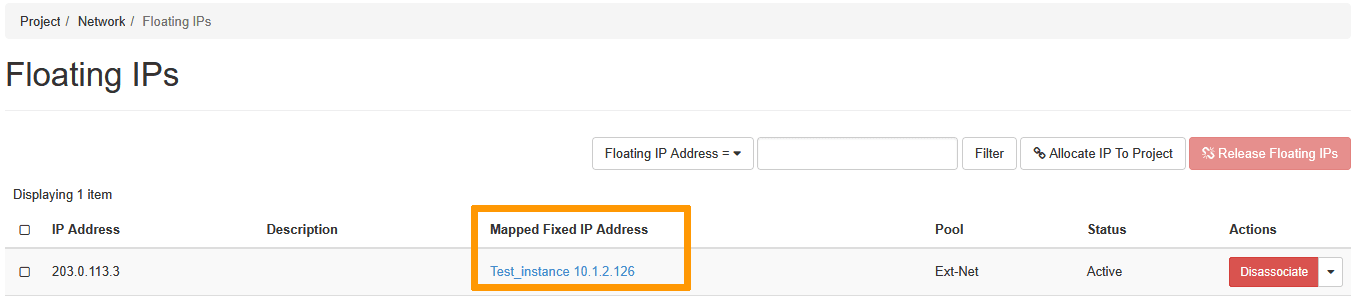
Once done, the Floating IP will be associated to the instance.
Detaching a Floating IP
You can detach a Floating IP from your instance at any time.
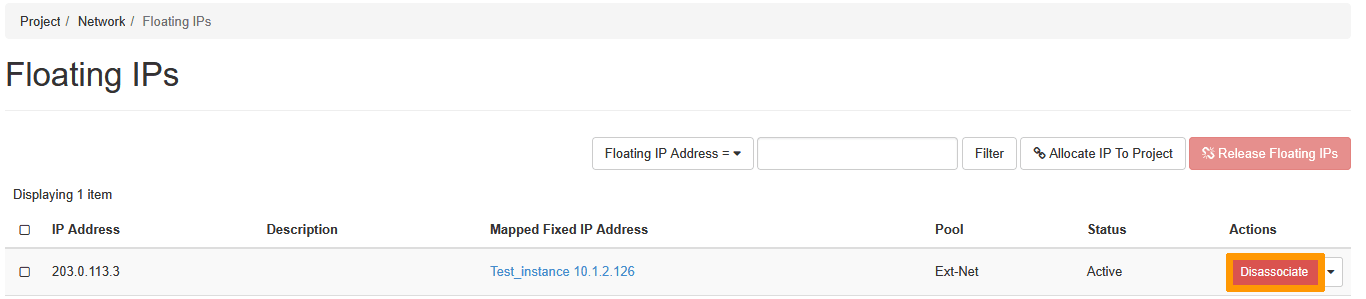
Once you are connected to the Horizon interface, click on Network, then on Floating IPs.
Click on Disassociate next to the corresponding IP.
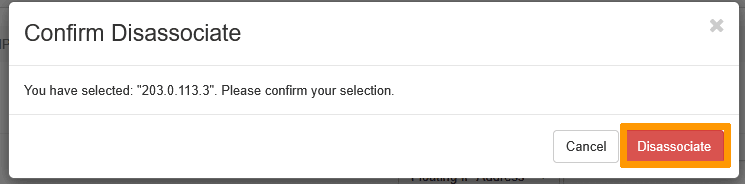
A pop-up window will appear prompting you to confirm the selection. Click on Disassociate.
Once done, the Floating IP will be detached from the instance and returned to the pool of Floating IPs.
Deleting a Floating IP
To delete a Floating IP, click on the drop-down arrow next to the corresponding instance, then click on Release Floating IP.
Via the OVHcloud API
Unfold this section
With the OVHcloud API, you can only attach a Floating IP to an existing instance.
Step 1
Step 2
Step 3
To begin, retrieve all the information you will need.
For the project ID, the calls below allow you to retrieve it.
Fill in the fields according to the following table.
Field
Description
serviceName
ID of the project
regionName
Name of the region in which the instance is located
instanceId
ID of the instance
name
Define a name for your Gateway
ip
The private IP of the instance
Info
The "gateway" property field should be left empty because you are attaching a Floating IP to an instance initially created with a private network only and already linked to a Gateway. Please note that for now, the Floating IP will not be created if the instance is linked to a private network that is not attached to a Gateway.
If you need training or technical assistance to implement our solutions, contact your sales representative or request a quote from our Professional Services team to get assistance on your specific use case.