Trigger your first VCDA migration to Public VCF as-a-Service
Find out how to trigger your first VM migration to your Public VCF as-a-Service organisation using VMware Cloud Director Availability
Objective
OVHcloud offers a VM migration feature to Public VCF as-a-Service based on VMware Cloud Director Availability (VCDA). This feature allows you to migrate your VMs from a vSphere or VCD on-premises environment to your Public VCF as-a-Service organisation.
This guide walks you through your first migration: data replication, monitoring, and the final cutover (migration) to your Public VCF as-a-Service organisation.
Requirements
- An active Public VCF as-a-Service organisation.
- The migration option enabled on your organisation from your . If needed, refer to Enable the VCDA migration option on your Public VCF as-a-Service organisation.
- A VCDA on-premises appliance deployed, configured and paired with your Public VCF as-a-Service organisation. If this is not yet the case, refer to the Public VCF as-a-Service Migration with VCDA - Getting Started guide.
- A user account on your Public VCF as-a-Service organisation with enough rights to manage replications.
Instructions
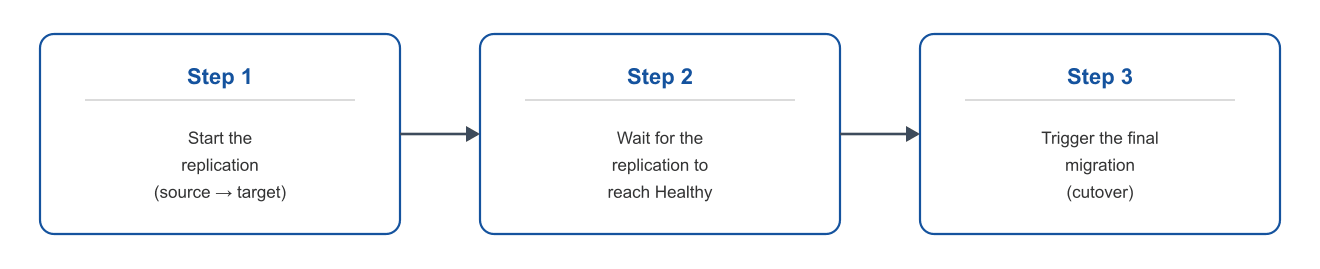
Workflow overview
The migration workflow has 3 main steps:
You can drive the operations from two interfaces:
- Your on-premises VCDA appliance UI, for source-side operations (recommended for this guide);
- The VMware Cloud Director UI of your Public VCF as-a-Service organisation, through the Availability plugin.
Accessing the Availability plugin in VMware Cloud Director
From your Public VCF as-a-Service organisation, open the VCD portal and click More > Availability to access the VCDA plugin:

The plugin shows the status of inbound and outbound replications for your organisation.
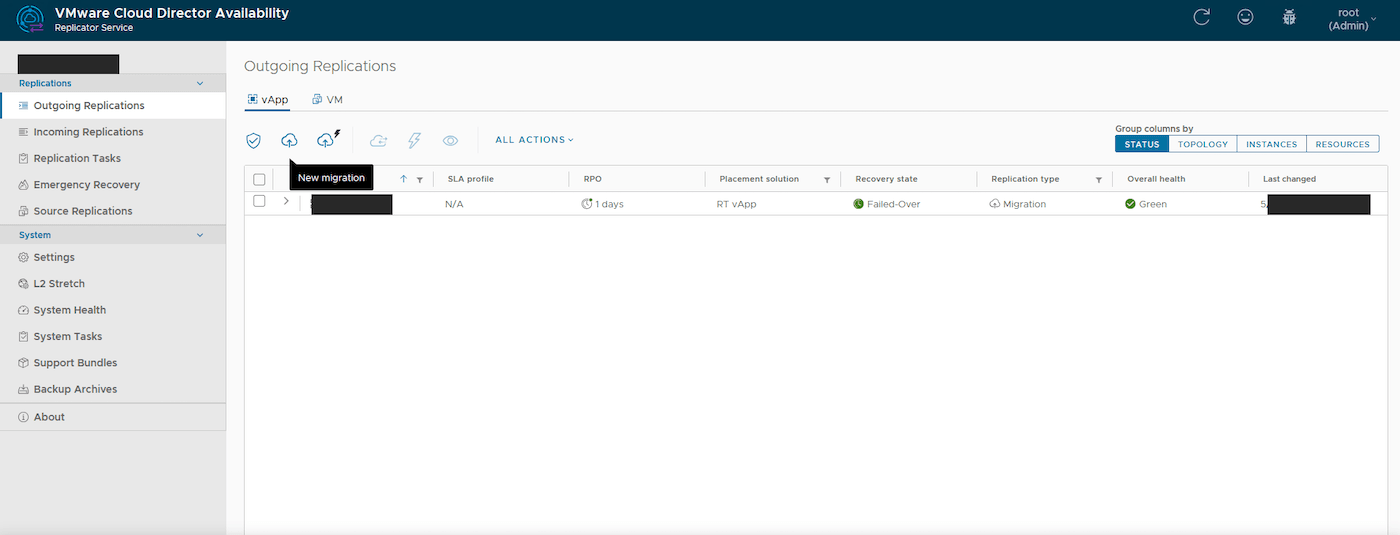
Step 1: Start the replication
In this example, the migration is triggered from the on-premises VCDA appliance to the Public VCF as-a-Service organisation.
Log in to your on-premises VCDA appliance interface (https://<appliance-IP>) with the root account.
In the left menu, click Outgoing Replications, then the vApp tab.
Click the New migration button (cloud icon with an upward arrow) to start the wizard.
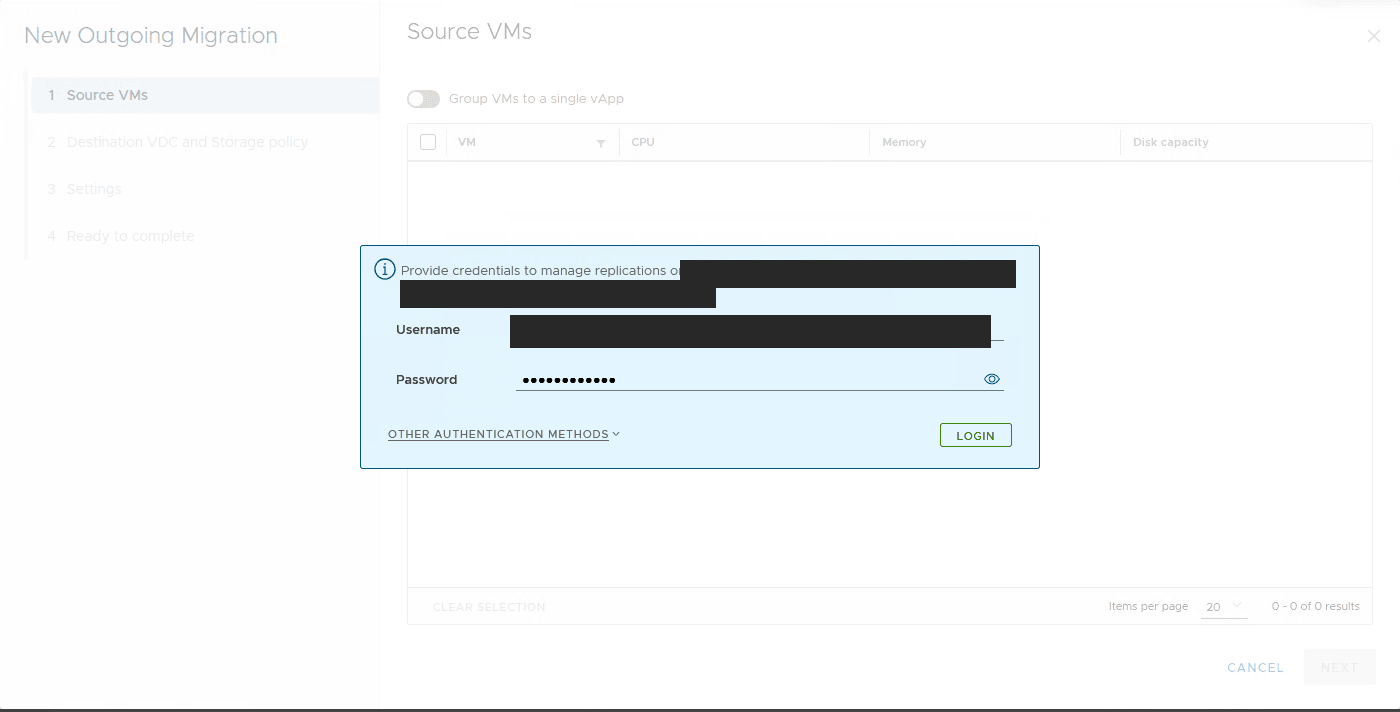
Authentication to the target organisation
The wizard prompts you to authenticate against the Public VCF as-a-Service organisation that will be the migration target.
Enter:
- Username: your username on the Public VCF as-a-Service organisation (in the
user@organizationformat); - Password: the associated password.
Click LOGIN.
Step 1.1: Selecting source VMs
Select the source vCenter from the Select VMs to replicate from dropdown, then tick the virtual machine(s) you want to migrate.
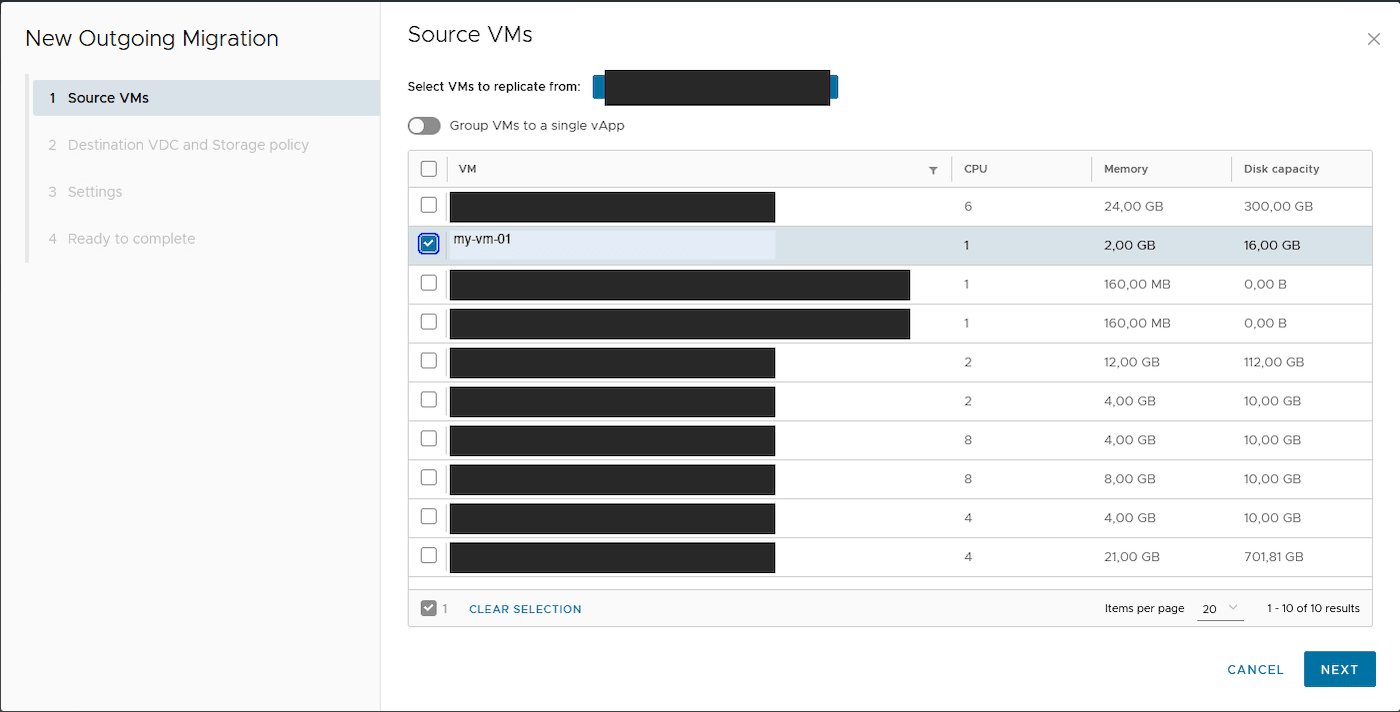
Click Next.
Step 1.2: Destination vDC and storage policy
Select the target virtual datacenter (vDC) in your Public VCF as-a-Service organisation and the storage policy to use for the migrated VMs.
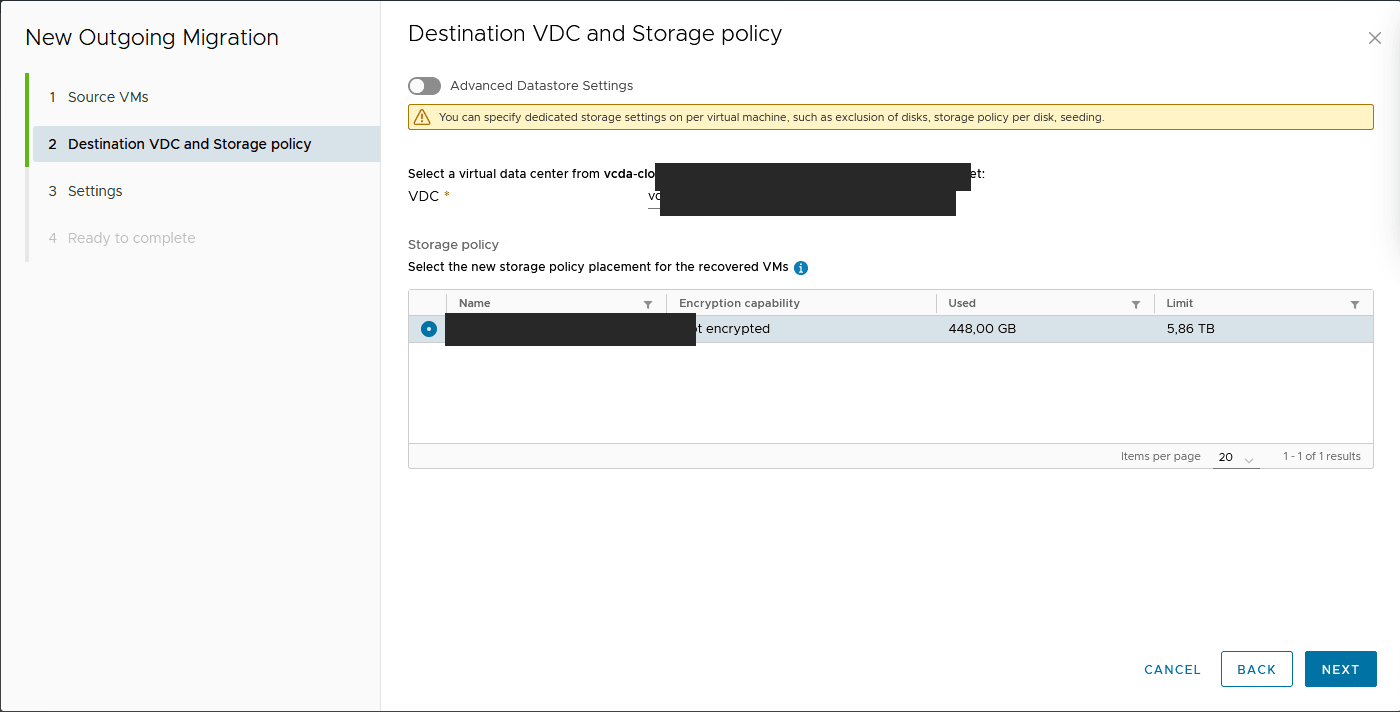
Click Next.
Step 1.3: Replication settings
This step allows you to adjust the replication settings:
- Compress replication traffic: enable it only on limited bandwidth links (increased CPU usage);
- Delay start synchronization: to postpone the start of the initial synchronisation;
- VDC policy settings: placement and sizing policies to apply on the target (leave
Noneto keep the original configuration).
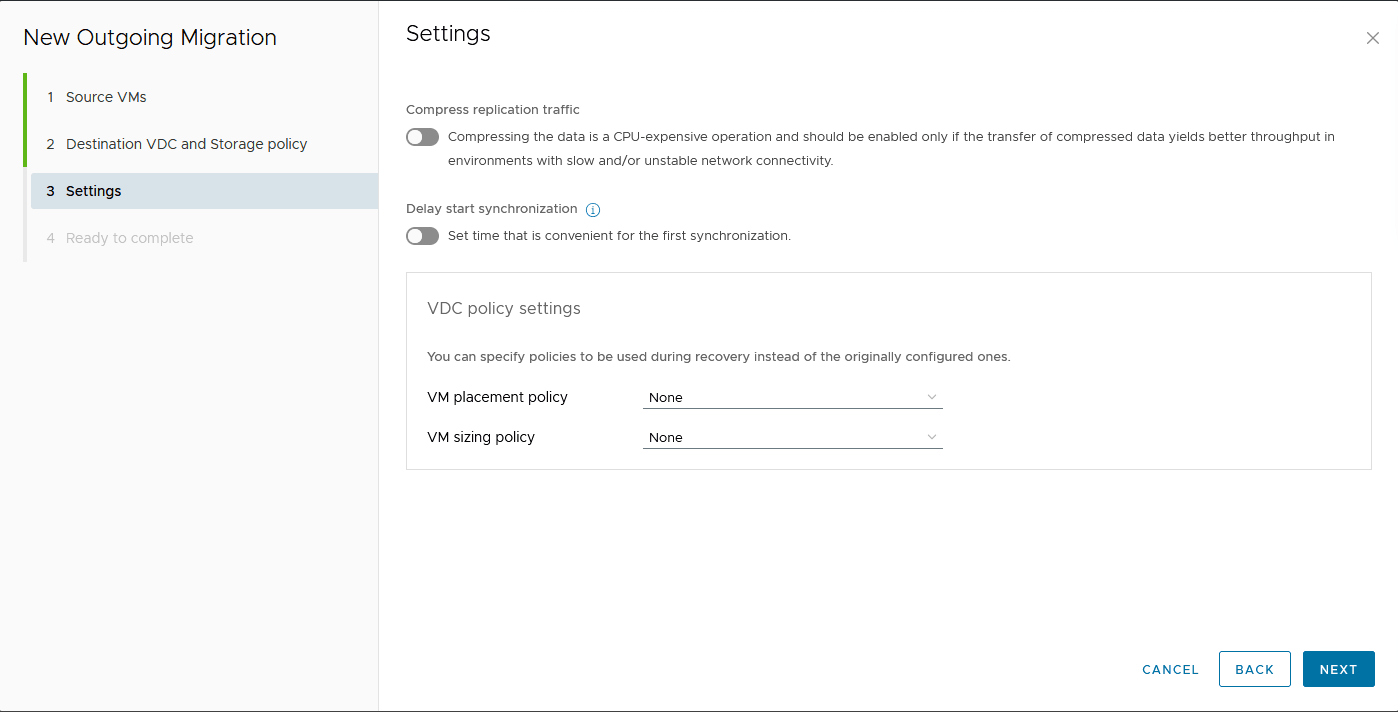
Click Next.
Step 1.4: Summary
The wizard displays a summary of the upcoming migration. Check:
- the selected VMs;
- the source and destination sites;
- the vDC and storage policy;
- the sizing and placement policies.
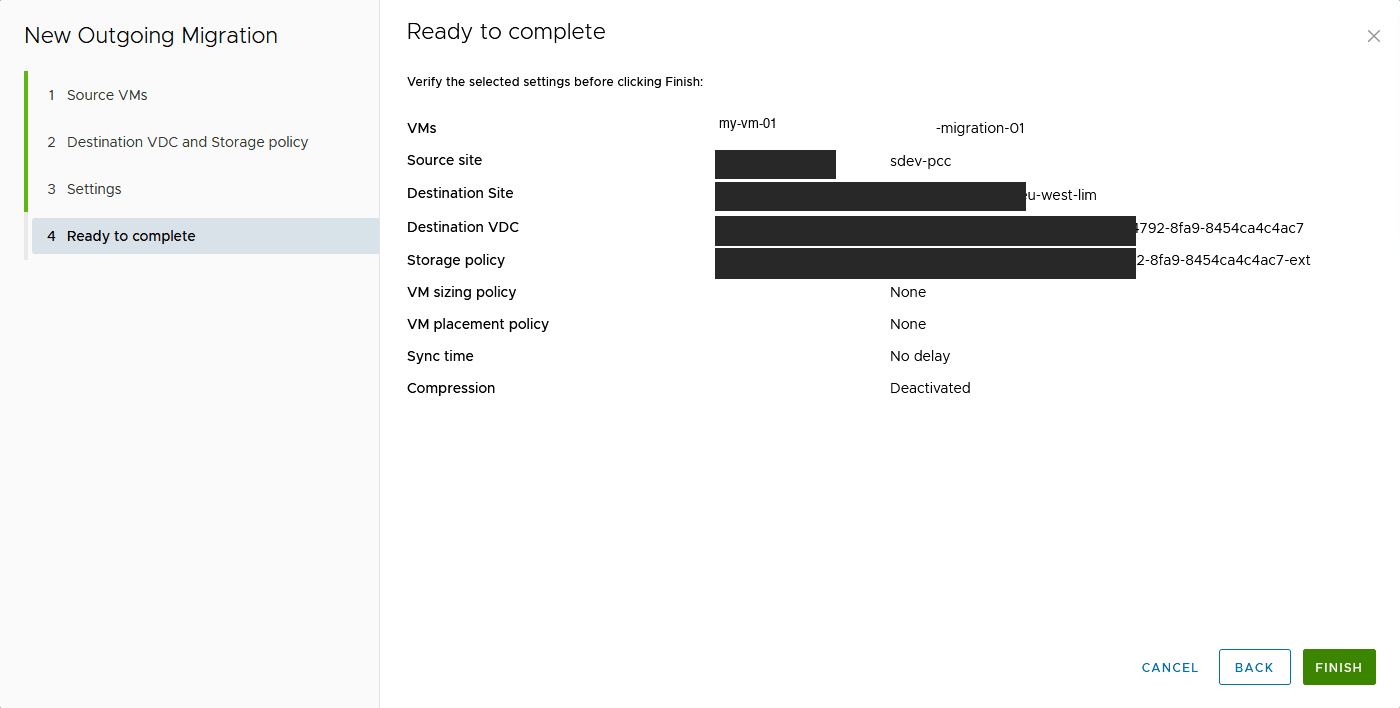
Click Finish to start the replication.
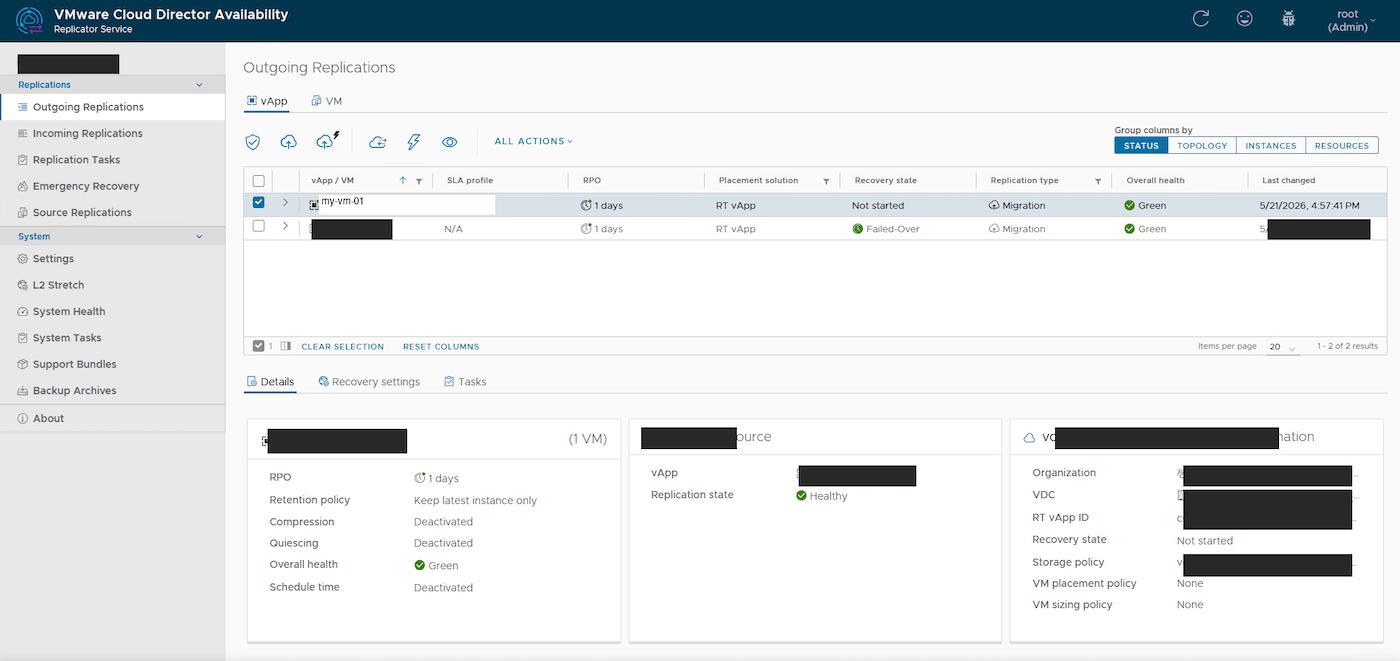
Step 2: Monitor the replication progress
Once the replication is started, it appears in the Outgoing Replications list with the Synchronizing state.
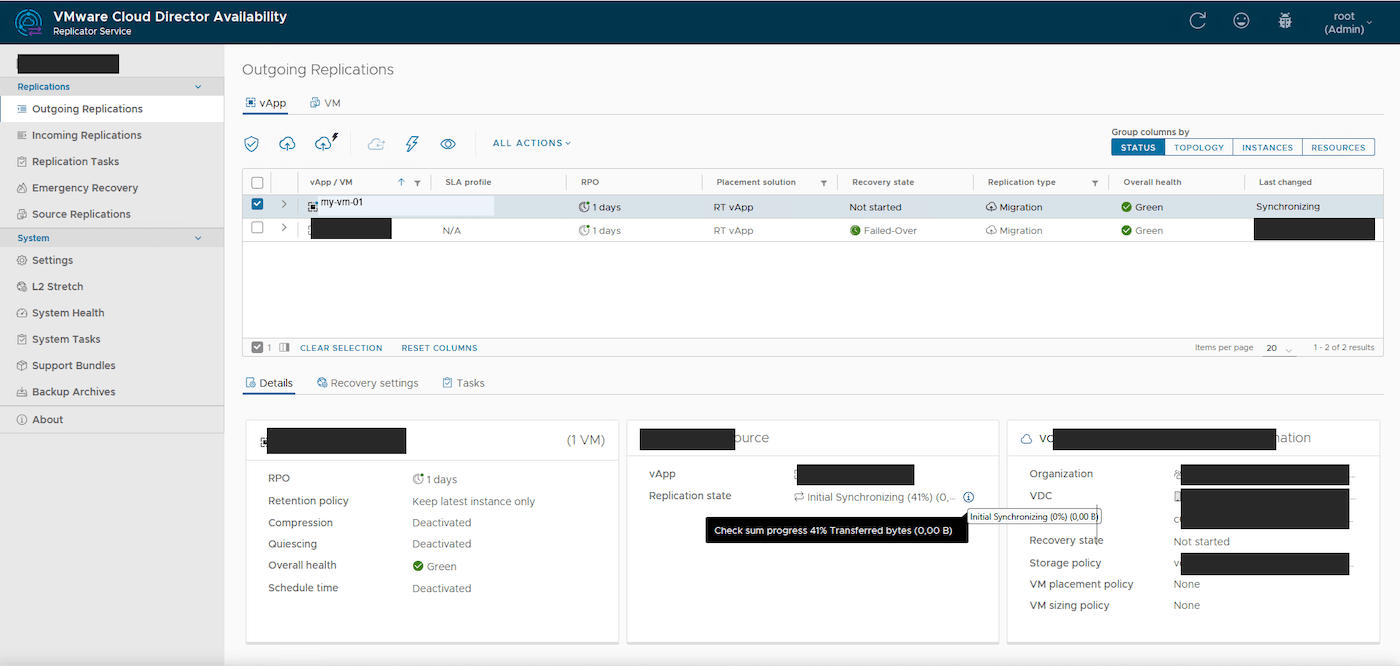
The replication details show:
- the checksum progress (block verification);
- the transferred bytes;
- the status of the source-side and target-side components.
Wait until the replication reaches the Healthy state before triggering the final migration. The initial replication time depends on disk sizes and available bandwidth.
When the replication is ready to be cut over, the state becomes Healthy and the Recovery state shows Not started:
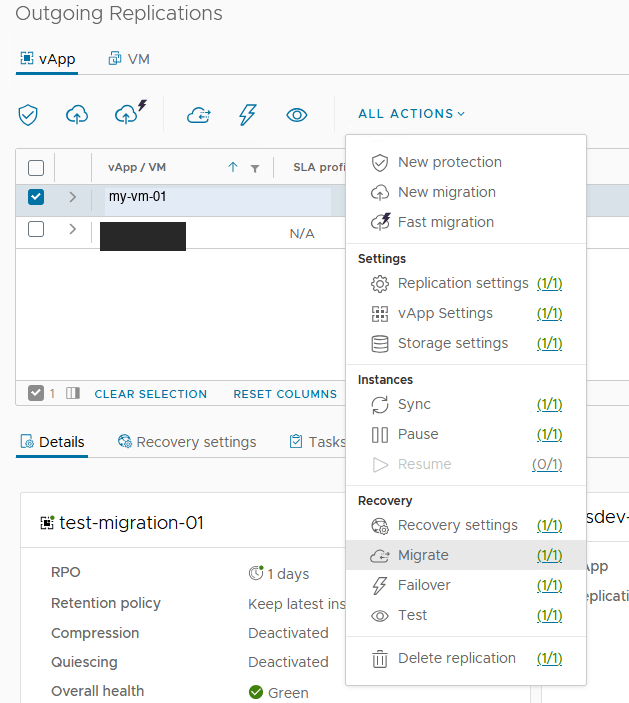
Step 3: Trigger the migration
Once the replication is in the Healthy state, you can trigger the cutover.
Select the replication in the list, then click ALL ACTIONS > Migrate.
Step 3.1: Migration settings
Configure the cutover parameters:
- Power settings: tick
Power on recovered vAppsto automatically start the VMs on the target side after the cutover; - Network Settings:
Apply preconfigured network settings on migrate: applies the network settings defined in the recovery profile;Connect all VMs to network: simply reconnects the VMs to the chosen network;
- VDC policy settings: placement, sizing and storage policies to use on the target.
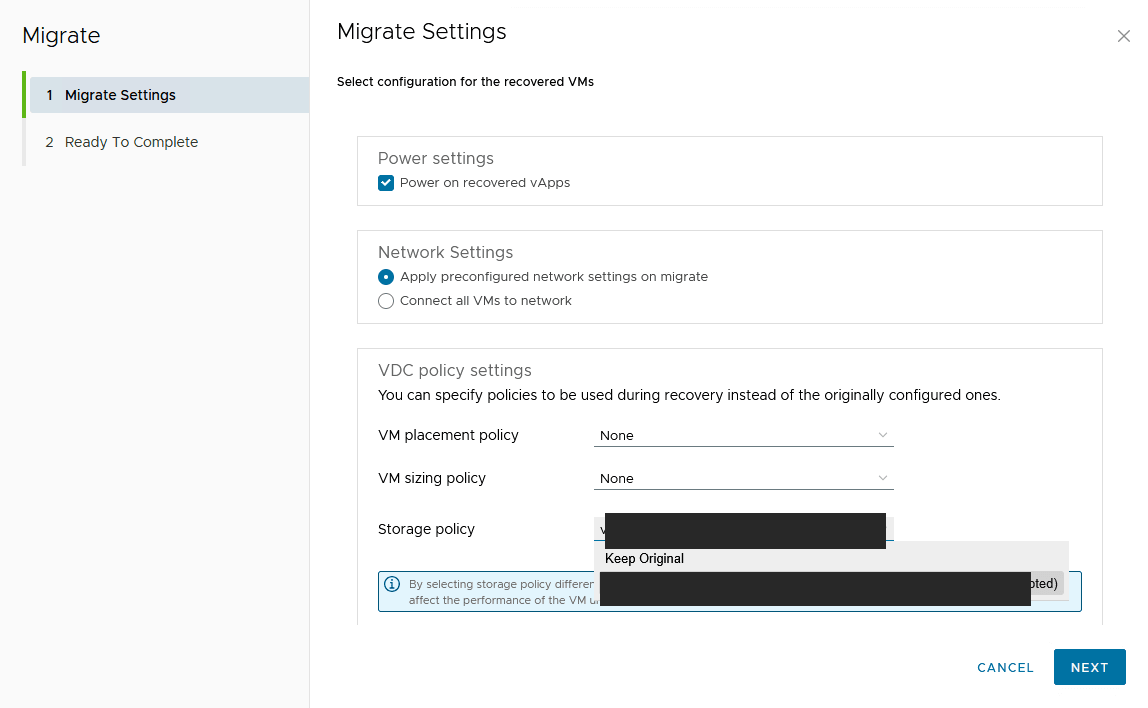
Click Next.
Step 3.2: Confirmation
Check the summary:
- the vApps to migrate;
- the recovery site;
- the network settings;
- the storage policy.
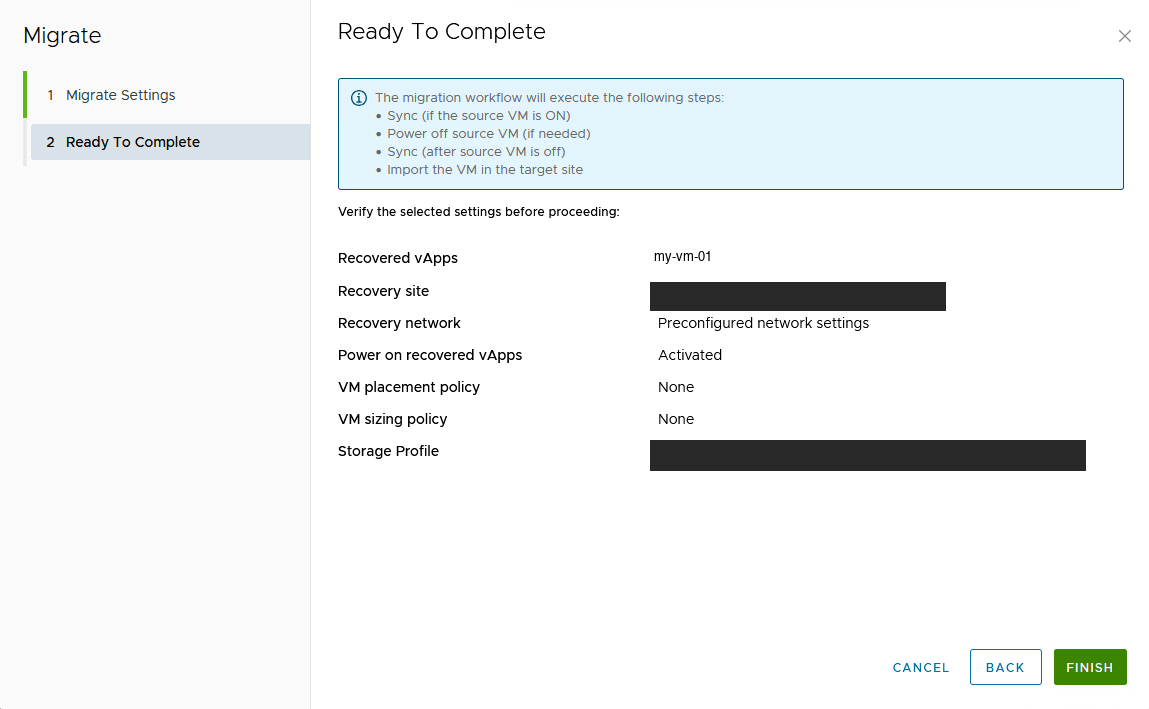
The migration workflow automatically performs the following steps:
- Final synchronisation (if the source VM is powered on);
- Shutdown of the source VM;
- Final synchronisation (once the source VM is off);
- Import of the VM into the target site.
Click Finish to start the migration.
Monitoring the migration
The cutover appears in the replication list with the Migrate state and a progress percentage:
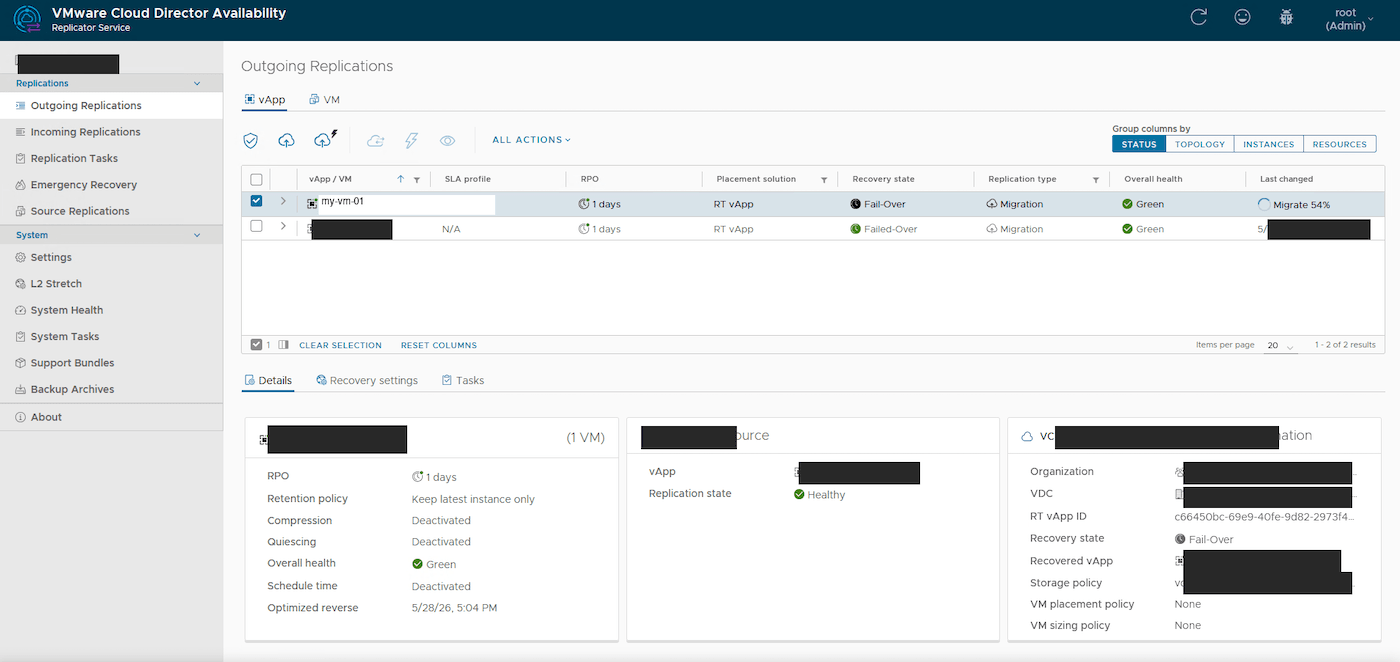
Migration completed
Once the migration is finalised, the VM appears in your Public VCF as-a-Service organisation and the replication state changes to Failed-Over in the Incoming Replications view of the VCD portal:
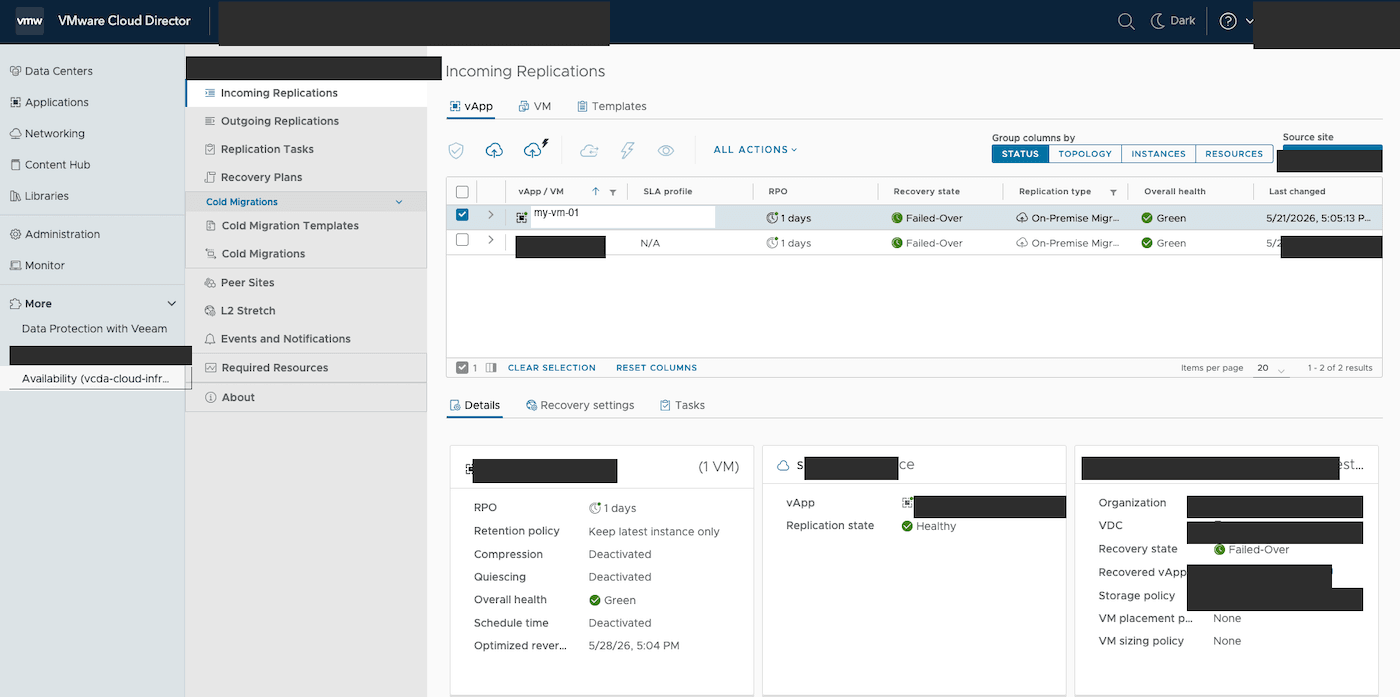
You can now find your migrated VMs directly in your Public VCF as-a-Service vDC, ready to use.
Go further
- Enable the VCDA migration option on your Public VCF as-a-Service organisation
- Public VCF as-a-Service Migration with VCDA - Getting Started
- How to use the Public VCF as-a-Service user interface
- Official VMware Cloud Director Availability documentation
For training or technical assistance implementing our solutions, contact your sales representative or visit our Professional Services page to request a quote and have your project analysed by our experts.
Join our community of users.