In this tutorial, we are using Stash to backup and restore persistent volumes on an OVHcloud Managed Kubernetes cluster.
Stash is an open source tool to safely backup and restore, perform disaster recovery, and migrate Kubernetes persistent volumes.
We are using our Public Cloud's Swift Object Storage with the Swift S3 API as storage backend for Stash. Stash uses the Amazon S3 protocol to store the cluster backups on a S3 * compatible object storage.
Before you begin
This tutorial presupposes that you already have a working OVHcloud Managed Kubernetes cluster, and some basic knowledge of how to operate it. If you want to know more on those topics, please look at the OVHcloud Managed Kubernetes Service Quickstart.
Stash needs an Object Storage bucket as storage backend to store the data from your cluster.
In this section you will create your Object Storage bucket on Swift.
Prepare your working environment
Before creating your Object Storage bucket you need to:
You should now have access to your OpenStack RC file, with a filename like <user_name>-openrc.sh, and the username and password for your OpenStack account.
Set the OpenStack environment variables
Set the environement variables by sourcing the OpenStack RC file:
source <user_name>-openrc.sh
The shell will ask you for your OpenStack password:
$ source <user_name>-openrc.shPlease enter your OpenStack Password for project <project_name> as user <user_name>:
Create EC2 credentials
Object Storage tokens are different, you need 2 parameters (access and secret) to generate an Object Storage token.
These credentials will be safely stored in Keystone. To generate them with python-openstack client:
openstack ec2 credentials create
Please write down the access and secret parameters:
Complete and write down the configuration for awscli into ~/aws/config:
[profile default]aws_access_key_id = <access fetched in previous step>aws_secret_access_key = <secret fetched in previous step>region = <public cloud region in lower case>endpoint_url = https://s3.<public cloud region without digit>.cloud.ovh.nets3 = signature_version = s3v4 addressing_style = virtual
Create an Object Storage bucket for Stash
Create a new bucket:
aws --profile default s3 mb s3://s3-stash
Create a Kubernetes Secret to store Object Storage credentials
To give Stash access to the Object Storage bucket, you need to put the credentials (the access_key and the secret_access_key) into a Kubernetes Secret.
$ helm repo add appscode https://charts.appscode.com/stable/"appscode" has been added to your repositories$ helm repo updateHang tight while we grab the latest from your chart repositories...[...]...Successfully got an update from the "appscode" chart repository[...]Update Complete. ⎈Happy Helming!⎈$ helm search repo appscode/stash --version v2021.11.24NAME CHART VERSION APP VERSION DESCRIPTIONappscode/stash v2021.11.24 v2021.11.24 Stash by AppsCode - Backup your Kubernetes nati...appscode/stash-catalog v2021.11.24 v2021.11.24 Stash Catalog by AppsCode - Catalog of Stash Ad...appscode/stash-crds v2021.11.24 v2021.11.24 Stash Custom Resource Definitionsappscode/stash-metrics v2021.11.24 v2021.11.24 Stash State Metrics$ helm install stash appscode/stash \ --version v2021.11.24 \ --namespace kube-system \ --set features.community=true \ --set-file global.license=stash-community-license-c187ab99-64a1-4f65-9871-7e5168f48e8f.txtW1221 14:36:32.478119 35817 warnings.go:70] policy/v1beta1 PodSecurityPolicy is deprecated in v1.21+, unavailable in v1.25+W1221 14:36:35.308665 35817 warnings.go:70] policy/v1beta1 PodSecurityPolicy is deprecated in v1.21+, unavailable in v1.25+W1221 14:36:35.484798 35817 warnings.go:70] policy/v1beta1 PodSecurityPolicy is deprecated in v1.21+, unavailable in v1.25+W1221 14:36:35.526044 35817 warnings.go:70] policy/v1beta1 PodSecurityPolicy is deprecated in v1.21+, unavailable in v1.25+W1221 14:36:35.838301 35817 warnings.go:70] spec.template.spec.nodeSelector[beta.kubernetes.io/arch]: deprecated since v1.14; use "kubernetes.io/arch" insteadW1221 14:36:35.838468 35817 warnings.go:70] spec.template.spec.nodeSelector[beta.kubernetes.io/os]: deprecated since v1.14; use "kubernetes.io/os" insteadNAME: stashLAST DEPLOYED: Tue Dec 21 14:36:31 2021NAMESPACE: kube-systemSTATUS: deployedREVISION: 1TEST SUITE: NoneNOTES:Get the Stash operator pods by running the following command: kubectl --namespace kube-system get pods
Verify installation
As suggested during the chart install, to check if Stash operator pods have started, we can run the suggested command and customize it in order to see only our stash Pod:
kubectl get pods -A -l app.kubernetes.io/name=stash-community
If everything is OK, you should get a stash-stash-community pod with a status Running.
kubectl get pods -A -l app.kubernetes.io/name=stash-communityNAMESPACE NAME READY STATUS RESTARTS AGEkube-system stash-stash-community-84b7f84b7f-ctzv7 2/2 Running 0 35s
Now, to confirm CRD groups have been registered by the operator, run the following command:
Stash provides a CLI using kubectl plugin to work with the stash Objects quickly.
Download pre-build binaries from stashed/cli Githhub release and put the binary to some directory in your PATH.
Volume Snapshot with Stash
A detailed explanation of Volume Snapshot with Stash is available in the official documentation.
In Kubernetes, a VolumeSnapshot represents a snapshot of a volume on a storage system. It was introduced as an Alpha feature in Kubernetes v1.12 and has been promoted to an Beta feature in Kubernetes 1.17.
In order to support VolumeSnapshot, your PersistenVolumes need to use a StorageClass with a CSI driver that supports the feature. Currently OVHcloud Managed Kubernetes cluster propose you two of these StorageClasses: csi-cinder-classic and csi-cinder-high-speed.
You also need a compatible VolumeSnapshotClass, in our case csi-cinder-snapclass.
An example: Nginx server with persistent logs
In this guide we are going to use a simple example: a small Nginx web server with a PersistentVolume to store the access logs.
Copy the following description to a nginx-example.yml file:
If you look attentively to the deployment part of this manifest, you will see that we have defined a .spec.strategy.type. It specifies the strategy used to replace old Pods by new ones, and we have set it to Recreate, so all existing Pods are killed before new ones are created.
We do so as the Storage Class we are using, csi-cinder-high-speed, only supports a ReadWriteOnce, so we can only have one pod writing on the Persistent Volume at any given time.
We can check if the Pod is running:
kubectl get pod -n nginx-example
Wait until you get an external IP:
kubectl -n nginx-example get svc nginx-service -w
And do some calls to the URL to generate some access logs:
curl -I <EXTERNAL_IP>
In my case:
$ kubectl apply -f nginx-example.ymlnamespace/nginx-example createdpersistentvolumeclaim/nginx-logs createddeployment.apps/nginx-deployment createdservice/nginx-service created$ kubectl get pod -n nginx-exampleNAME READY STATUS RESTARTS AGEnginx-deployment-766444c4d9-cxd2p 1/1 Running 0 32s$ kubectl -n nginx-example get svc nginx-service -wNAME TYPE CLUSTER-IP EXTERNAL-IP PORT(S) AGEnginx-service LoadBalancer 10.3.39.164 <pending> 80:31734/TCP 49snginx-service LoadBalancer 10.3.39.164 51.210.210.247 80:31734/TCP 3m$ curl -I 51.210.210.247HTTP/1.1 200 OKServer: nginx/1.7.9Date: Tue, 21 Dec 2021 14:16:20 GMTContent-Type: text/htmlContent-Length: 612Last-Modified: Tue, 23 Dec 2014 16:25:09 GMTConnection: keep-aliveETag: "54999765-264"Accept-Ranges: bytes$ curl -I 51.210.210.247HTTP/1.1 200 OKServer: nginx/1.7.9Date: Tue, 21 Dec 2021 14:16:31 GMTContent-Type: text/htmlContent-Length: 612Last-Modified: Tue, 23 Dec 2014 16:25:09 GMTConnection: keep-aliveETag: "54999765-264"Accept-Ranges: bytes
Verify the logs
Now we need to connect to the pod to read the log file and verify that our logs are written.
A Repository is a Kubernetes CustomResourceDefinition (CRD) which represents backend information in a Kubernetes native way. You have to create a Repository object for each backup target. A backup target can be a workload, database or a PV/PVC.
To create a Repository CRD, you have to provide the storage secret that we have created earlier in spec.backend.storageSecretName field. You will also need to define spec.backend.s3.prefix, to choose the folder inside the backend where the backed up snapshots will be stored
Create a repository.yaml file, replacing <public cloud region> with the region, without digits and in lowercase (e.g. gra):
$ kubectl apply -f repository.yamlrepository.stash.appscode.com/s3-repo created
Create a BackupConfiguration
A BackupConfiguration is a Kubernetes CustomResourceDefinition (CRD) which specifies the backup target, parameters(schedule, retention policy etc.) and a Repository object that holds snapshot storage information in a Kubernetes native way.
You have to create a BackupConfiguration object for each backup target. A backup target can be a workload, database or a PV/PVC.
To back up our PV we will need to create a backup-configuration.yaml file, where we describe the Persistent Volumes we want to back up, the repository we intend to use and the backing up schedule (in crontab format):
$ kubectl apply -f backup-configuration.yamlbackupconfiguration.stash.appscode.com/nginx-backup created
Verify CronJob
If everything goes well, Stash will create a CronJob to take periodic snapshot of nginx-logs volume of the deployment with the schedule specified in spec.schedule field of BackupConfiguration CRD (a backup every 5 minutes).
Check that the CronJob has been created:
kubectl -n nginx-example get cronjob
In my case
$ kubectl -n nginx-example get cronjobNAME SCHEDULE SUSPEND ACTIVE LAST SCHEDULE AGEstash-backup-nginx-backup */5 * * * * False 0 33s 3m36s
Wait for BackupSession
The stash-backup-nginx-backupCronJob will trigger a backup on each schedule by creating a BackupSession CRD.
Wait for the next schedule for backup. Run the following command to watch BackupSession CRD:
We can see above that the backup session has succeeded. Now, we are going to verify that the VolumeSnapshot has been created and the snapshots has been stored in the respective backend.
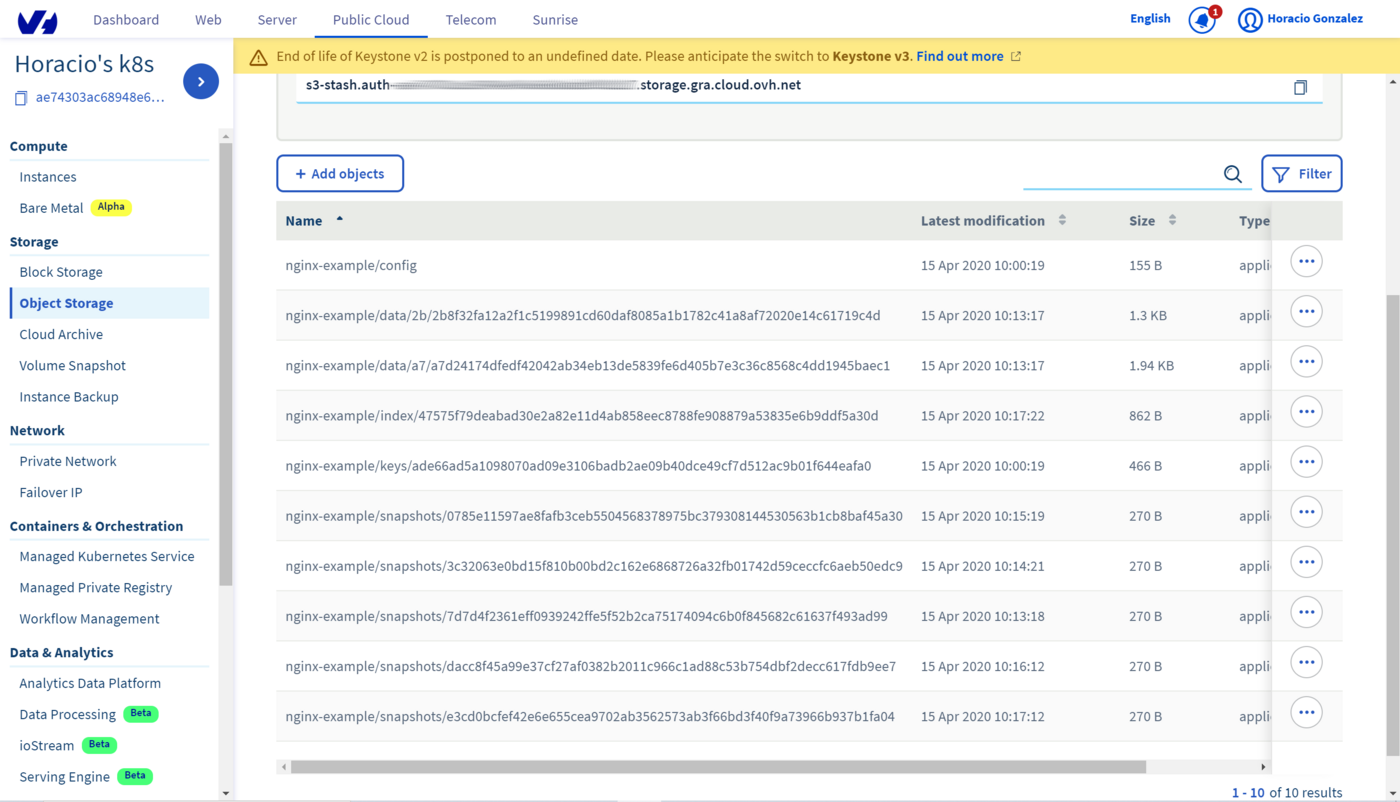
Verifying Volume Snapshots in OVHcloud Cloud Control Panel
The snapshots are visible on the . To see thmn, go to Object Storage section, where you will find the Object Storage bucket you have created. By clicking on the bucket you will see the list of objects, including all the snapshot beginning with the /backup/demo/deployment/stash-demo we had defined in the Repository:
Restore PVC from VolumeSnapshot
This section will show you how to restore the PVCs from the snapshots we have taken in the previous section.
Stop Snapshotting
Before restoring we need to pause the BackupConfiguration to prevent any snapshotting during the restore process. With the BackupConfiguration, Stash will stop taking any further backup for nginx-deployment.
Now you need to create a RestoreSession CRD to restore the PVCs from the last snapshot.
A RestoreSession is a Kubernetes CustomResourceDefinition (CRD) which specifies a target to restore and the source of data that will be restored in a Kubernetes native way.
Create a restore-session.yaml file:
apiVersion: stash.appscode.com/v1beta1kind: RestoreSessionmetadata: name: nginx-restore namespace: nginx-examplespec: repository: name: s3-repo target: # target indicates where the recovered data will be stored ref: apiVersion: apps/v1 kind: Deployment name: nginx-deployment volumeMounts: - name: nginx-logs mountPath: /var/log/nginx
And apply it to your cluster:
kubectl apply -f restore-session.yaml
And wait for the RestoreSession to succeed:
kubectl -n nginx-example get restoresession nginx-restore
If you need training or technical assistance to implement our solutions, contact your sales representative or click on this link to get a quote and ask our Professional Services experts for assisting you on your specific use case of your project.
*: S3 is a trademark of Amazon Technologies, Inc. OVHcloud’s service is not sponsored by, endorsed by, or otherwise affiliated with Amazon Technologies, Inc.