Log in to the SNC Regional Panel for your region.
In the left-hand menu, click on Compute, then on the Create server button.
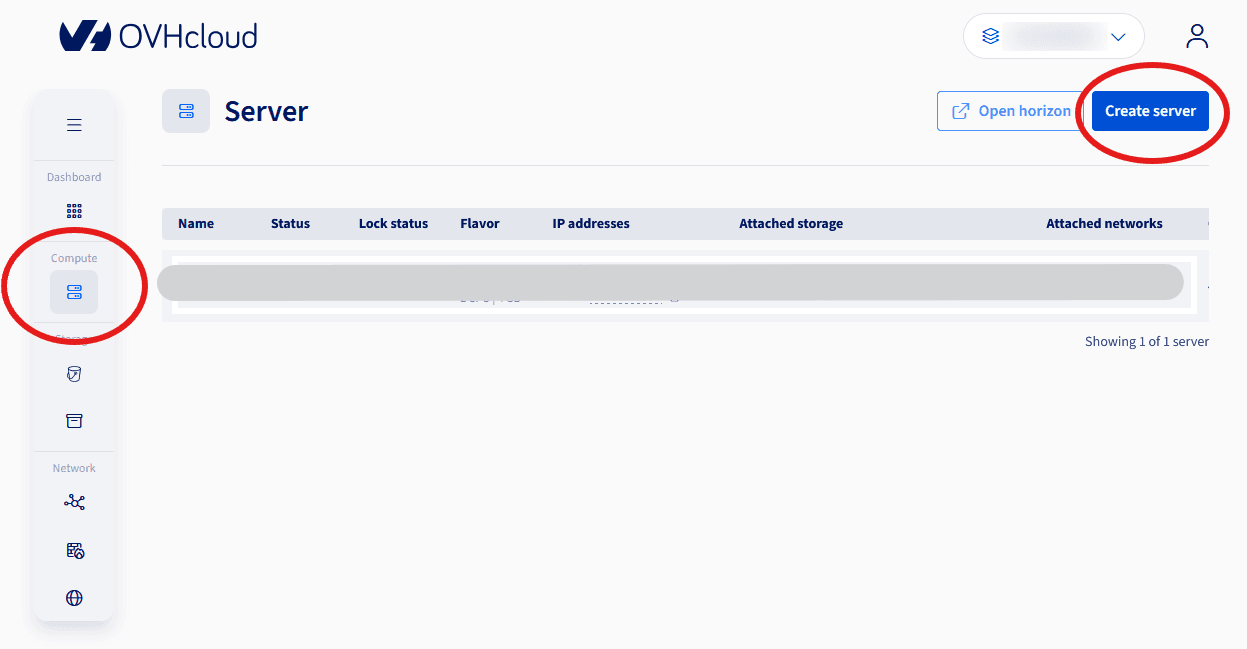
Then define the various configuration elements:
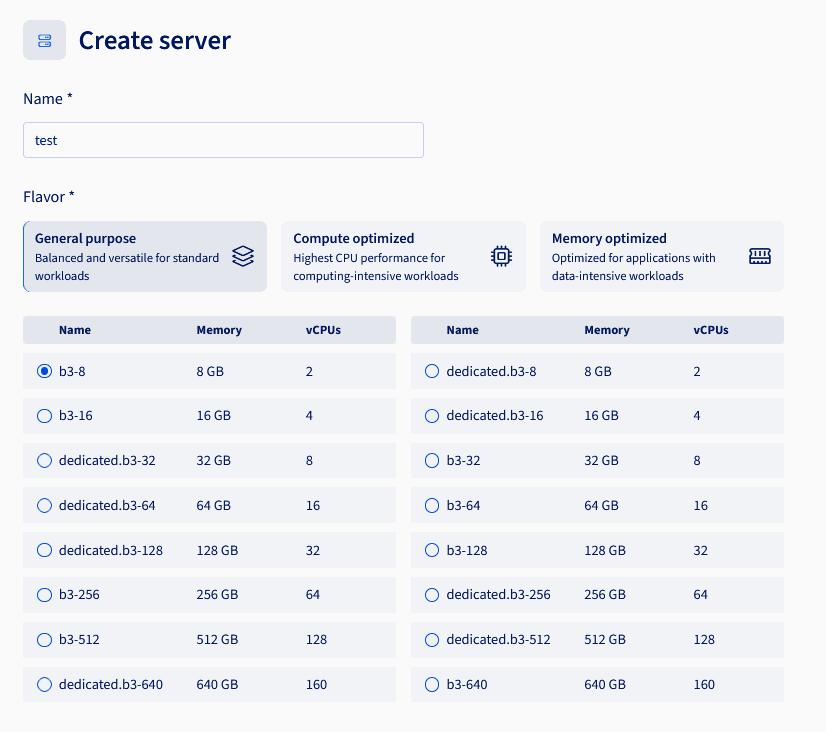
- Name the instance.
- Choose the flavor. 3 classes of flavors are offered:
- General purpose, for standard usage.
These instances come with 4 GiB of memory per vCPU.
- Compute optimized, for compute-intensive use cases.
They have twice as many vCPUs per GiB of memory.
- Memory optimized, for use cases requiring a lot of memory.
They have twice as much memory per vCPU as the General purpose range.
Dedicated instances guarantee that the instances will run on hypervisors dedicated to the customer.
The hypervisor will not be shared with any other customer; in return, the hypervisor is billed in full, regardless of the number of instances it hosts.
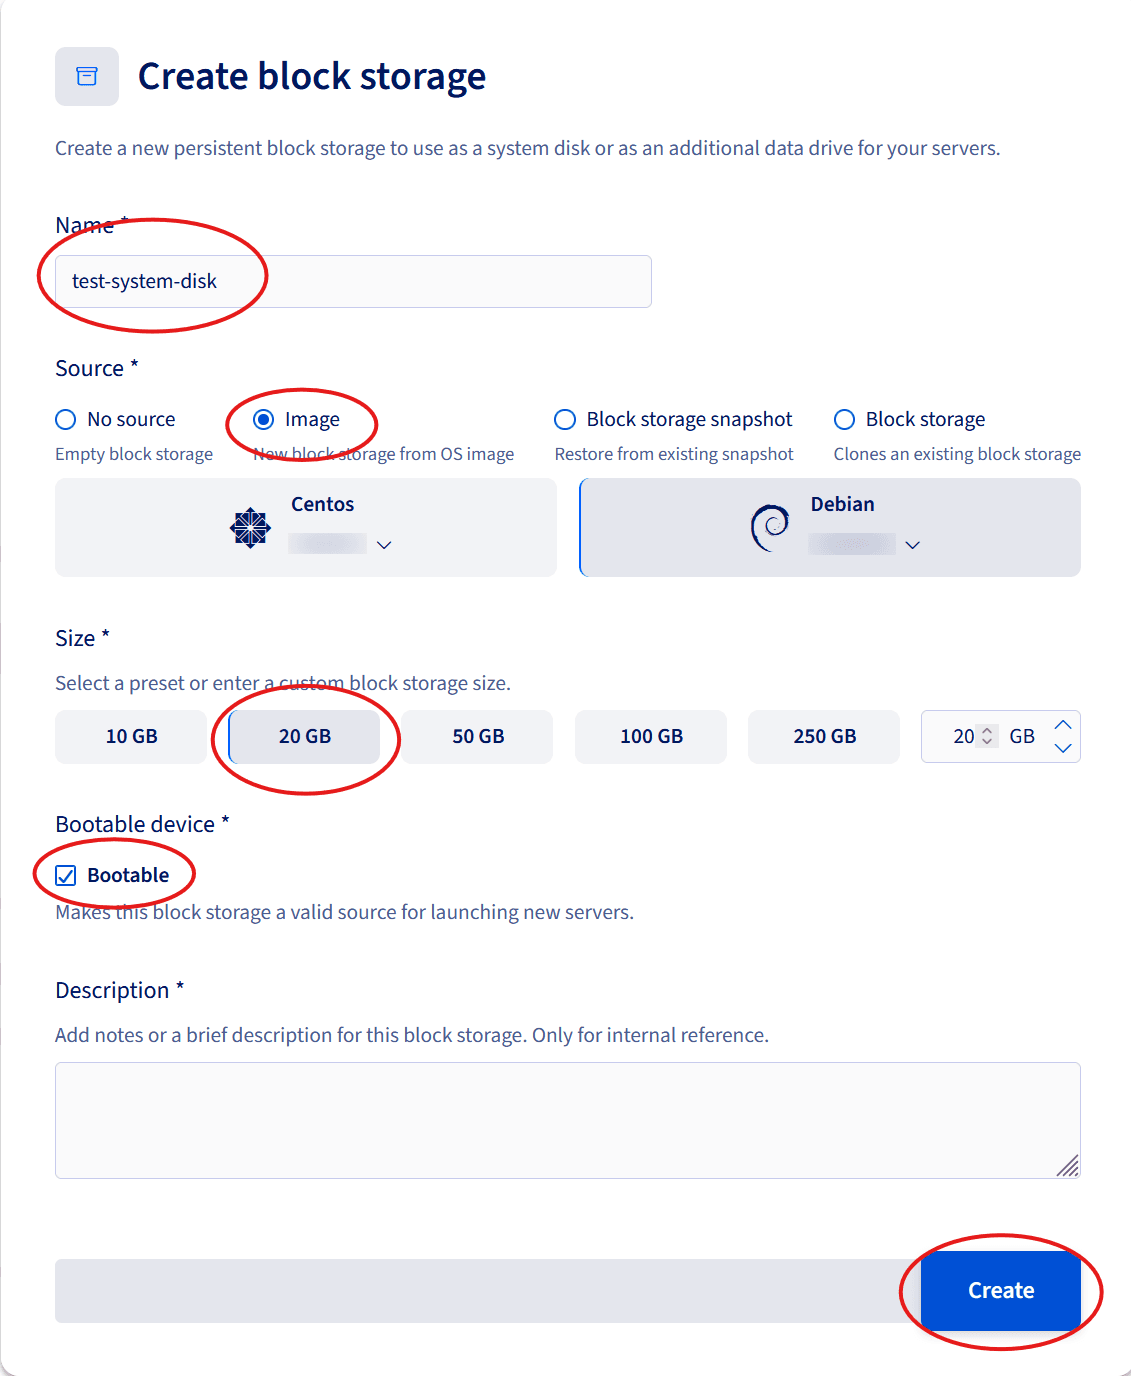
- Click on
Create block storage.
- Name the Block Storage.
- Select
Image and choose the image to deploy.
Only OVHcloud-managed images are available. To deploy your own image, previously added to the image library, you will need to use Horizon or the CLI mode.
- Choose the volume size. It must be at least the size required by the image.
Tick the
Bootable checkbox and click the Create button.
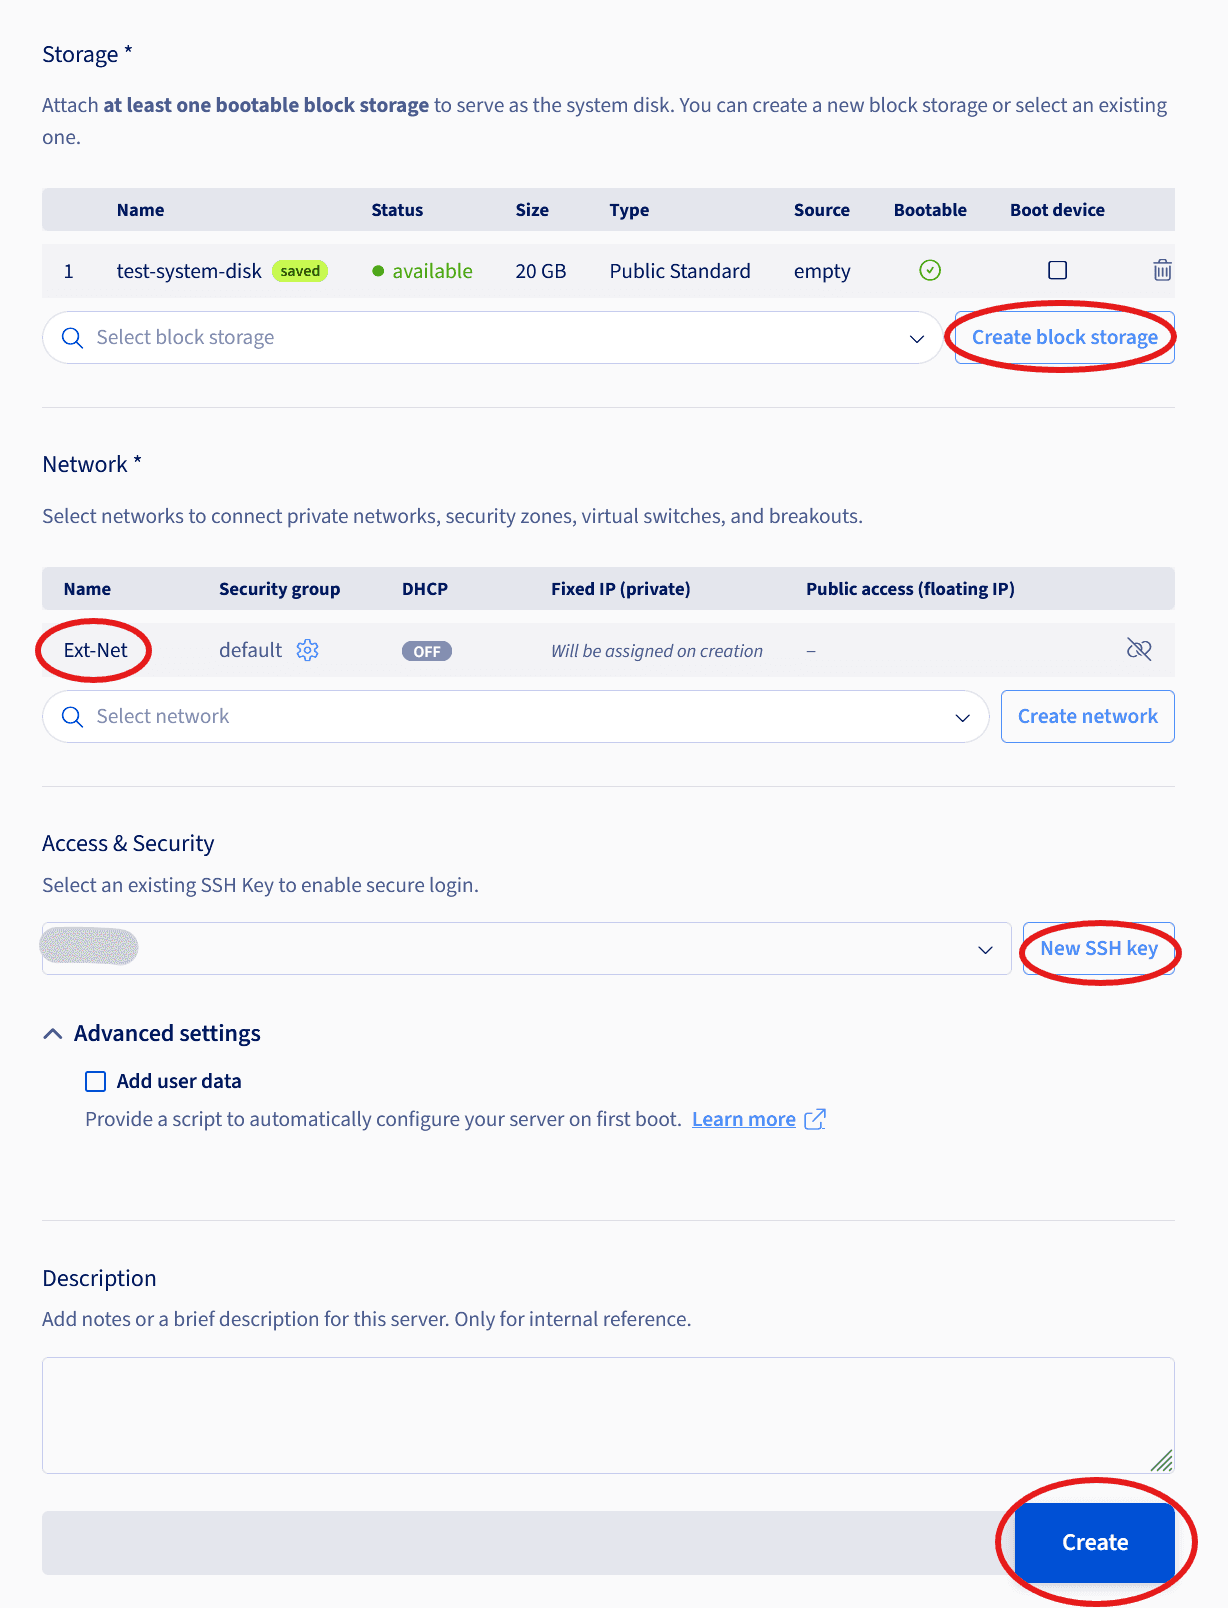
- Choose the network the instance will be attached to.
If the instance must be reached from the public network, choose the
Ext-Net network.
- Choose the SSH key. The instance can only be reached via SSH with a key.
If no key has been created yet, click on
New SSH key.
- Click
Create once the volume is ready (which may take a while depending on the image size).
Wait for the instance to reach the active status.
Its public IP address is displayed in the IP addresses column.

Then connect to it via SSH (see Connecting to the instance).
Log in to the OpenStack console by clicking the Open horizon button from the console >BETA_.

First, create a key pair by importing the SSH public key.
In the left-hand menu, go to the Compute > Key Pairs section and click the Import Public Key button.
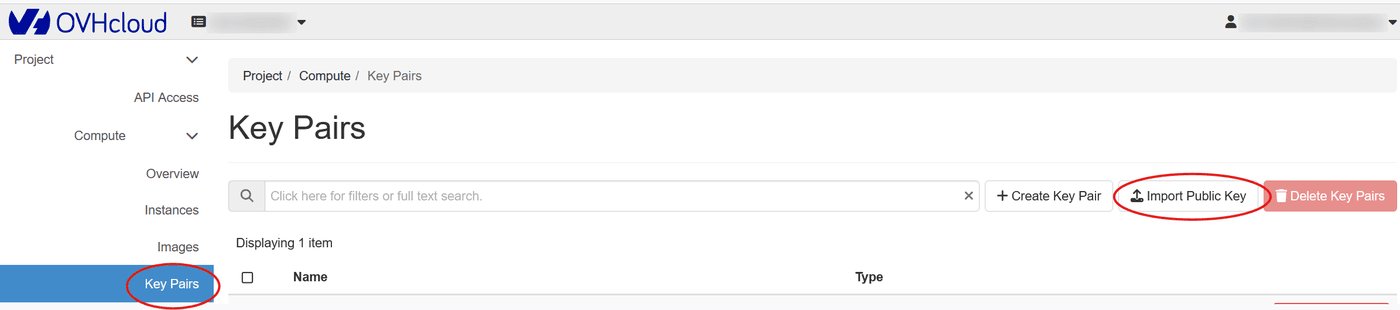
Import your key.
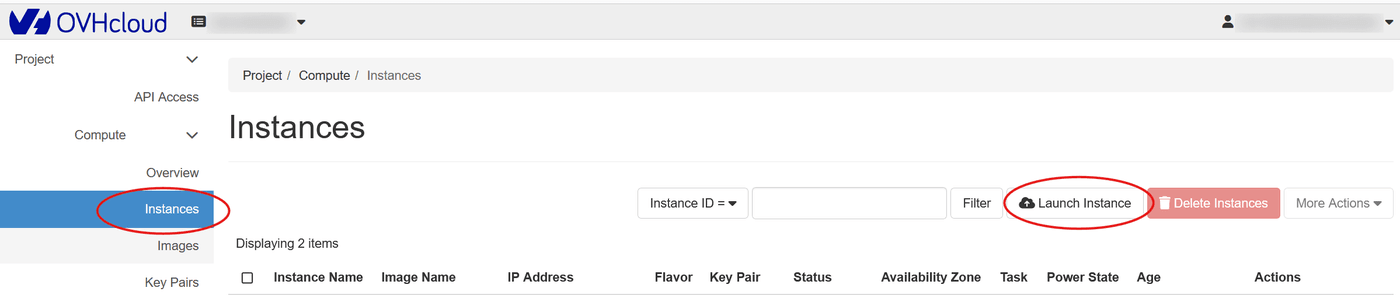
In the left-hand menu, go to the Compute > Instances section and click the Launch Instance button.
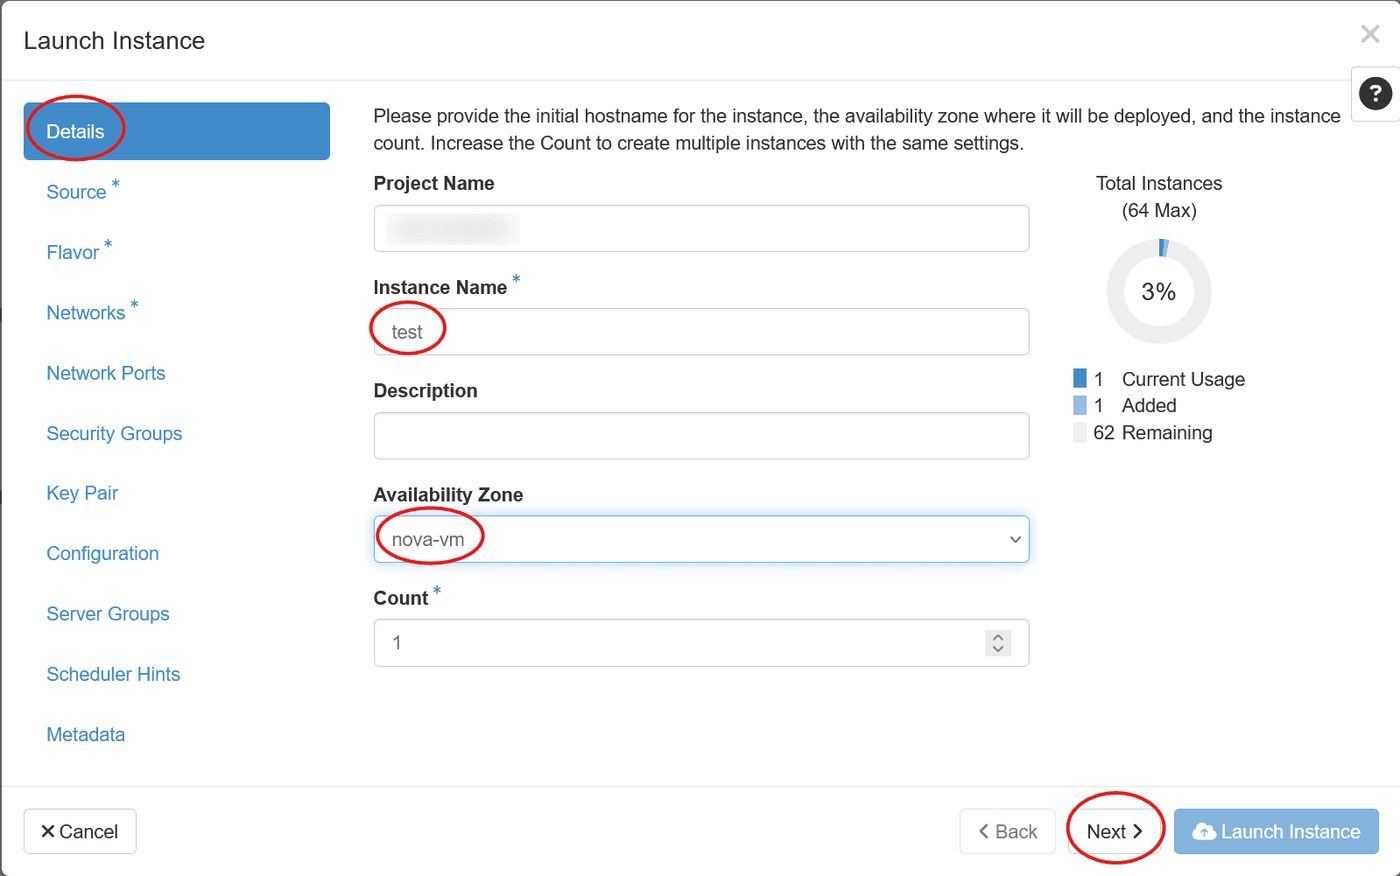
In the first section (Details):
- name the instance
- choose
nova-vm as the Availability Zone
- click
Next
In the next section (Source):
- in the Select Boot Source field, choose
Image and, above all, click Yes for Create New Volume
- choose the volume size, which must be at least equal to the one required for the image, and click
Yes for Delete Volume on Instance Delete
- choose the desired image and click the up arrow on the right of the image
- click
Next
Both OVHcloud-managed images and user-uploaded images are listed.
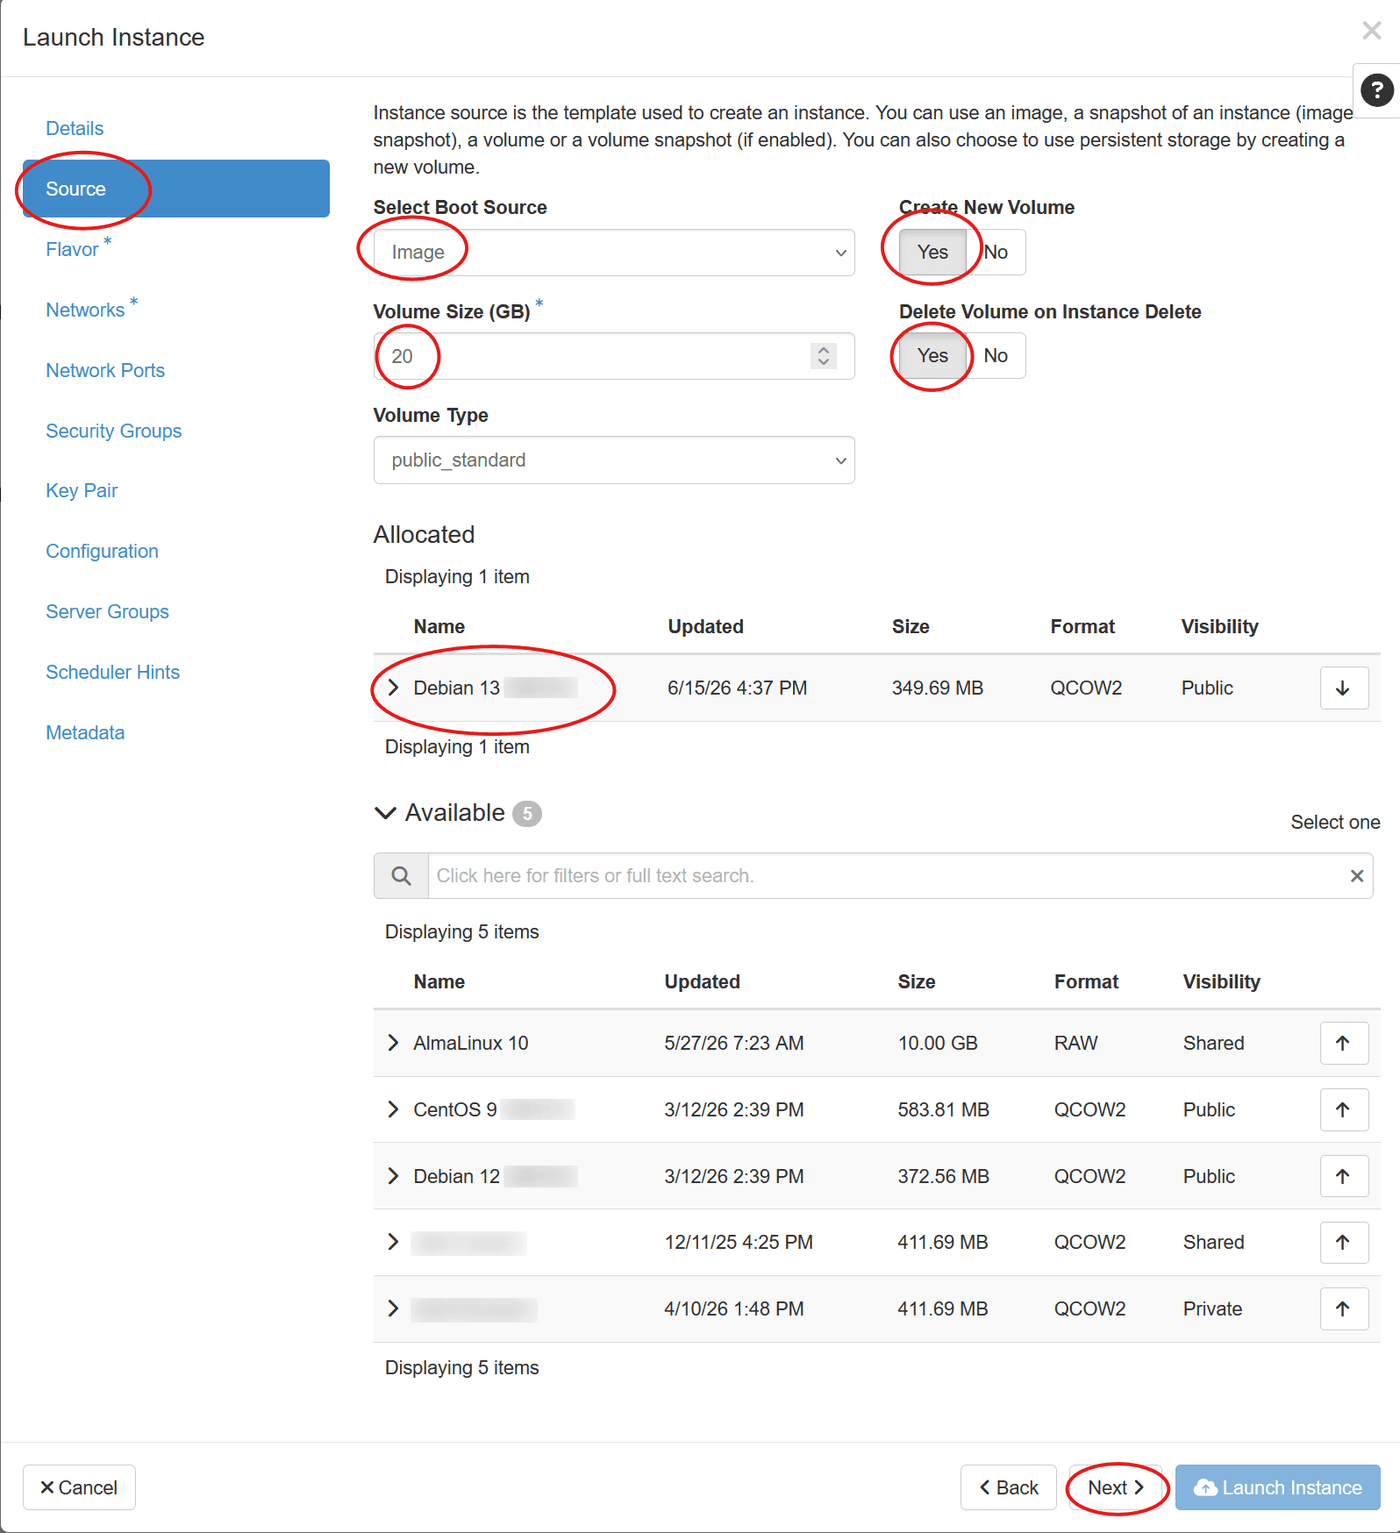
In the next section, choose the instance flavor by clicking the up arrow on the right of the desired flavor.
The flavor classes are described in the SNC Regional Panel tab.
Click Next.
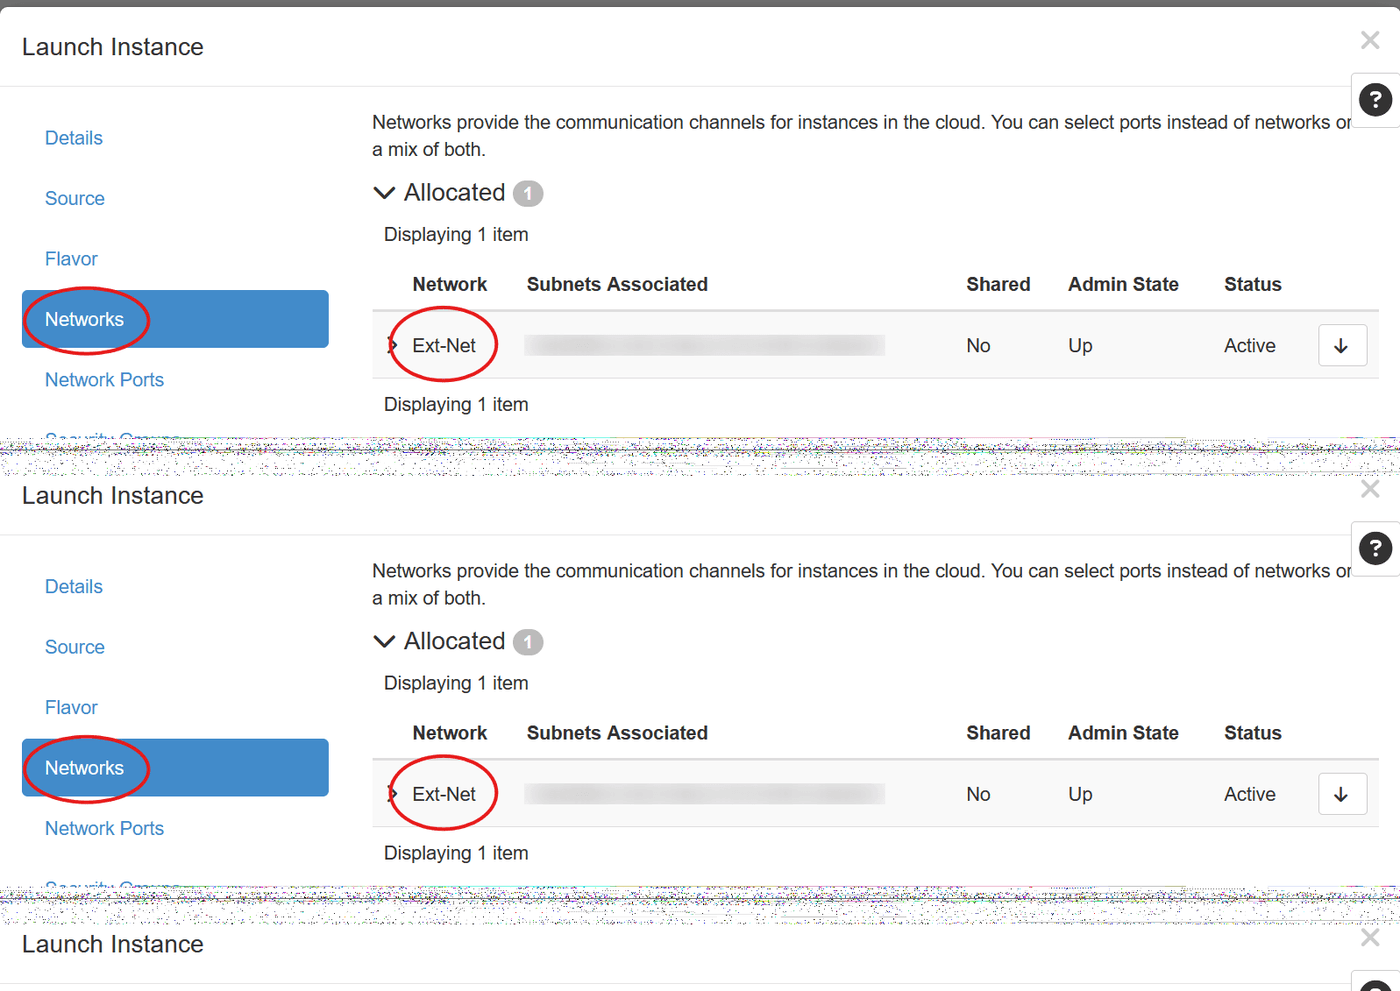
In the next section, choose the network the instance will be connected to.
If the instance must be reached from the public network, choose the Ext-Net network.
Then click Next until you reach the Key Pair section.
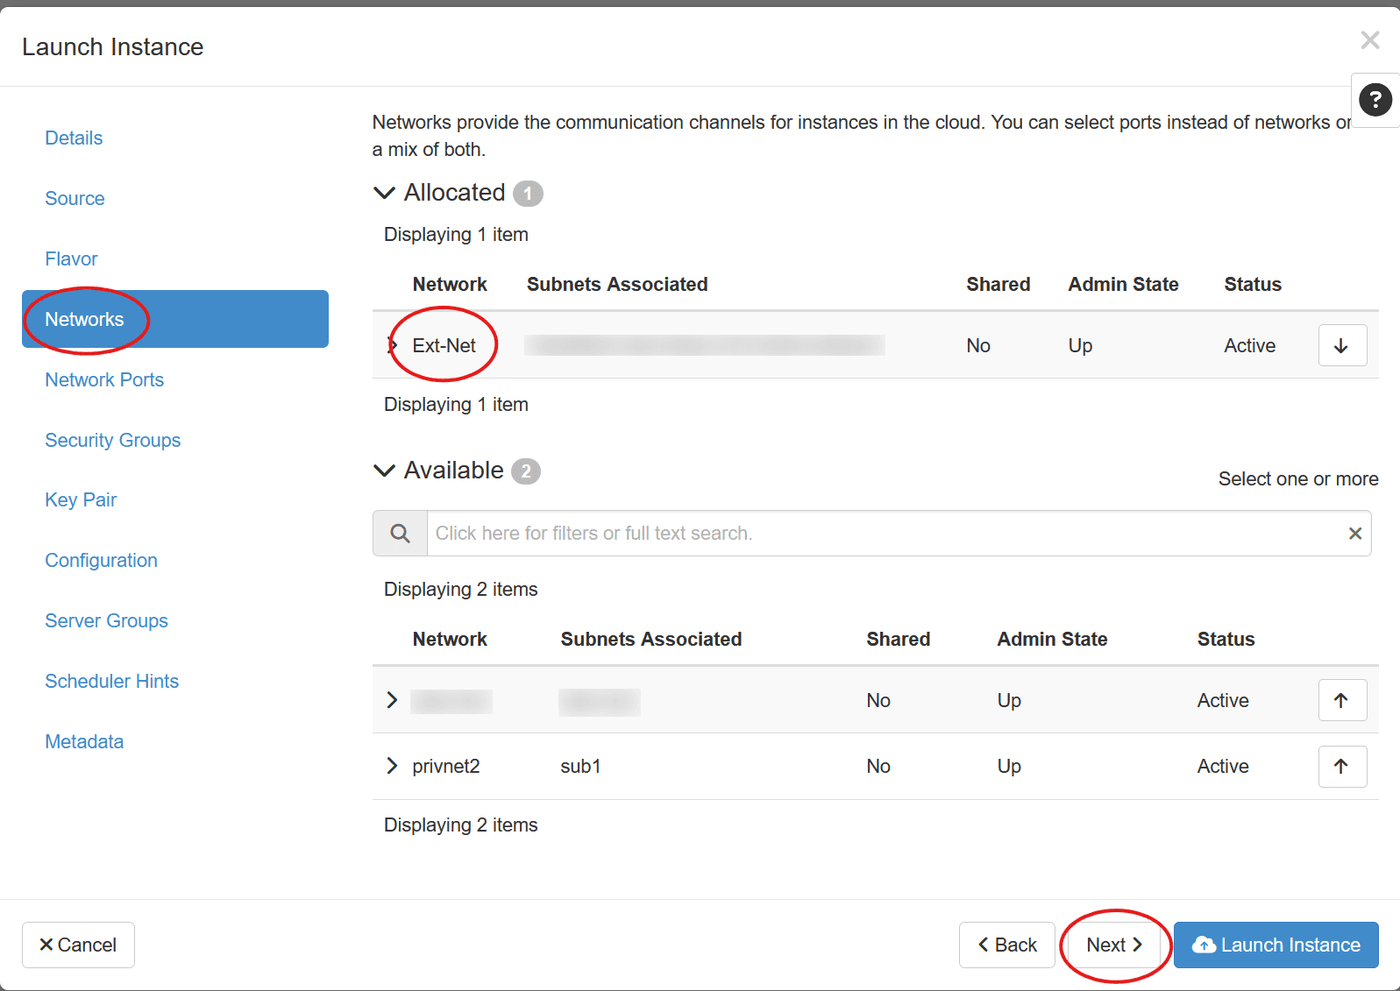
In the Key Pair section, choose the previously created key and click Launch Instance.
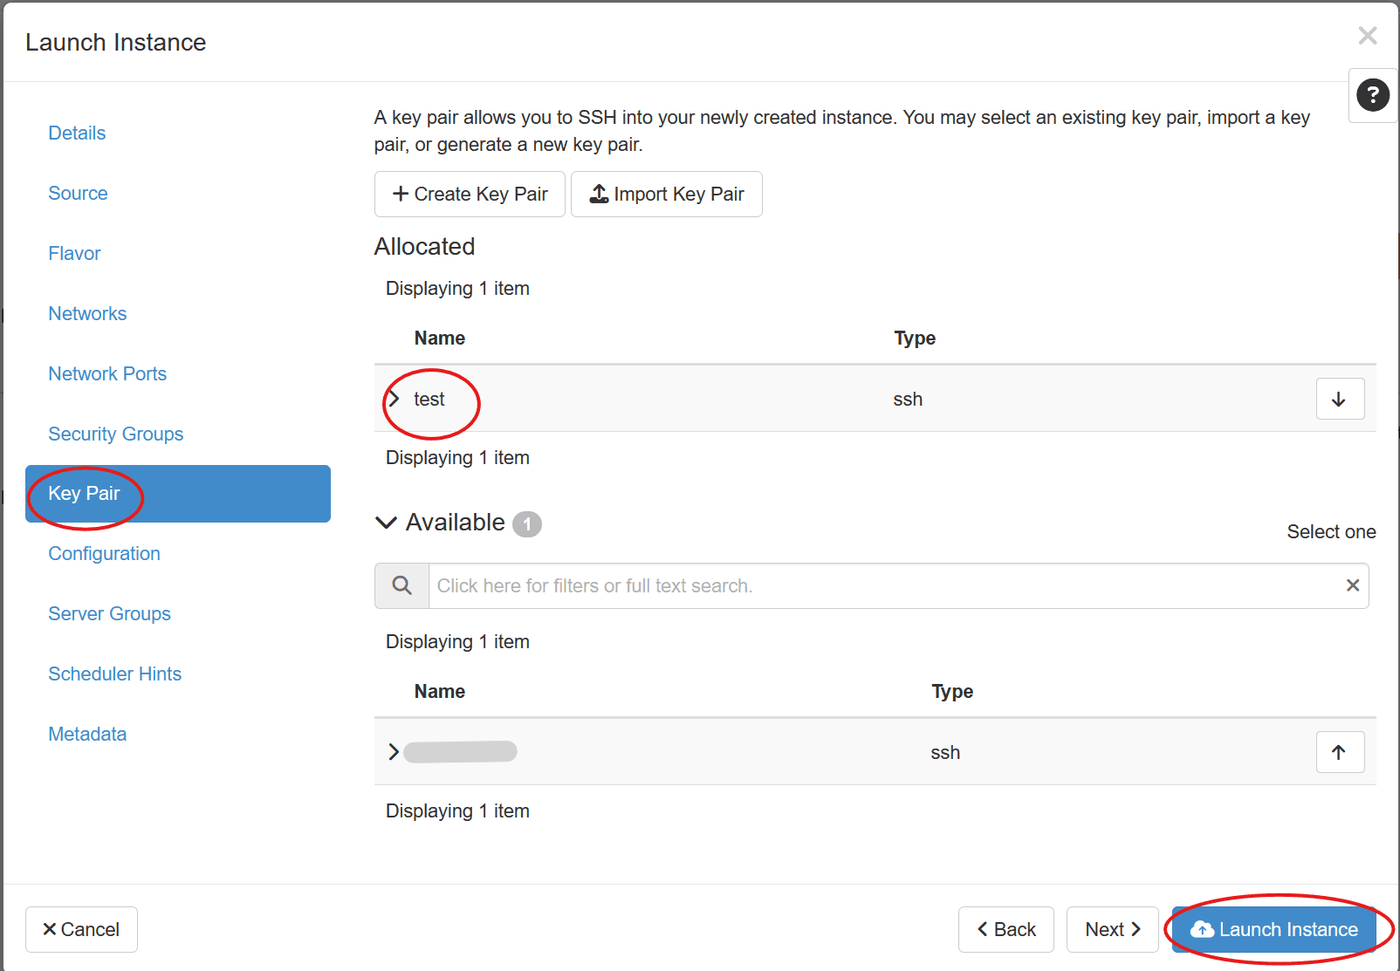
The instance is being created.
Wait for it to reach the Active status before connecting to it.
Its public IP address appears in the IP Address column.

Then connect to it via SSH (see Connecting to the instance).
First, install the OpenStack CLI.
Here is an example on Debian 13:
sudo apt update
sudo apt install -y python3 python3-pip python3-venv
python3 -m venv ~/.venvs/osc
. ~/.venvs/osc/bin/activate
pip install --upgrade pip
pip install python-openstackclient
echo "source ~/.venvs/osc/bin/activate" >> ~/.bashrc
Next, create an application credential which will provide the credentials needed to connect to the APIs.
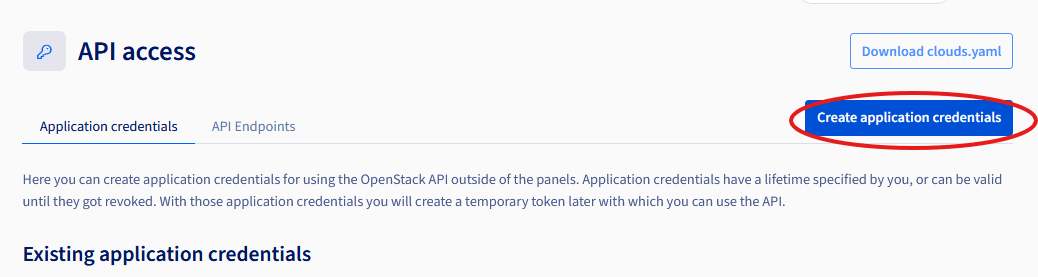
In the console >BETA_, click on the profile icon at the top right, go to the API access menu, then click the Create application credentials button.
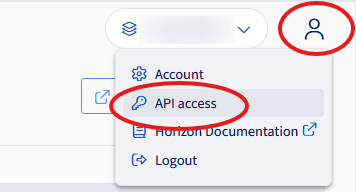
Name the application and set its expiration date (leave it empty to avoid the application expiring). Click Request credentials.
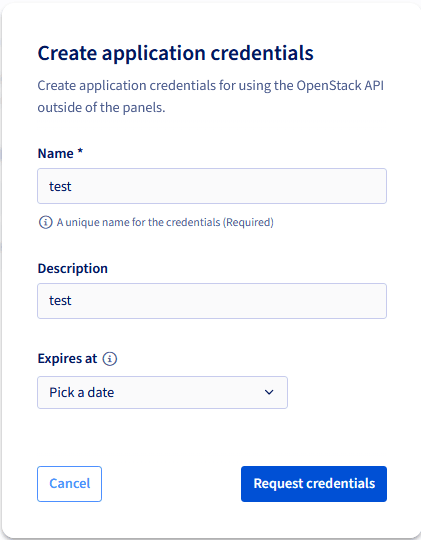
Copy the application secret now: it cannot be retrieved once the pop-up is closed.
The application appears in the list of applications.
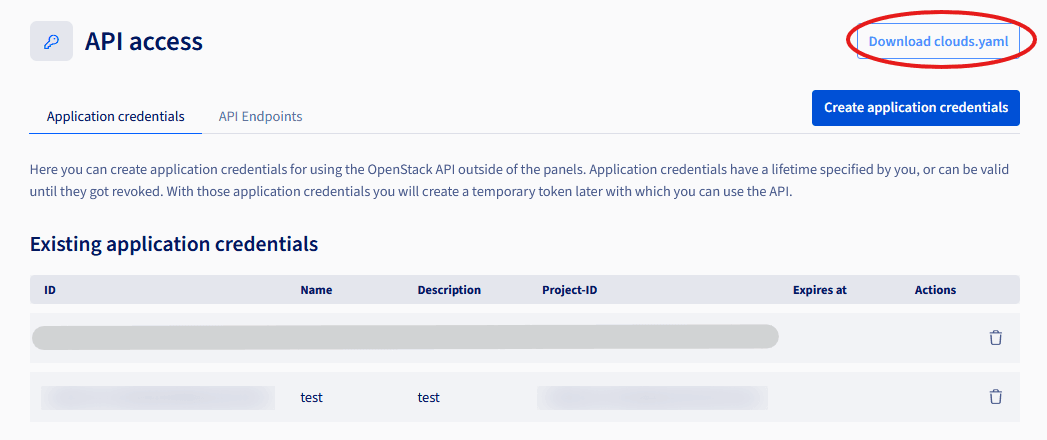
Finally, retrieve the clouds.yaml file by clicking Download clouds.yaml at the top right, fill in the required fields and click Download clouds.yaml.
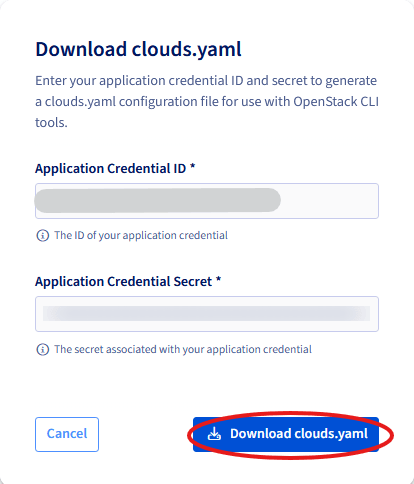
A clouds.yaml file will be downloaded to your workstation.
Then copy it to ~/.config/openstack/ (or to the directory you run the commands from). It will allow access to the OpenStack APIs.
Warning
The IP address from which the API connection is made must be "whitelisted" with OVHcloud.
To verify API access:
(osc) $ openstack server list
+--------------------------------------+------------+--------+----------------------------------------------+--------------------------+--------+
| ID                                   | Name       | Status | Networks                                     | Image                    | Flavor |
+--------------------------------------+------------+--------+----------------------------------------------+--------------------------+--------+
| 1d4bbfcc-48b5-4cb2-80ba-5aafd9f5a0eb | test       | ACTIVE | Ext-Net=192.0.2.10                          | N/A (booted from volume) | b3-8   |
+--------------------------------------+------------+--------+----------------------------------------------+--------------------------+--------+
First, create an SSH key from your public key:
(osc) $ openstack keypair create --type ssh --public-key my_key.pub test
+-------------+-------------------------------------------------+
| Field       | Value                                           |
+-------------+-------------------------------------------------+
| created_at  | None                                            |
| fingerprint | ae:e7:62:0a:cf:7f:18:55:d3:f6:5b:96:f5:53:a2:b0 |
| id          | test                                            |
| is_deleted  | None                                            |
| name        | test                                            |
| type        | ssh                                             |
| user_id     | 0123456789abcdef0123456789abcdef                |
+-------------+-------------------------------------------------+
Create the instance with the same values as in the other methods: b3-8, 20 GB disk, Debian 13 image:
(osc) $ openstack image list -f value -c Name | grep -i "debian 13"
Debian 13

(osc) $ openstack server create --flavor b3-8 --image "Debian 13" --boot-from-volume 20 --network Ext-Net --key-name test test
...
Info
No --availability-zone is needed here: the instance lands in the project's default availability zone, nova-vm — the same zone that is selected in the Horizon method.
Warning
Unlike the Horizon and OpenTofu methods, --boot-from-volume creates the boot volume without deleting it when the instance is deleted: the volume outlives the instance (it is billed as long as it exists). This is the intended behaviour here — the volume makes the instance easy to recreate — but delete it explicitly when it is no longer needed:
openstack server show test -f value -c volumes_attached   # before deleting the instance: note the boot volume ID
openstack volume delete <volume-id>                        # once the instance has been deleted
Wait for the instance to reach the ACTIVE status and retrieve its public IP address:
(osc) $ openstack server show test -f value -c status -c addresses
{'Ext-Net': ['192.0.2.10']}
ACTIVE
Then connect to it via SSH as the debian user (see Connecting to the instance).
First, install the OpenTofu CLI.
Here is an example on Debian 13:
sudo apt update
sudo apt install -y apt-transport-https ca-certificates curl gnupg
sudo install -m 0755 -d /etc/apt/keyrings
curl -fsSL https://get.opentofu.org/opentofu.gpg | sudo tee /etc/apt/keyrings/opentofu.gpg > /dev/null
curl -fsSL https://packages.opentofu.org/opentofu/tofu/gpgkey | sudo gpg --no-tty --batch --dearmor -o /etc/apt/keyrings/opentofu-repo.gpg > /dev/null
sudo chmod a+r /etc/apt/keyrings/opentofu.gpg /etc/apt/keyrings/opentofu-repo.gpg
echo "deb [signed-by=/etc/apt/keyrings/opentofu.gpg,/etc/apt/keyrings/opentofu-repo.gpg] https://packages.opentofu.org/opentofu/tofu/any/ any main" | sudo tee /etc/apt/sources.list.d/opentofu.list > /dev/null
sudo apt update
sudo apt install -y tofu
Check the installation:
$ tofu version
OpenTofu v1.12.2
on linux_amd64
Next, create an application credential which will provide the credentials needed to connect to the APIs, as detailed in the OpenStack CLI tab.
Here is a simplified example of Terraform scripts to create the SSH key pair and the instance, with the instance's public IP address as output.
Authentication goes through the same clouds.yaml as the CLI, via the OS_CLOUD and OS_CLIENT_CONFIG_FILE environment variables:
export OS_CLOUD=openstack
export OS_CLIENT_CONFIG_FILE=/path/to/clouds.yaml
// provider.tf
#
# Providers definition
#

# Providers
terraform {
  required_providers {
    openstack = {
      source  = "terraform-provider-openstack/openstack"
    }
  }
}

# OpenStack provider
# Authentication is the same as the CLI's: clouds.yaml + OS_CLOUD
# (see the Terraform guide of this platform). No secret hardcoded in .tf files.
provider "openstack" {
  cloud = "openstack"
}


// variables.tf
#
# Variables for the deployment
#

# SSH Key
variable "ssh_key" {
  description = "ssh key"
  default     = {
    public_key = "ssh-ed25519 xxxxxx user@domain",
    name       = "test"
  }
}

# Instance
variable "instance" {
  description = "Instance parameters"
  default     = {
    image                 = "Debian 13"
    flavor                = "b3-8"
    volume_size           = 20
    delete_on_termination = true
  }
}


// instance.tf
#
# Instance deployment
#

# Get image id
data "openstack_images_image_v2" "debian" {
  name        = var.instance.image
  most_recent = true
}

# SSH Key creation
resource "openstack_compute_keypair_v2" "test" {
  name       = var.ssh_key.name
  public_key = var.ssh_key.public_key
}

# Instance creation
resource "openstack_compute_instance_v2" "test" {
  name        = "test"
  flavor_name = var.instance.flavor
  key_pair    = var.ssh_key.name
  block_device {
    uuid                  = data.openstack_images_image_v2.debian.id
    source_type           = "image"
    destination_type      = "volume"
    boot_index            = 0
    volume_size           = var.instance.volume_size
    delete_on_termination = var.instance.delete_on_termination
  }
  network {
    name = "Ext-Net"
  }
  depends_on = [
    openstack_compute_keypair_v2.test
  ]
  security_groups = ["default"]
}

// outputs.tf
output "ip_address" {
  description = "instance public IP address"
  value       = openstack_compute_instance_v2.test.network[0].fixed_ip_v4
}
Warning
The IP address from which the API connection is made must be "whitelisted" with OVHcloud.
Initialise and apply the configuration:
$ tofu init
...
$ tofu version
OpenTofu v1.12.2
on linux_amd64
+ provider registry.opentofu.org/terraform-provider-openstack/openstack v3.4.0

$ tofu apply
...
Plan: 2 to add, 0 to change, 0 to destroy.

Changes to Outputs:
  + ip_address = (known after apply)

Do you want to perform these actions?
  OpenTofu will perform the actions described above.
  Only 'yes' will be accepted to approve.

  Enter a value: yes

...
openstack_compute_instance_v2.test: Creating...
openstack_compute_instance_v2.test: Still creating... [10s elapsed]
...
openstack_compute_instance_v2.test: Creation complete after 2m21s [id=8e97df41-f2e2-43f7-a1d7-a7fa4121ab11]

Apply complete! Resources: 2 added, 0 changed, 0 destroyed.

Outputs:

ip_address = "192.0.2.10"
Then connect via SSH with the user associated with the image, and the private key matching the registered public key.
Info
For more advanced Terraform/OpenTofu usage on this platform (networking, S31-compatible Object Storage, known pitfalls), see the platform's Terraform guide.
