
Managed Backup for VMware - Backing up and restoring from the VBR console
Learn how to start an on-demand backup and how to restore a full virtual machine, files or folders from the web console of your Veeam Backup & Replication server
Objective
Your Veeam Backup & Replication (VBR) backup server is dedicated to your infrastructure. You access it through its web console to start backups and restore your data, without opening a ticket.
This guide explains how to start an on-demand backup and how to restore a full virtual machine, files, or start a machine directly from its backup.
Requirements
- Have an active Managed Backup for VMware service.
- Have the login of your VBR account and its password (see Getting started with Managed Backup for VMware).
- Have at least one virtual machine that is tagged and backed up.
Instructions
What your account allows
To choose what is backed up, use the vSphere tags (see Protecting your virtual machines).
How your backups are scheduled
- Three backup jobs are created on your VBR at delivery, one per Backup plan: Standard, Advanced and Premium. Each machine joins the job of its tag.
- The jobs start every evening at 10 pm, in the local time of your infrastructure.
- An on-demand backup runs immediately, including outside this schedule.
Signing in to the VBR console
The VBR interface is in English. The labels below are the ones shown on screen.
- On your dashboard, click
Open the VBR console, choose your infrastructure, then clickOpen the VBR web interface. The Veeam Backup & Replication sign-in page opens in a new tab. - In Username, enter the login given in your delivery email. In Password, enter the initial password. Click
Sign in. TickRemember meonly on a personal computer. - At first sign-in, the Change password screen asks you to choose a new password. Fill in the two fields, check the
Password requirementslink if needed, which describes the rules to follow, then clickConfirm. OVHcloud does not keep this password, so write it down in a safe place. - The Overview page appears. The left menu gives you access to
JobsandBackups(under Home), then toLogs & Events(under Audit).
Starting an on-demand backup
This is useful right after you tag a machine, or before a sensitive operation (update, application migration).
-
Sign in to the console (see Signing in to the VBR console).
-
In the left menu, under Home, click
Jobs, then open theBackup Jobstab. You see one job per Backup plan. The job name ends withstandard,advancedorpremium. -
Tick the box of the job for the Backup plan you want.
-
In the action bar, click
Start. The job backs up all the machines that have this tag.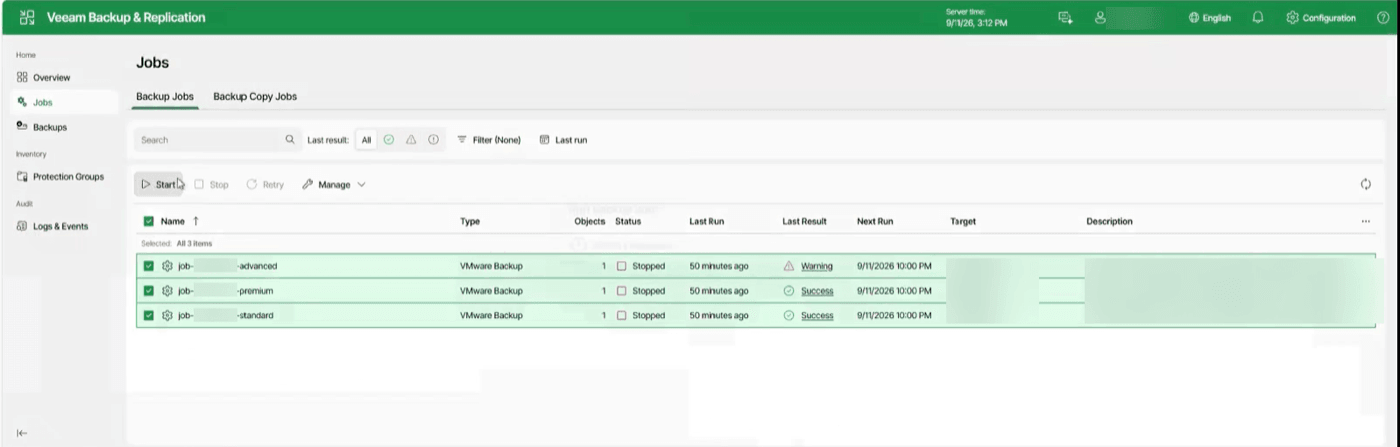
The Jobs page, Backup Jobs tab. In the screenshot, the three jobs are ticked. For a single backup, tick only the job you want.
-
Follow the result in the columns of the list:
- Status shows the state of the job. Stopped means it is not running at that moment.
- Last Run shows how long ago the job last ran.
- Last Result shows the result: Success for a successful backup, Warning for a warning to read in the job details.
-
Open the job details to read its sessions. The history at the top of the page shows the latest runs. The Session Details area lists the actions of the session in Job View, and Workload View shows the result machine by machine.
-
Check that a new restore point appears (see Checking the status of your backups).
Restoring a full virtual machine
Restoring a whole machine uses the Entire VM Restore wizard.
-
From the
Backupspage, select the machine to restore and its restore point, then start the full machine restore. -
The wizard shows its steps on the left: Virtual Machines, Restore Mode, Host, Datastore, Folder, Network, Reason and Summary. Click
Nextto move forward,Previousto go back,Cancelto quit. -
At the Restore Mode step, choose:
- Restore to the original location, to replace the existing machine.
- Restore to a new location, or with different settings, under another name, to keep the current machine.
-
At the Host and Datastore steps, choose the host and the datastore for the restored machine.
-
At the Folder step, the original folder of the machine is selected by default. To change it, select the machine then click
Folder. To restore the machine under another name, clickName. The Change VM Settings panel opens. It offers Set name to, Add prefix and Add suffix. Confirm withOK.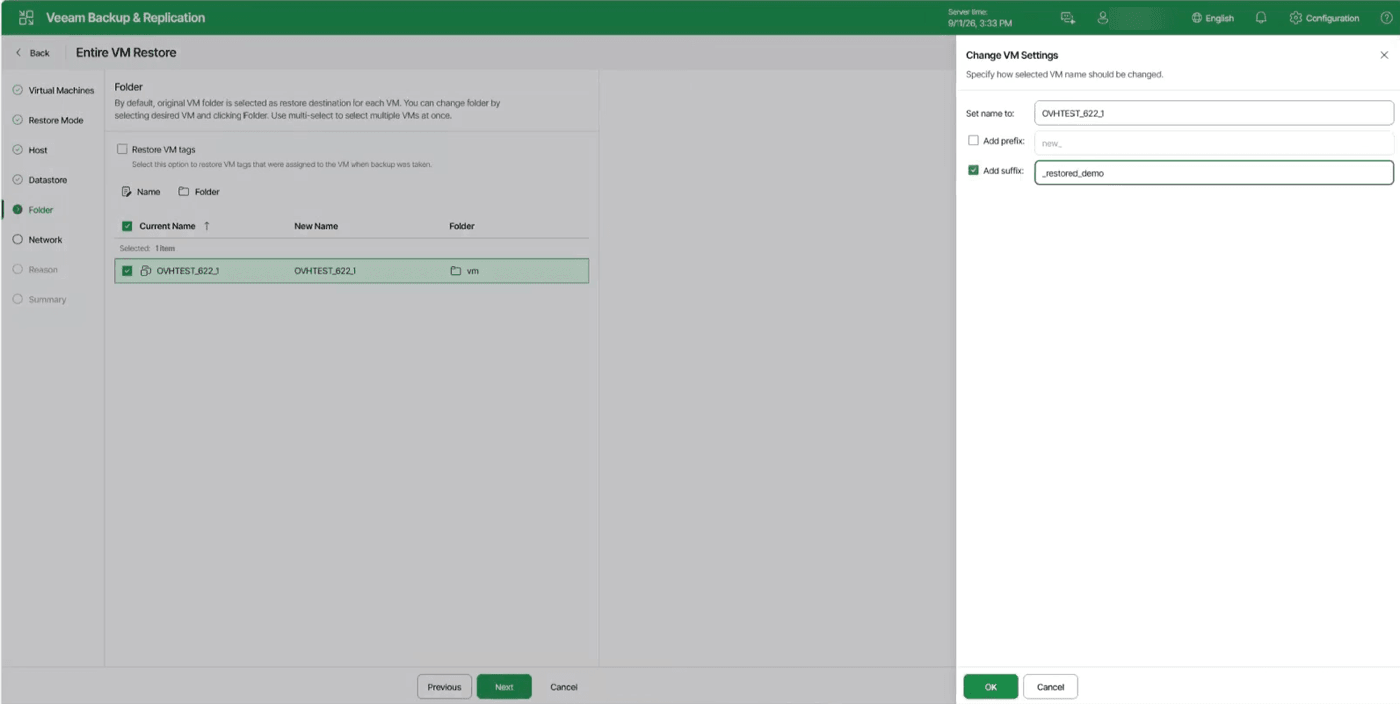
The Entire VM Restore wizard, Folder step, with the Change VM Settings panel open.
-
At the Network, Reason and Summary steps, check the network, enter the reason for the restore if needed, then review the summary before you start the restore.
-
Follow the restore until its final report.
Check the tag after a restore
After a restore, check the tag of the restored machine in vSphere and add it again if needed. A machine without a tag is neither backed up nor billed.
A restore always goes to the original infrastructure of the machine. Restoring to another infrastructure is not available.
Restoring files or folders
-
From the
Backupspage, select the machine then start a guest file restore (Guest File Restore). The Browse page of the machine opens. -
Next to Restore Point, click
Select restore point. The Select Restore Point dialog shows a calendar. The days that have restore points are active. The Available restore points list shows the time of each point and its type: Full for a full backup, Increment for an incremental backup. Choose a point, or clickSelect latest restore pointto take the most recent one. The Mount server field stays on Automatic. ClickSelect. -
Browse the tree of the restore point. The left tree shows the machine, and the right list shows the folders and files with their type, size, dates and owner. The Search field helps you find a name. Tick the files or folders you want.
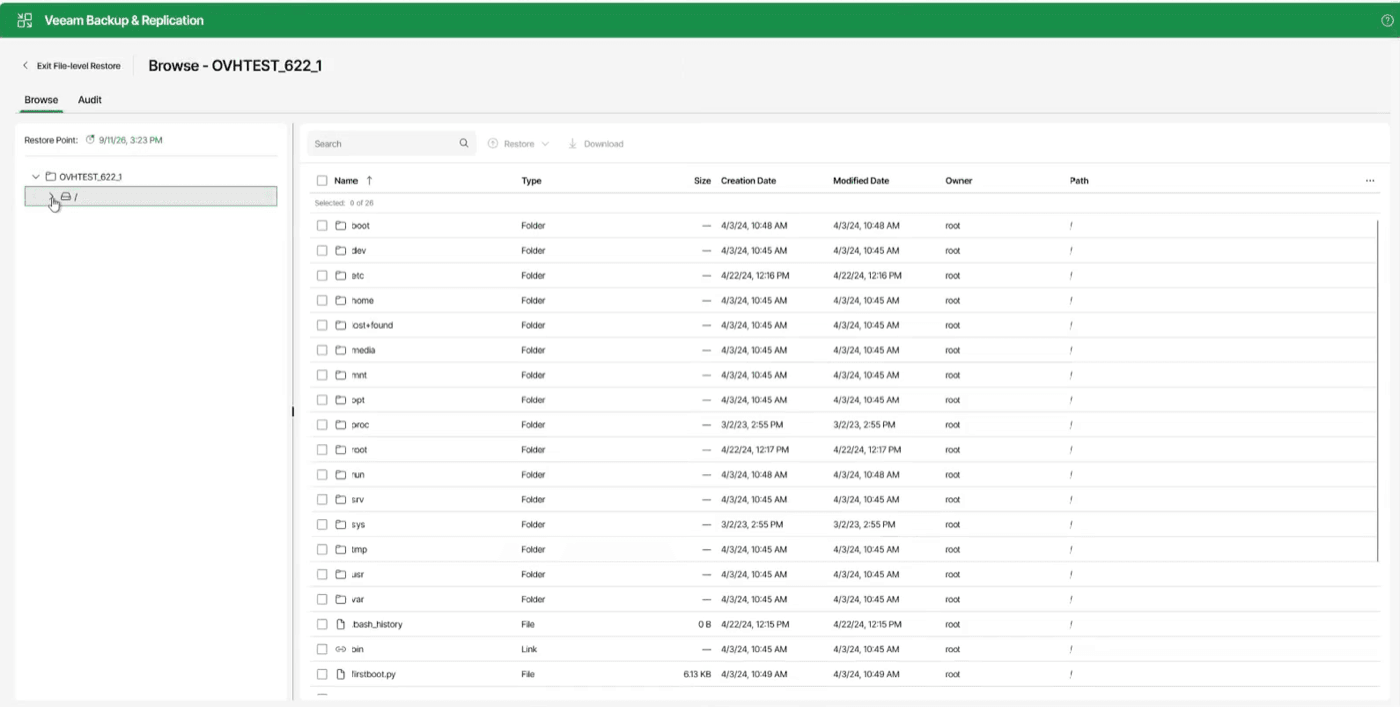
Browsing the files of the mounted restore point.
-
Click
Restoreto restore the selection to the original machine, orDownloadto download it. -
When you are done, click
Exit File-level Restore, at the top left, to close the file restore session.
The console gives you an operation report, which you can keep to document the incident.
Starting a machine from its backup (Instant Recovery)
Instant Recovery starts a machine directly from a restore point, without waiting for its data to be copied. It is the fastest way to bring a service back online.
-
From the
Backupspage, select the machine and start an instant restore. The Instant Recovery to VMware vSphere wizard opens. Its steps are Machines, Restore Mode, Reason and Summary. -
At the Machines step, tick the machine to restore. The Restore Point column shows the selected point.
Addadds other machines andRemoveremoves some. -
To change the restore point, click
Restore Point. The Restore Points panel lists the available points with their type (Increment or Full). Select one and clickOK. -
Click
Next. At the Restore Mode step, choose Restore to the original location for an identical restore, or Restore to a new location or with different settings to customise the location and settings. -
Click
Next. At the Reason step, you can enter the reason for the restore. The Summary step recaps your choices. Review them then start the restore. -
Once the machine has started, it appears in the left menu, under Action Required >
Instant Recovery. The list shows its state (Mounted) and the restore point used. Check that the machine works as expected. -
To finish the restore, select the machine then click
Migrate to Production. If you do not need the machine, clickStop Publishingto end the session without migrating it.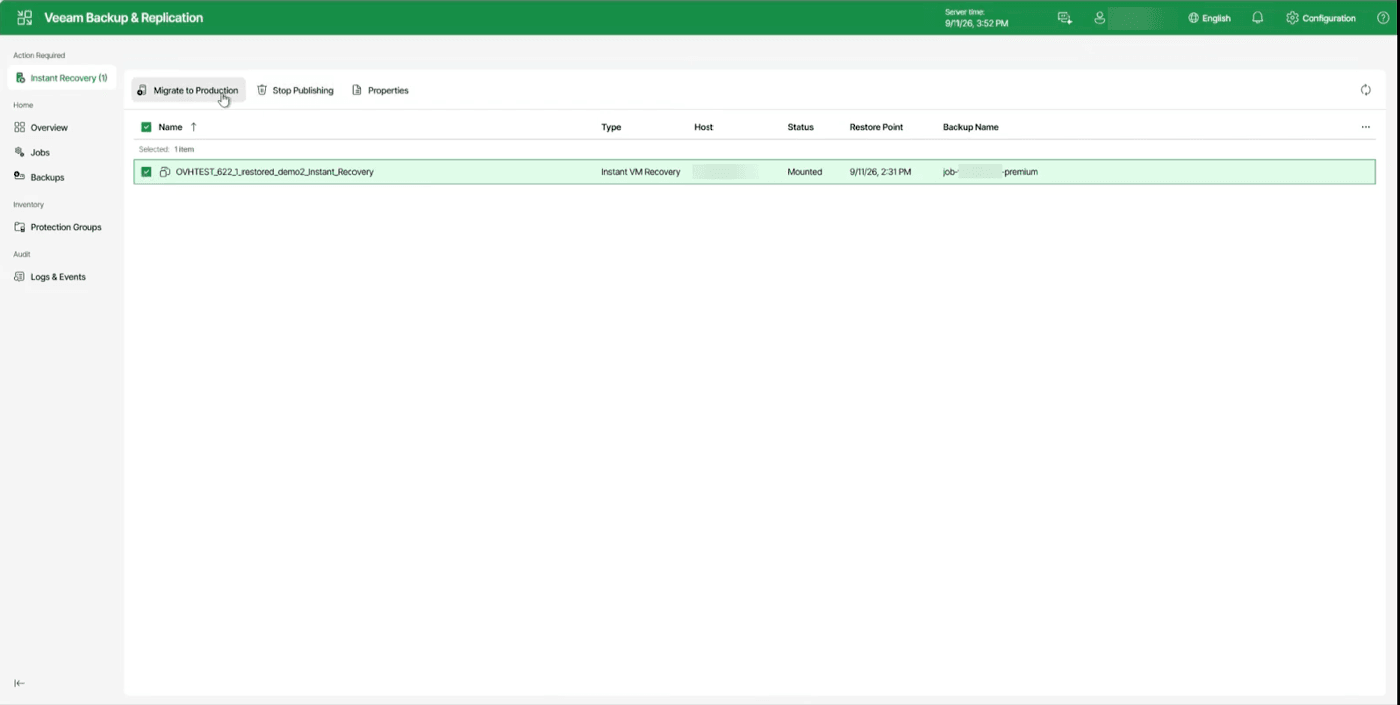
The Instant Recovery list under Action Required.
-
The Quick Migration wizard opens. Its steps are Virtual Machines, Destination, Datastore, Transfer and Summary. At the Destination step, choose the host or cluster (Host or cluster), the resource pool (Resource Pool) and the folder (VM folder) with the
Choosebuttons. -
At the Transfer step, the source and target proxies (Source proxy and Target proxy) are selected automatically by default. The Force Veeam transport usage box forces the disks to be moved by the Veeam transfer engine, even if VMware Storage vMotion is available. Finish with
Next, then confirm the summary.
Instant Recovery is a temporary solution, not a lasting way to run
During the session, the machine runs from the backup storage, not from your production storage. Its performance is reduced. It cannot be moved (vMotion). It is not covered by the automatic maintenance of the platform.
Do not leave a machine running in Instant Recovery: as soon as it is checked, migrate it to the production storage and end the session. If you do not need the machine, end the session without migrating it. The duration of the session is not monitored, so remember to end it yourself.
Restoring from the secondary site
Advanced and Premium backups are copied to the secondary site chosen at order time, where they stay restorable. If the primary site is unavailable, contact support, who will guide you: OVHcloud rebuilds the backup server (see Security and guarantees).
How long your restore points stay available
A restore point keeps the Backup plan under which it was written: if you change the tag of a machine, its old points keep their original retention.
Checking the status of your backups
Three pages of the console give you the status of your backups.
-
Overview summarises the activity. The Protection Overview card counts the sessions of the last 24 hours (Total Sessions) and splits them into Success, Warning and Failed.
-
Backups lists the backups present on your VBR, by job. Expand a job with the arrow to the left of its name to see one line per machine. The Restore Points column (header truncated on screen) shows the number of restore points of each machine.
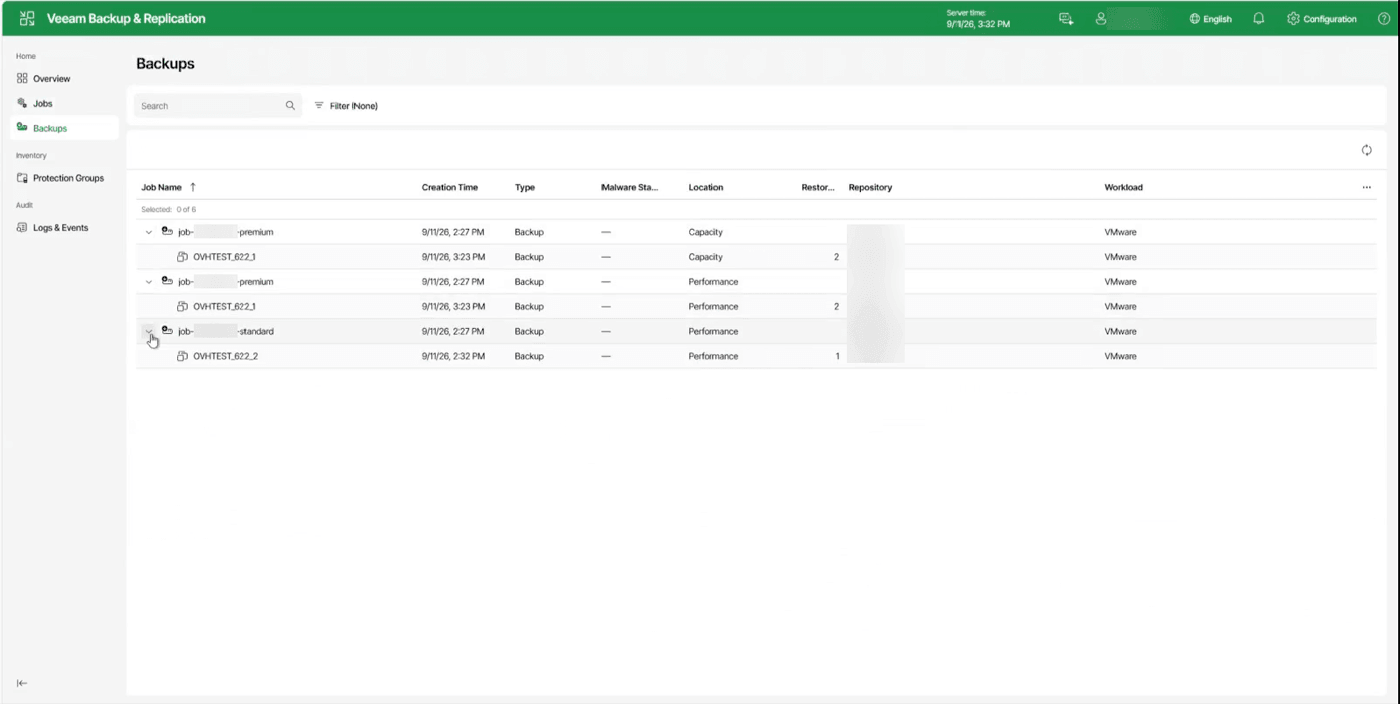
The Backups page, jobs expanded. The columns show, among other things, the creation date and the number of restore points.
-
Logs & Events, Session Logs tab, lists the sessions of the last 24 hours (Last 24 Hours) with the job name, the session type, its status (Success or Warning) and its start and end times. The Type in a name and Status fields let you filter the list.
Your VBR sends you its backup notifications by email, to the address of the OVHcloud account that ordered the service. The last backup date shown in the OVHcloud Console remains the signal to watch: a date older than that of the other machines, or no date, flags a machine to check. The details of a failure are available in the console of your VBR.
Go further
Protecting your virtual machines: choose what is backed up.
Security and guarantees of your backups: encryption, immutability, replication.
FAQ and troubleshooting: lost password, machine not backed up.
Vendor documentation: Veeam Help Center.
Join our community of users.