
Creating a Windows Server VM
Find out how to create a Windows Server VM on SNC Cloud Platform from a Microsoft evaluation ISO, from Glance upload to RDP connection
Objective
Practical guide to uploading a Windows image into Glance and provisioning a Windows Server VM on the SNC Cloud Platform OpenStack deployment, when no ready-made Windows image is available. Target audience: anyone comfortable working from the command line; prior OpenStack experience is helpful but not required.
This guide covers end-to-end provisioning of a Windows Server VM on an OpenStack platform that has no ready-made Windows image in Glance: downloading the Microsoft evaluation ISO, uploading it to Glance, provisioning network/storage, installing the OS (automated or manual), and post-install network configuration. Since Windows has no cloud-init equivalent, several steps that are automatic on a Linux VM must be done by hand.
Microsoft licensing: the platform does not currently supply Microsoft licences. This guide uses a Microsoft evaluation ISO (a temporary licence, for testing purposes) — acquiring, managing, and staying compliant with any Microsoft licence (Windows Server or otherwise) remains entirely the customer's responsibility.
Requirements
- Access to the platform via a
clouds.yaml(OpenStack application credential),memberrole at minimum. - The
openstackCLI (python-openstackclient), installable viapip. - A local machine with enough free disk space to stage the Windows ISO (~10 GB) — the upload happens from the local machine to Glance, not via a server-side download (see step 3 for why).
- A (free) Microsoft account to download a Windows Server evaluation ISO.
TLS note: depending on how old your local machine's OpenSSL/LibreSSL is, the openstack CLI may fail to negotiate TLS 1.3 against the platform's API. If openstack token issue fails with an SSL routines or handshake failure error, see known pitfalls.
Instructions
Overview: why a Windows VM needs more manual steps than a Linux VM
A Linux VM provisioned on this platform uses a ready-made cloud-init image: on first boot, the cloud-init agent reads OpenStack metadata (SSH key, network config, user_data) and configures the machine automatically, IP addressing included.
A Windows ISO has no such agent. Two direct consequences:
- The install itself is not automated by default — the ISO launches the interactive Windows Setup wizard. This guide shows how to automate it via an answer file (
autounattend.xml), but a fully manual install through the graphical console is also possible and described as an alternative. - Post-install network configuration is manual. This platform's public network,
Ext-Net, has no DHCP server (enable_dhcp = falseon its subnet) — Linux VMs work around this because cloud-init statically configures the IP from OpenStack metadata. Windows has no such capability: you must enter the IP address by hand once the OS is installed (see step 9).
Step 1 — Downloading the Windows ISO
Microsoft distributes time-limited evaluation ISOs for Windows Server (typically 180 days) via the Evaluation Center — requires a Microsoft account.
- Pick an edition (e.g. Windows Server 2025) and language.
- Download the ISO locally (~7-8 GB depending on edition).
- Note the local path, e.g.
~/Downloads/windows-server-2025-eval.iso.
A Windows ISO generally bundles several editions in a single install.wim file (Standard/Datacenter, with/without Desktop Experience). Step 4 lists them so you can pick which one to install.
Step 2 — Installing and configuring the OpenStack CLI
Step 3 — Uploading the ISO into Glance
Several methods exist to import an image into Glance. On this platform, only openstack image create --file (direct upload from the local machine) is supported — it is the recommended method:
Uploading a ~7-8 GB ISO typically takes 1-3 minutes depending on the local machine's upload bandwidth. --private restricts the image's visibility to your project.
Verify the result:
Step 4 — Preparing an unattended install medium
This step is optional: Windows Setup can also be driven by hand through the graphical console (see the note at the end of this section). Automating it via an answer file (autounattend.xml) avoids manual interaction and is reproducible.
4.1 Identifying the editions available in the ISO
The sources/install.wim file holds each edition's metadata (name, index, description) in an internal XML block. If wimlib-imagex is not installed, a short script extracts it:
Each <IMAGE INDEX="N"> block in the result carries a readable <DISPLAYNAME> tag (e.g. "Windows Server 2025 Standard Evaluation (Desktop Experience)") — note the INDEX of the edition you want; it will be used in the answer file.
4.2 Downloading the VirtIO drivers
This platform's disks and network cards are emulated as VirtIO devices by the underlying KVM/QEMU hypervisor — Windows does not include these drivers (unlike classic IDE/SATA storage, which it supports natively). The official driver package (Fedora/Red Hat project, Microsoft-signed):
The relevant folders are organised by OS version then architecture, e.g. NetKVM/2k25/amd64/, viostor/2k25/amd64/, vioscsi/2k25/amd64/ (adjust 2k25 to the targeted Windows version if different).
4.3 Building the secondary medium (autounattend.xml + drivers)
A complete answer-file template is available for download: autounattend.xml. Key points to adapt before use:
/IMAGE/INDEX: the edition index identified in 4.1.AdministratorPassword/Value: a generated password (never commit a real plaintext password to a versioned repo once filled in — see the "Secrets and sensitive data" section of the Terraform guide).UILanguage,InputLocale,SystemLocale,UserLocaleandTimeZone: set them to the language of your Windows ISO and to your region (the template usesfr-FRandRomance Standard Time).ComputerName: the machine name (the template useswin-test).DriverPaths: lists several candidate drive letters (D:,E:,F:) — see the note below.
Why several candidate letters? The drive letter actually assigned to the drivers medium depends on how many CD-ROM drives are attached to the instance (which can vary), and cannot be reliably predicted ahead of time. Windows Setup silently skips paths that do not exist, so the standard practice is to list 2-3 plausible letters rather than try to guess the right one.
Lay out the medium:
Build the ISO (macOS, no third-party tool needed):
On Linux: genisoimage -o unattend.iso -J -R -V UNATTEND media/ (or the equivalent xorriso).
Alternative without automation: without an autounattend.xml, Windows Setup is driven entirely by hand through the noVNC graphical console (see step 8) — slower, but sufficient for a one-off test. VirtIO drivers are still required (load them manually via Load driver during setup, or afterwards via Device Manager — see known pitfalls).
Step 5 — Uploading the secondary medium into Glance
Same method as step 3:
Step 6 — Provisioning network and volumes
6.1 Network and security group
Never open RDP to 0.0.0.0/0 on a Windows VM — it is a prime target for brute-force attacks. Restrict --remote-ip to a known range (VPN, fixed IP).
6.2 Public network port — independent from the instance
On this platform, a public IP is obtained by attaching a second network interface directly to the shared external network Ext-Net (no classic floating IP). Creating this port separately, before the instance, lets you detach/reattach it to another instance later without losing the address:
An openstack port create with --fixed-ip ip-address=<ip-address> on Ext-Net is rejected by platform policy (403 Forbidden) — picking a specific public IP is not possible on this platform; the IP is auto-assigned from the pool instead. This matters if you ever need to recreate the instance: a port created separately, as above, survives instance deletion; a port created implicitly via --nic net-id= at server create time is deleted automatically along with the instance (and the IP goes back into the pool).
6.3 System volume — marked bootable before use
A blank volume (source_type=blank) is never automatically flagged bootable by Cinder, even after an OS has been installed onto it from inside a VM. Without this flag, openstack server create refuses to boot from it with Block Device <id> is not bootable — set it before creating the instance.
Step 7 — Creating the instance
The most important point in this guide: the order of boot_index values determines which device becomes the instance's root device — and a root device can never be detached via the API, live or offline, for the entire lifetime of the instance.
Key points in this command:
boot_index=0on the (empty) system volume, not on the ISO. On first boot, the firmware (BIOS/UEFI) tries the disk at index 0: empty, no OS found, it automatically falls through to the next device (the ISO, index 1) and boots Windows Setup from there. Once installation completes, the disk at index 0 is bootable and becomes the natural target on subsequent boots. Direct consequence: the system disk, not the ISO, becomes the root device — the ISO remains an ordinary volume, detachable normally once installation is done (see step 11).disk_bus=sataeverywhere, notide. QEMU's IDE bus exposes only 4 slots total; this platform automatically injects a config volume (config-2, visible inside the OS as an extra CD-ROM drive) that consumes one slot on its own. With 2 CD-ROMs + 1 disk + this config volume, the IDE bus overflows — the instance then gets stuck looping throughscheduling/spawningtask states, never reachingACTIVE, with no explicit error message. SATA offers 6 slots, comfortably enough, and remains natively supported by Windows Setup (no driver needed to see it).--nic port-id=forExt-Net, never--nic net-id=— for the reason explained in 6.2 (port/IP portability).
Step 8 — Following the install through the console
Open the returned URL in a browser. If a valid autounattend.xml was supplied (step 4), installation proceeds without interaction. Otherwise, walk through Windows Setup manually:
- Pick the language and edition (the same edition you would set in
/IMAGE/INDEX, see step 4.1). - Select
Custom install, then select the empty disk (60 GB) as the target. - If the disk does not show up in the list: click
Load driver, browse to the drivers medium (viostororvioscsidepending on the configured bus; only needed if you replaced thesatabus used in step 7 with a VirtIO bus), load the driver matching the architecture (amd64). - Let the install run (several automatic reboots).
Step 9 — Finding the IP and configuring networking (manual)
Where to find the instance's public IP
These commands give the IP assigned on the OpenStack side — but until Windows is configured to use it, the VM is not reachable from outside. The next sections connect the two.
Why manual configuration is needed
Recap from the overview: the Ext-Net subnet has no DHCP. ipconfig will show a self-assigned address (169.254.x.x, APIPA) on the public network card until something is configured:
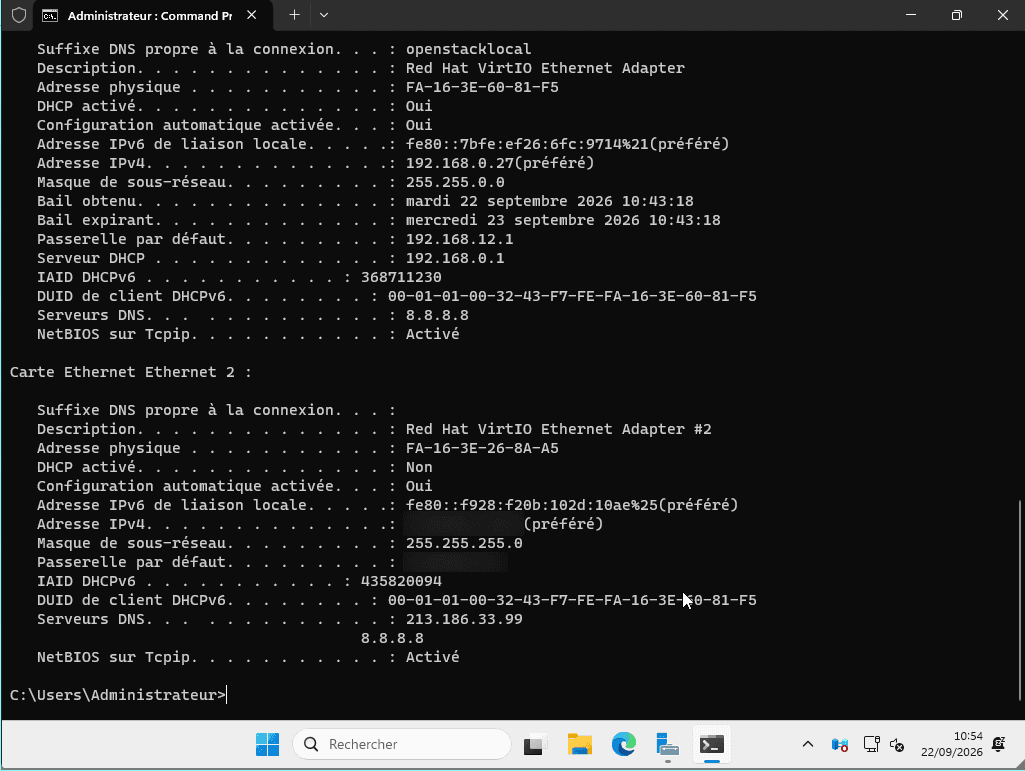
(in this example, the "Ethernet 2" card, listed second, has already been manually configured — see the next screenshot)
Configuring the static IP (GUI recommended)
From the console (the console types pasted text as a US QWERTY keyboard, which may not match the layout configured in Windows — see known pitfalls if special characters get mangled when pasting commands):
Control Panel > Network and Sharing Center > Change adapter settings > [public network card] > Properties > Internet Protocol Version 4 (TCP/IPv4) > Properties
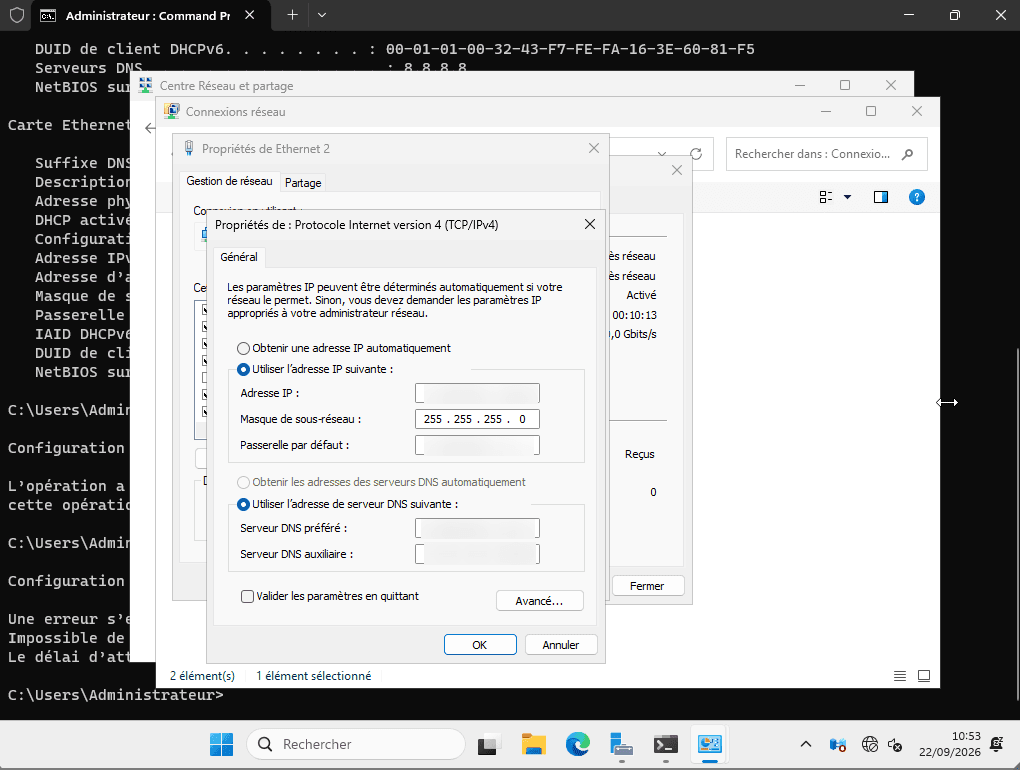
Fill in:
- IP address: the one returned by
openstack server show(above) - Subnet mask: read the CIDR of
Ext-Netviaopenstack subnet show <ext-net-subnet-id> -f value -c cidr, then convert it to a mask (e.g. a/24subnet maps to255.255.255.0) - Default gateway: retrievable via
openstack subnet show <ext-net-subnet-id> -f value -c gateway_ip(subnet ID fromopenstack subnet list --network Ext-Net) - DNS: retrievable via
openstack subnet show <ext-net-subnet-id> -f value -c dns_nameservers
Checking the network cards (VirtIO drivers)
If a network card does not show up at all in Get-NetAdapter (PowerShell), or shows a Code 28 error in Device Manager (missing driver):
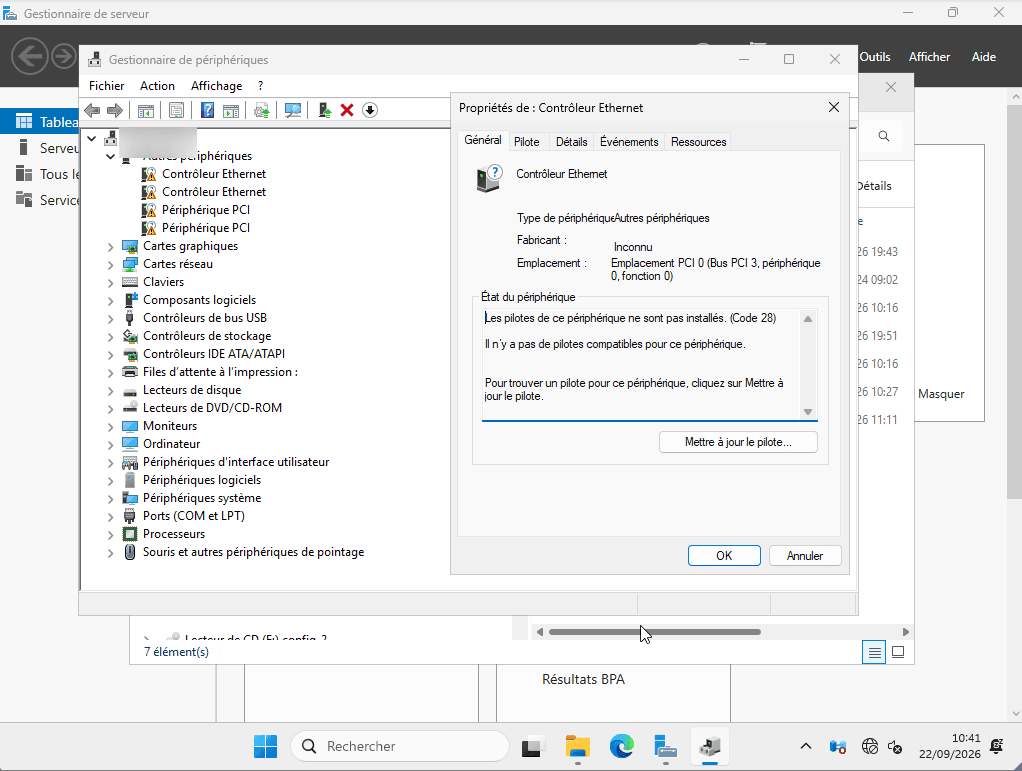
Manually install the NetKVM driver (shipped on the medium prepared in step 4):
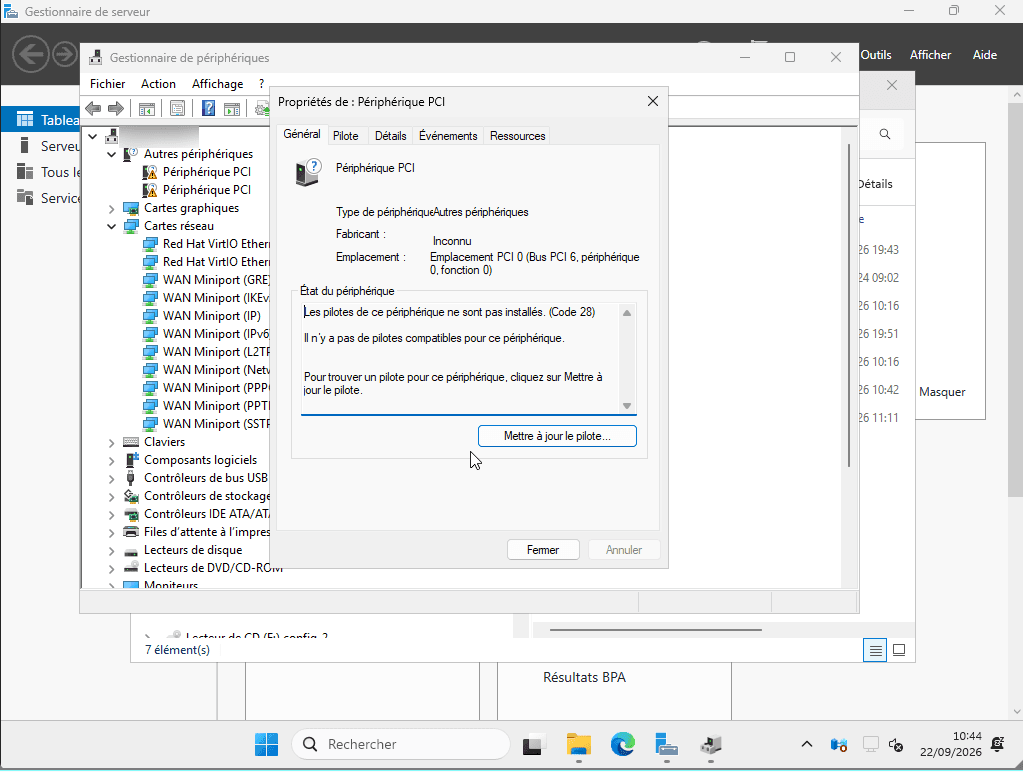
Device Manager > right-click the device > Update driver > Browse my computer > navigate to [letter]:\drivers\NetKVM\amd64
Once done, the card shows up correctly identified:
Step 10 — Connecting over RDP
RDP is disabled by default on Windows. If it was not enabled automatically via autounattend.xml (FirstLogonCommands, see the provided template), enable it by hand:
System > Remote Desktop > Enable
Then, in Windows Defender Firewall, make sure the "Remote Desktop" rule is allowed on all network profiles, not just Private/Domain — a newly configured network card is often classified "Public", a profile on which the RDP rule is not active by default. The following command enables it on all profiles:
Then connect with a standard RDP client (Microsoft Remote Desktop, mstsc, etc.) to the IP configured in step 9, port 3389.
The built-in administrator account name may be localised depending on the install language (e.g. Administrateur on a fr-FR install, not Administrator) — check via whoami or net user once connected.
Step 11 — Post-install cleanup
Because boot_index=0 was set on the system volume in step 7, neither the install ISO nor the unattended-install medium is a root device — both detach normally, without recreating the instance:
This directly affects billing: these volumes stay billed for as long as they exist, attached or not.
Known pitfalls (troubleshooting)
Go further
Full answer-file template: autounattend.xml.
Official VirtIO drivers (Fedora project): virtio-win.iso on fedorapeople.org.
Windows Server evaluation ISO: Microsoft Evaluation Center.
Microsoft documentation on answer files (unattend.xml): learn.microsoft.com — Windows Setup Automation Overview.
Terraform guide — Linux VM, S31, networking.
Managing Glance images — importing, verifying and sharing images, and creating volumes from them.
Managing public IPs — keeping the same public IP across instances.
For training or technical assistance implementing our solutions, contact your sales representative or visit our Professional Services page to request a quote and have your project analysed by our experts.
Join our community of users.
1: S3 is a trademark of Amazon Technologies, Inc. OVHcloud's service is not sponsored by, endorsed by, or otherwise affiliated with Amazon Technologies, Inc.