Backup and Restore OVHcloud Managed Kubernetes Cluster, Namespace and Applications using TrilioVault for Kubernetes
Introduction
In this tutorial, you will learn how to deploy TrilioVault for Kubernetes (or TVK) to your OVHcloud Managed Kubernetes Cluster, create backups, and recover from a backup if something goes wrong.
You can back up your entire cluster by including mutliple namespaces, or optionally choose a single namespace, label based backups, Helm Releases based backups or Operator based backups.
Advantages of using Trilio:
- Take full (or incremental) backups of your all namespaces, selective applications and restore in case of data loss.
- Migrate from one cluster to another.
- Helm release backups are supported.
- Backup of Operator based application deployment is also supported.
- Run pre and post hooks for backup and restore operations.
- Web management console, that allows you to inspect your backup/restore operations state in detail (and many other features).
- Define retention policies for your backups.
- Application lifecycle (meaning, TVK itself) can be managed via a dedicated TrilioVault Operator.
- Velero integration (Trilio supports monitoring Velero backups, restores, and backup/snapshot locations via its web management console).
How TrilioVault for Kubernetes works
TVK follows a cloud native architecture, meaning that it has several components that together form the Control Plane and Data Plane layers. Everything is managed via CRDs, thus making it fully Kubernetes native. What is nice about Trilio is the clear separation of concerns, and how effective it handles backup and restore operations.
Each TrilioVault application consists of a bunch of "Controllers" and the associated CRDs. Every time a CRD is created or updated, the responsible controller is notified and performs cluster reconciliation. Then, the controller in charge spawns Kubernetes jobs that perform the real operation (like backup, restore, etc) in parallel.
Control Plane consists of:
- Target Controller: defines the storage backend (
S3*,NFS, etc) via specific CRDs. - BackupPlan Controller: defines the components to backup, automated backups schedule, retention strategy, etc via specific CRDs.
- Restore Controller: defines restore operations via specific CRDs.
Data Plane consists of:
- Datamover Pods, responsible with transferring data between persistent volumes and backup media (or
Target). TrilioVault works with Persistent Volumes (PVs) using the CSI interface. For each PV that needs to be backed up, an ephemeral Datamover Pod is created. After each operation finishes, the associated pod is destroyed. - Metamover Pods, responsible with transferring Kubernetes API objects data to backup media (or
Target). Metamover pods are ephemeral, just like the Datamover ones.
Understanding TrilioVault Application Scope
TrilioVault for Kubernetes works based on scope, meaning you can have a Namespaced or a Cluster type of installation.
A Namespaced installation allows you to backup and restore at the namespace level only. In other words, the backup is meant to protect a set of applications that are bound to a namespace that you own. This is how a "BackupPlan" and the corresponding Backup CRD works. You cannot mutate those CRDs in other namespaces, they must be created in the same namespace where the application to be backed up is located.
On the other hand, a Cluster type installation is not scoped or bound to any namespace or a set of applications. You define cluster type backups via the Cluster prefixed CRDs, like: ClusterBackupPlan, ClusterBackup, etc. Cluster type backups are a little bit more flexible, in the sense that you are not tied to a specific namespace or set of applications to backup and restore. You can perform backup/restore operations for multiple namespaces and applications at once, including PVs as well (you can also backup etcd databased content).
In order to make sure that TVK application scope and rules are followed correctly, TrilioVault is using an Admission Controller. It intercepts and validates each CRD that you want to push for TVK, before it is actually created. In case TVK application scope is not followed, the admission controller will reject CRD creation in the cluster.
Another important thing to consider and remember is that a TVK License is application scope specific. In other words, you need to generate one type of license for either a Namespaced or a Cluster type installation.
Namespaced vs Cluster TVK application scope - when to use one or the other?
It all depends on the use case. For example, a Namespaced scope is a more appropriate option when you don't have access to the whole Kubernetes cluster, only to specific namespaces and applications.
In most of the cases you want to protect only the applications tied to a specific namespace that you own.
On the other hand, a cluster scoped installation type works at the global level, meaning it can trigger backup/restore operations for any namespace or resource from a Kubernetes cluster (including PVs and the etcd database).
To summarize:
- If you are a cluster administrator, then you will most probably want to perform cluster level operations via corresponding CRDs, like:
ClusterBackupPlan,ClusterBackup,ClusterRestore, etc. - If you are a regular user, then you will usually perform namespaced only operations (application centric) via corresponding CRDs, like:
BackupPlan,Backup,Restore, etc.
The application interface is very similar or uniform when comparing the two types: Cluster vs non-Cluster prefixed CRDs. So, if you're familiar with one type, it's pretty straightforward to use the counterpart.
For more information, please refer to the TVK CRDs official documentation.
Backup and Restore Workflow
Whenever you want to backup an application, you start by creating a BackupPlan (or ClusterBackupPlan) CRD, followed by a Backup (or ClusterBackup) object. Trilio Backup Controller is notified about the change and performs backup object inspection and validation (i.e. whether it is cluster backup, namespace backup, etc.). Then, it spawns worker pods (Metamover, Datamover) responsible with moving the actual data (Kubernetes metadata, PVs data) to the backend storage (or Target), such as OVHcloud Object Storage.
Similarly whenever you create a Restore object, the "Restore Controller" is notified to restore from a Backup object. Then, Trilio Restore Controller spawns worker nodes (Metamover, Datamover), responsible with moving backup data out of the OVHcloud Object Storage (Kubernetes metadata, PVs data). Finally, the restore process is initiated from the particular backup object.
Trilio is ideal for the disaster recoveryuse case, as well as for "snapshotting" your application state, prior to performing system operations on your cluster, like upgrades. For more details on this topic, please visit the Trilio Features and Trilio Use Case official page.
After finishing this tutorial, you should be able to:
- Configure OVHcloud Object Storage backend for Trilio to use.
Backupandrestoreyour applicationsBackupandrestoreyour entire OVHcloud Managed Kubernetes Cluster.- Create scheduled backups for your applications.
- Create retention policies for your backups.
Table of Contents
- Introduction
- Requirements
- Step 1 - Installing TrilioVault for Kubernetes
- Step 2 - Creating a TrilioVault Target to Store Backups
- Step 3 - Getting to Know the TVK Web Management Console
- Step 4 - Helm Release Backup and Restore Example
- Step 5 - Backup and Restore Whole Cluster Example
- Step 6 - Scheduled Backups
- Step 7 - Backups Retention Policy
- Conclusion
Requirements
To complete this tutorial, you need the following:
- An OVHcloud Object Storage Container/Bucket and a
Object StorageUser which will have permission to access the Object Storage Container. - A Git client, to clone the OVHcloud Docs repository.
- Helm, for managing TrilioVault Operator releases and upgrades.
- Kubectl, for Kubernetes interaction.
- krew, for installation of preflight checks plugin.
Important information:
In order for TrilioVault to work correctly and to backup your PVCs, the OVHcloud Managed Kubernetes Cluster needs to be configured to support the Container Storage Interface (or CSI, for short) and volumesnapshot CustomResourceDefinitions should be deployed.
The output should look similar to below:
Also make sure that the CRD support both v1beta1 and v1 API version. You can run below command to check the API version:
At the end of the CRD yaml, you should obtain an output similar to below, showing storedVersions as v1beta1 and v1:
User can then install the Hostpath CSI driver and create a storageclass, volumesnapshotclass. You can check the existing storage class using below command:
The output should look similar to (notice the provisioner is hostpath.csi.k8s.io if you have installed hostpath CSI driver):
Users should run a preflight check to make sure all the prerequisites for the TVK are fulfilled to proceed safely with installation. Follow the TVK Preflight Checks page to install and run preflight through krew plugin.
Instructions
Step 1 - Installing TrilioVault for Kubernetes
In this step, you will learn how to deploy TrilioVault for Kubernetes for OVHcloud Managed Kubernetes Cluster, and manage TVK installations via Helm. Backups data will be stored in the OVHcloud Object Storage bucket created earlier in the Requirements section.
TrilioVault for Kubernetes consists of TVK Operator and TVM application.
The TrilioVault Operator (installable via Helm) which also installs the TrilioVaultManager CRD and creates a tvm custom resource.
TVK Operator handles the installation, post-configuration steps, and future upgrades of the Trilio application components.
Installing TrilioVault Operator and Manager Using Helm
This tutorial is using the Cluster installation type for the TVK application (applicationScope Helm value is set to "Cluster"). All examples from this tutorial rely on this type of installation to function properly.
Please follow the steps below, to install TrilioVault via Helm:
First, clone the OVHcloud Docs Git repository and change directory to your local copy:
Next, add the TrilioVault Helm repository, and list the available charts:
The output looks similar to the following:
The chart of interest is triliovault-operator/k8s-triliovault-operator, which will install TrilioVault for Kubernetes Operator on the cluster. You can run helm install command to install the Operator which will also install the Triliovault Manager CRD. Install TrilioVault for Kubernetes Operator using Helm:
TVK allows user to alter the values to be used by TVK Operator installation using --set option. Check the detailed instructions in the One-click Installation page.
Now, please check your TVK deployment:
The output looks similar to the following (STATUS column should display "deployed"):
Next, verify that TrilioVault-Operator and Triliovault-Manager application is up and running:
The output looks similar to the following (deployment pods must be in the Ready state):
Now, please check your triliovaultmanagers CRDs, tvm CR as well:
The output looks similar to the following:
You can also check if the TVM Custom Resource is created.
The output looks similar to the following:
If the output looks like above, you installed TVK successfully. Next, you will learn how to check license type and validity, as well as how to renew.
TrilioVault Application Licensing
By default, when installing TVK via Helm, there is no Free Trial license generated. This tutorial will help you install the 'Cluster' scoped license which is of type 'Basic' for cluster capacity of 500 CPUs and has expiration time of 5 years.
You can always go to the Trilio website and generate a new license for your cluster that suits your needs.
Installing TVK Application Licensing
Please run below command to see what license is available for your cluster (it is managed via the License CRD):
Run the below command to verify if the license is successfully created for OVHcloud users:
The output looks similar to (notice the STATUS which should be "Active", as well as the license type in the EDITION column and EXPIRATION TIME):
The license is managed via a special CRD, namely the License object. You can inspect it by running below command:
The output looks similar to (notice the Message and Capacity fields, as well as the Edition):
The above output will also tell you when the license is going to expire in the Expiration Timestamp field, and the Scope (Cluster based in this case). You can opt for a cluster wide license type, or for a namespace based license. More details can be found on the Trilio Licensing documentation page.
Renewing TVK Application License
To renew the license, you will have to request a new one from the Trilio website, by navigating to the licensing page. After completing the form, you should receive the License YAML manifest, which can be applied to your cluster using kubectl. Below commands assume that TVK is installed in the default tvk namespace (please replace the <> placeholders accordingly, where required):
Then, you can check the new license status as you already learned via:
In the next step, you will learn how to define the storage backend for TrilioVault to store backups, called a target.
Step 2 - Creating a TrilioVault Target to Store Backups
TrilioVault needs to know first where to store your backups. TrilioVault refers to the storage backend by using the target term, and it's managed via a special CRD named Target. The following target types are supported: S3 and NFS.
For OVHcloud and the purpose of the tutorial, it makes sense to rely on the S3 storage type because it's cheap and scalable. To benefit from an enhanced level of protection you can create multiple target types (for both S3 and NFS), so that your data is kept safe in multiple places, thus achieving backup redundancy.
OVHcloud provides two types of S3 compatible Object Storage solutions:
- To create Target for the
OVHcloud Object Storage using S3 Swift API, use this link. - To create Target for the
S3 compatible Object Storage, use this link
Create an Object Storage user in the tab next to Object Storage Container. Now, from Users and Roles, assign the Administrator priviledges to the S3 user.
Next, create an Access Key and Secret Key to access the Object Storage Container using the Getting Started with the Swift S3 API tutorial.
If you have created a container with High Performance then follow the Getting started with S3 compatible Object Storage documentation.
Save the Access key and Secret key used in AWS CLI ~/.aws/credentails file. It is required to create a target secret later.
Take a note of the Object Storage endpoint URL s3.endpoint_url, and the region name region provided in the AWS CLI ~/.aws/config file. It is required to create a Target later.
To access Object Storage, each target needs to know bucket credentials. A Kubernetes Secret must be created as well:
Notice that the secret name is trilio-ovh-s3-target-secret.
It's referenced by the spec.objectStoreCredentials.credentialSecret field of the Target CRD explained below. The secret can be in the same namespace where TrilioVault was installed (defaults to tvk), or in another namespace of your choice. Just make sure that you reference the namespace correctly. On the other hand, please make sure to protect the namespace where you store TrilioVault secrets via RBAC, for security reasons.
Typical Target definition looks like below:
Explanation for the above configuration:
spec.type: Type of target for backup storage (Object Storage is an object store).spec.vendor: Third party storage vendor hosting the target (for OVHcloud Object Storage you need to use "Other" instead of "AWS").spec.enableBrowsing: Enable browsing for the target to browse through the backups stored on it.spec.objectStoreCredentials: Defines required credentials (viacredentialSecret) to access the Object Storage, as well as other parameters such as bucket region and name.spec.thresholdCapacity: Maximum threshold capacity to store backup data.
Steps to create a Target for TrilioVault:
- First, change directory where the
ovh/docsGit repository was cloned on your local machine:
- Next, create the Kubernetes secret containing your target Object Storage bucket credentials (please replace the
<>placeholders accordingly):
- Then, open and inspect the
Targetmanifest file provided in thedocsrepository, using an editor of your choice (preferably with YAML lint support). You can use VS Code for example:
- Now, please replace the
<>placeholders accordingly to your OVHcloud Object Storage Trilio bucket, like:bucketName,region,urlandcredentialSecret. - Finally, save the manifest file and create the
Targetobject usingkubectl:
What happens next is, TrilioVault will spawn a worker job named trilio-ovh-s3-target-validator responsible with validating your Object Storage bucket (like availability, permissions, etc.). If the job finishes successfully, the bucket is considered to be healthy or available and the trilio-ovh-s3-target-validator job resource is deleted afterwards. If something bad happens, the Object Storage target validator job is left up and running so that you can inspect the logs and find the possible issue.
Now, please go ahead and check if the Target resource created earlier is healthy:
The output looks similar to (notice the STATUS column value - should be "Available", meaning it's in a healthy state):
If the output looks like above, then you configured the Object Storage target object successfully.
Hint:
In case the target object fails to become healthy, you can inspect the logs from the trilio-ovh-s3-target-validator Pod to find the issue:
First, you need to find the target validator
The output looks similar to:
Now, fetch logs data
The output looks similar to (notice the exception as an example):
Next, you will discover the TVK web console which is a really nice and useful addition to help you manage backup and restore operations very easily, among many others.
Step 3 - Getting to Know the TVK Web Management Console
While you can manage backup and restore operations from the CLI entirely via kubectl and CRDs, TVK provides a Web Management Console to accomplish the same operations via the GUI. The management console simplifies common tasks via point and click operations, provides better visualization and inspection of TVK cluster objects, as well as to create disaster recovery plans (or DRPs).
The Helm based installation covered in Step 1 - Installing TrilioVault for Kubernetes already took care of installing the required components for the web management console.
Getting Access to the TVK Web Management Console
To be able to access the console and explore the features it offers, you can either user LoadBalancer, NodePort or need to port forward the ingress-nginx-controller service for TVK.
First, you need to identify the ingress-nginx-controller service from the tvk namespace:
The output looks similar to (search for the k8s-triliovault-ingress-nginx-controller line, and notice that it listens on port 80 in the PORT(S) column):
If you are using LoadBalancer for the ingress-nginx-controller then the output would look like:
TVK is using an Nginx Ingress Controller to route traffic to the management web console services. Routing is host based, and the host name is ovh-k8s-tvk.demo.trilio.io as defined in the Helm values file from the ovh/docs:
Having the above information at hand, please go ahead and edit the /etc/hosts file, and add this entry:
Next, create the port forward for the TVK ingress controller service:
Finally download the kubeconfig file for your OVHcloud Managed Kubernetes Cluster present under Service tab as Kubeconfig file. This step is required so that the web console can authenticate you using kubeconfig file:
After following the above steps, you can access the console in your web browser by navigating to: http://ovh-k8s-tvk.demo.trilio.io. When asked for the kubeconfig file, please select the one that you created in the last command from above.
Please keep the generated kubeconfig file safe because it contains sensitive data.
Exploring the TVK Web Console User Interface
The home page looks similar to:

Go ahead and explore each section from the left:
Cluster Management: This shows the list of primary cluster and other clusters having TVK instances, added to the primary OVHcloud cluster using Multi-Cluster Management feature.Backup & Recovery: This is the main dashboard which gives you a general overview for the whole cluster, like: Discovered namespaces, Applications, Backupplans list, Targets, Hooks, Policies etc.Namespaces:
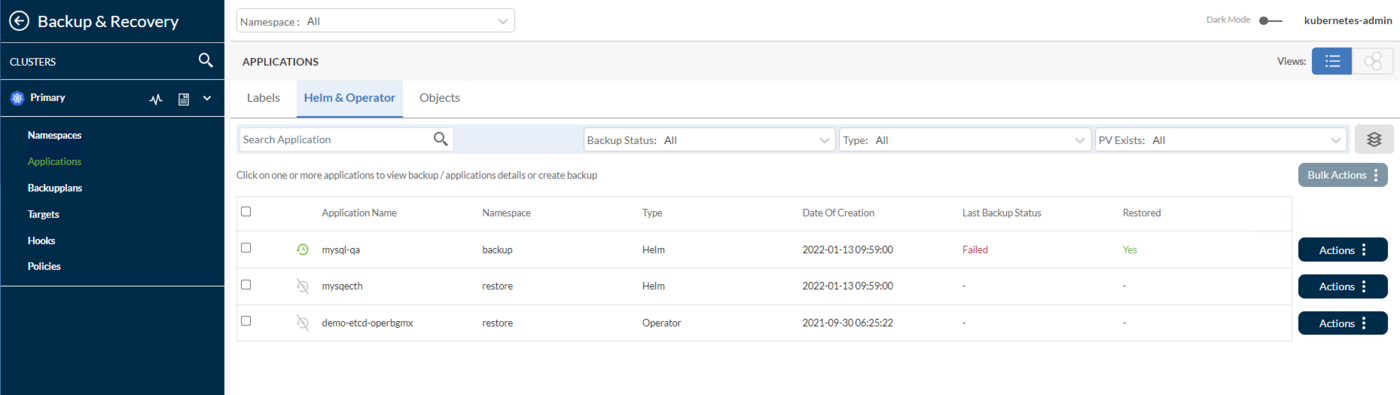
Applications:
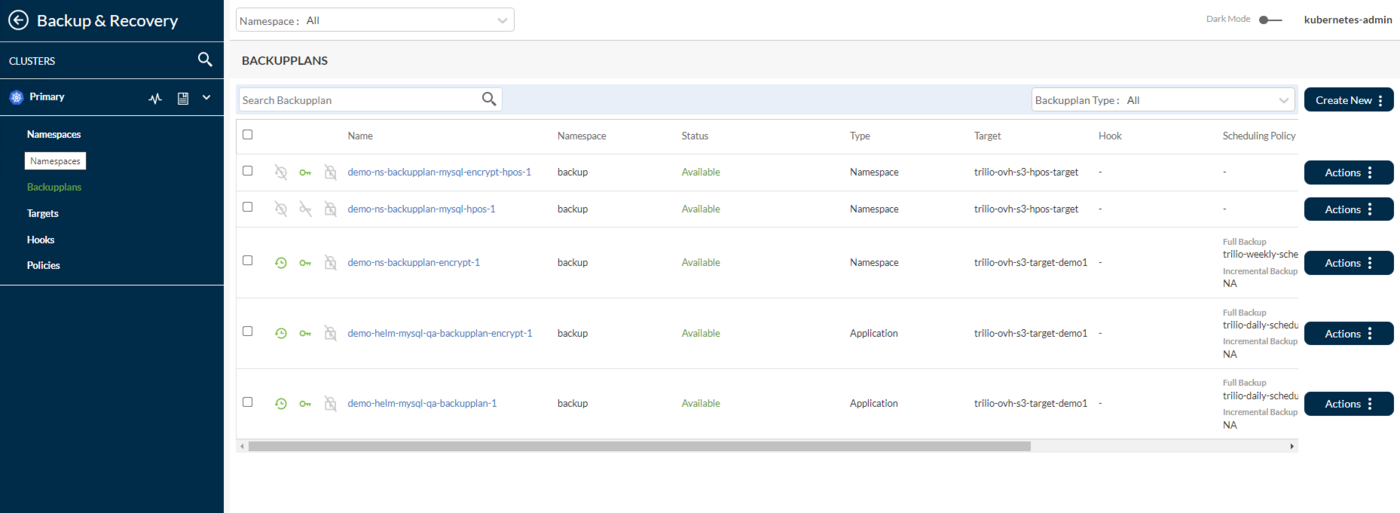
Backupplans:
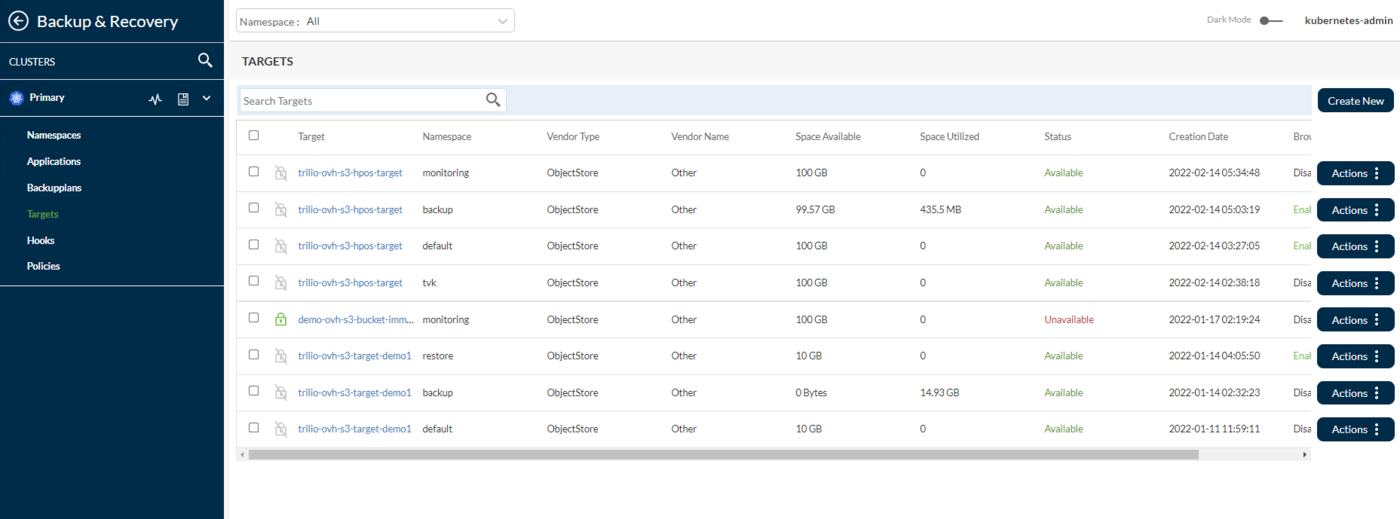
Targets:
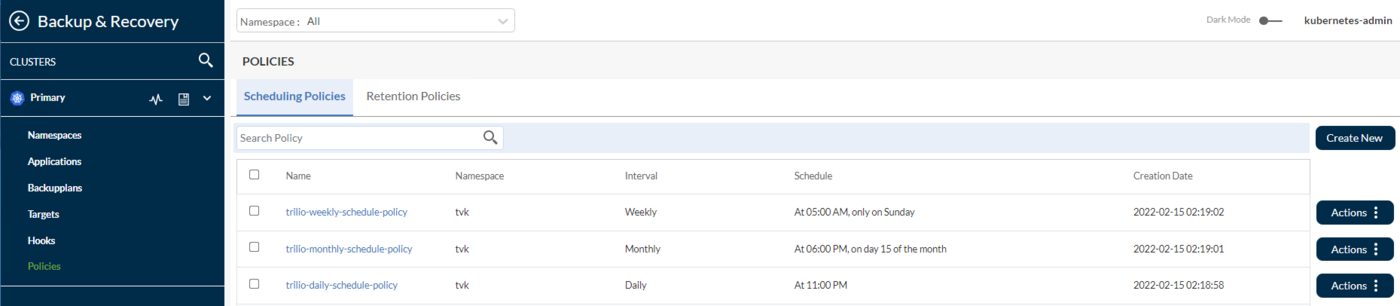
Scheduling Policy:
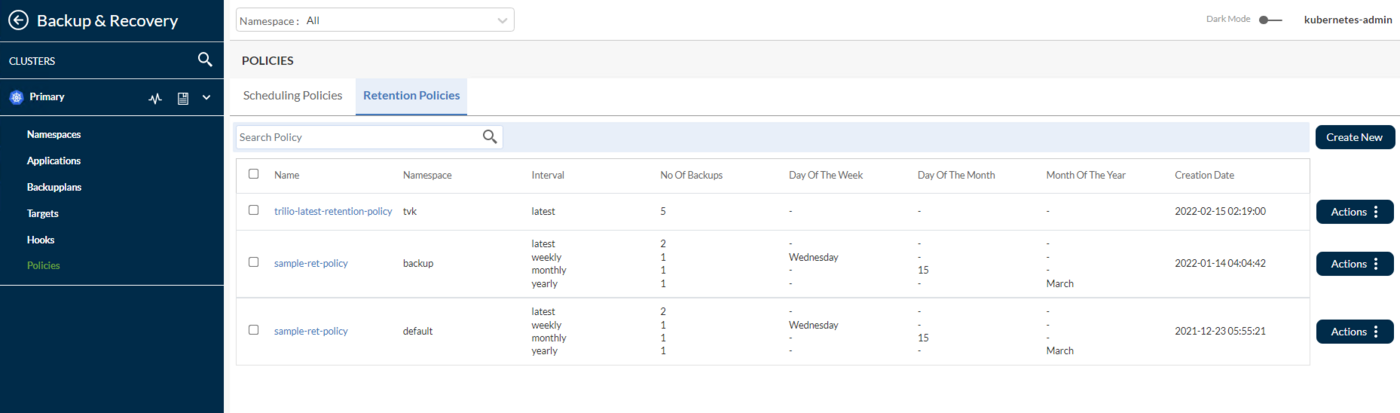
Retention Policy:
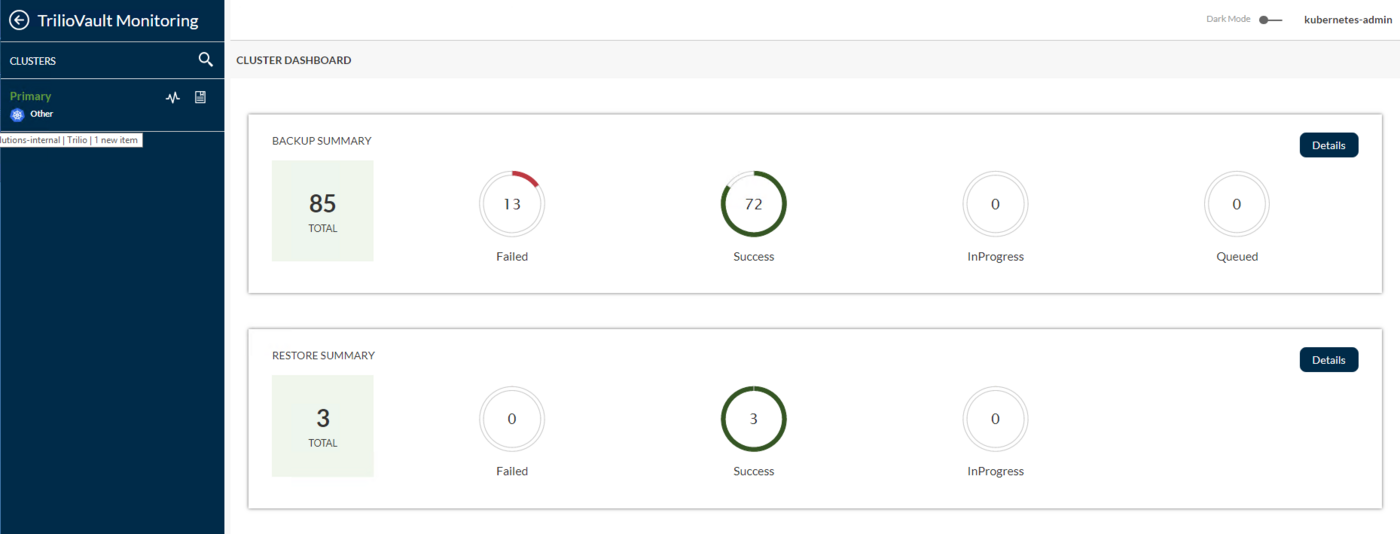
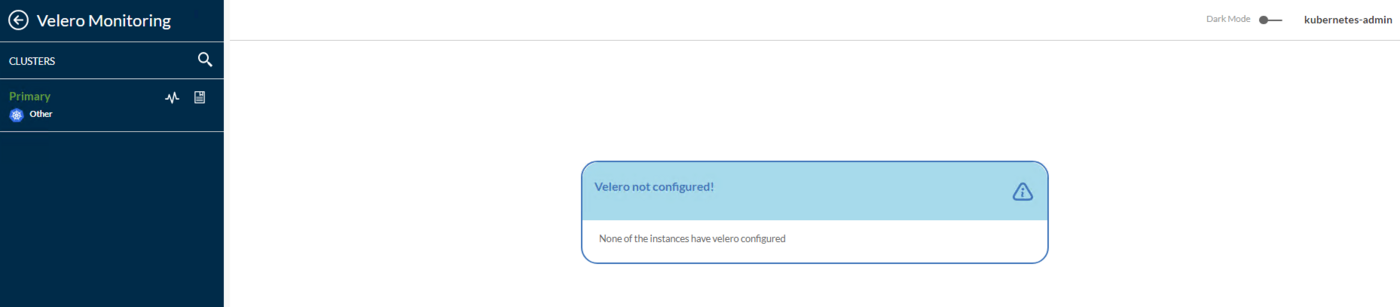
Monitoring: This has two options, TrilioVault Monitoring and Velero Monitoring if user has Velero configured on their OVHcloud cluster.TrilioVault Monitoring: It shows the backup and restore summary of the kubernetes cluster.
Velero Monitoring:
Disaster Recovery: Allows you to manage and perform disaster recovery operations.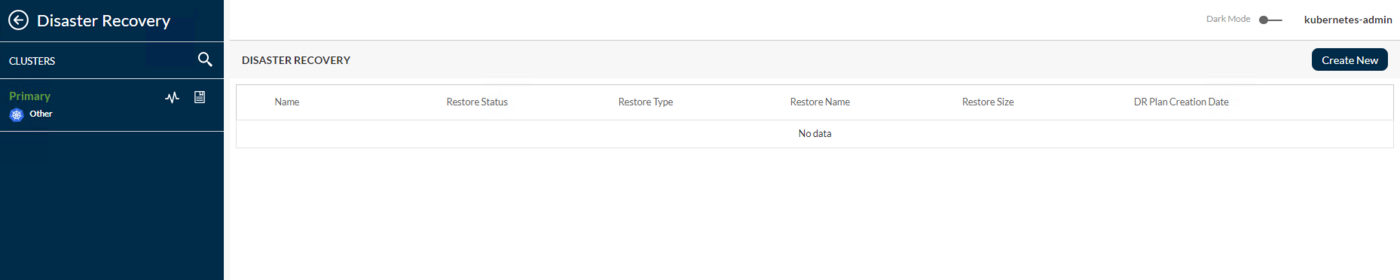
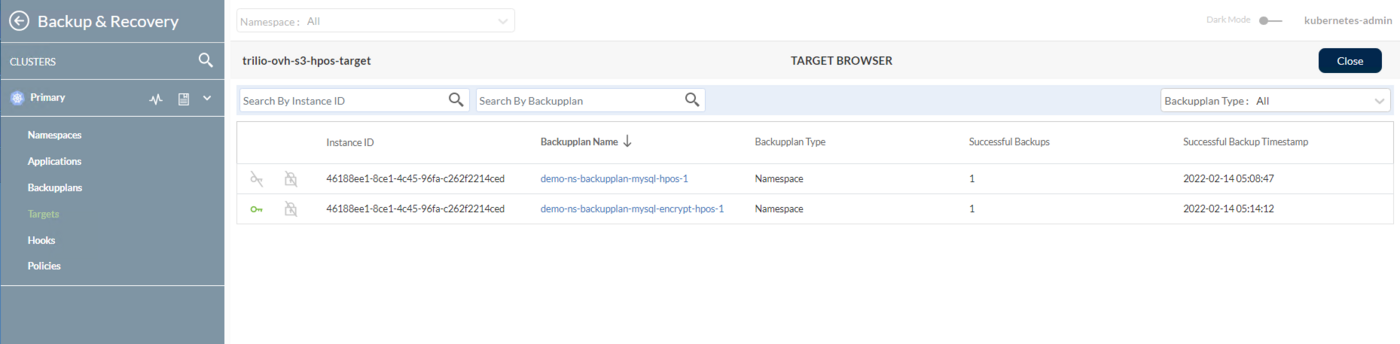
You can also see the Object Storage Target created earlier, by navigating to Backup & Recovery > Targets > Select the TVK Namespace from the dropdown on the top (in case of ovh/docs the TVK Namespace is tvk):
Going further, you can browse the target and list the available backups by clicking on the Actions button from the right, and then select Launch Browser option from the pop-up menu (for this to work the target must have the enableBrowsing flag set to true):
For more information and available features, please consult the TVK Web Management Console User Interface official documentation.
Next, you will learn how to perform backup and restore operations for specific use cases, like:
- Specific namespace(s) backup and restore.
- Whole cluster backup and restore.
Step 4 - Helm Release Backup and Restore Example
In this step, you will learn how to create a one-time backup for an entire helm release from your OVHcloud Managed Kubernetes Cluster and restore it afterwards, making sure that all the resources related to the helm release are re-created. The namespace in question is demo-backup-ns. TVK has a neat feature that allows you to perform backups at a higher level than just Helm releases, meaning: complete namespaces, Label based application, and Operator based application. You will learn how to accomplish such a task, in the steps to follow.
Next, you will perform the following tasks:
- Create the
demo-backup-nsnamespace and create amysql-qahelm release for the MySQL Database - Perform a namespace backup, via BackupPlan and Backup CRDs.
- Delete the
mysql-qaHelm release. - Restore the
mysql-qaHelm release, via Restore CRD. - Check the
mysql-qaHelm release resources restoration.
Creating mysql-qa helm release
To verify if the helm release is deployed correctly, run below command:
The output looks similar to below:
Next, verify that mysql-qa deployment is up and running:
The output looks similar to below:
This shows that the mysql-qa helm release is ready to be backedup.
Creating mysql-qa Helm Release Backup
To perform backups for a single application at the namespace level (or Helm release), a BackupPlan followed by a Backup CRD is required. A BackupPlan allows you to:
- Specify a
targetwhere backups should be stored. - Define a set of resources to backup (e.g.: namespace or Helm releases).
- Encryption, if you want to encrypt your backups on the target (this is a very nice feature for securing your backups data).
- Define
schedulesfor full or incremental type backups. - Define
retentionpolicies for your backups.
The TrilioVault for Kubernetes has created a few sample scheduling and retention policies for users. Users can create the new policies or utilize the sample policies.
In other words a BackupPlan is a definition of "what", "where", "to" and "how" of the backup process, but it doesn't perform the actual backup. The Backup CRD is responsible with triggering the actual backup process, as dictated by the BackupPlan spec.
Typical BackupPlan CRD looks like below:
Explanation for the above configuration:
spec.backupConfig.target.name: Tells TVK what target name to use for storing backups.spec.backupConfig.target.namespace: Tells TVK in which namespace the target was created.spec.backupComponents: Defines a list of resources to back up (can be namespaces or Helm releases).
Typical Backup CRD looks like below:
Explanation for the above configuration:
spec.type: Specifies backup type (e.g.FullorIncremental).spec.backupPlan: Specifies theBackupPlanwhich thisBackupshould use.
Steps to initiate the mysql-qa Helm release one time backup:
- First, make sure that the
mysql-qais deployed in your cluster by following these steps. - Next, change directory where the
docsGit repository was cloned on your local machine:
- Then, open and inspect the mysql-qa helm release BackupPlan and Backup manifest files provided in the
pages/public_cloud/containers_orchestration/managed_kubernetes/backup-and-restore-cluster-namespace-and-applications-with-trilio/guide.en-us.mdrepository, using an editor of your choice (preferably with YAML lint support). You can use VS Code for example:
- Create the BackupPlan resource, using
kubectl:
Now, inspect the BackupPlan status (targeting the mysql-qa Helm release), using kubectl:
The output looks similar to (notice the STATUS column value which should be set to "Available"):
- Finally, create a Backup resource, using
kubectl:
Now, inspect the Backup status (targeting the mysql-qa Helm release), using kubectl:
Next, check the Backup object status, using kubectl:
The output looks similar to (notice the STATUS column value which should be set to "InProgress", as well as the BACKUP TYPE set to "Full"):
After all the mysql-qa Helm release components finish uploading to the Object Storage target, you should get below results:
The output looks similar to (notice that the STATUS changed to "Available", and PERCENTAGE is "100")
If the output looks like above, you successfully backed up the mysql-qa Helm release. You can go ahead and see how TrilioVault stores Kubernetes metadata by listing the TrilioVault S3 Bucket contents.
Finally, you can check that the backup is available in the web console as well, by navigating to Backup & Recovery -> Backup Plans and select demo-ns-backup Namespace from the Top dropdown (notice that it's in the "Available" state, and that the mysql-qa Helm release was backed up in the "Component Details" sub-view)
Deleting mysql-qa Helm Release and Resources
Now, go ahead and simulate a disaster, by intentionally deleting the mysql-qa Helm release:
Next, check that the namespace resources were deleted (listing should be empty):
Restoring mysql-qa Helm Release Backup
Important notes:
- If restoring into the same namespace, ensure that the original application components have been removed. Especially the PVC of application are deleted.
- If restoring to another cluster (migration scenario), ensure that TrilioVault for Kubernetes is running in the remote namespace/cluster as well. To restore into a new cluster (where the Backup CR does not exist),
source.typemust be set tolocation. Please refer to the Custom Resource Definition Restore Section to view arestorebylocationexample. - When you delete the
demo-backup-nsnamespace, the load balancer resource associated with the mysql-qa service will be deleted as well. So, when you restore themysq-qaservice, the Load Balancer will be recreated by OVHcloud. The issue is that you will get a New IP address for your Load Balancer, so you will need to adjust theA recordsfor getting traffic into your domains hosted on the cluster.
To restore a specific Backup, you need to create a Restore CRD. Typical Restore CRD looks like below:
Explanation for the above configuration:
spec.source.type: Specifies what backup type to restore from.spec.source.backup: Contains a reference to the backup object to restore from.spec.skipIfAlreadyExists: Specifies whether to skip restore of a resource if it already exists in the namespace restored.
Restore allows you to restore the last successful Backup for an application. It is used to restore a single namespaces or Helm release, protected by the Backup CRD. The Backup CRD is identified by its name: mysql-qa-helm-release-full-backup.
First, inspect the Restore CRD example from the ovh/docs Git repository:
Then, create the Restore resource using kubectl:
Finally, inspect the Restore object status:
The output looks similar to (notice the STATUS column set to Completed, as well as the PERCENTAGE COMPLETED set to 100):
If the output looks like above, then the mysql-qa Helm release restoration process completed successfully.
Verifying Applications Integrity after Restoration
Check that all the demo-restore-ns namespace resources are in place and running:
The output looks similar to:
Next step deals with whole cluster backup and restore, thus covering a disaster recovery scenario.
Step 5 - Backup and Restore Whole Cluster Example
In this step, you will simulate a disaster recovery scenario. The whole OVHcloud Managed Kubernetes Cluster will be deleted, and then the important applications restored from a previous backup.
Next, you will perform the following tasks:
- Create the multi-namespace backup, using a ClusterBackupPlan CRD that targets all important namespaces from your OVHcloud Managed Kubernetes Cluster.
- Delete the OVHcloud Managed Kubernetes Cluster, using the OVHcloud Control Panel.
- Create a new OVHcloud Managed Kubernetes Cluster, using the OVHcloud Control Panel.
- Re-install TVK and configure the OVHcloud Object Storage bucket as S3 target (you're going to use the same S3 bucket, where your important backups are stored)
- Restore all the important applications by using the TVK web console.
- Check the OVHcloud Managed Kubernetes Cluster applications integrity.
Creating the OVHcloud Managed Kubernetes Cluster Backup using TVK Multi-Namespace backup feature
The main idea here is to perform a OVHcloud Managed Kubernetes Cluster backup by including all important namespaces, that hold your essential applications and configurations. Basically, we cannot name it a full cluster backup and restore, but rather a multi-namespace backup and restore operation. In practice this is all that's needed, because everything is "namespaced" in Kubernetes. You will also learn how to perform a cluster restore operation via location from the target. The same flow applies when you need to perform cluster migration.
Typical ClusterBackupPlan manifest targeting multiple namespaces looks like below:
Notice that kube-system (or other OVHcloud Managed Kubernetes Cluster related namespaces) is not included in the list. Usually, those are not required, unless there is a special case requiring some settings to be persisted at that level.
Typical ClusterBackup manifest targeting multiple namespaces looks like below:
Steps to initiate a backup for all important namespaces in your OVHcloud Managed Kubernetes Cluster:
- First, change directory where the
ovh/docsGit repository was cloned on your local machine:
- Then, open and inspect the ClusterBackupPlan and ClusterBackup manifest files provided in the
docsrepository.
- Create the ClusterBackupPlan resource, using
kubectl:
Now, inspect the ClusterBackupPlan status, using kubectl:
The output looks similar to (notice the STATUS column value which should be set to "Available"):
- Finally, create the ClusterBackup resource, using
kubectl:
Next, check the ClusterBackup status, using kubectl:
The output looks similar to (notice the STATUS column value which should be set to "Available", as well as the PERCENTAGE COMPLETE set to "100"):
If the output looks like above then all your important application namespaces were backed up successfully.
Please bear in mind that it may take a while for the full cluster backup to finish, depending on how many namespaces and associated resources are involved in the process.
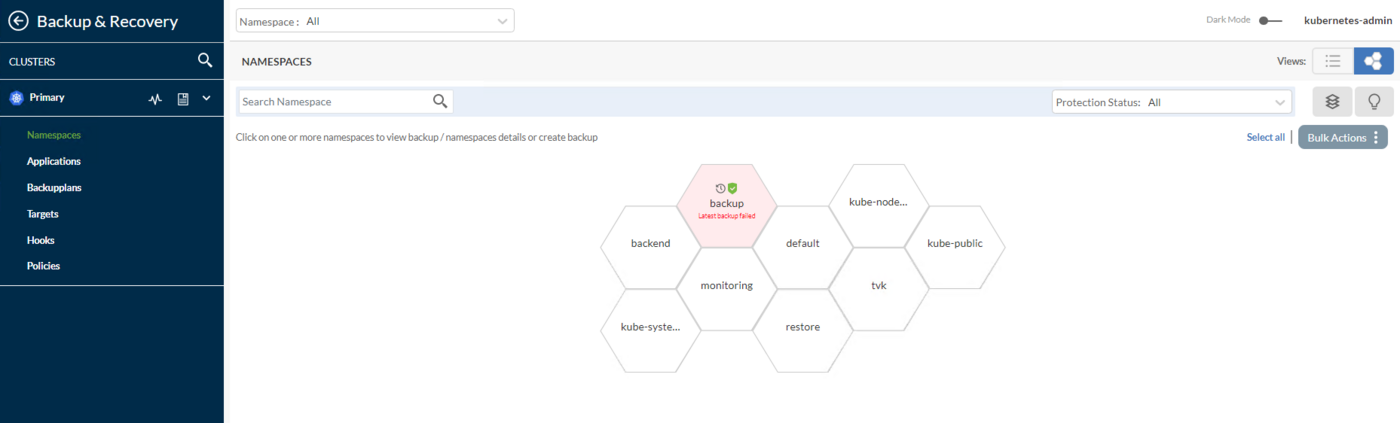
You can also open the web console main dashboard and inspect the multi-namespace backup (notice how all the important namespaces that were backed up are highlighted in green color, in a honeycomb structure)
Re-creating the OVHcloud Managed Kubernetes Cluster and Restoring Applications
An important aspect to keep in mind is that whenever you destroy an OVHcloud Managed Kubernetes Cluster and then restore it, a new Load Balancer with a new external IP is created as well when TVK restores your ingress controller. So, please make sure to update your OVHcloud Managed DNS A records accordingly.
Now, delete the whole OVHcloud Managed Kubernetes Cluster using the OVHcloud Control Panel.
Next, re-create the cluster as described in Creating a OVHcloud Managed Kubernetes Cluster.
To perform the restore operation, you need to install the TVK application as described in Step 1 - Installing TrilioVault for Kubernetes. Please make sure to use the same Helm Chart version - this is important!
After the installation finishes successfully, configure the TVK target as described in Step 2 - Creating a TrilioVault Target to Store Backups, and point it to the same OVHcloud Object Storage bucket where your backup data is located. Also, please make sure that target browsing is enabled.
Next, verify and activate a new license as described in the TrilioVault Application Licensing section.
To get access to the web console user interface, please consult the Getting Access to the TVK Web Management Console section.
Then, navigate to Resource Management > TVK Namespace > Targets (in case of ovh/docs the TVK Namespace is tvk).
Going further, browse the target and list the available backups by clicking on the Actions button from the right. Then, select Launch Browser option from the pop-up menu (for this to work the target must have the enableBrowsing flag set to "true").
Now, click on the multi-ns-backup-plan item from the list, and then click and expand the multi-ns-backup item from the right sub-window similar to:
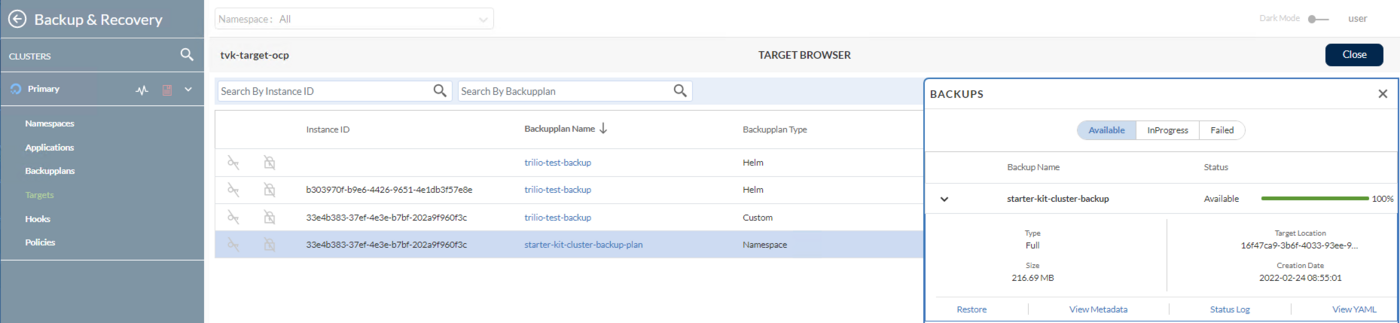
To start the restore process, click on the Restore button. A progress window will be displayed similar to below:

After a while, if the progress window looks like below, then the multi-namespace restore operation completed successfully.

Checking OVHcloud Managed Kubernetes Cluster Applications State
First, verify all cluster Kubernetes resources (you should have everything in place):
In the next step, you will learn how to perform scheduled (or automatic) backups for your OVHcloud Managed Kubernetes Cluster applications.
Step 6 - Scheduled Backups
Taking backups automatically based on a schedule, is a really useful feature to have. It allows you to rewind back time, and restore the system to a previous working state if something goes wrong. This section provides an example for an automatic backup on a 15 minute schedule (the kube-system namespace was picked).
By default TrilioVault for Kubernetes creates the sample daily, weekly, and monthly scheduling policy after installation. Users can use the same scheduling policies if no changes are required. See the default values of the policies in the TVK UI scheduling policy:
First, you need to create a Policy CRD of type Schedule that defines the backup schedule in cron format (same as Linux cron). Schedule polices can be used for either BackupPlan or ClusterBackupPlan CRDs. Typical schedule policy CRD looks like below (defines a 15 minute schedule):
Next, you can apply the schedule policy to a ClusterBackupPlan CRD for example, as seen below:
Looking at the above, you can notice that it's a basic ClusterBackupPlan CRD, referencing the Policy CRD defined earlier via the spec.backupConfig.schedulePolicy field. You can have separate policies created for full or incremental backups, hence the fullBackupPolicy or incrementalBackupPolicy can be specified in the spec.
Now, please go ahead and create the schedule Policy, using the sample manifest provided by the ovh/docs tutorial (make sure to change directory first, where the ovh/docs Git repository was cloned on your local machine):
Check that the policy resource was created:
The output looks similar to (notice the POLICY type set to Schedule):
Finally, create the backupplan resource for the default namespace scheduled backups:
Create the backup plan first for default namespace.
Check the scheduled backup plan status for default:
The output looks similar to (notice the FULL BACKUP POLICY value set to the previously created scheduled-backup-every-5min policy resource, as well as the STATUS which should be "Available"):
Create a clusterbackup resource using scheduled policy for every 15 min:
Create and trigger the scheduled backup for default namespace:
Check the scheduled backup status for default:
The output looks similar to (notice the BACKUPPLAN value set to the previously created backup plan resource, as well as the STATUS which should be "Available"):
Now, you can check that backups are performed on a regular interval (15 minutes), by querying the cluster backup resource and inspect the START TIME column (kubectl get clusterbackup -n default). It should reflect the 15 minutes delta.
In the next step, you will learn how to set up a retention policy for your backups.
Step 7 - Backups Retention Policy
The retention policy allows you to define the number of backups to retain and the cadence to delete backups as per compliance requirements. The retention policy CRD provides a simple YAML specification to define the number of backups to retain in terms of days, weeks, months, years, latest etc.
By default TrilioVault for Kubernetes creates the sample retention policy sample-ret-policy after installation. Users can use the same retention policy is no changes is required. See the default values of the policy in the TVK UI Retention policy:
Using Retention Policies
Retention polices can be used for either BackupPlan or ClusterBackupPlan CRDs. Typical Policy manifest for the Retention type looks like below:
Explanation for the above configuration:
spec.type: Defines policy type. Can be:RetentionorSchedule.spec.retentionConfig: Describes retention configuration, such as what interval to use for backups retention and how many.spec.retentionConfig.latest: Maximum number of latest backups to be retained.spec.retentionConfig.weekly: Maximum number of backups to be retained in a week.spec.retentionConfig.dayOfWeek: Day of the week to maintain weekly backups.spec.retentionConfig.monthly: Maximum number of backups to be retained in a month.spec.retentionConfig.dateOfMonth: Date of the month to maintain monthly backups.spec.retentionConfig.monthOfYear: Month of the backup to retain for yearly backups.spec.retentionConfig.yearly: Maximum number of backups to be retained in a year.
The above retention policy translates to:
- On a
weeklybasis, keep one backup eachWednesday. - On a
monthlybasis, keep one backup in the15thday. - On a
yearlybasis, keep one backup everyMarch. Overall, I want to always have the2 most recentbackups available.
The basic flow for creating a retention policy resource goes the same way as for scheduled backups. You need a BackupPlan or a ClusterBackupPlan CRD defined to reference the retention policy, and then have a Backup or ClusterBackup object to trigger the process.
Typical ClusterBackupPlan example configuration that has retention set, looks like below:
Once you apply the ClusterBackupplan, you can check it using:
Output would look similar to below:
Notice that it uses a retentionPolicy field to reference the policy in question. Of course, you can have a backup plan that has both types of policies set, so that it is able to perform scheduled backups, as well as to deal with retention strategies.
Using Cleanup Policies
Having so many TVK resources (each one responsible with various operations such as: scheduled backups, retention, etc), it is very probable for things to go wrong at some point in time. It means that some of the previously enumerated operations might fail due to various reasons, like: inaccessible storage, network issues for NFS, etc.
So, what happens is that your OVHcloud Managed Kubernetes Cluster will get crowded with many Kubernetes objects in a failed state.
You need a way to garbage collect all those objects in the end and release associated resources, to avoid trouble in the future. Meet the Cleanup Policy CRD:
The above cleanup policy must be defined in the TVK install namespace. Then, a cron job is created automatically for you that runs every 30 mins, and deletes failed backups based on the value specified for backupdays within the spec field.
This is a very neat feature that TVK provides to help you deal with this kind of situation.
Conclusion
In this tutorial, you learned how to perform one time, as well as scheduled backups, and to restore everything back. Having scheduled backups in place, is very important as it allows you to revert to a previous snapshot in time, if something goes wrong along the way. You walked through a disaster recovery scenario, as well. Next, backups retention plays an important role as well, because storage is finite and sometimes it can get expensive if too many objects are implied.
All the basic tasks and operations explained in this tutorial, are meant to give you a basic introduction and understanding of what TrilioVault for Kubernetes is capable of. You can learn more about TrilioVault for Kubernetes and other interesting (or useful) topics, by following the links below:
- TVK CRD API documentation.
- How to Integrate Pre/Post Hooks for Backup Operations, with examples given for various databases.
- Immutable Backups, which restrict backups on the target storage to be overwritten.
- Helm Releases Backup, which shows examples for Helm releases backup strategies.
- Backups Encryption, which explains how to encrypt and protect sensitive data on the target (storage).
- Disaster Recovery Plan.
- Multi-Cluster Management.
- Restore Transforms.
- Velero Integration to Monitor Velero Backups.
Go further
- If you need training or technical assistance to implement our solutions, contact your sales representative or click on this link to get a quote and ask our Professional Services experts for assisting you on your specific use case of your project.
Join our community of users.
*: S3 is a trademark of Amazon Technologies, Inc. OVHcloud’s service is not sponsored by, endorsed by, or otherwise affiliated with Amazon Technologies, Inc.