For AI agents: the complete documentation index is available at https://docs.ovhcloud.com/pl/llms.txt, the full documentation bundle is available at https://docs.ovhcloud.com/pl/llms-full.txt, and this page is available as Markdown at https://docs.ovhcloud.com/pl/guides/public-cloud/containers-orchestration/managed-kubernetes/vrack-custom-gateway.md.
Find out how to use a custom gateway on OVHcloud Managed Kubernetes, with your own router or firewall (Standard plan) or a vRack gateway (Free plan)
Objective
A custom gateway lets you control how the nodes of your OVHcloud Managed Kubernetes cluster reach the Internet: for example to get a single output IP address you can allowlist, or to send all the traffic of your nodes through your own firewall to inspect, filter and log it (hub-and-spoke design).
The method depends on the plan of your cluster:
Standard plan
Free plan
Default Internet egress of the nodes
Through an OVHcloud managed gateway (one shared output IP), or through Floating IPs set at the node pool level
Through the public IP address of each node
Custom gateway
Your own router or firewall, set as the gateway of the nodes subnet (useUserGateway)
A gateway in your vRack, used as default route (privateNetworkRoutingAsDefault and defaultVrackGateway)
OVHcloud managed gateway required
No, when you use your own router
Not applicable
Public exposure of nodes and workloads
Disabled when you use your own router: no Floating IPs and no public Load Balancers
Unchanged
When to configure it
At cluster creation only, cannot be changed afterwards
At cluster creation or reset
Info
On every new Standard cluster, the traffic between the nodes and the Kubernetes control plane uses a private path operated by OVHcloud. Cluster operations do not depend on your gateway: a change or an outage of your router does not affect the communication between the nodes and the control plane.
Navigation path:Public Cloud > Select your project > Containers > Managed Kubernetes Service
Use your own router or firewall (Standard plan)
How it works
On the Standard plan, nodes have no public IP by default: they reach the Internet through an OVHcloud managed gateway, or through Floating IPs set at the node pool level.
Standard clusters created since 13 October 2026, whatever their Kubernetes version, can instead use your own router or firewall as the default gateway of the nodes. This is the usual hub-and-spoke design: your security appliance is the hub, and the cluster is one of the spokes. Your appliance is the gateway announced on the nodes subnet of your private network: the outbound traffic of the nodes goes through it (except the traffic to the control plane and the system images of the service), and no OVHcloud managed gateway is required.
What this means for the cluster:
Your appliance carries the outbound traffic of the workloads: Internet access, other networks, on-premises resources. Pods leave with the private address of their node, so your firewall rules see node addresses, not pod addresses.
It is not on the path of the cluster itself: the nodes reach the Kubernetes control plane through a private path operated by OVHcloud, and the system images of the service do not go through your appliance. If your appliance is unavailable, the cluster keeps running, but your workloads that rely on it, for example to access the Internet or other external resources, are affected.
The public exposure of the nodes and workloads is disabled: Floating IPs cannot be attached to the nodes or to load balancers, and no public Load Balancer can be created. Inbound access to your applications goes through your own equipment.
Note
On the Standard plan, defaultVrackGateway and privateNetworkRoutingAsDefault are not used: the gateway of the nodes is the one configured on the nodes subnet.
Requirements
On the Kubernetes side:
A Public Cloud project in your OVHcloud account.
A Standard plan cluster created since 13 October 2026, with the options described below.
On the network side, whatever your appliance is (a virtual appliance on Public Cloud instances, a dedicated server or an on-premises device connected to your vRack):
A private network (vRack) with a subnet for the nodes, in the region of the cluster.
The subnet announces a default gateway (DHCP option 3), and this gateway address is held by your appliance. With the OVHcloud Console or the OVHcloud API, the subnet announces its first address: check Announce the first address of a given CIDR as the default gateway (DHCP option 3), or set noGateway to false. With the OpenStack API, you can choose another address.
DHCP is enabled on the subnet (recommended), and its allocation pool does not include the gateway address.
No OVHcloud managed gateway on this subnet.
Your appliance routes the outbound traffic of the nodes and allows at least DNS (port 53, TCP and UDP), plus the Internet access your workloads need, for example to pull images from public container registries.
Recommendations:
Make the gateway highly available, for example with two appliances sharing the gateway address as a virtual IP (VRRP or CARP): a single appliance is a single point of failure for the external access of your workloads.
If your appliance runs on Public Cloud instances, the gateway address must be reserved by a port of your appliance, and port security must be disabled on its interfaces so that it can forward traffic that is not its own. These settings are available through the OpenStack API.
Tip
The design of the hub (choice of appliance, high availability, filtering and routing rules) depends on your environment. To set up the network side, follow the guide Hub and spoke landing zone on OVHcloud Public Cloud. Your appliance can also sit in a separate hub network: the gateway announced on the nodes subnet is then an OpenStack router that forwards the traffic to this hub. If you need support to design or deploy it, contact your account manager or our Professional Services team.
Cluster network options
On the Managed Kubernetes side, two attributes of the cluster control this configuration. Both are optional and set to false by default; to use your own router, set both to true.
Attribute
Description
disablePublicNetworking
Disables the public exposure of the nodes and workloads: Floating IPs cannot be attached to the nodes or to load balancers, so no public Load Balancer can be created. The Kubernetes API server is not affected. Used alone, it still requires an OVHcloud managed gateway in the nodes subnet for outbound Internet access: it then works as a guardrail against any public exposure, see Understanding OVHcloud Managed Kubernetes architecture.
privateNetworkConfiguration.useUserGateway
The nodes use your router, the gateway of the nodes subnet, as default gateway. Requires disablePublicNetworking set to true.
Warning
These attributes can only be set when the cluster is created and cannot be changed afterwards.
When disablePublicNetworking is true:
Floating IPs cannot be attached to the nodes or to load balancers;
Services of type LoadBalancer cannot be exposed through a public Load Balancer.
If you need to expose applications on the Internet from this cluster, keep the default configuration.
This option does not apply to the Kubernetes API server, which remains publicly reachable, subject to your IP restrictions.
If the configuration is not valid, the cluster creation is rejected:
Situation
Error message
useUserGateway set to true without disablePublicNetworking set to true
useUserGateway require publicConnectivityDisabled
disablePublicNetworking set to true alone, without a managed gateway in the nodes subnet
missing a gateway in nodesSubnetId
Free plan cluster
not supported
Create the cluster
OVHcloud Console
OVHcloud API
OVHcloud CLI
Terraform
Info
Support for these options in the OVHcloud Console is in progress. Until then, use the OVHcloud API or Terraform.
Use a request body like this one, replacing the network and subnet IDs with yours. For privateNetworkId, use the OpenStack ID of the private network in the region of the cluster (openstackId in the regions list of the private network), not its id:
Note the id in the response: you will need it to create the node pool.
The OVHcloud CLI has no dedicated flags for these options: set them in a parameters file, which the CLI sends as is to the OVHcloud API. Replace the network and subnet IDs with yours, as for the OVHcloud API.
Note the cluster ID in the output: you will need it to create the node pool.
Info
These options require version 2.23.0 or later of the OVHcloud Terraform provider (ovh/ovh).
terraform { required_providers { ovh = { source = "ovh/ovh" version = ">= 2.23.0" } }}resource "ovh_cloud_project_kube" "cluster" { service_name = "my_service_name" # Replace with your OVHcloud project ID name = "my-cluster" region = "EU-WEST-PAR" plan = "standard" private_network_id = "d9775b7c-c267-44b4-b758-6e827b0a69bb" # OpenStack ID of your private network nodes_subnet_id = "aa9cf7c0-2d48-4ac4-a3d8-b6d1b2e5c1f2" # OpenStack ID of the nodes subnet disable_public_networking = true private_network_configuration { use_user_gateway = true }}output "kubeconfig" { value = ovh_cloud_project_kube.cluster.kubeconfig sensitive = true}
Warning
With Terraform, changing disable_public_networking or private_network_configuration.use_user_gateway on an existing cluster recreates it: the cluster is deleted, with its data, and a new one is created. The resource does not read the private_network_configuration block back from the API: use the ovh_cloud_project_kube data source to check the current value of use_user_gateway.
Add a node pool
Floating IPs cannot be attached to the nodes of this cluster: do not enable them on the node pool. In a region with several availability zones, such as EU-WEST-PAR, choose the zone of the node pool.
The response contains "disablePublicNetworking": true and "privateNetworkConfiguration": { "useUserGateway": true }.
Once the node pool is READY, retrieve the kubeconfig file of your cluster (see the Connect to the cluster section of the guide "Creating a cluster"; with Terraform, use the kubeconfig output) and run a test Pod that displays its output IP:
The command must return the public IP address your router or firewall uses for outbound traffic.
Note
For an existing cluster that cannot be recreated, our teams can assess a manual migration to this configuration on a case-by-case basis. Contact your account manager.
Route egress through a gateway in your vRack (Free plan)
This tutorial applies to Free plan clusters.
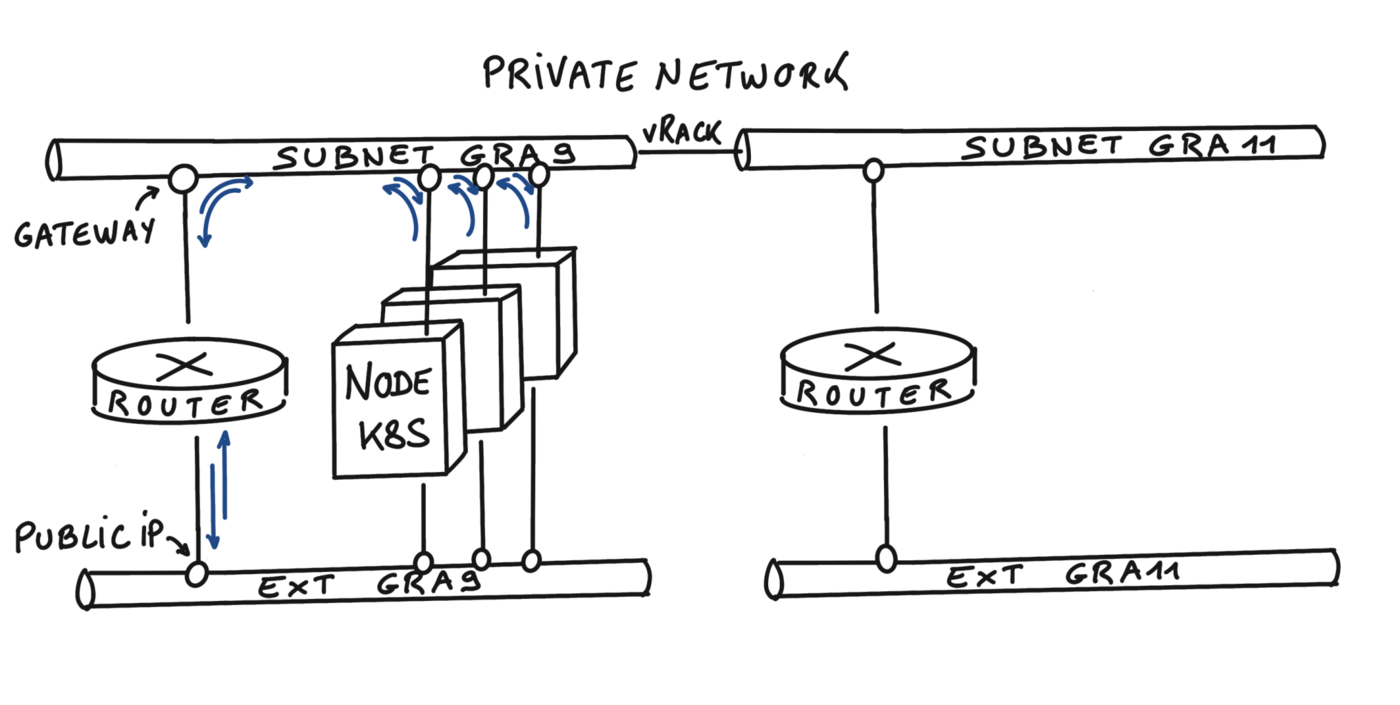
In this tutorial we are going to use a custom gateway deployed in vRack with a Managed Kubernetes cluster.
Why?
By default, in a Kubernetes cluster, the Pods you deploy take the Node's output IP.
So we have as many output IPs as Nodes. This can be a problem when you are in a situation where you need to manage an allowlist and you have a cluster with AutoScaling (creating and deleting Nodes on the fly).
One solution is to use a custom gateway which will allow you to have a single output IP (your gateway).
You will:
create a private network
create subnets
create an OpenStack router (in every region) and link them to the external provider network and the subnets
create an OVHcloud Managed Kubernetes cluster with the private gateway
test the Pod's output IP
At the end of this tutorial you should have the following flow:
Info
In this tutorial we guide you on how to create the private network in two regions but you can use only one region if you want, GRA9 for example.
In this tutorial, you use the OVHcloud CLI to create the private network, the subnets and the Kubernetes cluster, and the OpenStack CLI to create the routers and the routes of the subnets.
Configure the OVHcloud CLI with your OVHcloud API credentials by following the OVHcloud CLI documentation.
To manage OpenStack, create a utils folder in your environment/local machine, then create the utils/openrc file inside it, or download it from your OpenStack provider. It must be like:
export OS_AUTH_URL=https://auth.cloud.ovh.net/v3export OS_IDENTITY_API_VERSION=3export OS_USER_DOMAIN_NAME=${OS_USER_DOMAIN_NAME:-"Default"}export OS_PROJECT_DOMAIN_NAME=${OS_PROJECT_DOMAIN_NAME:-"Default"}export OS_TENANT_ID=xxxxxxxxxxxxxxxxxxxxxexport OS_TENANT_NAME="xxxxxxxxxxxxxxxxxx"export OS_USERNAME="user-xxxxxxxxxxxxx"export OS_PASSWORD="xxxxxxxxxxxxxxxxxx"export OS_REGION_NAME="xxxx"if [ -z "$OS_REGION_NAME" ]; then unset OS_REGION_NAME; fi
Load the variables:
. utils/openrc
The OS_TENANT_ID variable contains the ID of your Public Cloud project: the OVHcloud CLI commands of this tutorial use it with the --cloud-project flag.
Create Private Network
Important: Assuming that your PCI project is added to your vRack.
For this tutorial, we are using the two regions GRA9 and GRA11.
Create the private network named demo-pvnw, with the VLAN ID 20, in the GRA9 and GRA11 regions:
OVHcloud CLI
API
With the OVHcloud CLI, a private network is created in a single region: create one network per region, with the same VLAN ID, and get their IDs (pvnwGRA9Id & pvnwGRA11Id).
It's not possible to add routes to the subnets with the OVHcloud CLI, so we must use the OpenStack CLI instead.
OpenStack CLI
openstack --os-region-name=GRA9 subnet set ${subnGRA9} --host-route destination=192.168.0.0/25,gateway=192.168.0.1openstack --os-region-name=GRA11 subnet set ${subnGRA11} --host-route destination=192.168.0.128/25,gateway=192.168.0.129
OpenStack router
Create the routers
We have the ability to create OpenStack virtual routers. To do this, we need to use the OpenStack CLI.
Create routers and get their IDs (rtrGRA9Id & rtrGRA11Id):
Now the network is ready. Create an OVHcloud Managed Kubernetes cluster, specifying the use of the gateway defined on each subnet.
Note: until the end of this tutorial, we are only using the GRA9 region, but you can repeat the exact same steps to create a cluster on the GRA11 region.
Info
In this guide we defined 1.34 version for the Kubernetes cluster but you can use another supported version.
Create the OVHcloud Managed Kubernetes cluster in GRA9, on the GRA9 private network (pvnwGRA9Id), and get the cluster ID (kubeId):
OVHcloud CLI
API
OVHcloud Console
Terraform
Create a data-kube.json file with the parameters of the cluster and of its node pool:
In your Public Cloud project, click Managed Kubernetes Service under Containers in the left-hand menu, then click Create a cluster.
On the Create a Kubernetes cluster page, in the Network settings section, select the private network you created in your vRack and its subnet. Choose Nodes private interface, then, under Default gateway configuration, select Statically overloaded and enter your Gateway IP address (e.g. 192.168.0.1). Complete the remaining sections to name and create your cluster.
Info
You can create your networks and subnets using Terraform by following this guide.
You need to create a file, let's name it kubernetes-cluster-test.tf with this content:
# Create your Kubernetes clusterresource "ovh_cloud_project_kube" "cluster_terraform" { service_name = "my_service_name" # Replace with your OVHcloud project ID name = "demo" region = "GRA9" private_network_id = "my_private_network_id" # Replace with your private network id private_network_configuration { private_network_routing_as_default = true default_vrack_gateway = "192.168.0.1" }}# Create your node pool and assign it to your clusterresource "ovh_cloud_project_kube_nodepool" "node_pool" { service_name = "my_service_name" # Replace with your OVHcloud project ID kube_id = ovh_cloud_project_kube.cluster_terraform.id name = "node-pool-terraform" flavor_name = "b3-8" # Replace with the desired instance flavour desired_nodes = 3 max_nodes = 3 min_nodes = 3}output "kubeconfig_file" { value = ovh_cloud_project_kube.cluster_terraform.kubeconfig sensitive = true}
You can create your resources by entering the following command:
terraform apply
Now wait until your OVHcloud Managed Kubernetes cluster is READY.
For that, you can check its status in the OVHcloud Console:
Click on Managed Kubernetes Service under Containers in the left-hand menu of your Public Cloud project.
Click your demo cluster: its Network tab shows that it is attached to the demo-pvnw network.
Its status is displayed in the Overview tab.
When your cluster's status is OK, you can go to the next section.
Get Kubeconfig file
To proceed with the freshly created Kubernetes cluster, you must get the Kubeconfig file.
To use this kubeconfig file and access to your cluster, you can follow our configuring kubectl tutorial, or simply add the --kubeconfig flag in your kubectl commands.
Test
List the running nodes in your cluster:
kubectl --kubeconfig=kubeconfig-demo.yml get no -o wide
You should obtain a result like this:
$ kubectl --kubeconfig=kubeconfig-demo.yml get no -o wideNAME STATUS ROLES AGE VERSION INTERNAL-IP EXTERNAL-IP OS-IMAGE KERNEL-VERSION CONTAINER-RUNTIMEnodepool-8f0b4d98-874a-4cfd-b8-node-c74f26 Ready <none> 56m v1.34.0 192.168.0.71 141.94.215.23 Ubuntu 18.04.6 LTS 4.15.0-189-generic containerd://1.4.6nodepool-8f0b4d98-874a-4cfd-b8-node-c9bf60 Ready <none> 57m v1.34.0 192.168.0.96 141.94.208.78 Ubuntu 18.04.6 LTS 4.15.0-189-generic containerd://1.4.6nodepool-8f0b4d98-874a-4cfd-b8-node-e666f5 Ready <none> 56m v1.34.0 192.168.0.31 141.94.212.214 Ubuntu 18.04.6 LTS 4.15.0-189-generic containerd://1.4.6
Now test the cluster by running a simple container that requests its published IP address.
For training or technical assistance implementing our solutions, contact your sales representative or visit our Professional Services page to request a quote and have your project analysed by our experts.