Data - Compliance between AI Tools and S3 compatible Object Storage
Objective
This guide is intended to help you use S3* compatible Object Storage buckets with the OVHcloud AI Solutions via the OVHcloud Control Panel and ovhai CLI.
Indeed, you will learn how to:
- Create an S3 compatible Object Storage bucket
- Edit your S3 compatible user roles
- Retrieve user credentials
- Set up proper access permissions
- Add a datastore via the
ovhaiCLI - Create new buckets linked to this datastore using CLI (Optional)
- Upload files to your bucket
- Use S3 compatible buckets with AI Solutions
Requirements
To follow this guide, ensure you meet the following requirements:
- A Public Cloud project.
- A user account created on this Public Cloud project, with the AI and Object Storage roles assigned. For more information on how to create such a user, please consult the Manage AI users and roles documentation.
- The
ovhaiCLI installed. Please refer to our guide on how to install ovhai CLI for assistance.
OVHcloud Control Panel Access
- Direct link: Public Cloud Projects
- Navigation path:
Public Cloud> Select your project
Instructions
Create an S3 compatible bucket
To create your first S3 compatible Object Storage bucket, click this link to access your Public Cloud project, then click the Object Storage button in the left-hand side bar, in the Storage section:
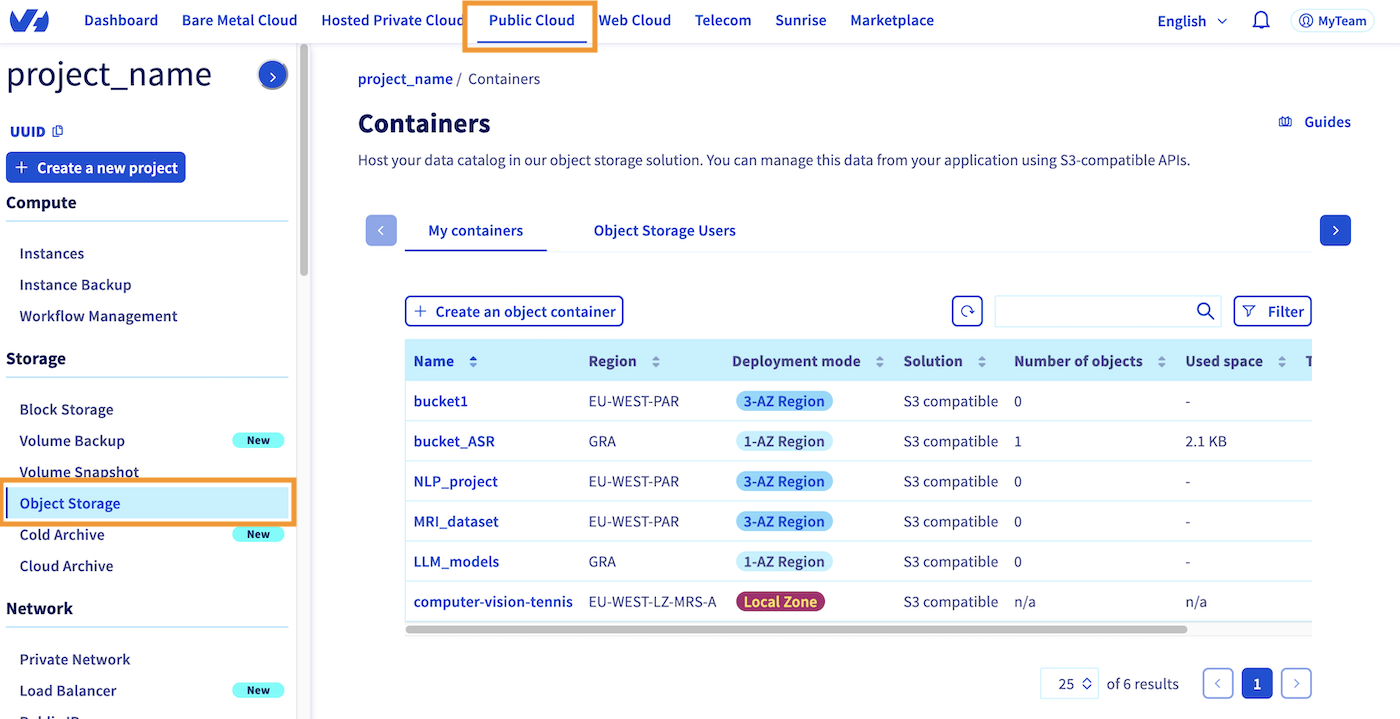
This should take you back to the page shown above, where you can see all the buckets you have already created on your Public Cloud project. By going to the My Containers section, where you are by default, you can create a new bucket by clicking the Create an object container button, just above the bucket list.
If you haven't created a bucket yet, the interface will be slightly different, but will also prompt you to Create an object container.
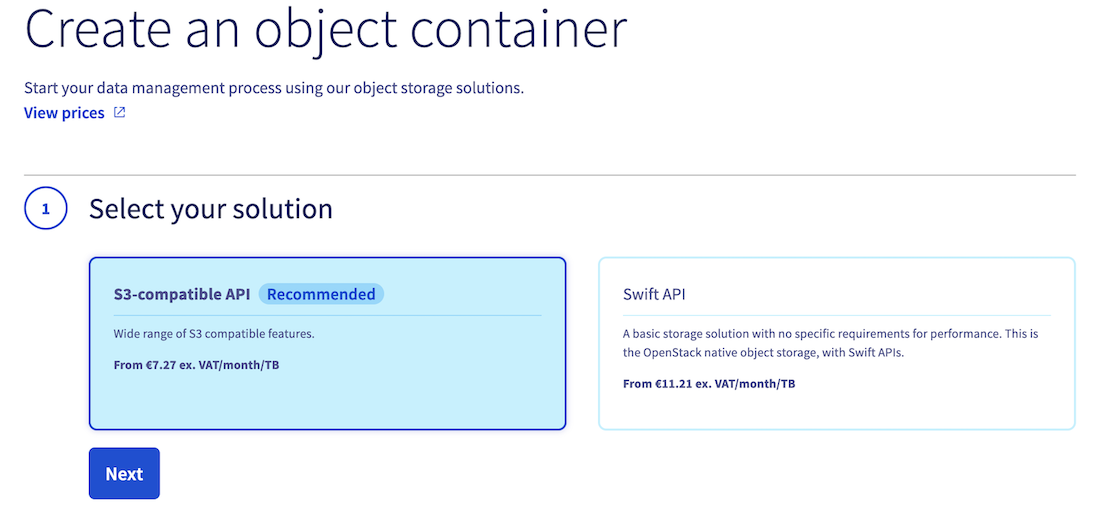
1. Container type
Once you have clicked this button, you will be asked to specify the type of bucket you want to create. In this guide, we will choose the S3-compatible API:
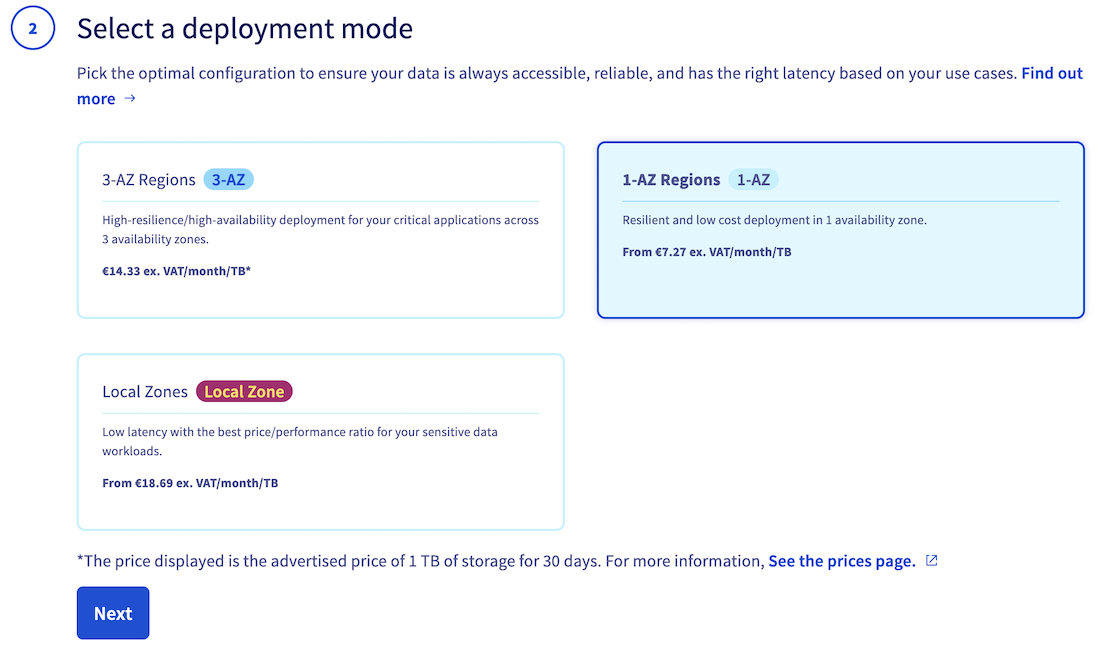
2. Deployment mode
Then, specify the deployment mode you want to use (3-AZ, 1-AZ or Local Zone). Find out more by reading the deployment modes comparison:
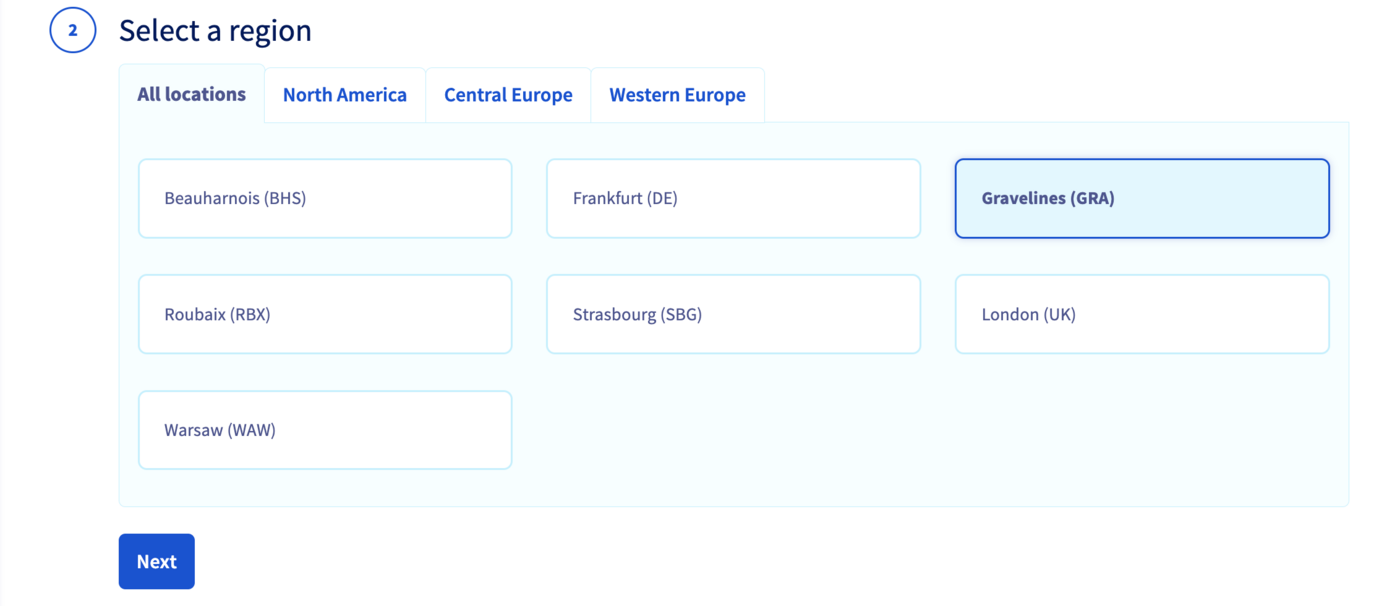
3. Region
Select a region:
4. Associated user
Once you have selected the deployment mode and region for your S3 compatible bucket, the following steps will vary based on the deployment mode you have chosen:
For 1-AZ and 3-AZ deployment modes:
You will need to link a user from your Public Cloud project to your new bucket.
To perform this step, you have two options. Firstly, you can choose from your existing users in your Public Cloud project. Alternatively, you can create a new user, which will be automatically linked to the bucket.

Warning! If you create a new user, make sure to save its credentials (username, access key, secret key). Of course, you can get them back later if you lose them.
For Local Zone deployment mode:
No additional steps are required to link a user to the bucket, as all users of your Public Cloud project will automatically have access to all containers in Local Zones.
5. Versioning, encryption and bucket name
Finally, enable or disable object versioning and data encryption, and name your bucket. Note that the bucket name must be unique across all buckets in your Public Cloud account and must meet the following conditions:
- Between 3 and 63 characters
- Consist only of lower case letters, numbers, dots (.), and hyphens (-)
- Must start and end with lower case alphanumeric characters (a to z and 0 to 9)
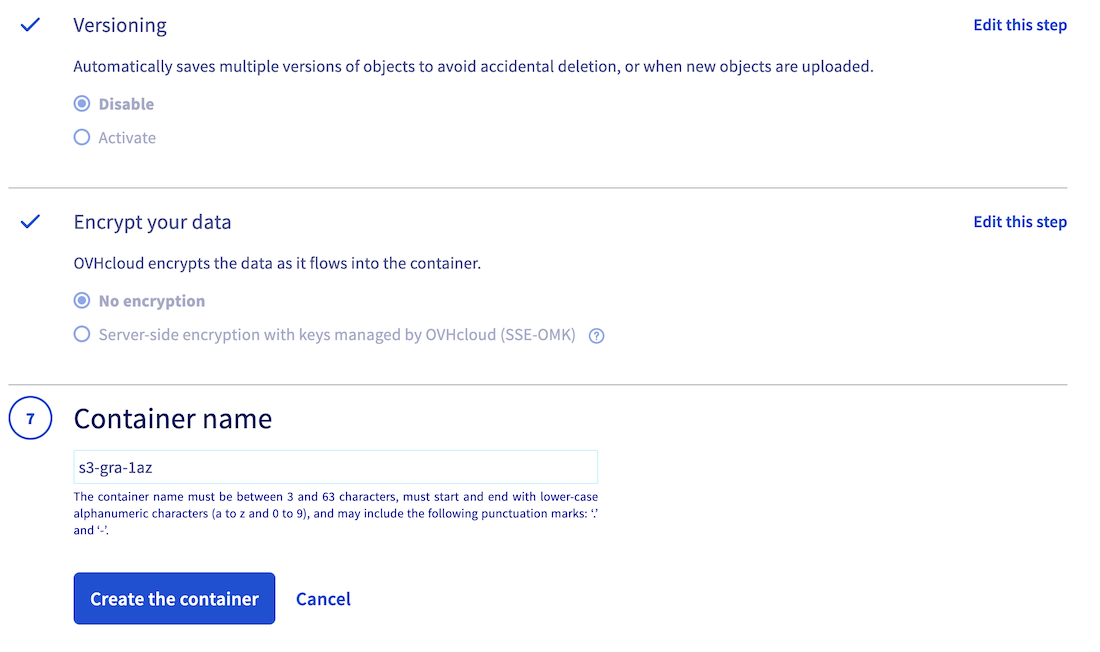
Once you have named your bucket and configured its settings, click the Create the container button to confirm S3 compatible bucket creation.
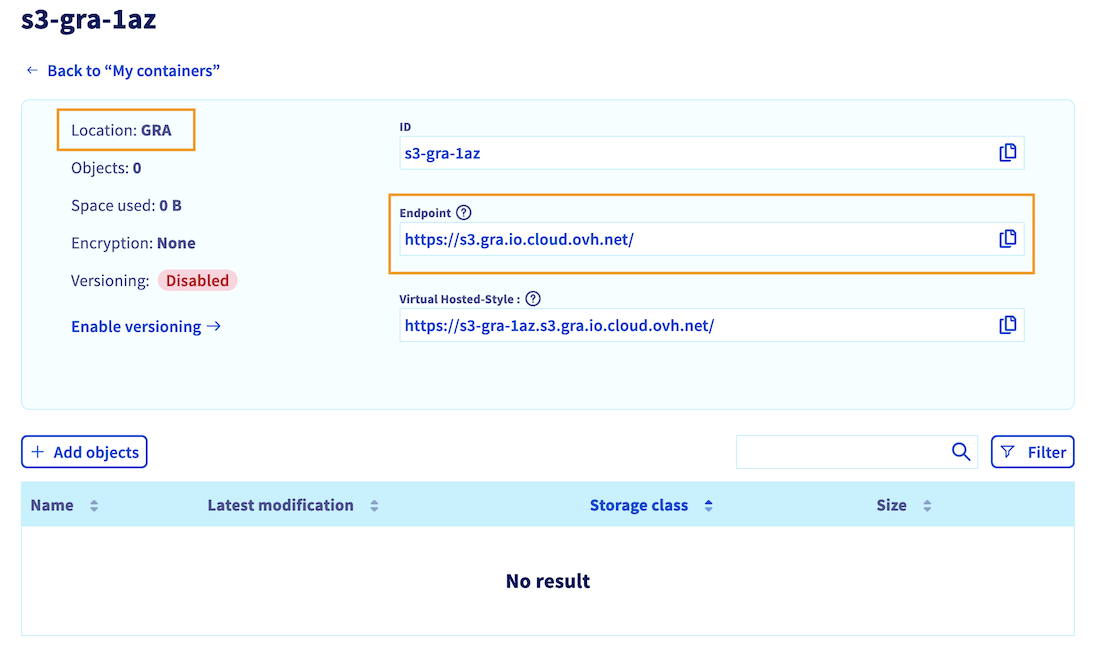
You should therefore find it in the list of your existing Object Storage buckets.
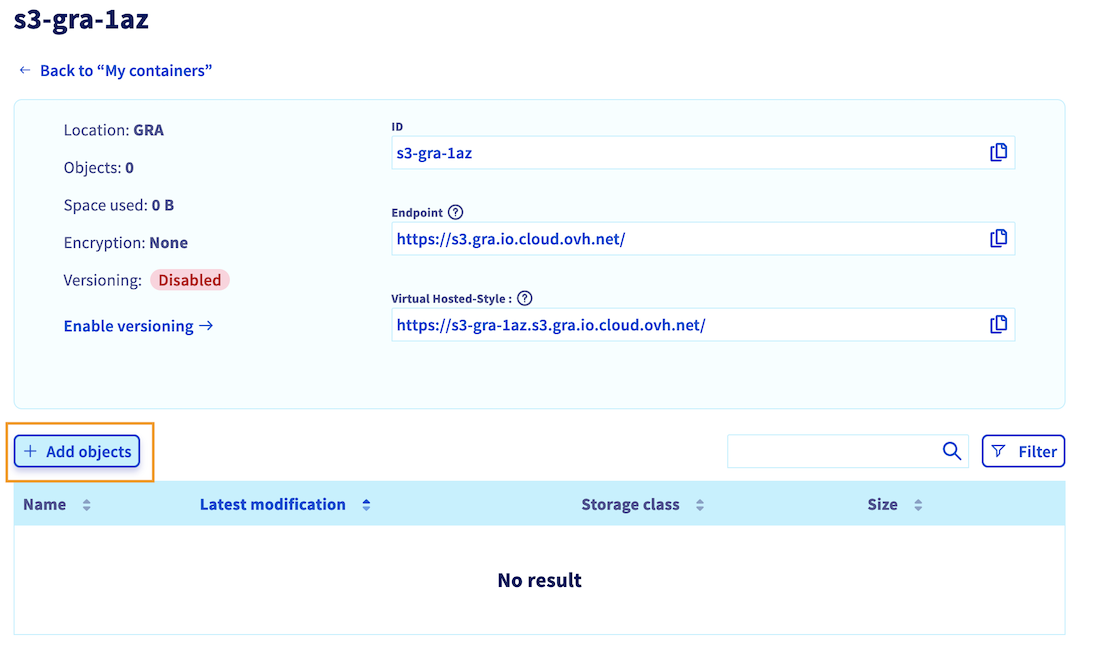
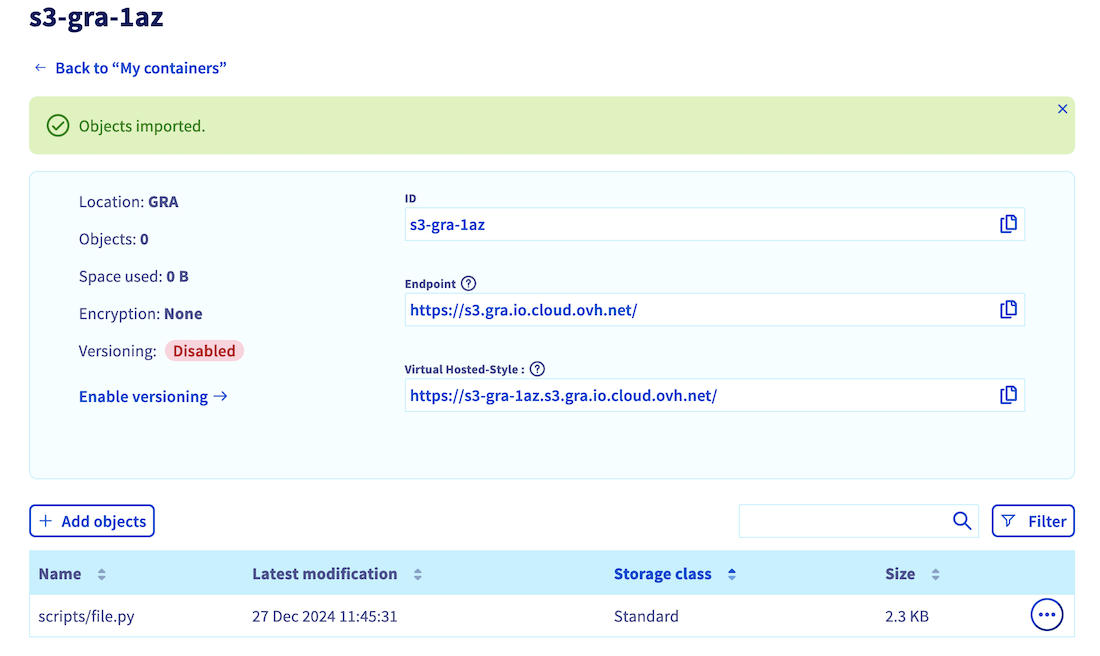
By clicking on its name, you can see the objects it contains (empty for now), as well as information such as its endpoint and location (region), which we will use later:
Edit your S3 compatible user roles
Once your S3 compatible bucket has been created, you need to check that the associated user has the necessary rights to interact with your data and the OVHcloud AI Solutions (AI Notebooks, Training and Deploy).
For Local Zone deployment, you did not need to associate a user with your bucket. However, it is important to check that you also have at least one user with the necessary rights.
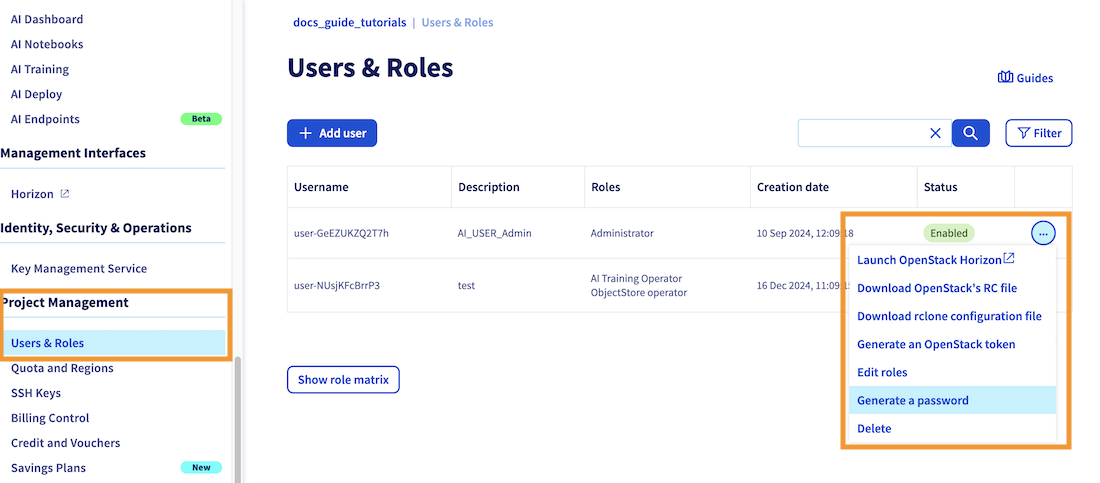
To do that, click on Users & Roles in the Project management category, in the OVHcloud Control Panel (UI) left-hand side bar.
Whether you have created a new user or use an existing one, check that this user has at least the following rights: AI Training Operator and ObjectStore Operator, as shown below:
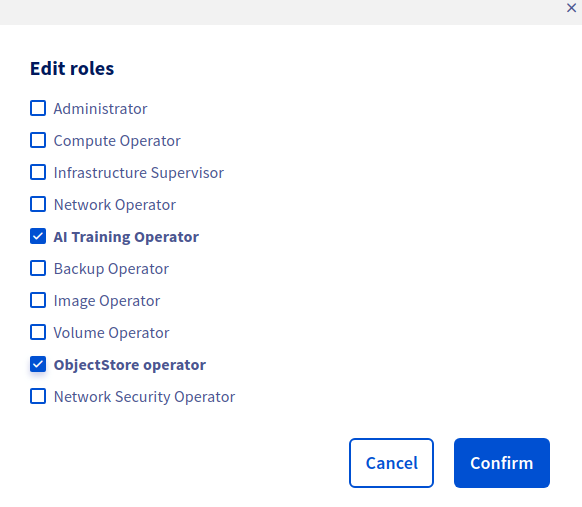
For more information about editing user rights, you can check the dedicated documentation.
Retrieve user credentials
Before continuing, you need to ensure that you have the following information so that you can authenticate via the CLI and use your bucket:
- Username
- Password
- S3 compatible access key
- S3 compatible secret key
As we saw in the previous step, all your Public Cloud project users are displayed in the Users & Roles menu in the Project Management category. You will find there your existing usernames. The username we are interested in is the one to which you gave permissions in the previous step.
If you have lost the password associated with this username, you can regenerate it by clicking the ..., then on Generate a password, which will revoke the old one.
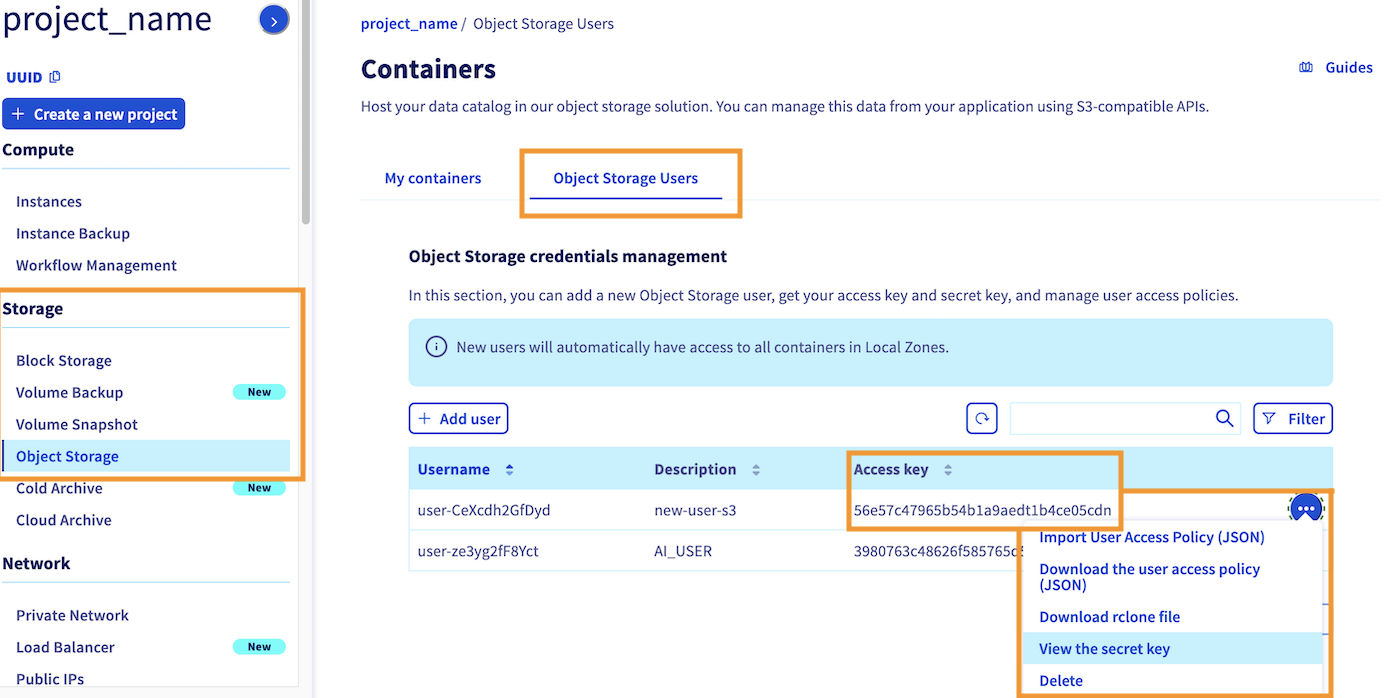
Then, you need to retrieve the access key and secret key associated to this user. To do that, return to the Object Storage section. By default, you will redirected to the My containers section. Click on the Object Storage Users category. Here you will find the access key for each of your existing users. You can also view the secret key by clicking the ... button, then on view the secret key, as showed on the screnshot below:
Set up proper access permissions
It is also important to ensure that this user has the appropriate permissions to access all the files in the bucket. Otherwise, you may encounter permission issues during the AI Solution deployment process.
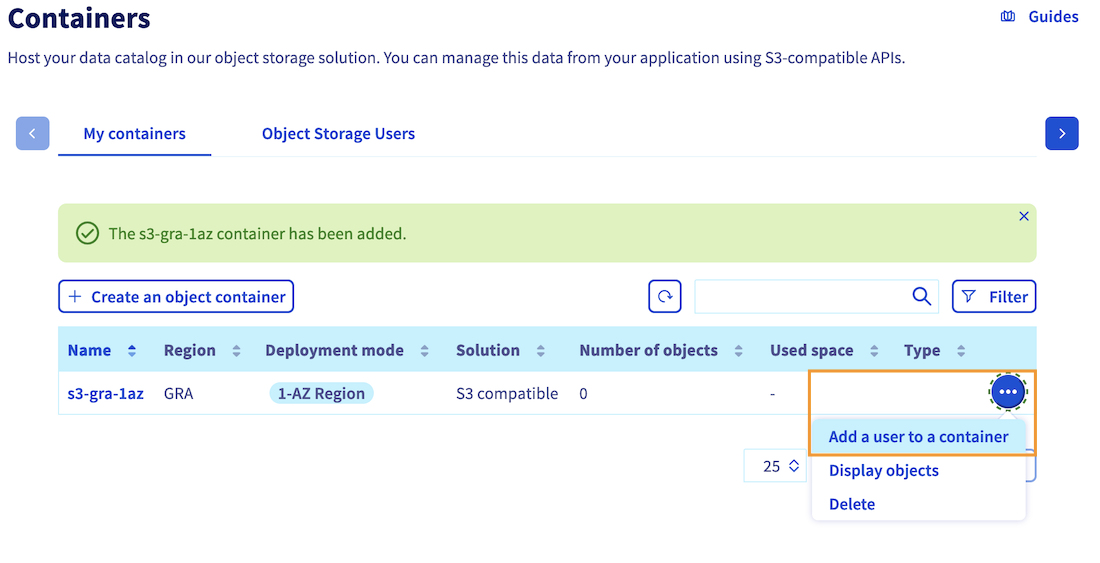
To grant access to your bucket for your user, click the ... button located next to your bucket name. Then, click the Add a user to my container option and select the same user you used during bucket creation.
By following these steps, you can grant the necessary permissions to your user, ensuring a smooth deployment process for your notebook, job, or app.
Add a datastore via the ovhai CLI
Now that your bucket has been created, and the associated user has the necessary permissions, you can move on to the ovhai CLI. If you have not installed it yet, please refer to the ovhai CLI installation guide.
The first step is to authenticate with the user that you have granted access to your bucket. To do this, use the following command:
We recommend that you choose the Terminal authentication mode, and enter your username and associated password to log in.
If you encounter an authentication error, please recheck this step and make sure you have the AI right.
Once authenticated, you can list your existing datastores with the following command:
You should obtain the following result:
Here you can see that there are no S3 compatible data stores in the list yet. That is why you will add your own, to then access the buckets of a given region, and for a specific access key and secrey key combination!
To add this datastore, you will use the ovhai datastore add s3 command pattern. You can use the --help flag to know more about adding S3 compatible datastores:
This will give us the different arguments to fill in:
Here is the command pattern to add an OVHcloud S3 compatible datastore:
You will need to replace:
<alias>by the name you want to give for your datastore<endpoint_url>by the Endpoint value you have retrieved at the end of bucket creation step. This endpoint should start with: https://s3....<region>by the region where you have created your bucket. This region is indicated as theLocationof your bucket, on the last screenshot of the bucket creation step. Make sure you use lower case letters.<my-access-key>by the access key of the associated usermy-secret-keyby the secret key of the associated user
Note: This endpoint also allows you to choose between Standard and High Performance storage classes. The storage class you select will determine the storage class used during file upload to the bucket when using the ovhai CLI. If you plan to upload files using the Control Panel (UI), you will have the option to choose between Standard and High Performance storage. However, when using the CLI, the default endpoint will use Standard storage. If you require High Performance storage, please ensure that the endpoint ends with .perf.cloud.ovh.net.
For more information on storage classes, please consult this documentation.
Here is an example to add a datastore named 1azgra that will handle 1-AZ buckets created in Gravelines (gra) region (since they share the same endpoint_url):
You can now check the datastore list:
You should see your new datastore in the list:
Now that you have a datastore dedicated for the specified region, you can list the buckets associated to this region and access and secret keys combination by running the following command (replace <alias> by your datastore name, 1azgra in previous example):
You can see that the bucket s3-gra-1az you created using the Control Panel (UI) has been retrieved.
Create new buckets linked to this datastore using CLI (Optional)
This step is optional and for information only.
Now that your datastore is configured, you can simply create new buckets for the region and user associated with your datastore using the following command, rather than using the OVHcloud Control Panel (UI):
Keep in mind that the bucket name must be between 3 and 63 characters, can consist only of lower case letters, numbers, dots (.), and hyphens (-) and must start and end with lower case alphanumeric characters (a to z and 0 to 9).
Then you can check that your S3 compatible bucket has been created correctly, and linked to your datastore (replace <alias> by your datastore name, 1azgra in previous example):
You should see your bucket in the list:
Upload files to your bucket
Before connecting your bucket to the AI solutions, you are going to upload a few objects to it (images, codes, models, ...) so that you can then retrieve these files from the AI Solutions. You can do this using the Control Panel (UI) or the ovhai CLI:
Go to the Object Storage section (in the Storage category) and click on your bucket name. Then, click the + Add objects button:
Select the files you want to upload to your bucket. If needed, you can prefix their names. Then, choose between Standard or High performance storage (find more information about storage classes here). Once you have made your selection, confirm by clicking on Import.
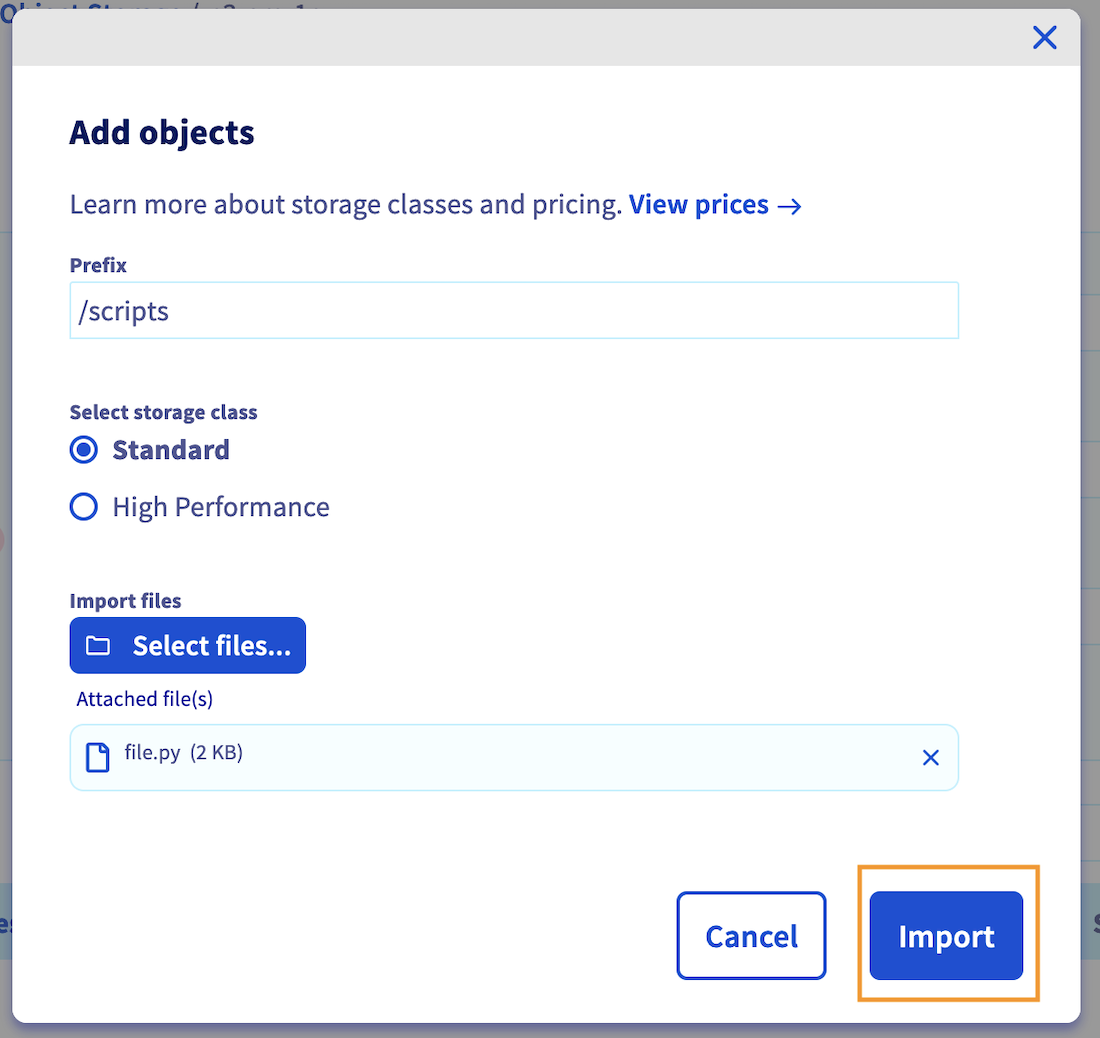
In this example, the python file file.py is added and prefixed by /scripts, resulting in the file path /scripts/file.py.
Once the upload is completed, you should see uploaded files in the object list.
Use S3 compatible buckets with AI Solutions
Now that your S3 compatible bucket has been created and populated with some objects, you can mount it on any OVHcloud AI Solution to access your data.
Please note that for the moment this S3 compatible feature can be used through ovhai CLI only. It will soon be available from the OVHcloud Control Panel (UI).
To launch an AI notebook with an S3 compatible bucket mounted as remote data, you can use the following command pattern:
Just make sure to replace the framework and editor by those of your choice. Also, specify the right <bucket-name> and <datastore-alias, and designate the destination where you want the bucket data to be stored (<mount_path>) and its access permission (rw for read & write, or ro for read only).
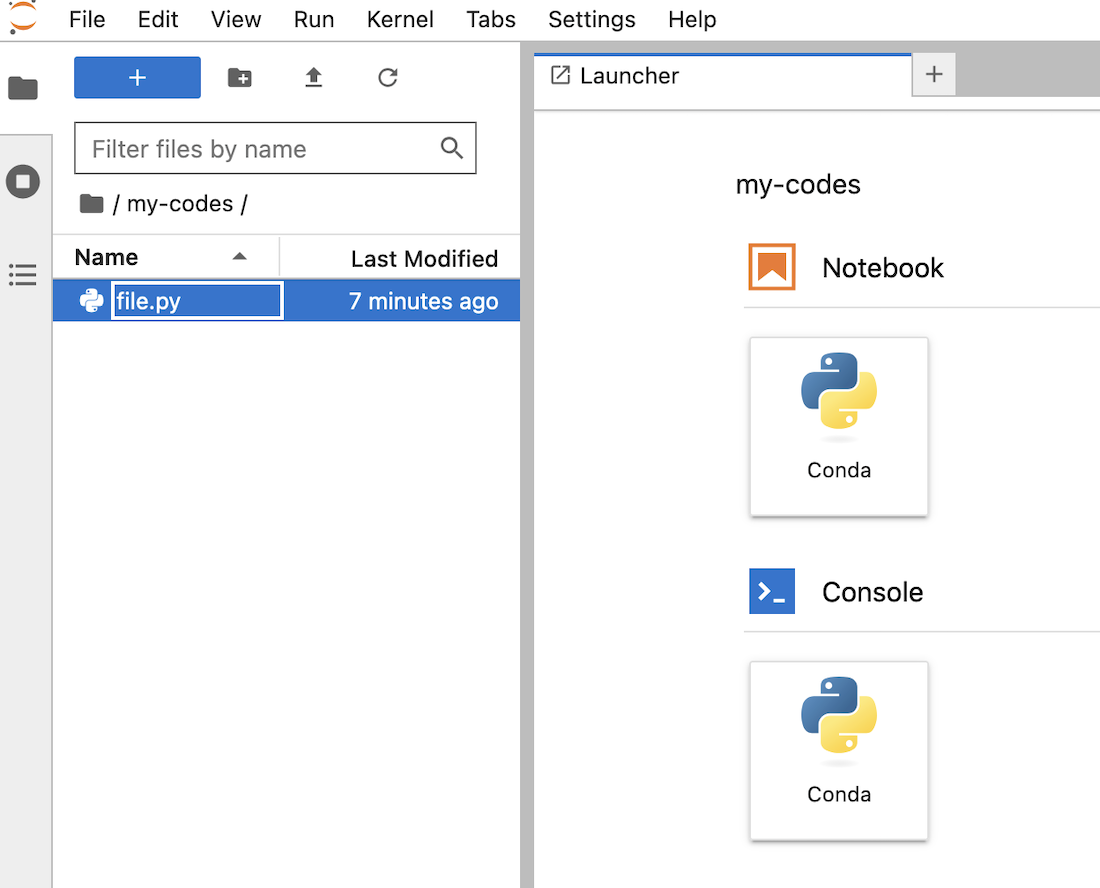
For example, to launch a basic Jupyter notebook on 2 CPUs, with a Conda pre-packaged environment, and the bucket s3-gra-1az from the 1azgra datastore mounted as remote data on /workspace/my-codes with read and write (RW) permissions, use the following command:
This command will create an AI notebook with the specified framework and editor, and will mount the specified bucket at the specified destination with the specified permissions. After logging in to your notebook interface (using the same credentials you have used to ovhai login), you should see the uploaded file in your notebook's workspace:
For more information on the capabilities of the ovhai notebook run command, you can run the following command:
You can also consult the dedicated CLI - Launch an AI notebook documentation to know more about the possible options, frameworks, and editors available.
If you want to use the boto3 library to manage your S3 compatible bucket objects, here is a notebook that contains basic commands.
Feedback
Please send us your questions, feedback and suggestions to improve the service:
- On the OVHcloud Discord server
If you need training or technical assistance to implement our solutions, contact your sales representative or click on this link to get a quote and ask our Professional Services experts for a custom analysis of your project.
*: S3 is a trademark of Amazon Technologies, Inc. OVHcloud’s service is not sponsored by, endorsed by, or otherwise affiliated with Amazon Technologies, Inc.