Move2Cloud - Migrate VMware workloads to OVHcloud SecNumCloud Hosted Private Cloud with Zerto
Objective
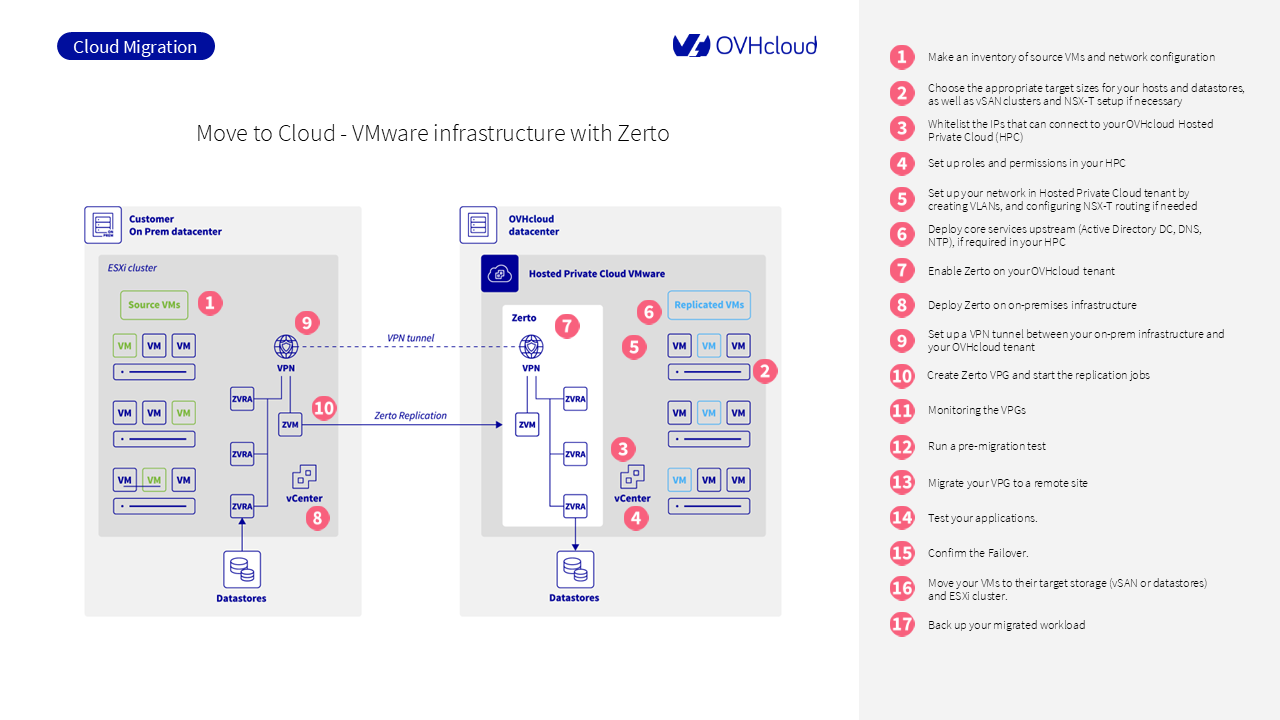
This guide explains how to migrate your on-premises VMware workloads to an OVHcloud SecNumCloud Hosted Private Cloud (HPC) using Zerto Virtual Replication.
This guide applies to SecNumCloud (SNC) qualified Hosted Private Cloud environments. Some features available in standard environments like OVHcloud IAM, vRack or the advanced NSX-T network may be restricted or unavailable here. For standard environments, refer to the dedicated guide: Move2Cloud - Migrate VMware workloads to OVHcloud Hosted Private Cloud with Zerto.
Requirements
Before you begin, make sure you have:
- A complete inventory of your VMs, including FQDN, IP address, OS version, and application dependencies.
- A batch migration plan grouped by application stack.
- A full list of VLANs, subnets, and segments for your target network.
- An HPC environment properly sized (hosts, datastores, vSAN, NSX-T).
- A working IPsec VPN tunnel between your on-premises infrastructure and OVHcloud.
- Access to the Zerto console and vCenter interfaces on both sides.
As of May 2025, Zerto does not support replication of virtual machines with VMEncrypt enabled.
vSAN's encryption at rest is supported. You can also encrypt your VMs after migration is complete.
Instructions
Step 1: Define your migration scope
At the end of this step, you will have a structured list of workloads to migrate and the associated network design.
Step 1.1: Create an inventory of source VMs
List all virtual machines to be migrated and collect the following data:
- FQDN and static IP address
- Operating system and version
- Application or service associated with each VM
- Technical dependencies (for example, frontend servers depending on a database VM)
This inventory allows you to group VMs into consistent application stacks for batch migration.
Step 1.2: Group VMs into migration batches
Organize your VMs into logical groups according to application-level dependencies.
Each batch should contain all virtual machines required to migrate and operate a single application, such as:
- Web frontend VM
- Application logic VM
- Database backend VM
Step 1.3: Document the current network configuration
Record the full network configuration used by your source VMs:
- VLAN IDs and associated subnets
- IP address ranges to preserve
- Inter-VM communication flows (source/destination, port, protocol)
This network design will be recreated in your OVHcloud HPC tenant using NSX-T overlay segments.
You can find more about network planning in NSX-T - First steps.
For additional guidance from Zerto, refer to Installing the Zerto Solution.
Step 2: Plan Hosted Private Cloud resources
This step helps you determine the required compute, storage, and network resources for your HPC environment.
Step 2.1: Estimate CPU and memory
Review your current infrastructure to calculate how many vCPUs and how much RAM you will need in the target environment.
Use your existing pCPU/vCPU consolidation ratio to size the number of ESXi hosts required.
Step 2.2: Define storage capacity
Based on your workloads, select the most appropriate storage type:
NFS datastoresfor general-purpose workloadsvSANfor performance-intensive applications
Estimate total disk space needed, plus redundancy if applicable.
If your workloads require high IOPS, vSAN is the preferred option.
Step 2.3: Plan the target network
Plan your virtual network using NSX-T:
- Only overlay segments are supported; VLAN-backed segments are not allowed.
- Define Tier-0 and Tier-1 gateway needs based on internal routing.
- Configure firewall rules for east-west traffic.
No direct internet exposure is permitted. All access must go through approved bastion or VPN links.
The Bring Your Own IP (BYOIP) feature is not available in SecNumCloud environments.
Step 3: Enable access to the vCenter
Access to vCenter is restricted by default in SecNumCloud environments.
You must request access from OVHcloud Support.
- Open a support ticket from the OVHcloud Control Panel.
- Select your
Hosted Private Cloud. - Provide the list of source IPs that require access.
For step-by-step instructions, refer to Authorize IPs to connect to vCenter.
Step 4: Configure roles and permissions
As IAM is not available in SecNumCloud environments, you must configure roles and permissions for your VMware environment using local accounts within the OVHcloud SecNumCloud tenant.
All accounts in a SecNumCloud environment must be secured with two-factor authentication (2FA).
For detailed instructions on how to enroll local accounts with 2FA, refer to the official guide: Enabling secure access to the vSphere interface
Step 5: Build the target network
Before starting any VM replication or failover test, your Hosted Private Cloud network must be ready to receive the workloads. This includes replicating the source structure, creating the right segments, and preparing firewall rules.
Step 5.1: Recreate your segments
In SecNumCloud environments, VLAN-backed segments and vRack are not available.
When your HPC is delivered, it comes with a default distributed virtual switch. You must use NSX-T overlay segments only.
Use NSX Manager to:
- Create overlay segments for each application batch or service zone.
- Reproduce the IP addressing plan from your inventory.
- Attach segments to the relevant gateways (usually Tier-1).
Do not expose any segment to the internet. Access must be routed through bastions or private VPN links.
Step 5.2: Configure NSX-T routing and gateways
In SNC environments, NSX-T gateways are used only for internal routing or secure VPN-based flows.
- A Tier-1 Gateway handles internal routing between overlay segments.
- Tier-0 Gateways may be deployed but only for approved VPN uplinks.
Use the NSX Manager interface to define and manage your gateway configuration.
No external/public IP connectivity is allowed.
Step 5.3: Prepare firewall rules
NSX-T provides a distributed firewall (DFW) that controls east-west traffic between VMs. You should define rules for:
- Application-specific ports (e.g., web → app, app → db)
- Management access to vCenter and Zerto components
- Optional: quarantine or isolation zones for test VMs
If you are not using NSX-T, implement similar rules using your preferred virtual firewall appliance (e.g., FortiVM, Stormshield, Palo Alto VM-Series).
You can find an overview of how NSX handles these features in NSX-T – First steps.
In SecNumCloud, firewall rules must strictly restrict traffic to internal flows or secured VPN entry points. No DNAT/SNAT rules toward the public internet are allowed.
Step 6: Deploy core services in the target HPC
Your migrated workloads will need basic infrastructure services to function properly once they are running in your Hosted Private Cloud.
Step 6.1: Deploy NTP
Ensure all VMs and services use a consistent time source. You can configure your HPC workloads to use ntp.ovh.net as a reliable time server.
Step 6.2: Deploy DNS
If your applications rely on internal DNS resolution, deploy a domain controller or dedicated DNS server inside your HPC environment. This can be a clone of your on-prem server or a new instance.
Step 6.3: Set up authentication services
If your authentication is based on Active Directory, deploy a replica domain controller in the HPC.
You can also establish secure communication between the on-prem AD and the tenant to avoid duplicating identities.
Step 7: Install and activate Zerto in the OVHcloud tenant
Zerto must be installed by OVHcloud in SecNumCloud environments.
- In the
Hosted Private Cloudinterface, open a support ticket. - Request Zerto Virtual Replication for your SNC tenant.
- Wait for OVHcloud to deploy the ZVM, ZVRAs, and required firewall rules.
Full details: Zerto Virtual Replication on OVHcloud
Step 8: Install Zerto on the source site
You must install Zerto components manually on your on-premises infrastructure.
Follow the procedure in Installing Zerto on source site.
The main components are:
- ZVM: Installed on a Windows Server with vSphere access
- ZVRAs: Deployed on each ESXi host hosting protected VMs
Ensure that:
- TCP ports 9071, 9081 are open between ZVMs.
- TCP ports 4007, 4008 are open between ZVRAs.
Step 9: Set up the IPsec VPN tunnel
Zerto requires direct communication between ZVMs and ZVRAs. NAT is not supported.
Set up a site-to-site IPsec tunnel between your on-prem firewall and the OVHcloud tenant.
You can use any compatible device (e.g., Fortinet, Palo Alto, OPNsense).
Details and parameters are available in Zerto VPN Setup on OVHcloud.
Step 10: Pair the sites and create VPGs
Once ZVMs are online and communication is confirmed:
- Use the Zerto console to pair both sites.
- Create your first Virtual Protection Group (VPG).
A VPG groups all VMs that should be replicated and failed over together.
More information in Creating a VPG
Step 11: Monitor the replication status
Monitor each VPG from the Zerto UI:
- Confirm that replication is active.
- Check the RPO (Recovery Point Objective).
- Resolve any alerts before running a test or failover.
Refer to Monitoring Virtual Protection Groups
Step 12: Run a test failover
Before migrating production workloads, test the behavior of your VMs in the OVHcloud tenant.
Use the Failover Test option in the Zerto UI. This powers on the replicated VMs without impacting production.
Instructions:
Step 13: Execute the planned migration
When you are ready to migrate:
- Use the Move operation in Zerto to migrate each VPG.
- Choose the commit policy (manual, auto, rollback).
See The Move Process for full instructions.
Step 14: Validate application availability
After the move:
- Verify that all VMs are powered on.
- Test connectivity (AD, DNS, Bastion, internet).
- Validate each application and service.
Step 15: Commit or roll back the migration
If all tests succeed, commit the operation in Zerto.
If something is not working, you can cancel the move and roll back to your on-prem environment.
More in Moving Protected VMs to Remote Site
Step 16: Use Storage vMotion to place VMs on target storage
After migration, you may want to move some VMs to another datastore or vSAN policy.
Use Storage vMotion via the vSphere Client:
- Right-click on the VM >
Migrate. - Select
Change storage only. - Choose the destination datastore or vSAN policy.
See VMware Storage vMotion for full details.
Step 17: Back up your workloads
Once your VMs are in production, secure them with a backup plan.
You have 2 options:
- Option 1: Use Veeam Backup as a Service if you want a managed backup solution integrated with your HPC.
- Option 2: Deploy your own Veeam Backup server and use Veeam Backup & Replication for Public Cloud.
Go further
If you need training or technical assistance to implement our solutions, contact your sales representative or click on this link to get a quote and ask our Professional Services experts for a custom analysis of your project.
Ask questions, give your feedback and interact directly with the team building our Hosted Private Cloud services on the dedicated Discord channel.
Join our community of users.