---
title: "Configurar HYCU Backup (EN)"
description: "Installing HYCU Backup on a Nutanix cluster"
url: https://docs.ovhcloud.com/pt/guides/hosted-private-cloud/nutanix-on-ovhcloud/hycu-backup
lang: pt
lastUpdated: 2025-05-14
---
# Configurar HYCU Backup (EN)
## Objective
HYCU for Nutanix is a backup software available for Nutanix.
**Find out how to install, configure and use HYCU on a Nutanix cluster with Object Storage storage provided by OVHcloud.**
:::warning
OVHcloud provides services for which you are responsible, with regard to their configuration and management. It is therefore your responsibility to ensure that they work properly.
This guide is designed to assist you as much as possible with common tasks. However, we recommend reaching out to the [OVHcloud Professional Services team](https://www.ovhcloud.com/pt/professional-services/) or a [specialized provider](https://partner.ovhcloud.com/pt/directory/) if you encounter difficulties or have doubts regarding the administration, use, or setup of a service on a server.>
:::
***
### OVHcloud Control Panel Access
- **Direct link:** [Load Balancer](https://manager.eu.ovhcloud.com/#/dedicated/iplb)
- **Navigation path:** Network > Load Balancer > Select your service
***
## Requirements
- A valid [HYCU for OVHcloud](https://www.ovhcloud.com/pt/storage-solutions/hycu/) license in your OVHcloud account (the first step of this guide will detail the procedure to follow) or a HYCU license purchased from a third-party provider.
- A Nutanix on OVHcloud cluster in your OVHcloud account.
- Access to your OVHcloud Control Panel.
- Access to the cluster via Prism Central.
- A Public Cloud project with a High Performance Object Storage type storage bucket, with a user with read and write permissions for this bucket. You can find more information on how to create a Public Cloud project and how to use the High Performance Object Storage service on the following pages:
- [Creating your first OVHcloud Public Cloud project](/pt/guides/public-cloud/cross-functional/create-a-public-cloud-project.md).
- [Getting started with Object Storage](/pt/guides/storage-and-backup/object-storage/s3-getting-started-with-object-storage.md).
- [Object Storage - Managing object immutability with Object Lock (WORM)](/pt/guides/storage-and-backup/object-storage/s3-managing-object-lock.md)
- 60 GB of storage, 8 GB of memory, and 8 cores on your Nutanix Cluster for the HYCU Instance/Appliance.
## Instructions
### Content Overview
- [Order a HYCU for OVHcloud license](#license-order)
- [Activate the license](#license-activation)
- [Regenerate a HYCU for OVHcloud license](#license-renew)
- [Cancel a HYCU for OVHcloud subscription (and its associated license)](#license-cancel)
- [Upgrade a HYCU for OVHcloud license](#license-upgrade)
- [Install and configure HYCU](#installation)
- [Add the HYCU installation image](#adding-image)
- [Configure the IP address for ISCSI](#adding-ip)
- [Add a user account in Prism Element for HYCU](#adding-user)
- [Create the virtual machine for HYCU](#create-vm)
- [Configure URL redirection for HYCU to the public network](#url-redirection)
- [Configure HYCU](#hycu-configuration)
- [HYCU update](#hycu-update)
- [Add sources for a new HYCU version](#adding-new-sources)
- [Start the update from HYCU](#update-launch)
- [Configure backups in HYCU](#backup-configuration)
- [Set passwords for virtual machine connections](#setting-passwords)
- [Create backup strategies](#backup-strategies)
- [Assign backup strategies](#backup-strategies-assignment)
- [Check the backup status](#backup-check)
- [Restore from HYCU](#restoring)
- [Restore a virtual machine](#restoring-vm)
- [Retrieve a file](#restoring-file)
- [Restore an application](#restoring-app)
### Order a HYCU for OVHcloud license [](#)
We offer different license packs based on the number of virtual machines (VMs) used by your Nutanix workloads.
:::tip
For more information, visit our [HYCU for OVHcloud](https://www.ovhcloud.com/pt/storage-solutions/hycu/) page.
:::
:::info
**You already have a HYCU license?**
Continue reading this guide at the [Install and configure HYCU](#installation)
step.
:::
Log in to the OVHcloud Control Panel
and navigate to `Hosted Private Cloud
` and `Storage and Backup
`.
Click on `HYCU
` then `All My Licenses
`.
Click the `Get Started
` button to choose and order a HYCU for OVHcloud pack.
Once your order is complete, you will receive a confirmation email and your subscription will appear in the `All My Licenses
` dashboard.
Click on your license to proceed with activation.
#### Activate the license [](#)
:::warning
This step requires that you have **the HYCU software already installed and configured on your Nutanix cluster**
.
If you have not already done so, please read the [Install and configure HYCU](#installation)
step of this guide before following the HYCU license activation step below.
:::
Activate the HYCU license
When you click on a license in your dashboard, a menu will appear allowing you to rename, activate, renew, or cancel your HYCU for OVHcloud license.
Click the Activate License button (in the `Shortcuts` box).
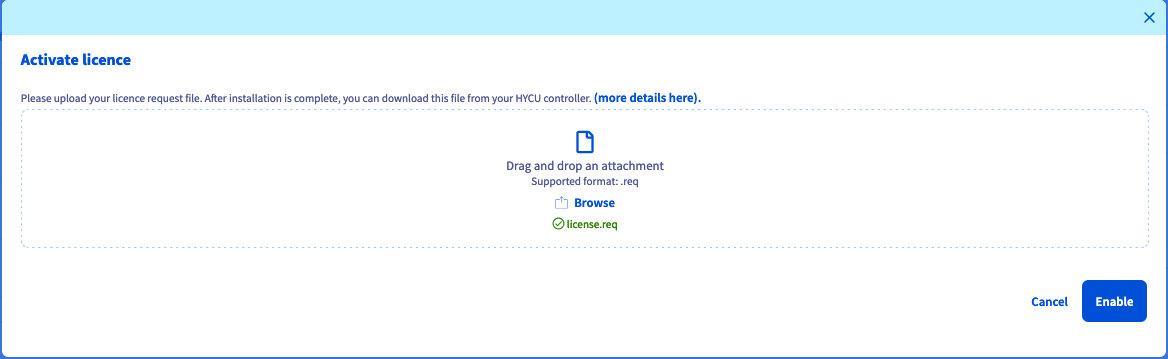
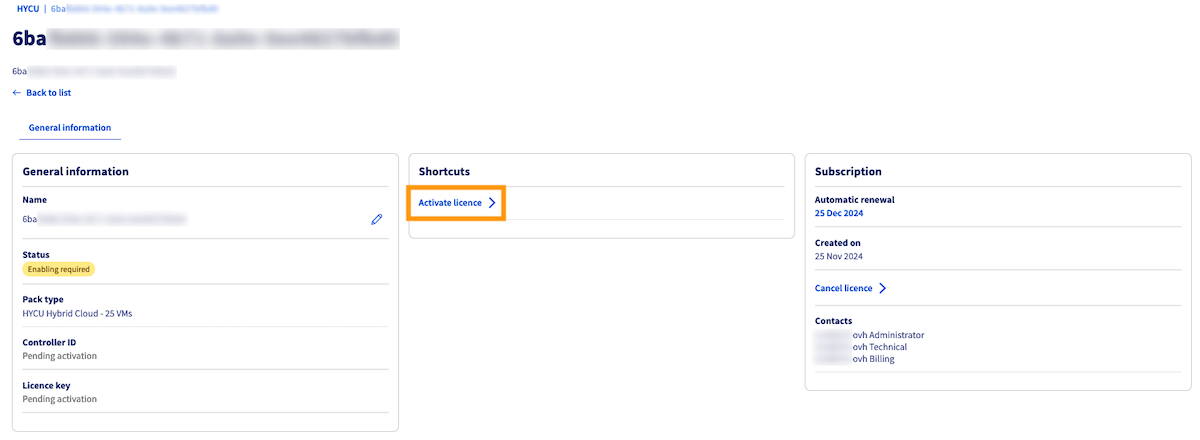A window will open to upload the license request file.
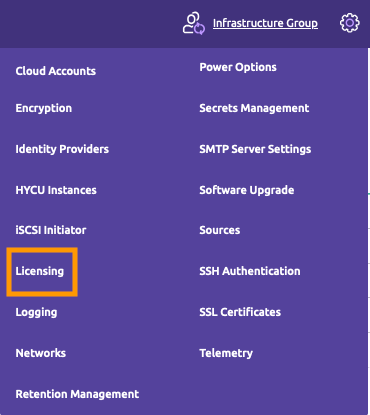
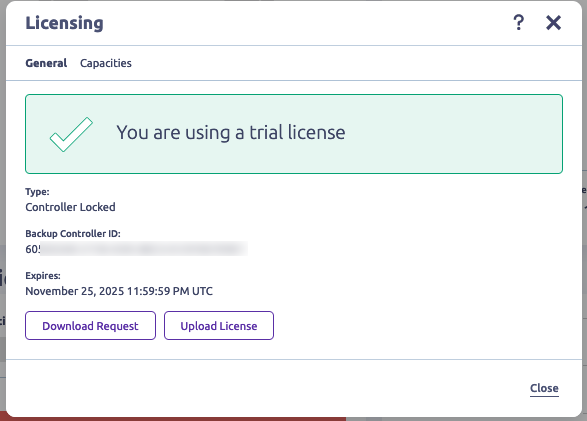
To obtain your license request file, log in to your Hybrid Cloud HYCU instance/appliance and go to the Licensing menu.
Click Download Request and download the file.
Back in the OVHcloud Control Panel, drag and drop the downloaded file into the open window, then click Activate.
After verification, the status of your license will change to `Active`.
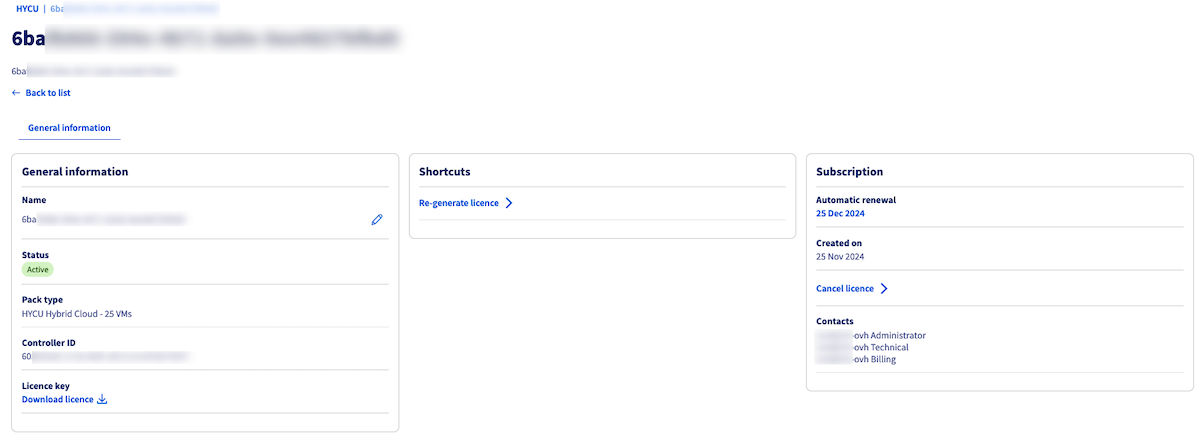Once the license is active, click the Download License button (at the bottom of the `General Information` box).
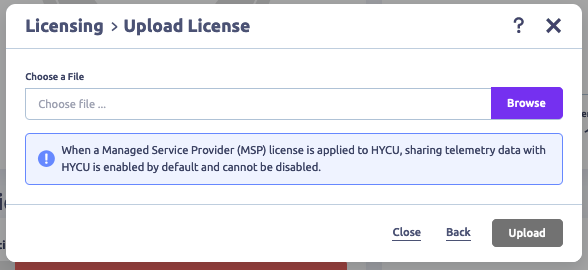
Return to the Licensing menu of your Hybrid Cloud HYCU instance/appliance and upload the license you just downloaded from the OVHcloud Control Panel.
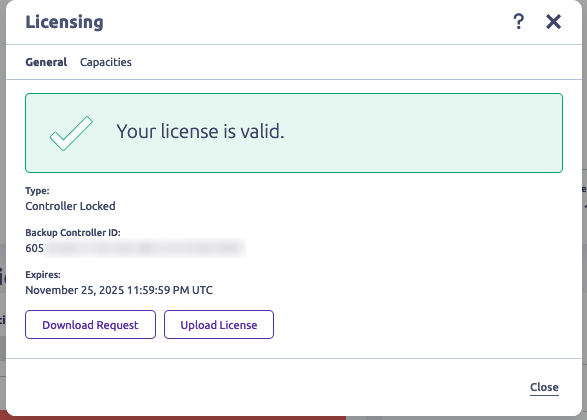
A window will inform you that your license has been validated.
#### Regenerate a HYCU for OVHcloud license [](#)
If your HYCU technical configuration has changed, you will need to make a new request to obtain a new license file compatible with your HYCU controller.
Regenerate a HYCU for OVHcloud license
Log in to the OVHcloud Control Panel and navigate to Hosted Private Cloud and Storage and Backup. Click on HYCU.
Once in your license dashboard, click the Regenerate License button (in the `Shortcuts` box).
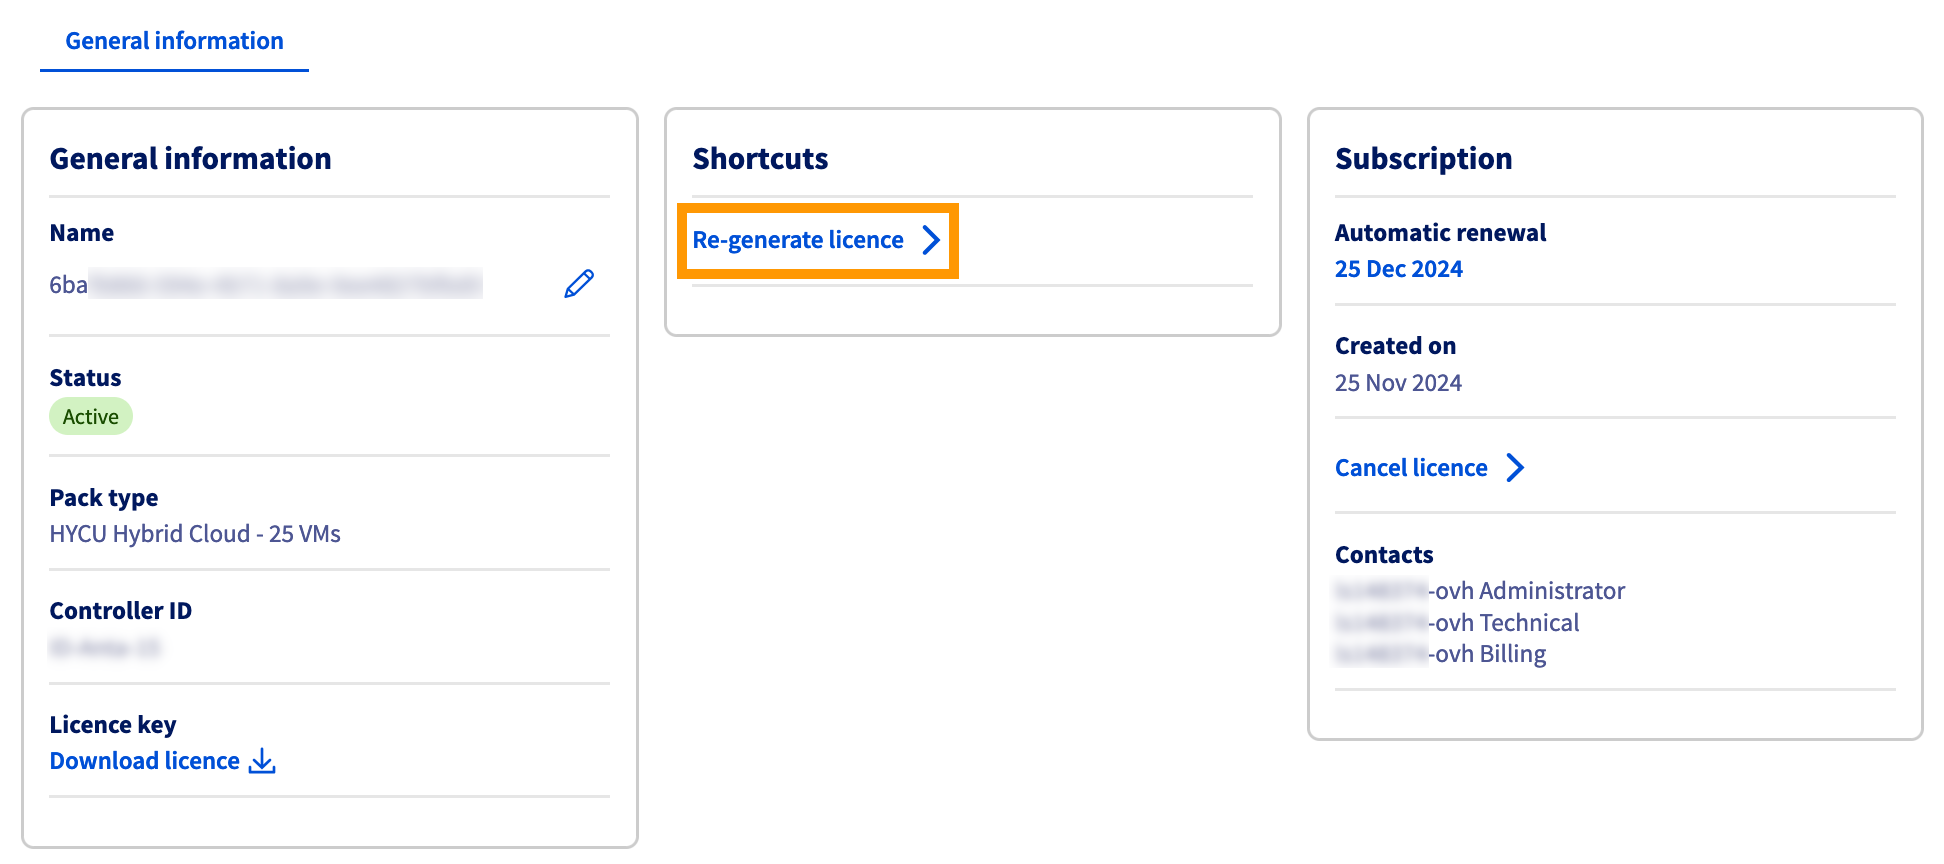As with the activation of your license, download and upload your license request.
Then follow the same process as for license activation:
- Download the license key.
- Upload the license key to your Hybrid Cloud instance/appliance.
#### Cancel a HYCU for OVHcloud subscription (and its associated license) [](#)
How to cancel a HYCU for OVHcloud subscription
Log in to the OVHcloud Control Panel and navigate to Hosted Private Cloud and Storage and Backup. Click on HYCU.
Once in your license dashboard, click Cancel License in the `Subscription` box.
Then confirm the cancellation by typing `TERMINATE` in the provided box, then click Cancel.

#### Upgrade a HYCU for OVHcloud license [](#)
To upgrade your offer, you must first cancel your current HYCU for OVHcloud subscription (see above) and then [order a new subscription](https://www.ovhcloud.com/pt/storage-solutions/hycu/) with the required virtual machines pack.
### Install and Configure HYCU [](#)
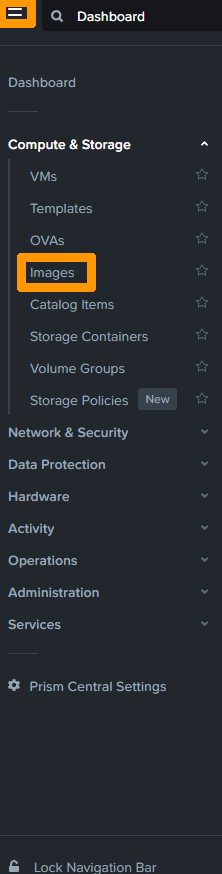
#### Add the HYCU installation image [](#)
Log in to **Prism Central**.
For more information on how to connect to the cluster, refer to the [Go further](#gofurther) section of this guide.
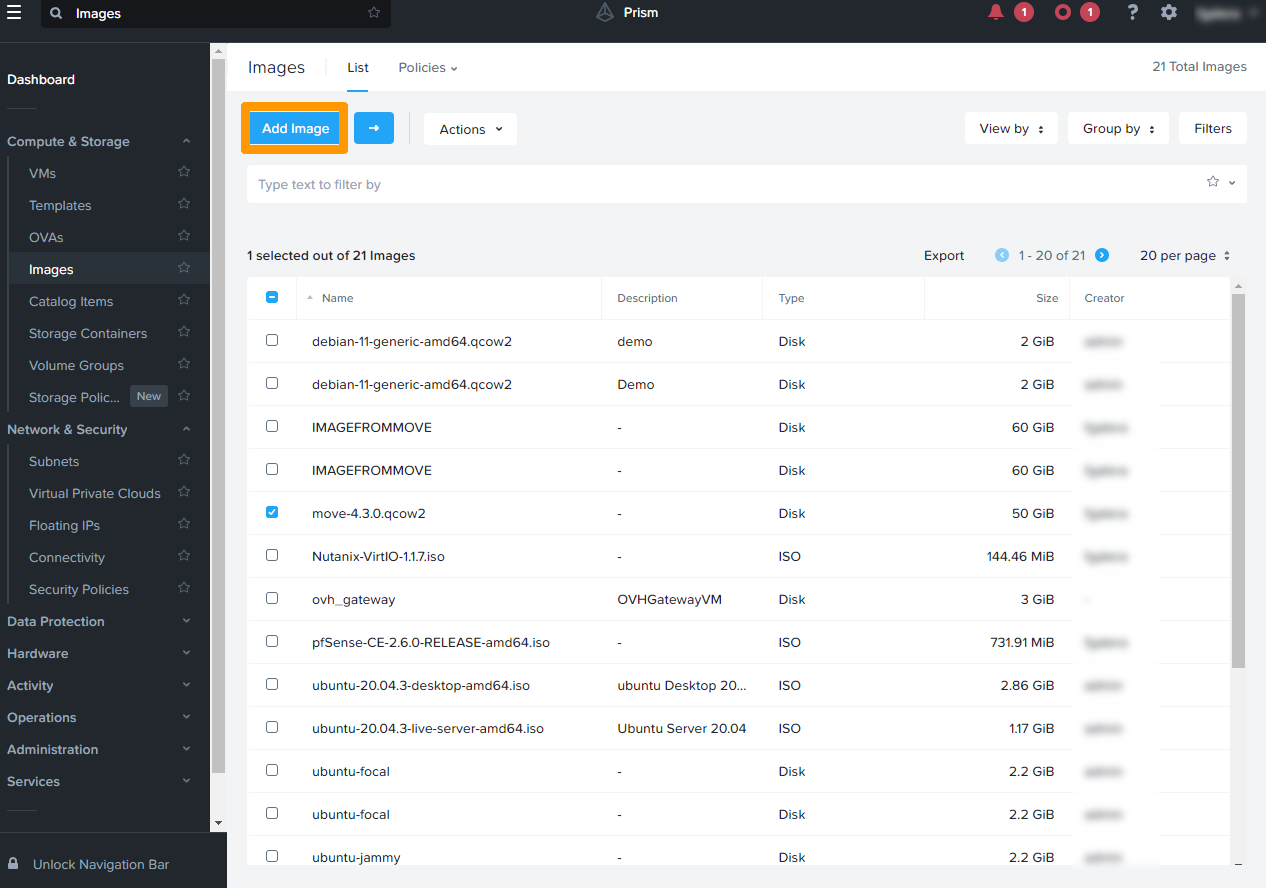
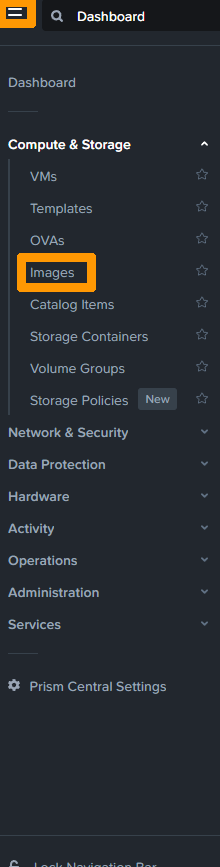
From the main menu, click `Images
` from the `Compute & Storage menu
`.
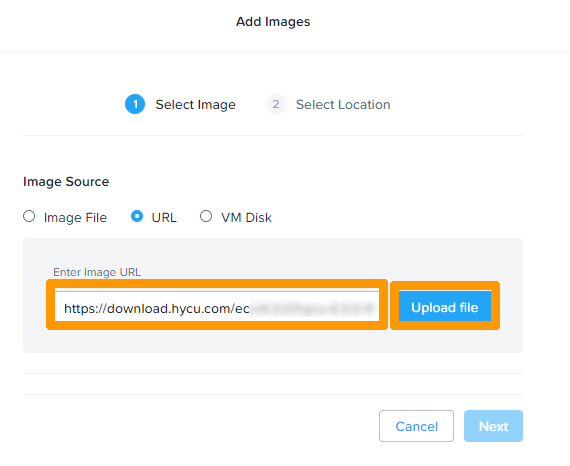
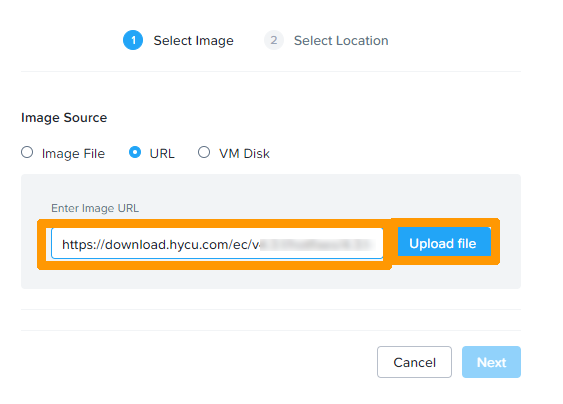
Click `Add Image
`.
Choose `URL
` as the source type, enter the URL `https://download.hycu.com/ec/v4.X.X/hycu-4.X.X-XXXX.qcow2`
in **Enter Image URL**
, and click `Upload file
`.
:::info
The URL used for the download is the latest version available on the HYCU website.
:::
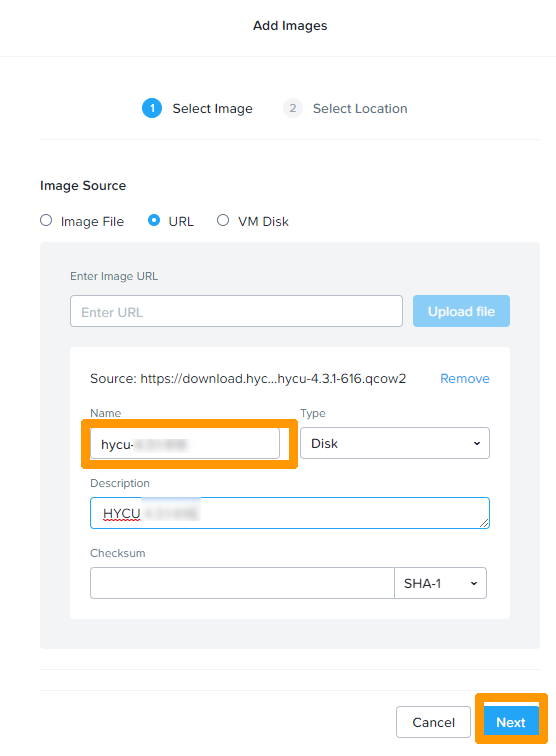
Remove the **.qcow2**
extension behind the name and leave `hycu-4.X.X-XXXX`
. Enter a description and click `Next
`.
:::warning
It is important to remove the extension in the name to facilitate the HYCU configuration process.
:::
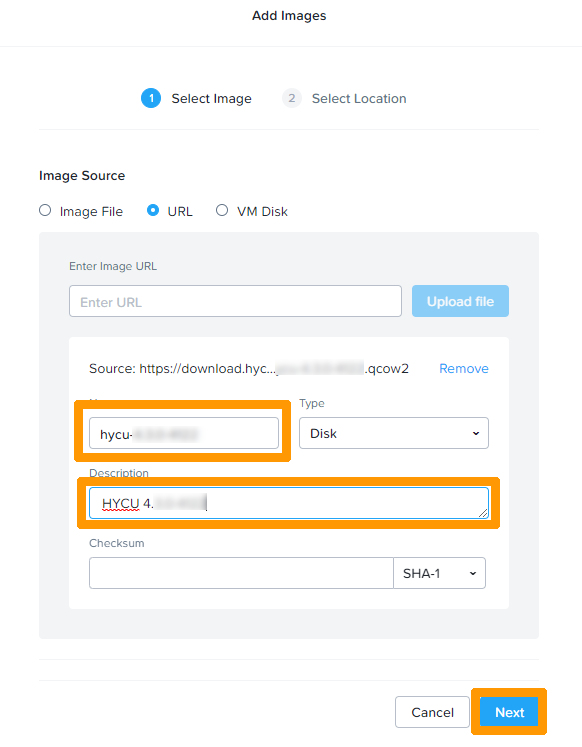
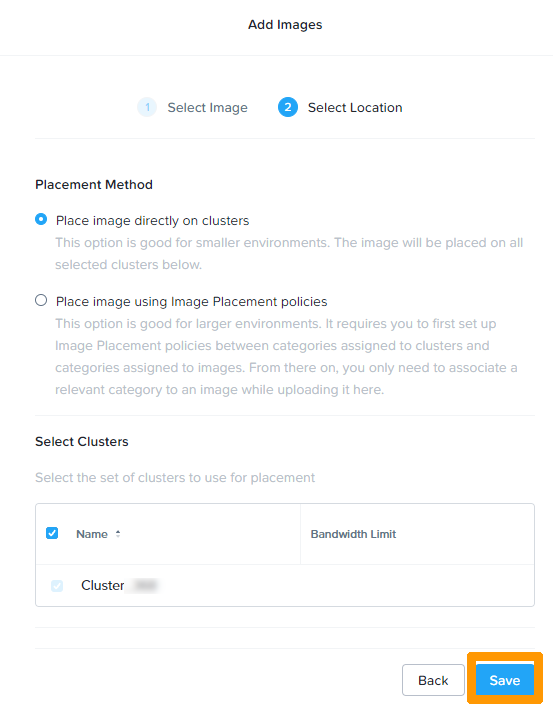
Click `Save
` to import the image.

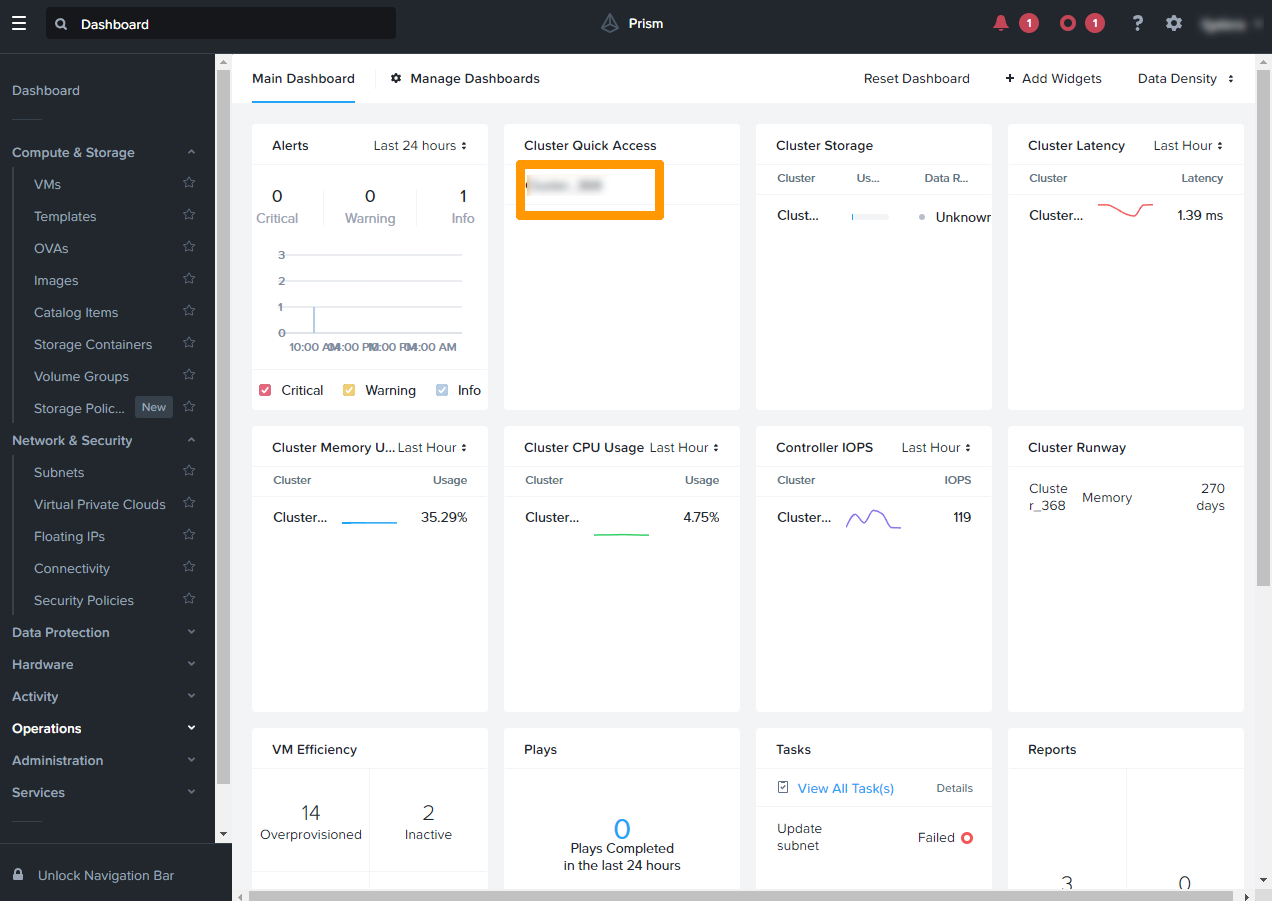
On the **Prism Central**
dashboard, click the `cluster name
` in the **Cluster Quick Access**
section to go to the **Prism Element**
.
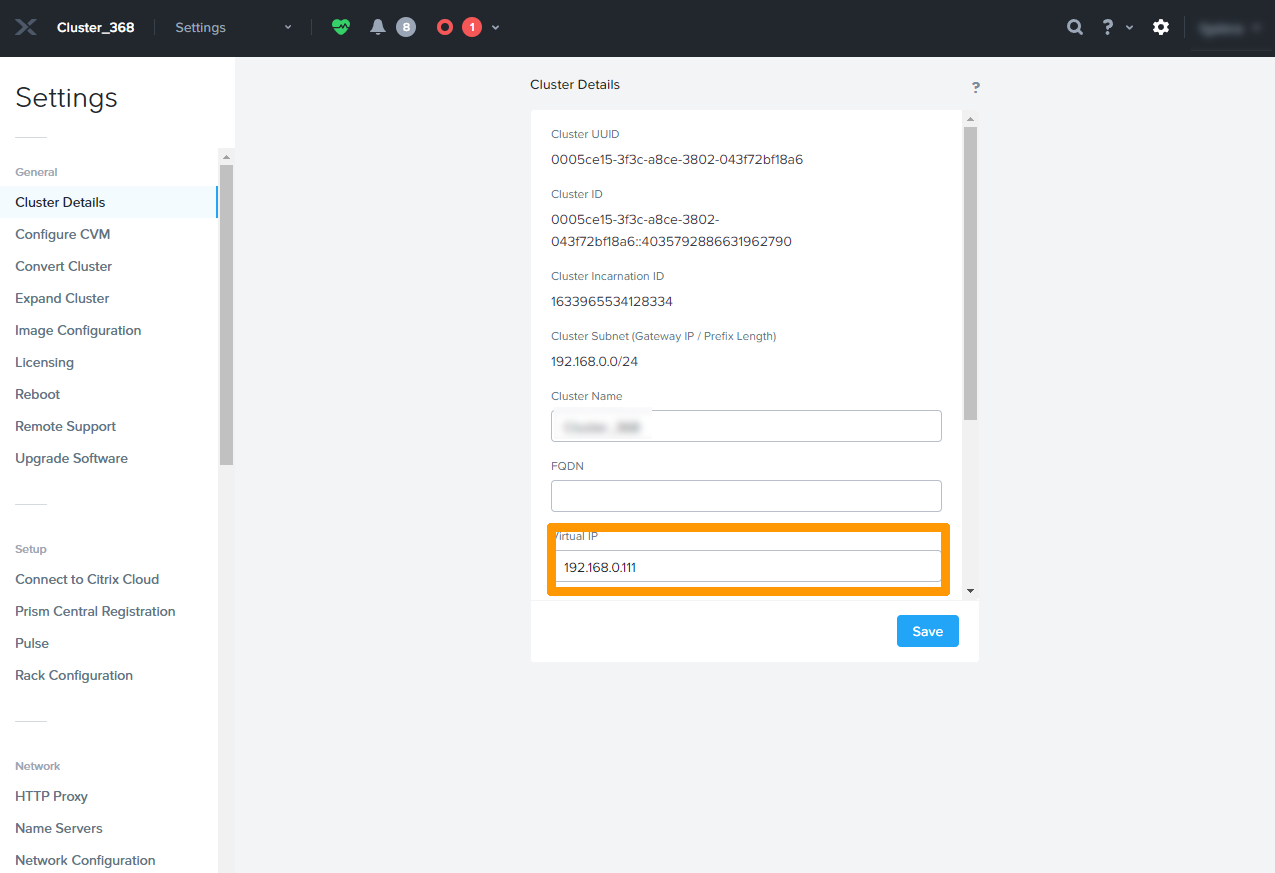
#### Configuring the IP address for ISCSI [](#)
Go to the settings by clicking on the `gear icon
`.
Click `Cluster Details
`.

Enter an unused local IP address in the **Data Services IP**
field and click `Save
`.
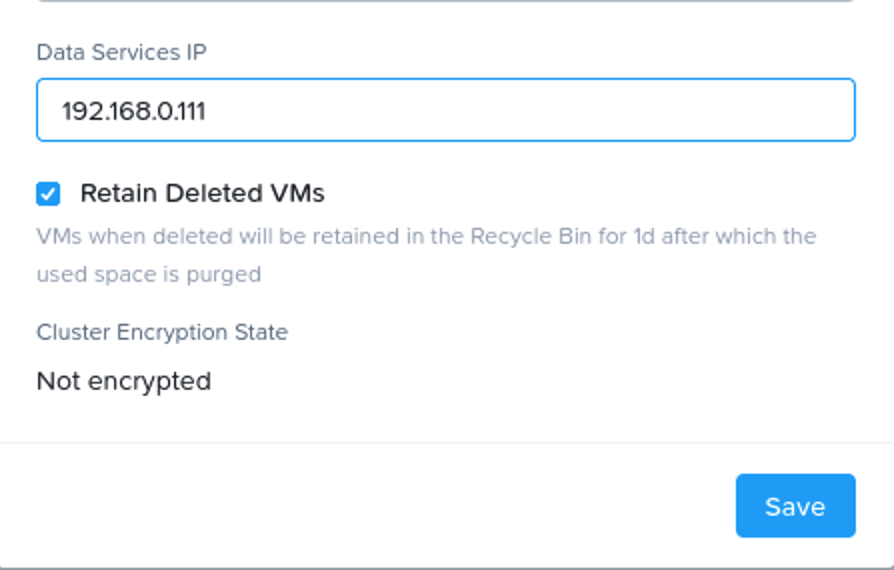
Check your choice and click `Yes
`.
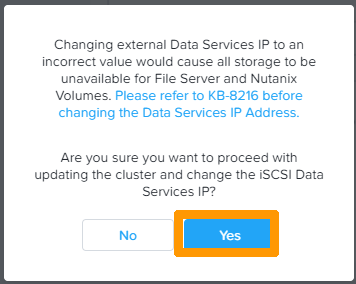
The IP address is displayed in **virtual IP**.
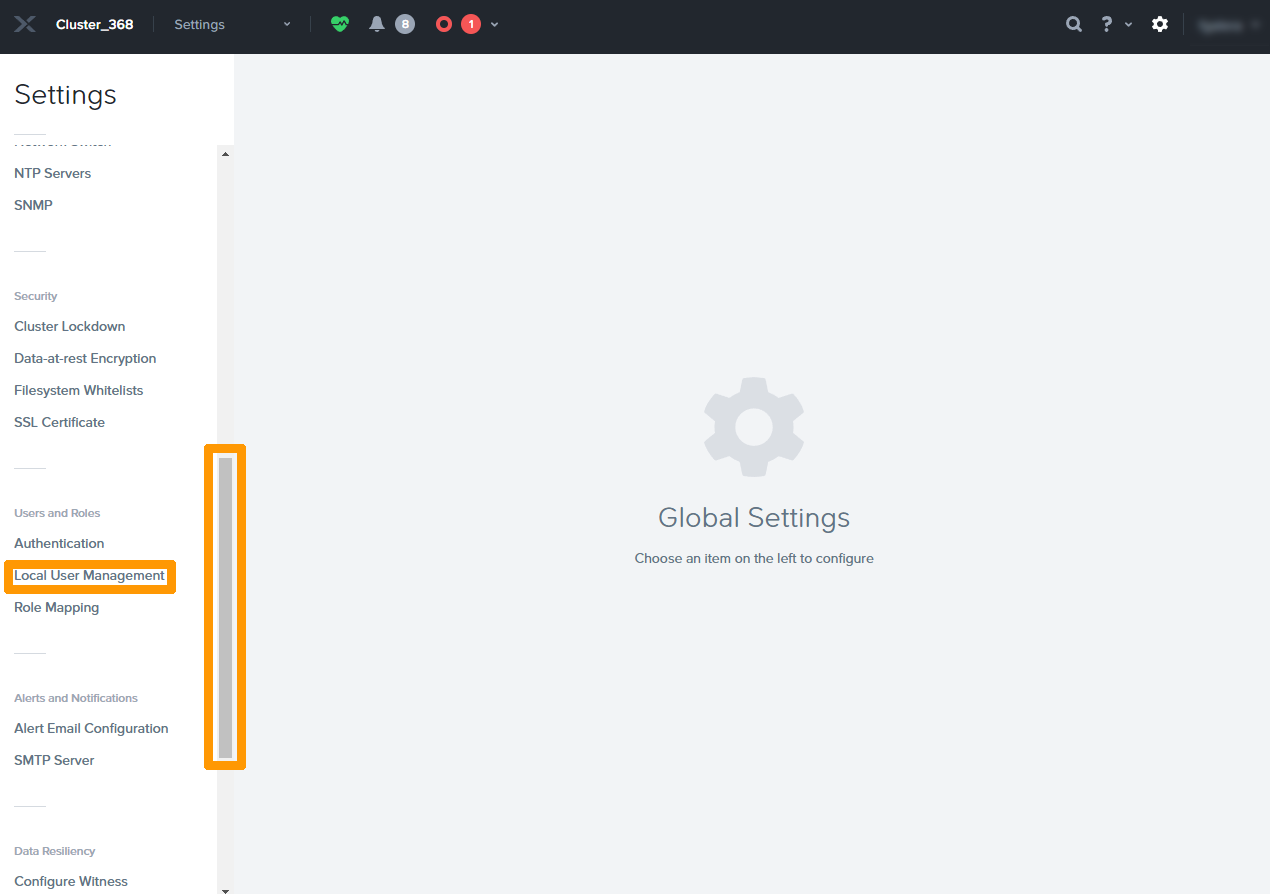
#### Adding a user account in **Prism Element**
for HYCU [](#)
Click the gear to go to the **Prism Element configuration**.
Scroll down the menu and click `Local User Management
`.
Click `New User
`.
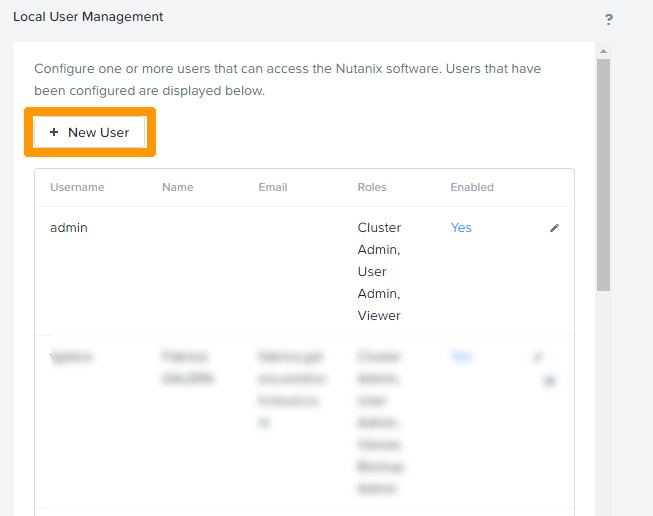
Enter these values:
- **Username**: `svc_hycu`
- **First Name**: `HYCU`
- **Last Name**: `HYCU`
- **Email**: `hycu@example.com`
- **Password**: `password`
:::info
This information is provided as an example, the email address is mandatory but is not used.
:::
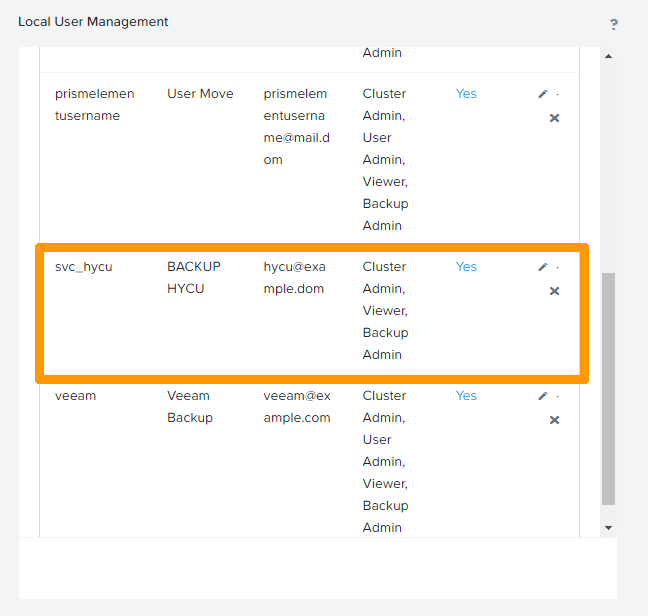
Select the `Cluster Admin
` checkbox and click `Save
`.
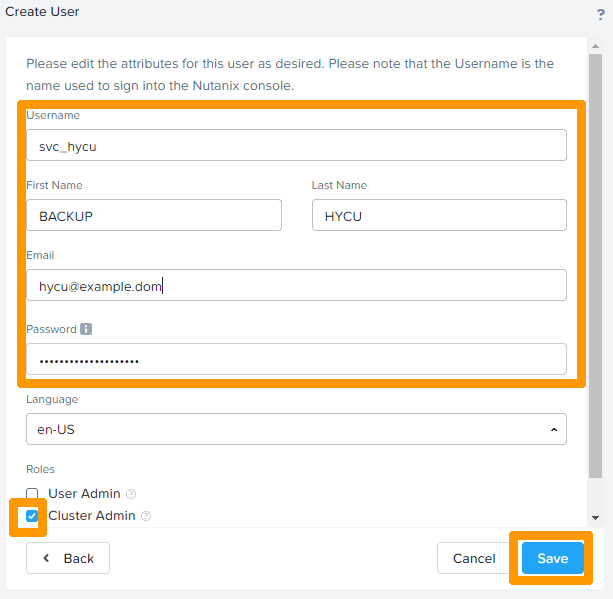
The user is then created.
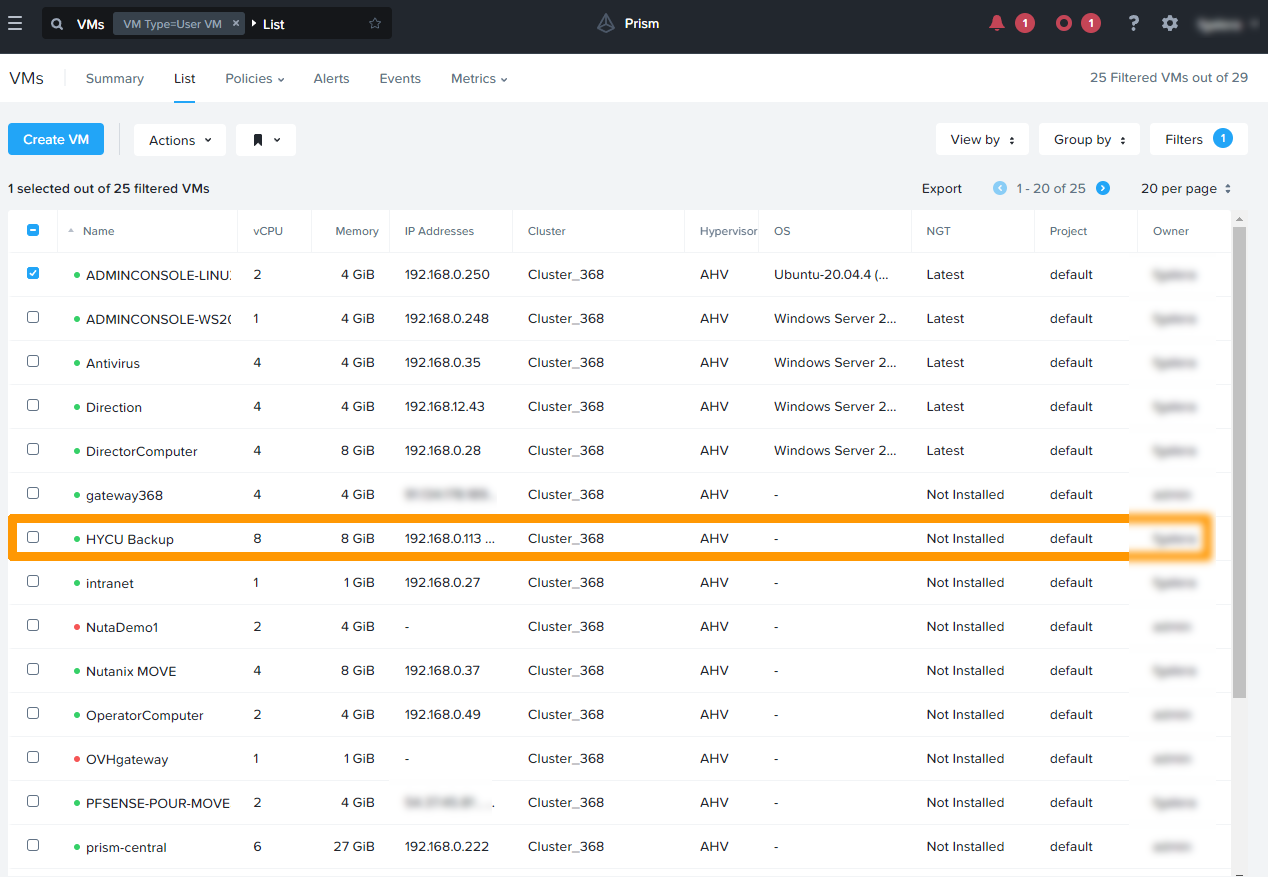
#### Creating the virtual machine for HYCU [](#)
Go to **Prism Central**.
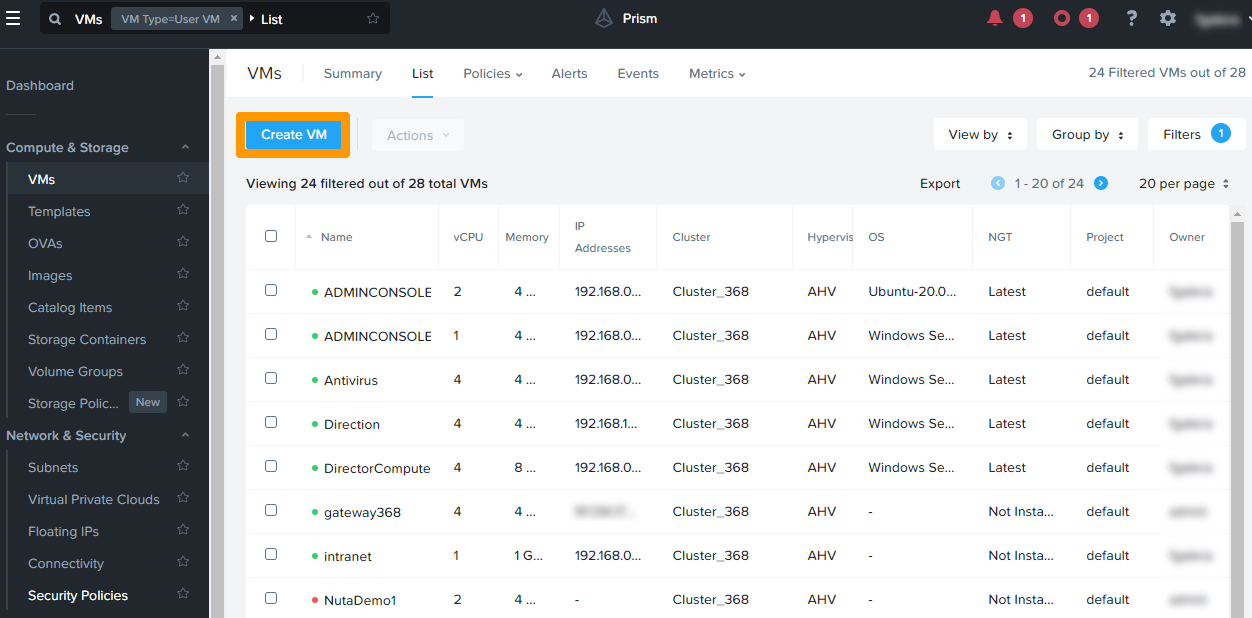
In the main menu, click `VMs
` from the `Compute & Storage
` menu.
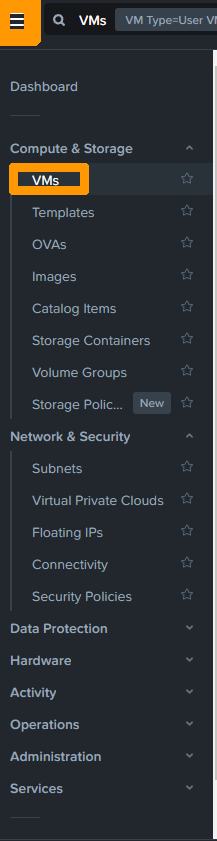
Click `Create VM
`.
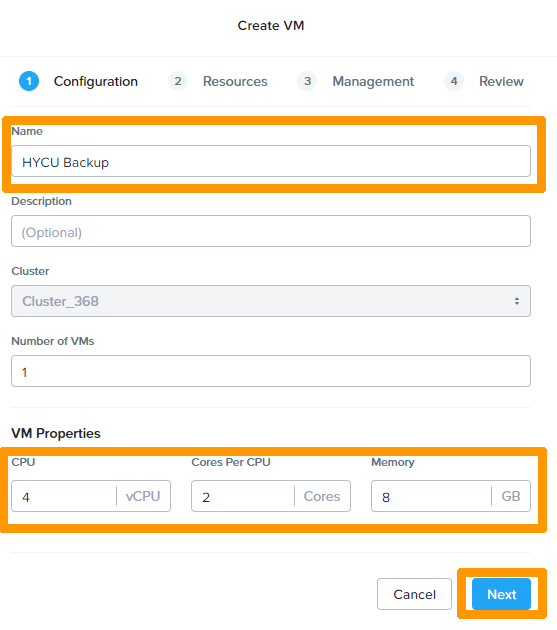
Name the virtual machine and change the properties of the virtual machine with these settings:
- **CPU**: `4 vCPU`
- **Cores Per CPU**: `2 Cores`
- **Memory**: `8GB`
Click `Next
`.
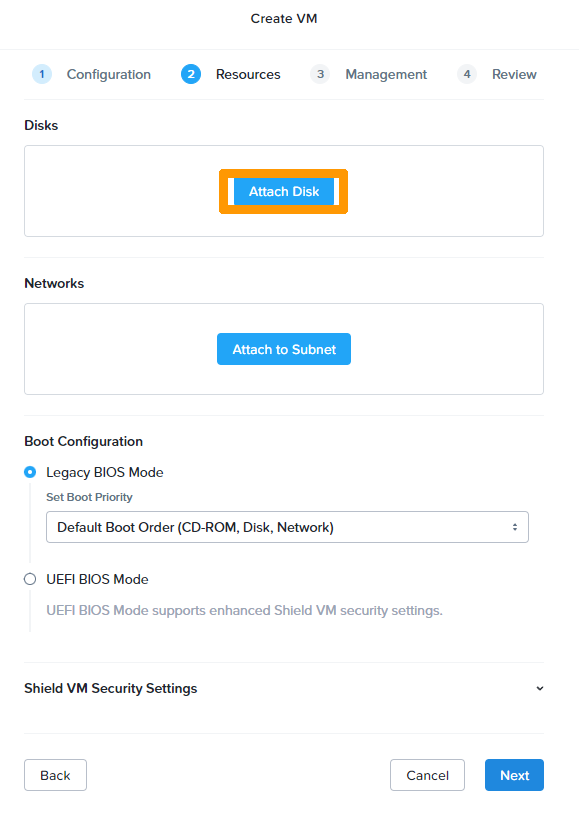
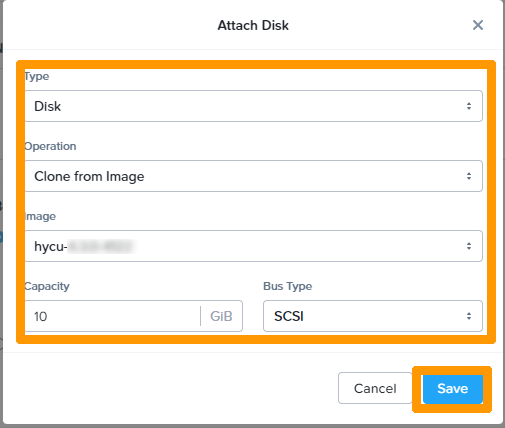
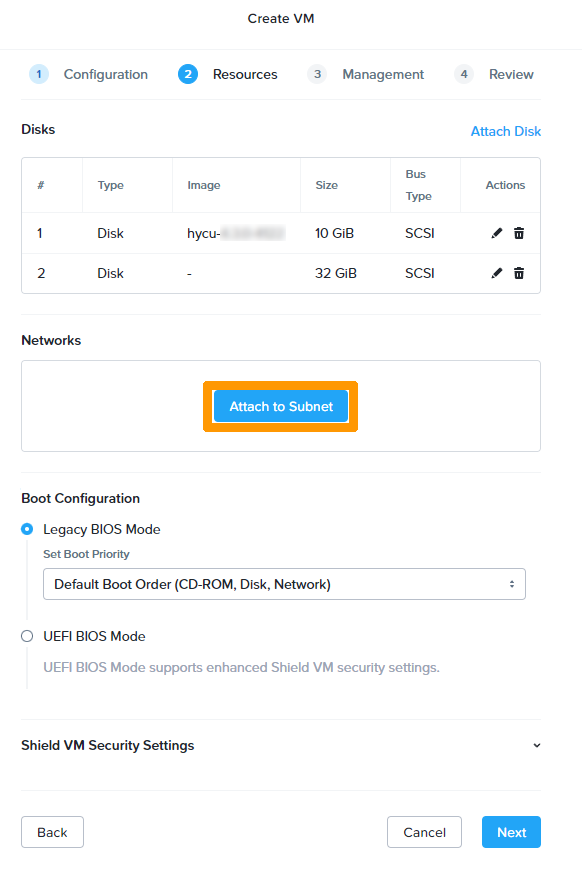
Click `Attach Disk
`.
Enter these values:
- **Type**: `Disk`
- **Operation**: `Clone from Image`
- **Image**: `hycu-4.X.X-XXXX`
Click `Save
`.
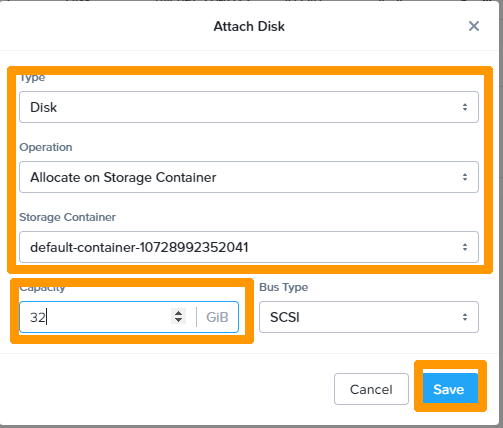
Click `Attach Disk
`.

Choose these options:
- **Type**: `Disk`
- **Operation**: `Allocate on Storage Container`
- **Image**: `default-container`
- **Capacity**: `32Gib`
Click `Save
`.
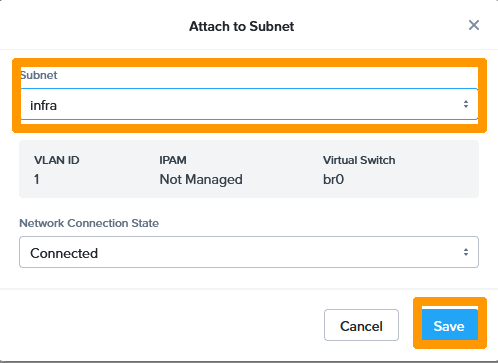
Click `Attach to Subnet
`.
Select the `infra
` network from the **Subnet**
drop-down menu, select `Connected
` in the **Network Connection State**
drop-down menu. Then click `Save
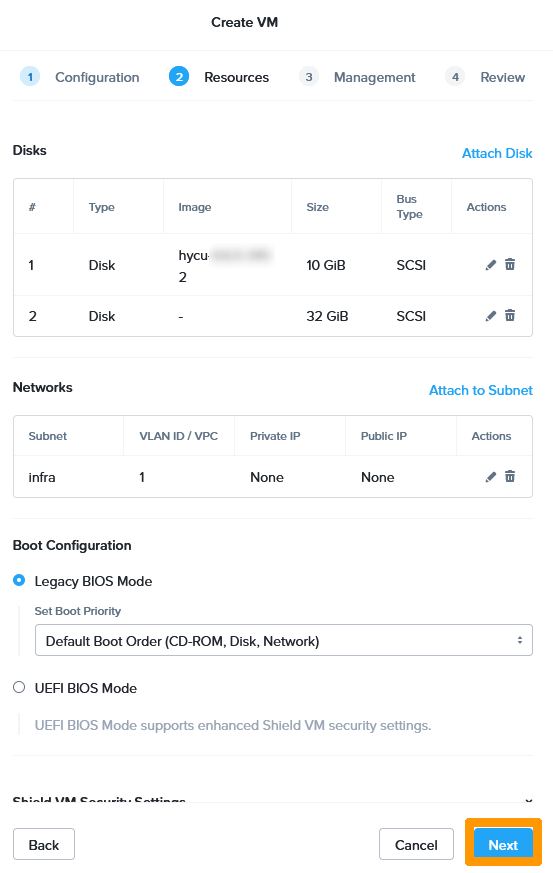
`.
Click `Next
`.
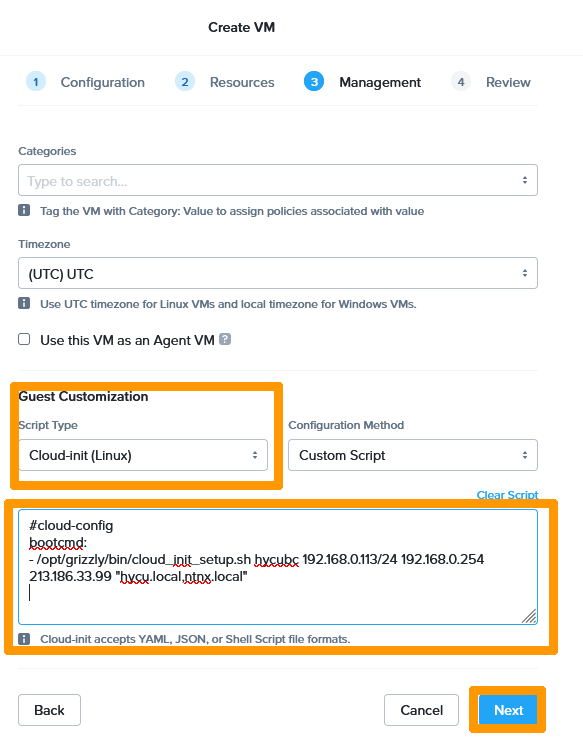
Create a **yaml** file by editing these values:
- **\< IP address >**: The local IP address of the virtual machine with the subnet mask as XX.XX.XX.XX/XX.
- **\< GATEWAY >**: Local gateway for the virtual machine to access the Internet.
- **\< DNS >**: DNS used on the Internet.
```yaml
#cloud-config
bootcmd:
- /opt/grizzly/bin/cloud_init_setup.sh hycubc < IP address > < GATEWAY > < DNS > `hycu.local,ntnx.local`
```
Modify **Guest Customisation**
options by selecting `Cloud-init (Linux)
` in the **Script Type**
drop-down menu. Select `Custom Script
` in the **Configuration Method**
drop-down menu.
Copy the contents of the yaml script and paste it to the field below **Clear Script**
. Then click `Next
`.
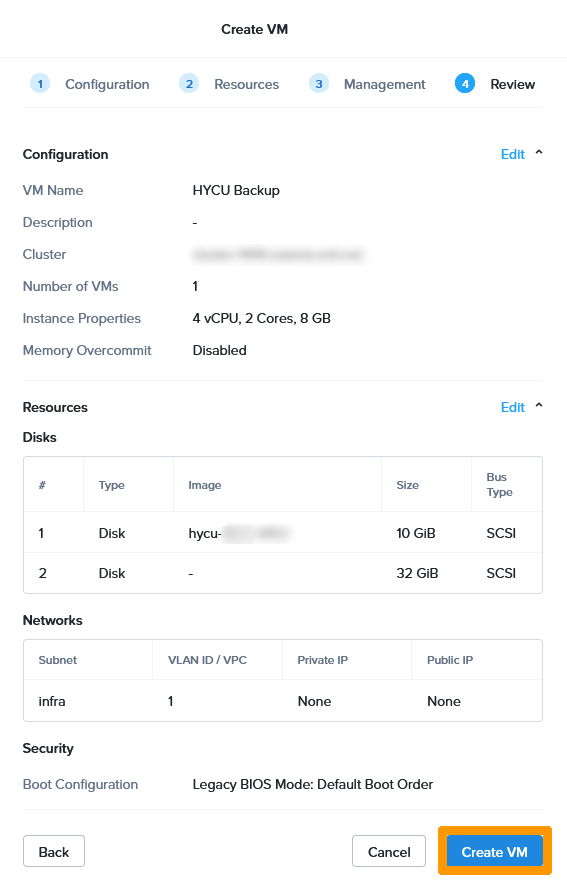
Click `Create VM
`.
Select the virtual machine created by using the `checkbox
` to the right of the virtual machine.
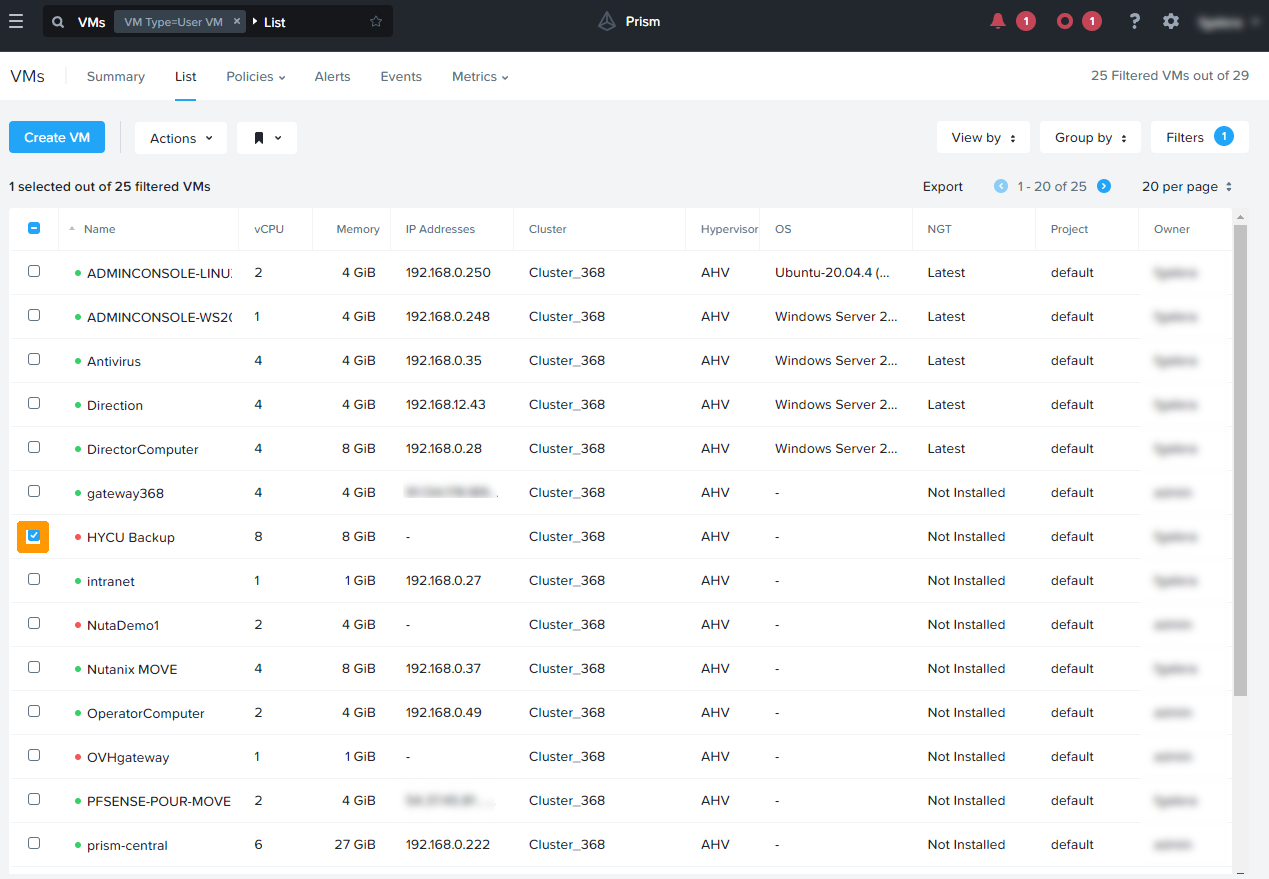
Click `Power On
` in the `Actions`
menu.
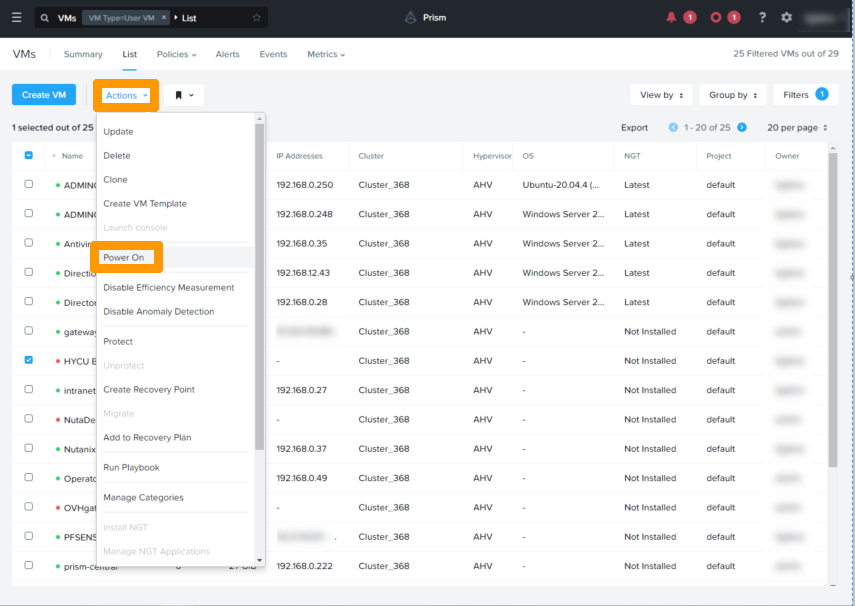.
The virtual machine is started and has the IP address defined in **cloud-init**.
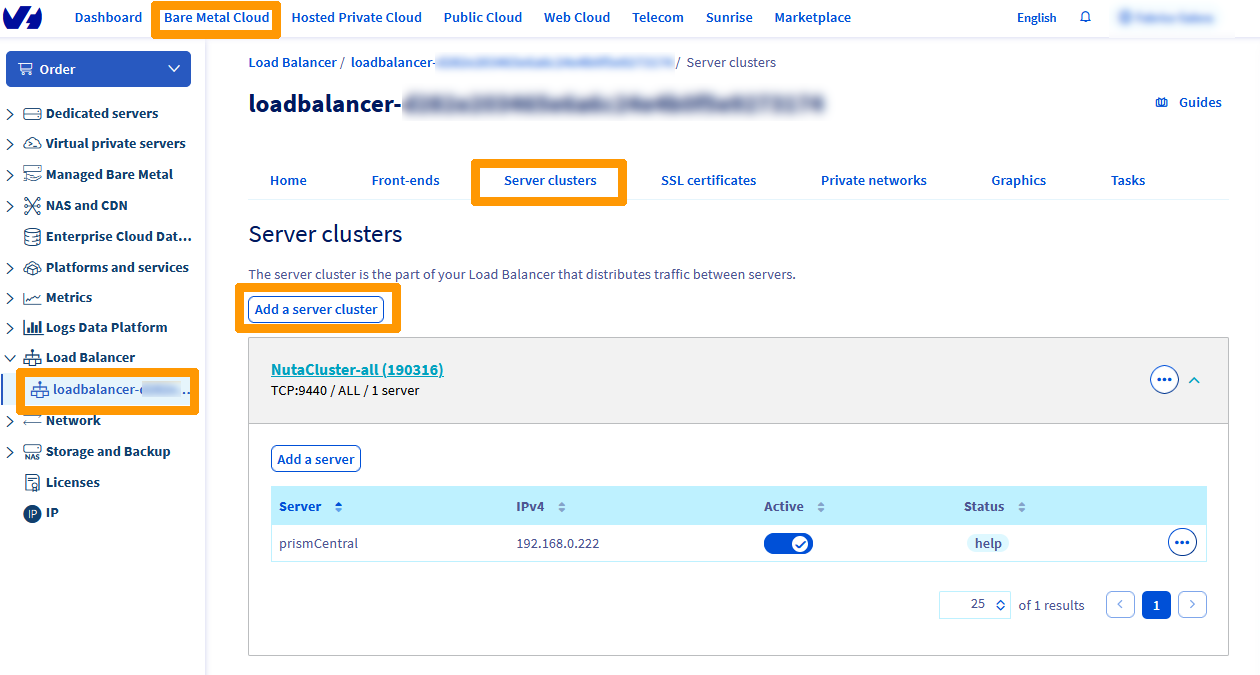
#### Configuring HYCU URL redirection to public network [](#)
In this section, we will configure a redirection so that you can configure HYCU using the web interface from outside your cluster.
In the OVHcloud Control Panel, select `Bare Metal Cloud
`, then click on your `Load Balancer
` in the menu bar on the left-hand side.
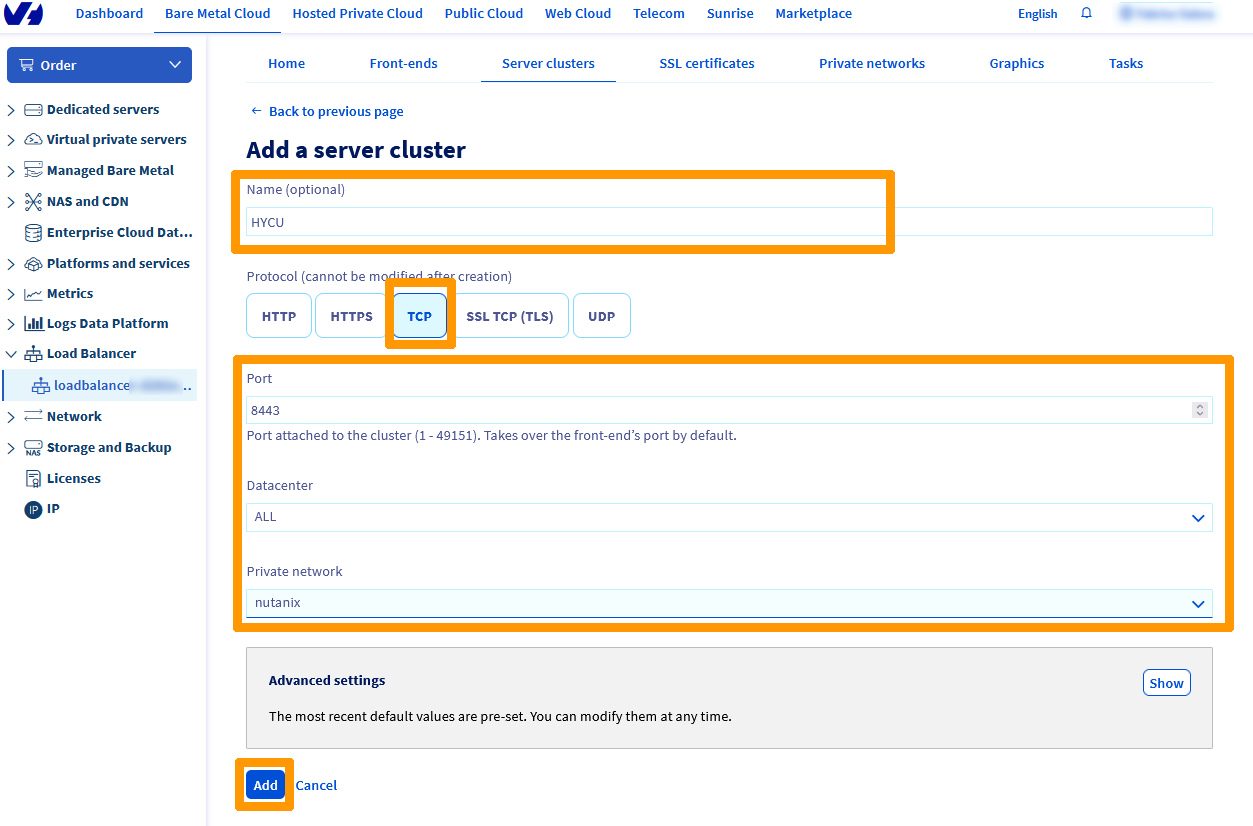
In the `Server clusters
` tab, click `Add a server cluster
`.
Name your server cluster, then select `TCP
` and enter this information:
- **Port**: `8443`
- **Datacenter**: `ALL`
- **Private network**: `nutanix`
Click `Add
` to confirm the server farm creation.
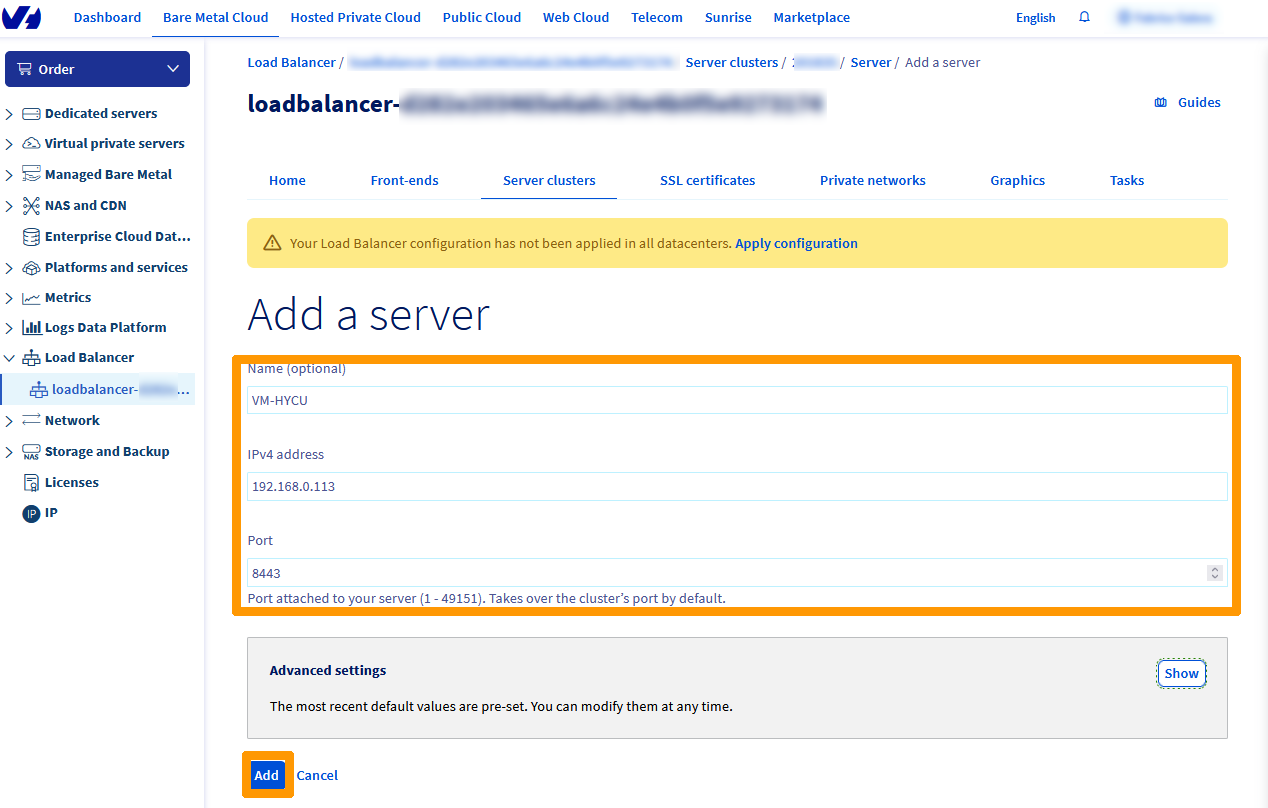
Click `Add a server
`.
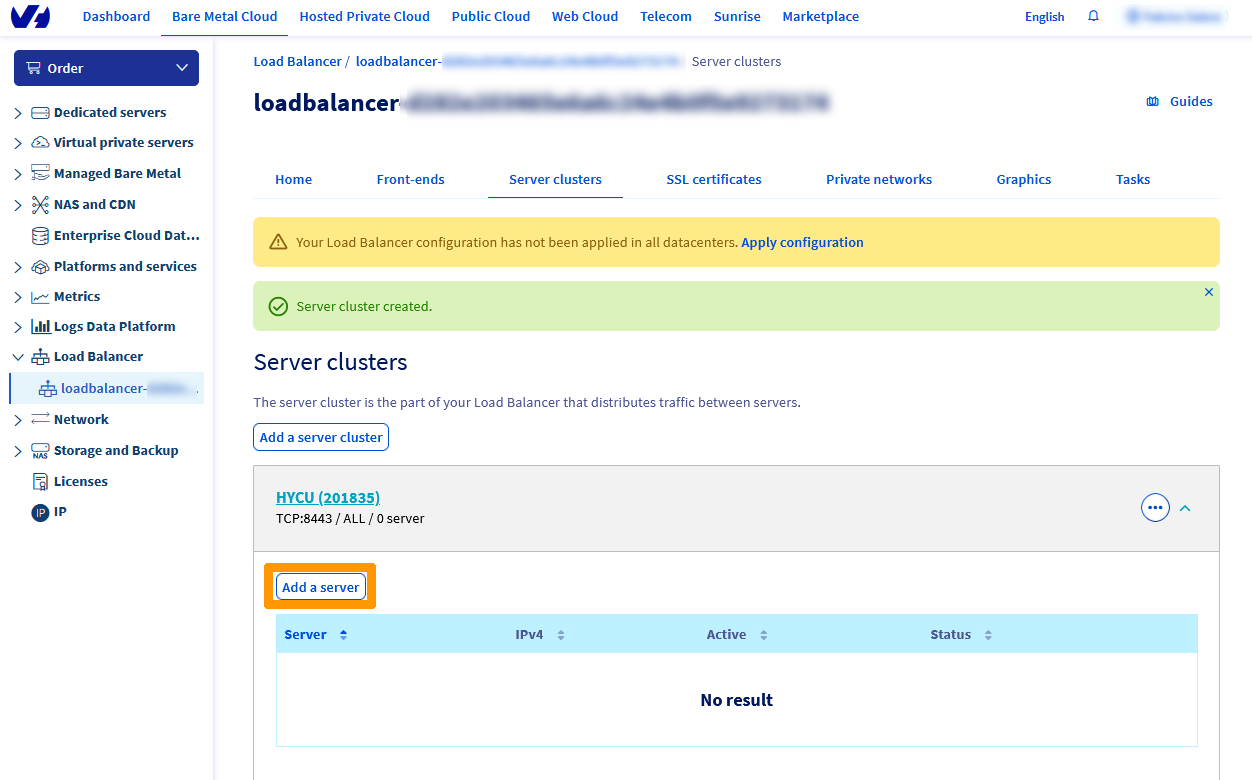
Enter these values:
- **Name (optional)**: `VM-HYCU`
- **IPv4** address: `ipaddresshycu`
- **Port**: `8443`
Click `Add
` to confirm the cluster creation.
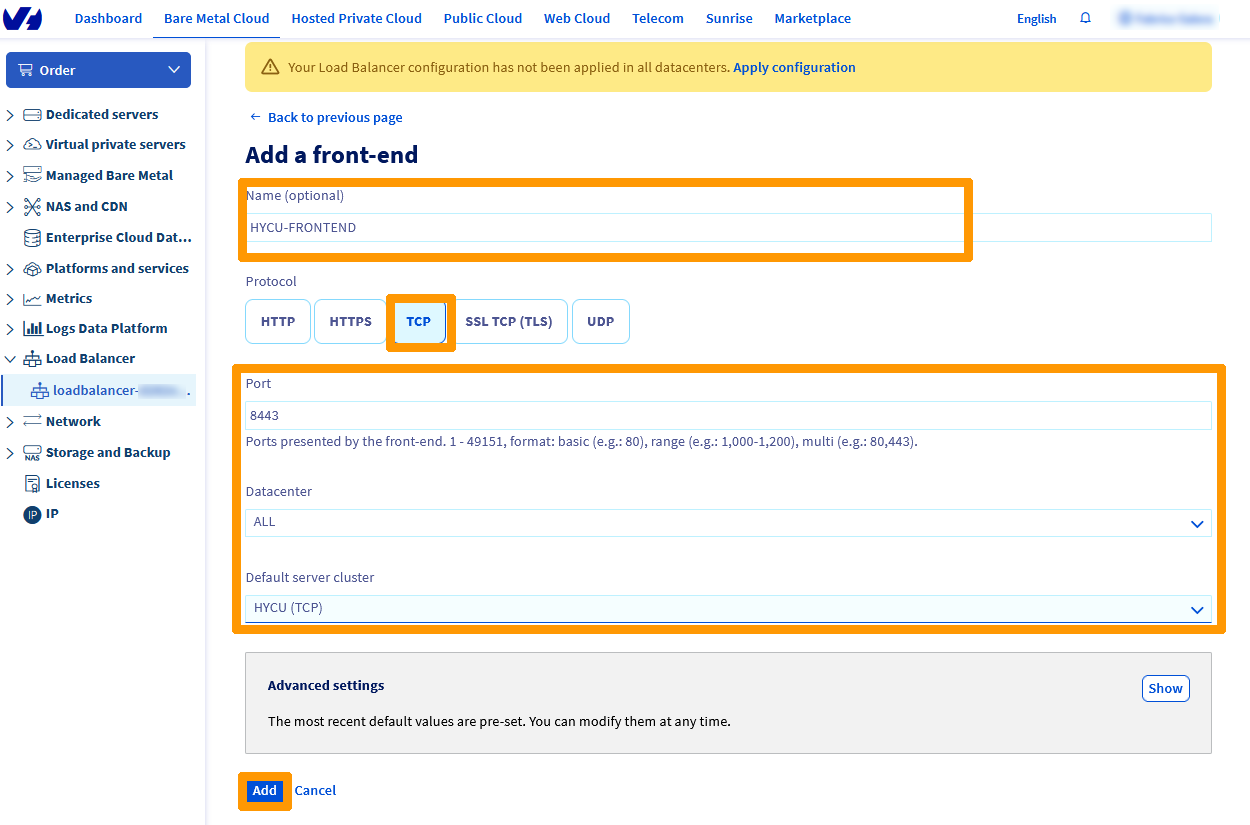
Next, click on the `Front-ends
` tab, and `Add a front-end
`.
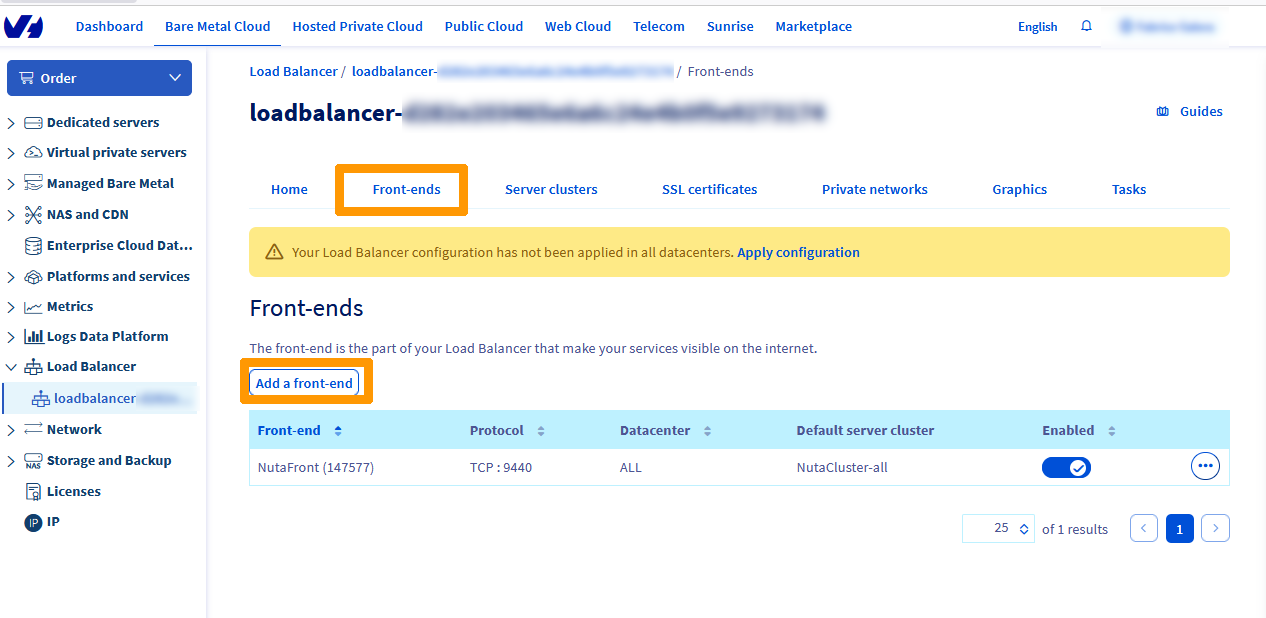
Name your front-end, choose the `TCP
` protocol, and modify these values:
- **Port**: `8443`
- **Datacenter**: `ALL`
- **Default server cluster**: `HYCU (TCP)`
Click `Add
`.
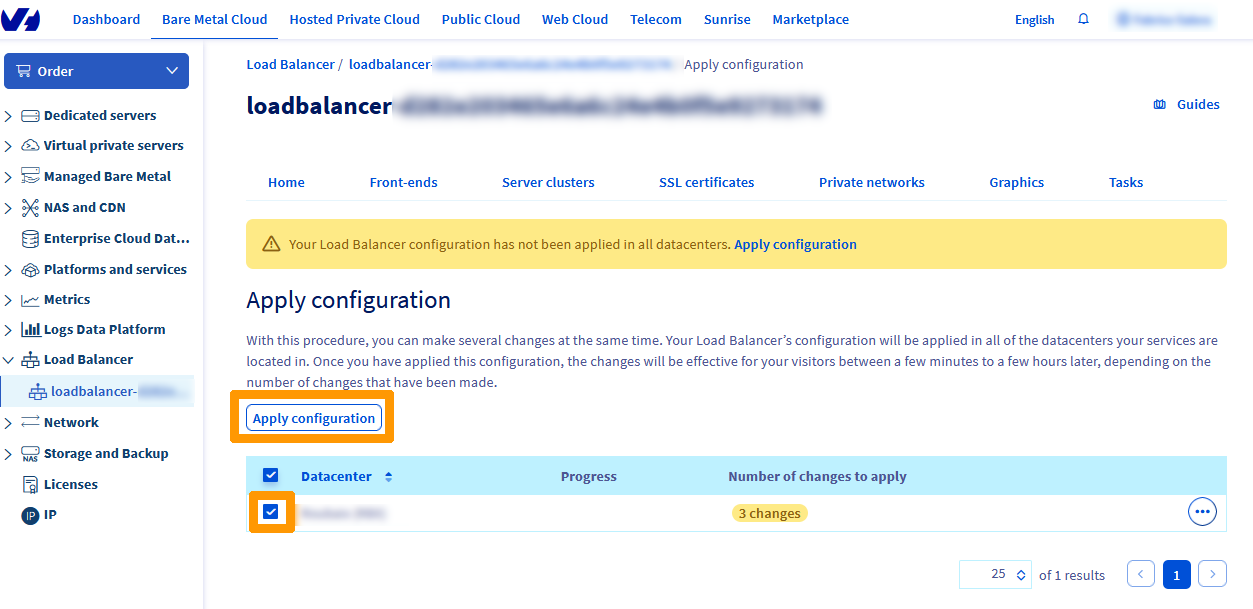
Click `Apply configuration
`.
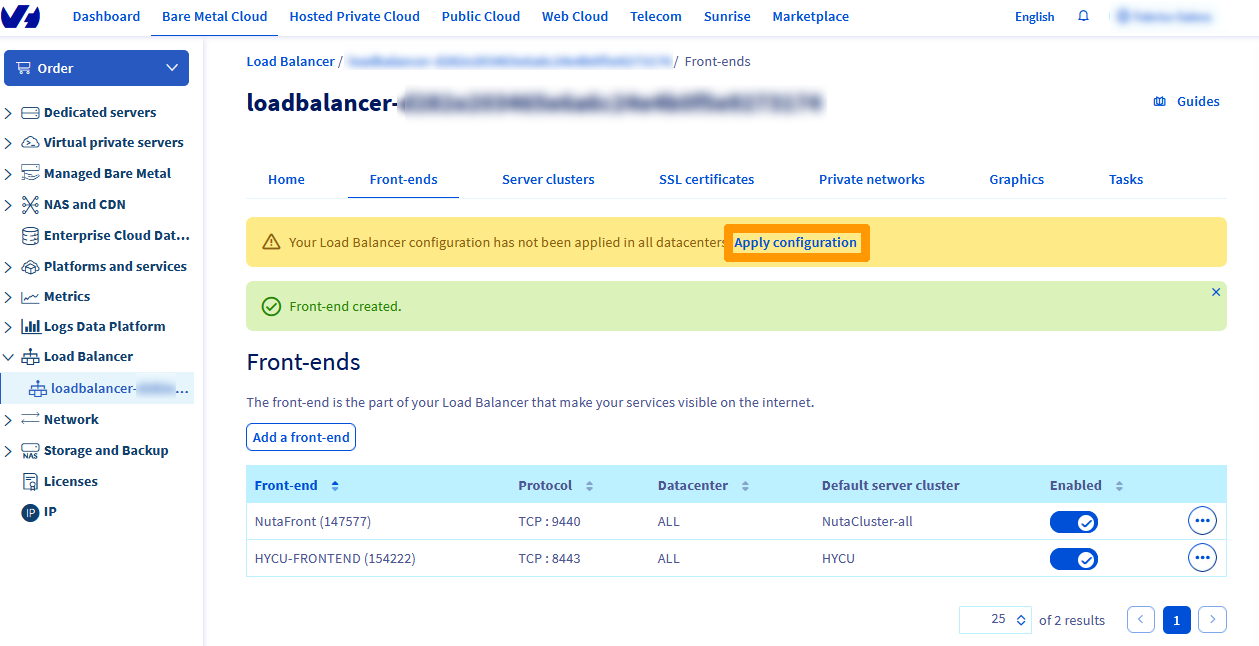
Select the `Datacenter
` and click `Apply configuration
`.
In the `Tasks
` tab, you can track the progress of applying the changes.
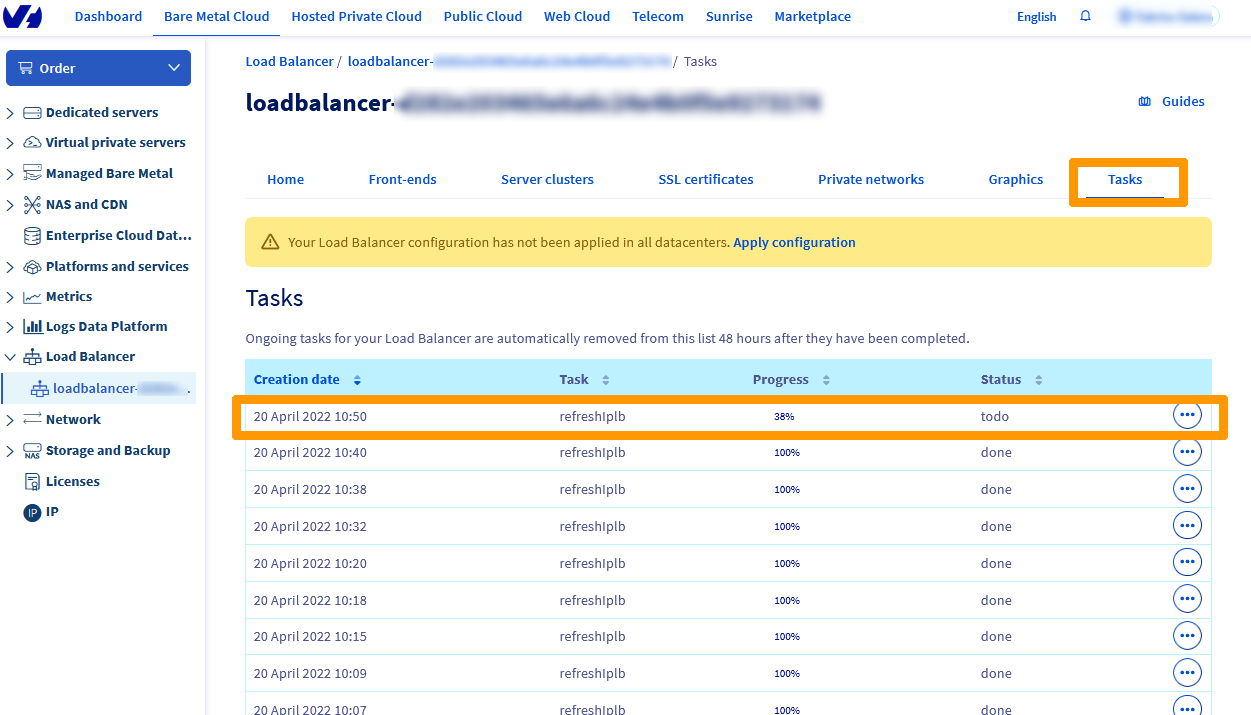
For more information on the OVHcloud Load Balancer, please refer to the [Go further](#gofurther) section of this guide.
#### Configuring HYCU [](#)
Connect with a web browser to the HYCU administration interface, which should be similar to **[https://nutanixfqdncluster:8443](https://nutanixfqdncluster:8443)**. The `fqdn` variable corresponds to the URL provided when the Nutanix cluster was created.
Enter the default password and click `Sign In
`.
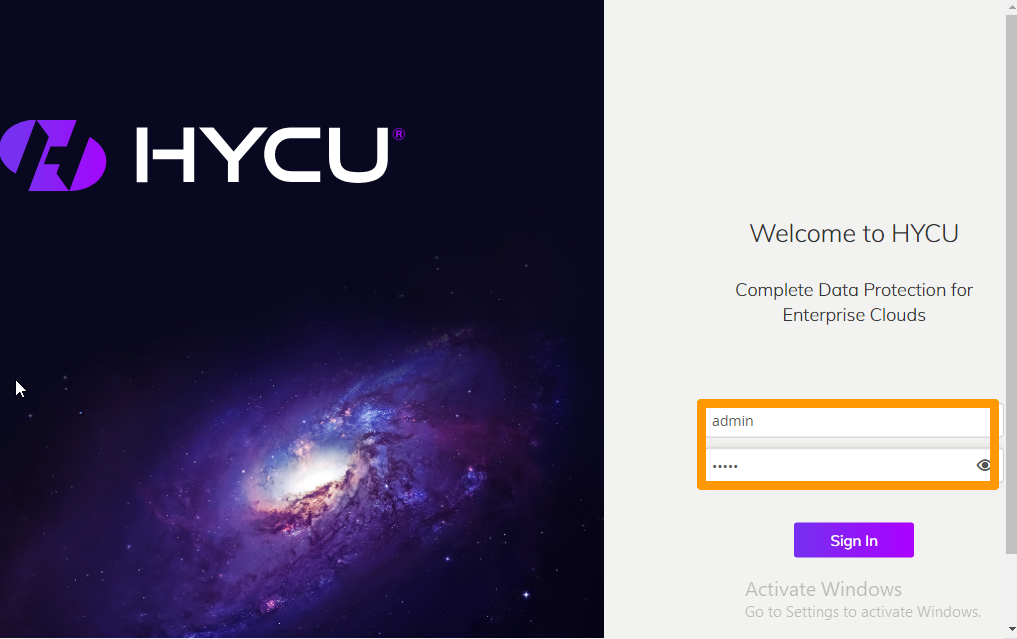
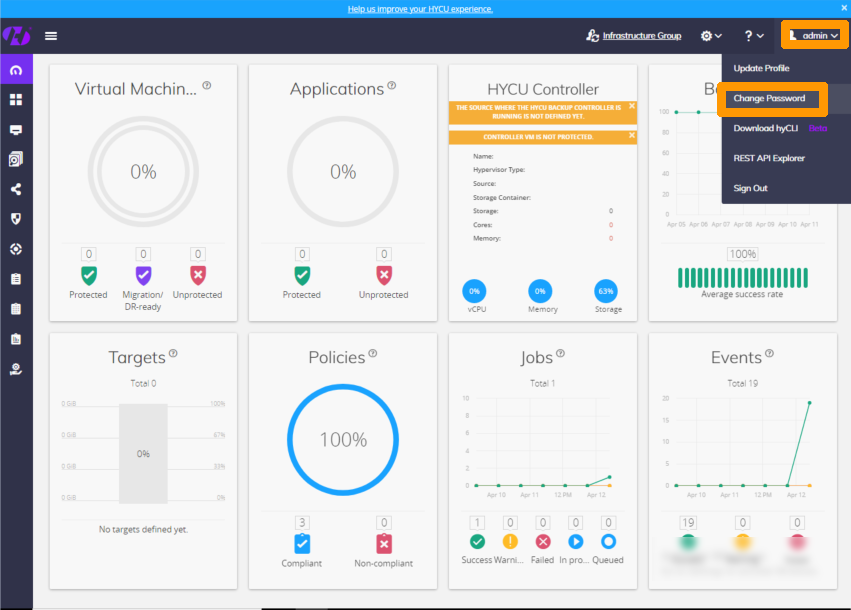
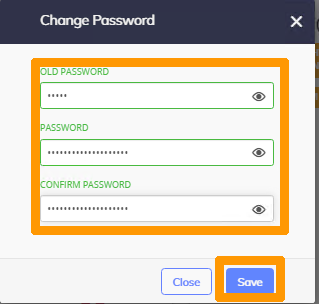
Change the login password for more security.
Click `Change Password
` in the `admin
` menu in the top right-hand corner of the interface.
Enter the default password in the **OLD PASSWORD** field, the new password in the **PASSWORD** and **CONFIRM PASSWORD** fields.
Then click `Save
`.
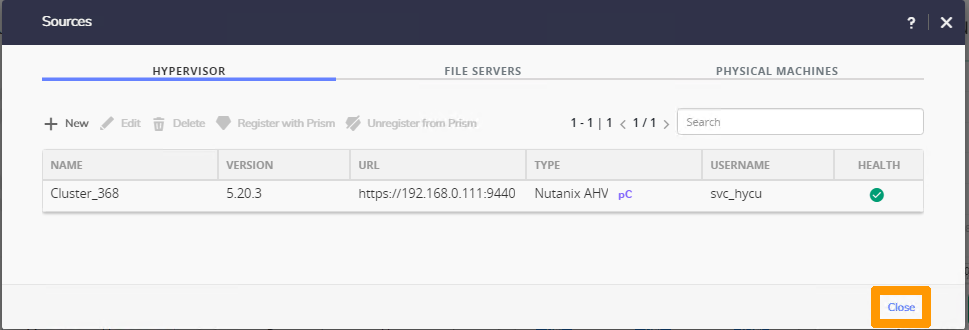
We will now connect HYCU to the Nutanix cluster.
Click the `Administration
` gear icon in the top right corner and choose `Sources
`
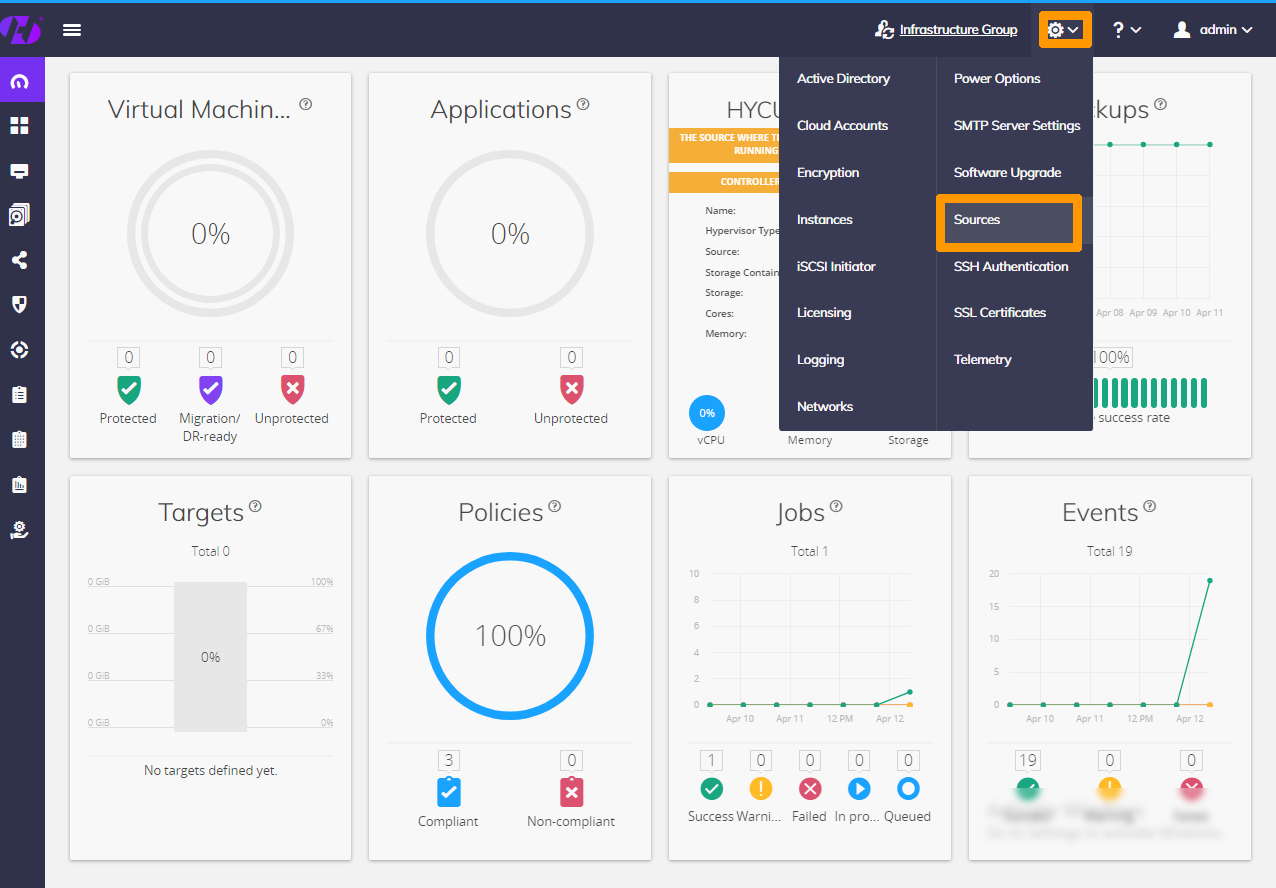
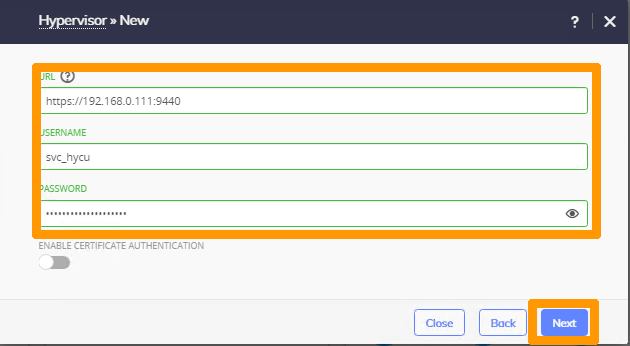
Enter information about **Prism Element**:
- **URL**: `https://url_prism_element_local:9440`
- **USERNAME**: `Prism Element user`
- **PASSWORD**: `Prism Element user password`
Click `Next
`.
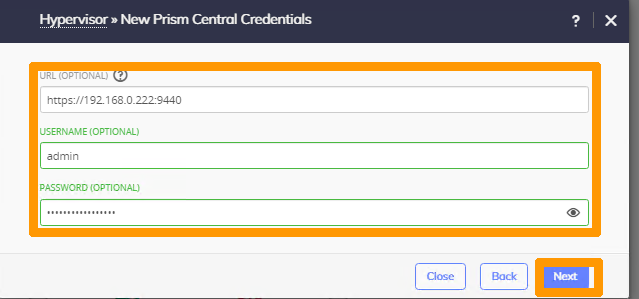
Enter this information about **Prism Central**:
- **URL**: `https://url_prism_central_local:9440`
- **USERNAME**: `Prism Central user`
- **PASSWORD**: `Prism Central password`
Click `Next
`.
The `VALIDATION SUCCESSFUL`
information appears to indicate that the entered information is correct. Click `Save
`.
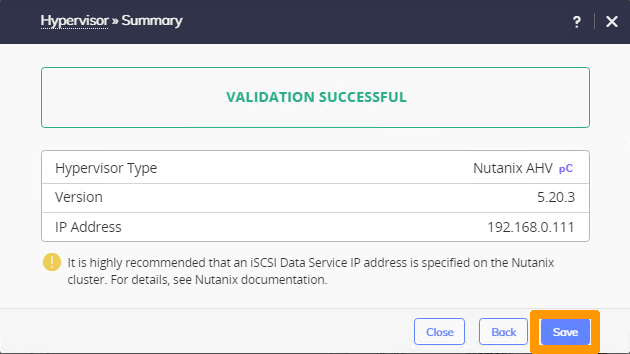
Click `Close
`.
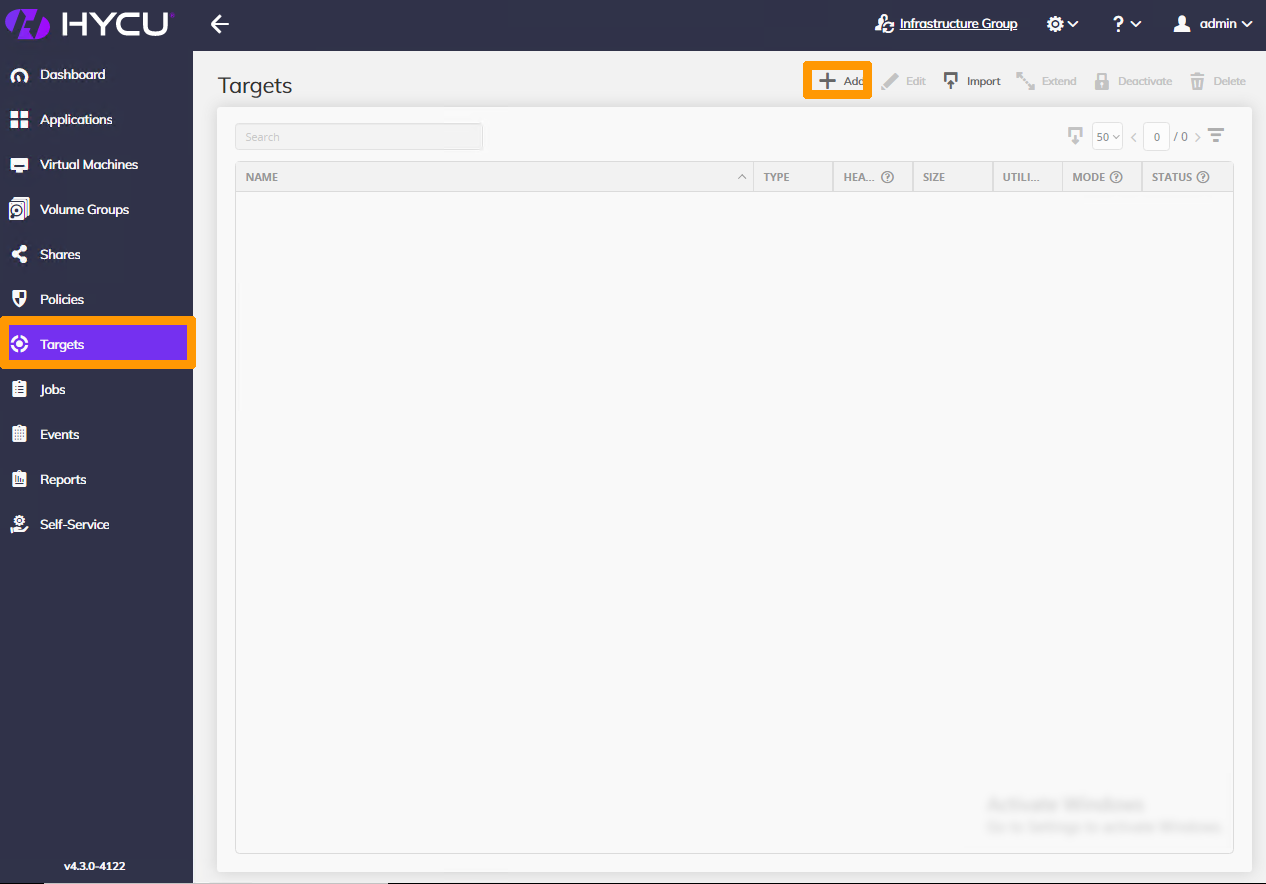
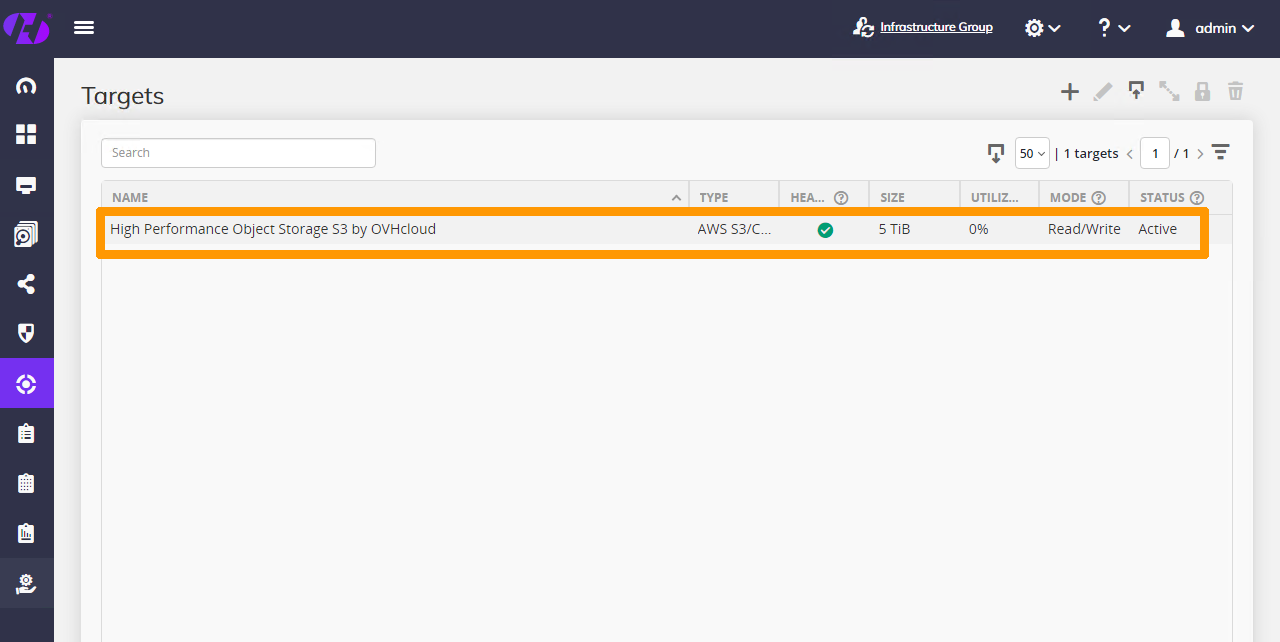
Select `Targets
` in the menu on the left and click `\+ Add
` in the top right of the interface.
Enter the configuration settings and authentication keys for your Object Storage user with read/write access to the Object Storage bucket used as explained below:
- **name** Name
- **Size**: Storage size
- **Type**: `AWS S3/Compatible`
:::warning
OVHcloud **High Performance Object Storage** service has no storage limits and is billed on a per-use basis.
In the HYCU software configuration, it is necessary to set a size as in the example below. You can of course choose another value.
:::
Enable `ENABLE COMPRESSION
` and scroll down through the window.
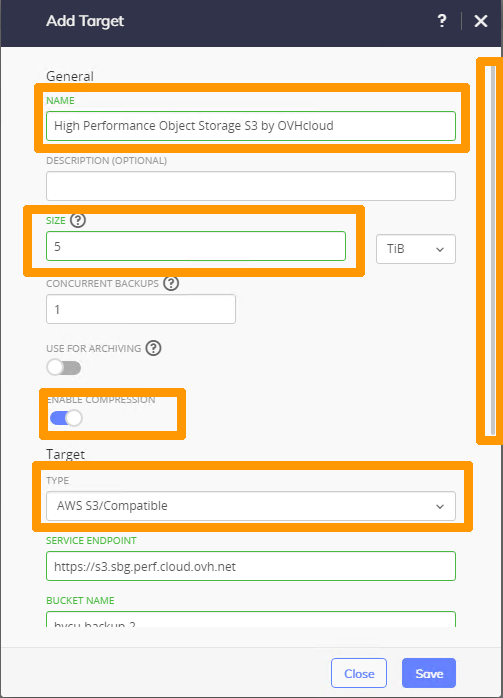.
Complete the information:
- SERVICE ENDPOINT: `Object Storage URL`
- BUCKET NAME: `Bucket name`
- ACCESS KEY ID: `Object Storage User Access Key`
- SECRET ACCESS KEY: `Object Storage User Secret Key`
Enable `TARGET ENCRYPTION
` and click `Save
`.
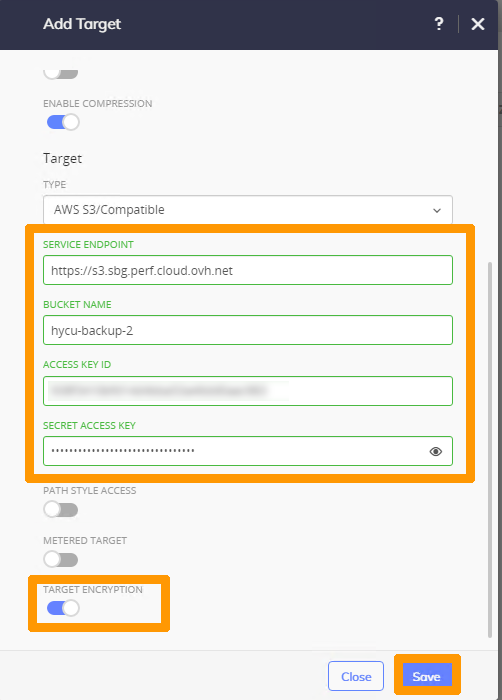.
The target is enabled for Nutanix cluster backups.
.
### Updating HYCU [](#)
HYCU regularly provides updates for which we detail the process below.
#### Adding sources for a new version of HYCU [](#)
From the **Prism Central**
main menu, click `Images
` from the `Compute & Storage
` menu.
Click `Add Image
`.
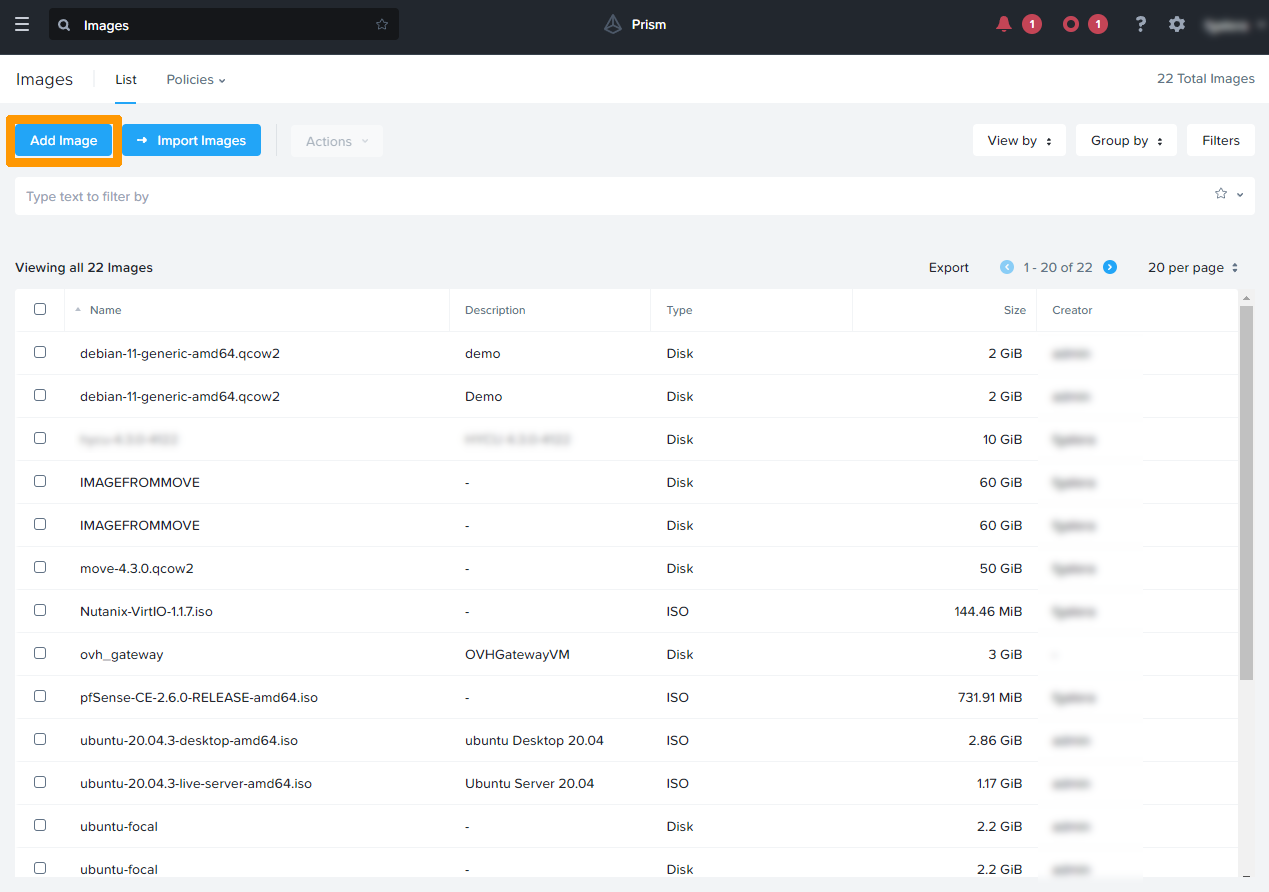
Select `URL
`.
Enter the URL for the qcow2 image of the latest version of HYCU, such as:
- `https://download.hycu.com/ec/v4.X.X/hotfixes/4.X.X-XXXX/hycu-4.X.X-XXXX.qcow2`
:::info
The URL used for the download is the latest version available on the HYCU website.
:::
Click `Upload file
`.
Remove the extension **.qcow2**
behind the name `hycu-'4.X.X-XXXX`
, enter a description and click `Next
`.
:::warning
It is important to remove the extension in the name to facilitate the HYCU update process.
:::
Click `Save
` to import the image.
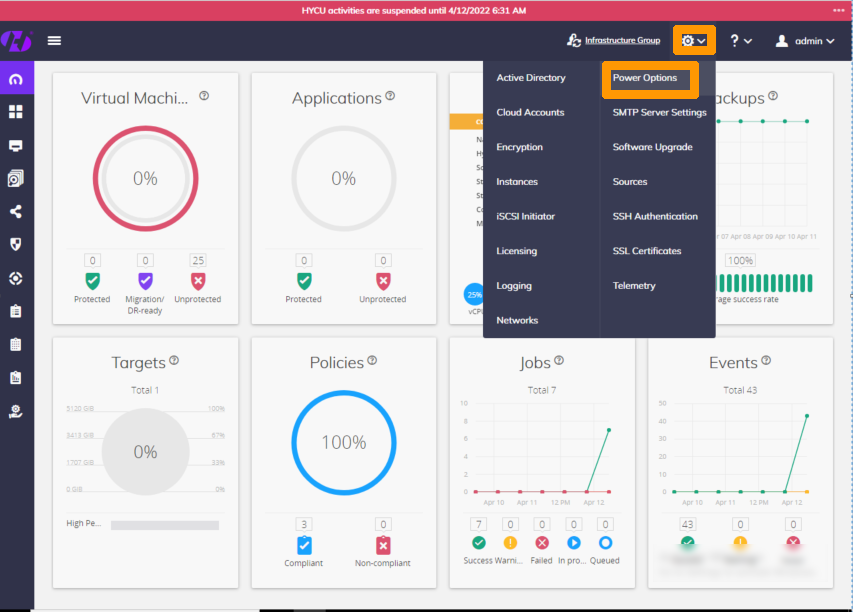
#### Runing the update from HYCU [](#)
Log in via the URL provided when you created the Nutanix cluster, replacing the port **[https://fqdnclusternutanix:8443](https://fqdnclusternutanix:8443)**.
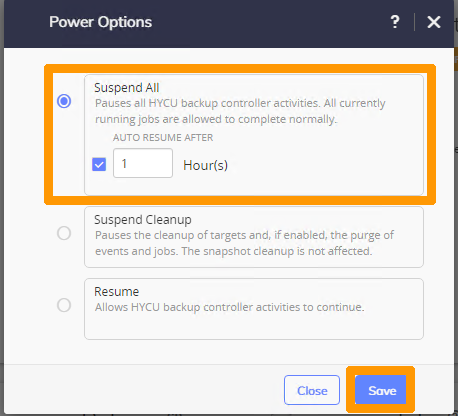
Go to the HYCU configuration by clicking the `Administration
` gear icon and choose `Power Options
`.

Select `Suspend All
`, check `AUTO RESUME AFTER
` and leave the **Hours**
field at `1
`, then click `Save
`.
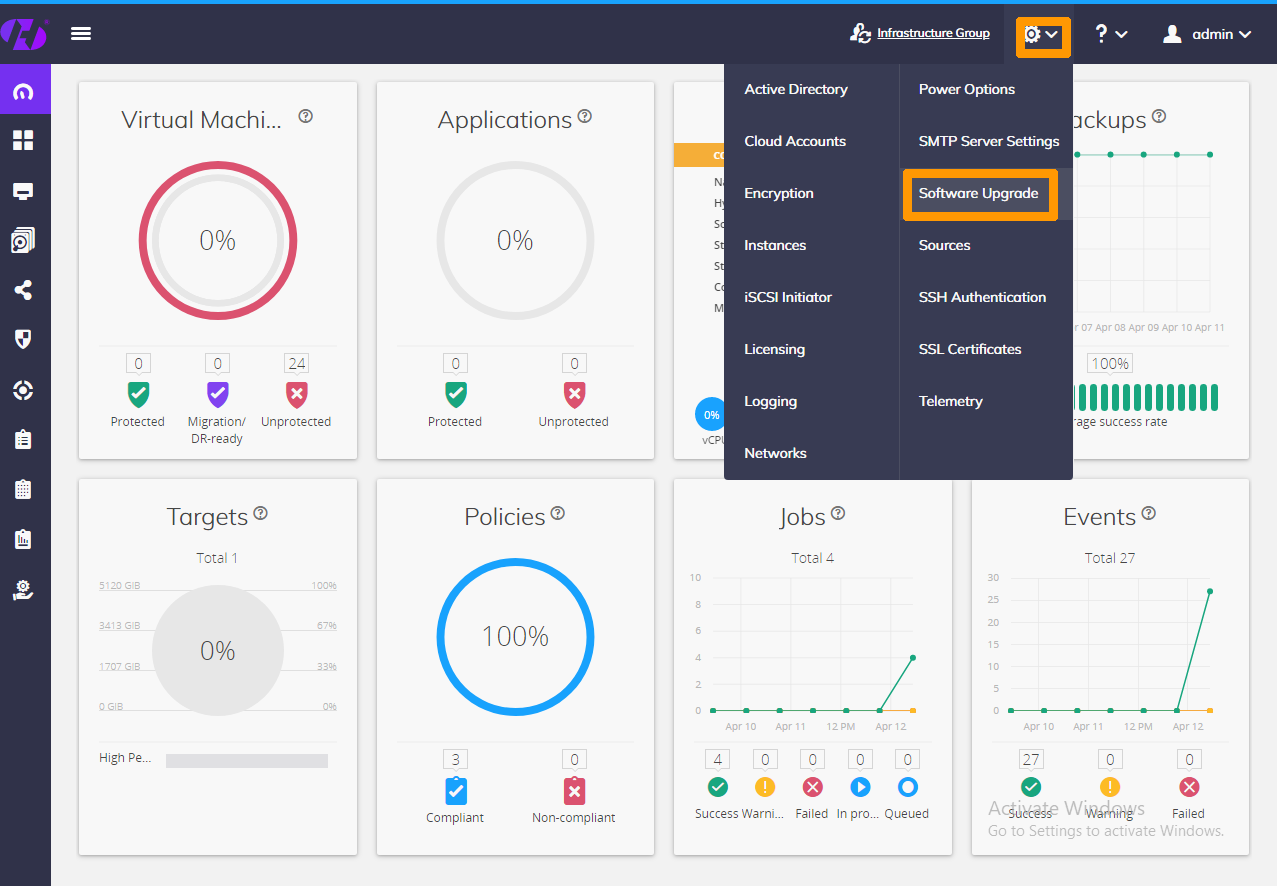
Click `Software Upgrade
` from the `Administration
` gear menu.
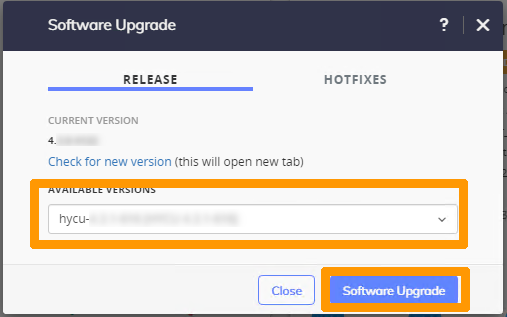
Choose the latest version from the **AVAILABLE VERSIONS**
drop-down menu and click `Software Upgrade
`.
Click `Yes
` to start the update process.
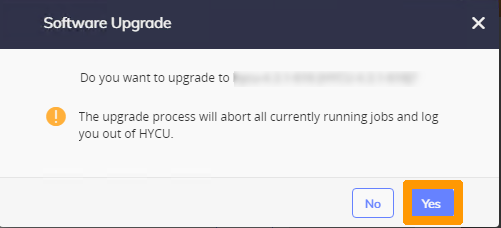
A backup copy is made during the update process so that it can be restored if there are any issues.
Log in to the HYCU administration interface.
Click the gear icon and click `Power Options
`.
Uncheck `Suspend All
` and click `Save
`.

### Configuring backup in HYCU [](#)
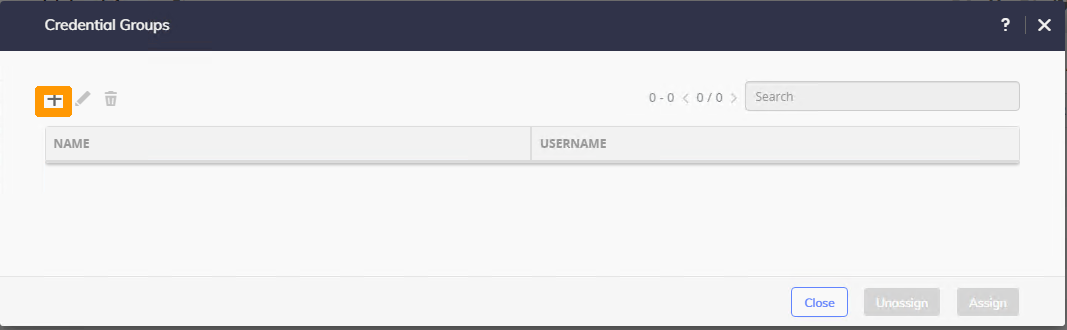
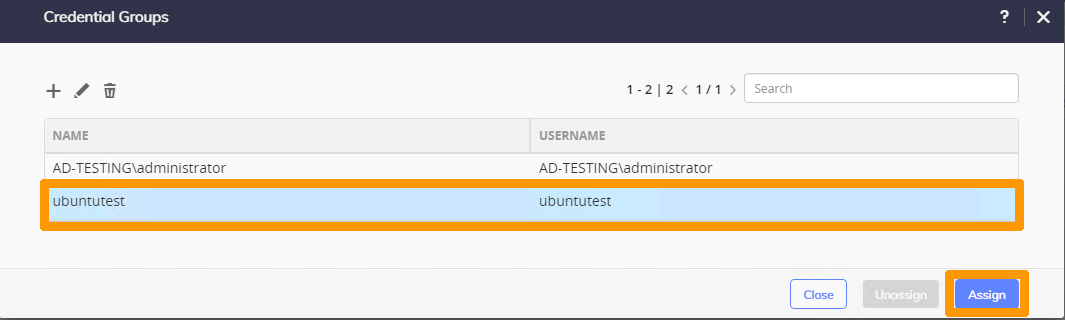
#### Setting up VM login passwords [](#)
Virtual machine login passwords enable backup of applications such as a Microsoft SQL database or Exchange server.
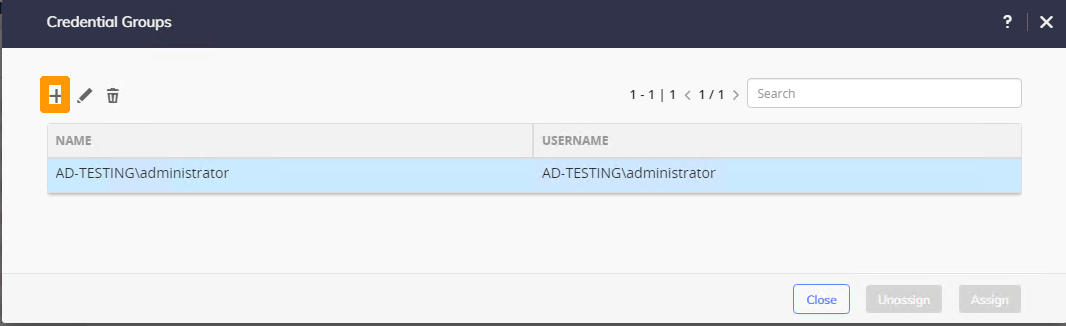
Log in via the `Virtual Machines
` menu on the left and click the key-shaped `Credentials
` button at the top right of the interface.
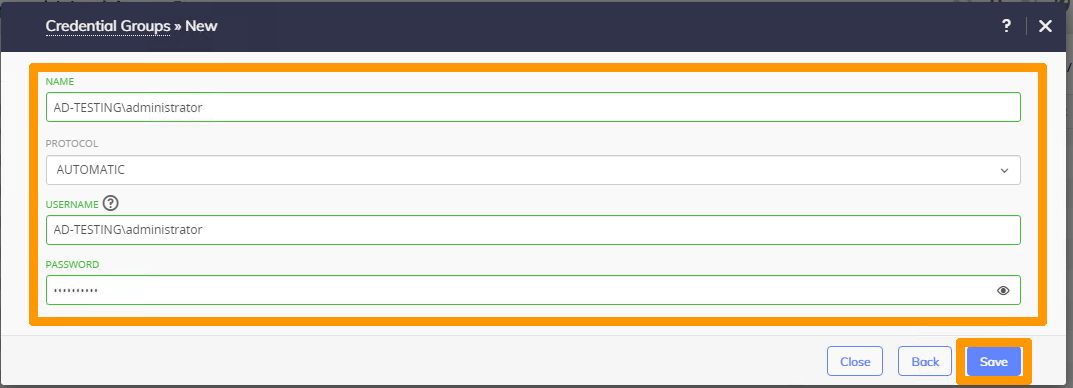
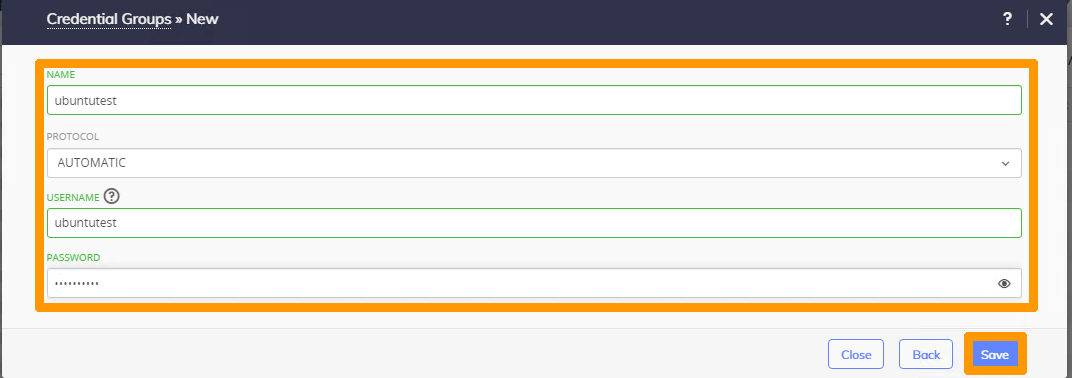
Click the `\+
` sign.
Enter these values:
- **NAME**: password storage name
- **PROTOCOL**: `AUTOMATIC`
- **USERNAME**: virtual machine user account
- **PASSWORD**: password
Click `Save
`.
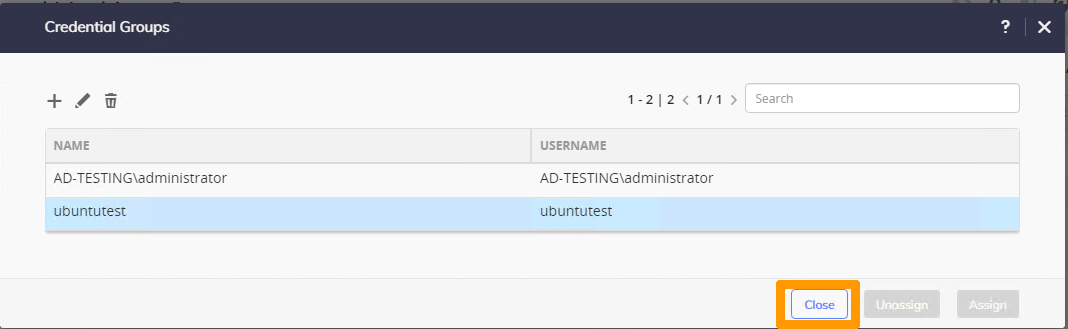
Click the `\+
` sign to add another account.
Enter these values:
- **NAME**: password storage name
- **PROTOCOL**: `AUTOMATIC`
- **USERNAME**: virtual machine user account
- **PASSWORD**: password
Click `Save
`.
Click `Close
`.
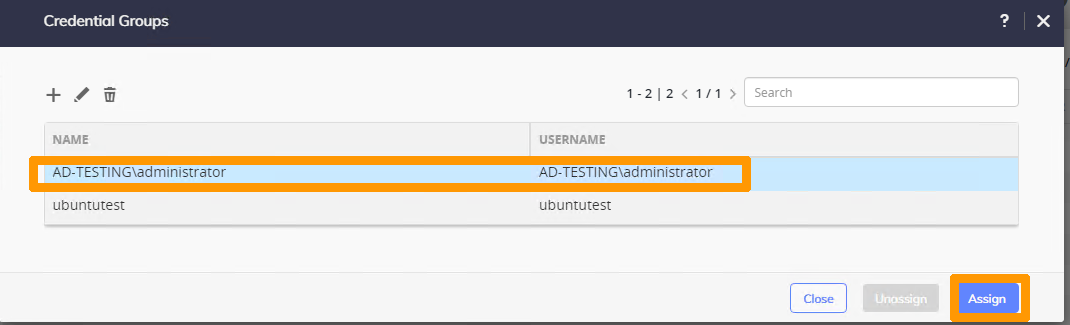
Select the virtual machines that will use a password by ticking the box to the right of the virtual machine, then click the `credentials
` key button.

Select the password you want to use and click `Assign
`.
Select another virtual machine that will use a password by ticking the box to the right of the virtual machine, then click the `credentials
` key button.
Select the password you want to use and click `Assign
`.
#### Creating backup policies [](#)
Go to the `policies
` menu on the left and click the `\+
` button in the top right corner.
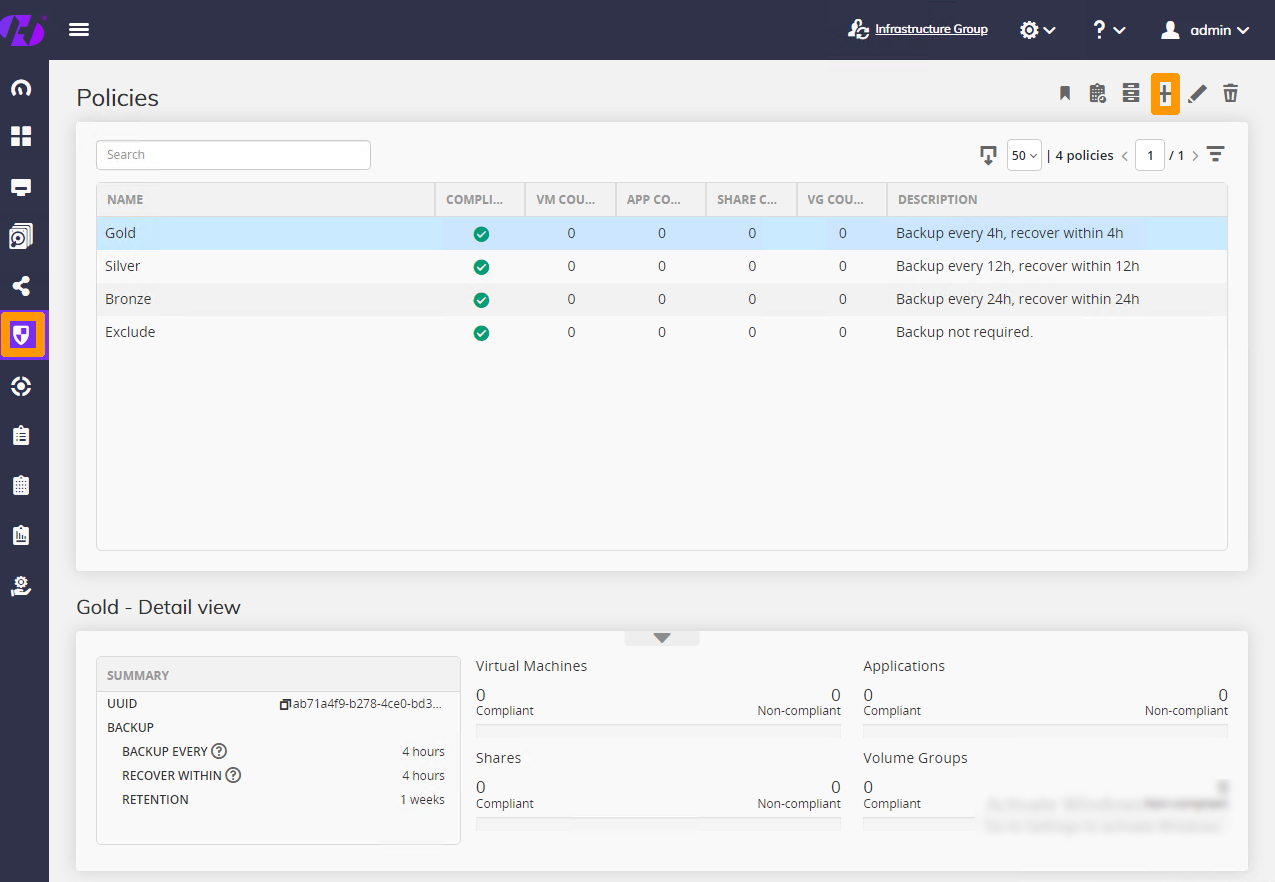
Enter this information:
- **NAME**: `HYCU VM`
- **BACKUP EVERY**: `4 hours`
- **BACKUP THRESHOLD**: `42`
Leave the `BACKUP
` option checked and use the scroll bar on the right.
Click `Save
`.
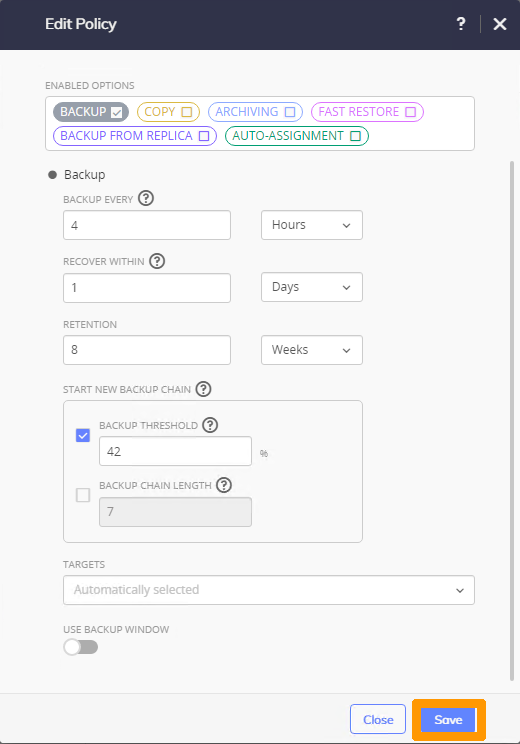
This policy is created for the HYCU virtual machine.
In the `policies`
menu, click the `\+
` button in the top right corner.

Set the policy name `BACKUP to Object Storage OVHcloud and local SNAPSHOTS
` in the **NAME**
field.
Check the `FAST RESTORE
` option, leave the `BACKUP
` option checked.
Change the backup options in **Backup**
and change the **BACKUP THREESHOLD**
value to `25
`. Then scroll down the page.
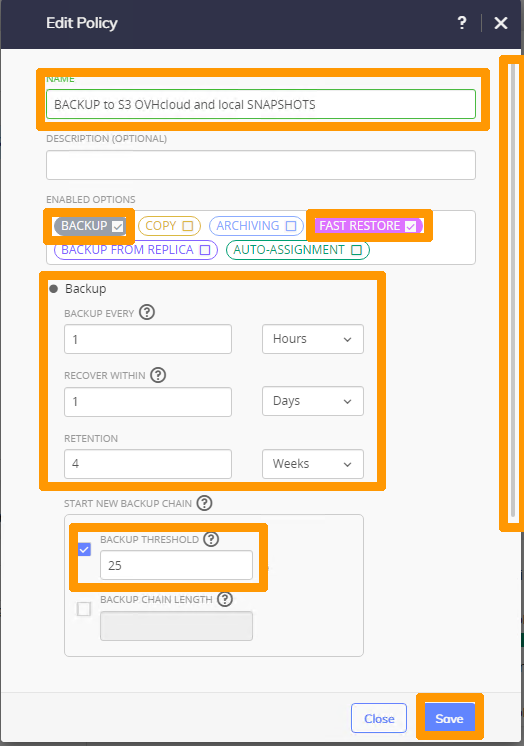
Edit the **Fast restore**
option with your settings and click `Save
`.
This strategy makes a backup on OVHcloud Object Storage and also takes **snapshots** inside the Nutanix cluster, allowing for faster recovery.
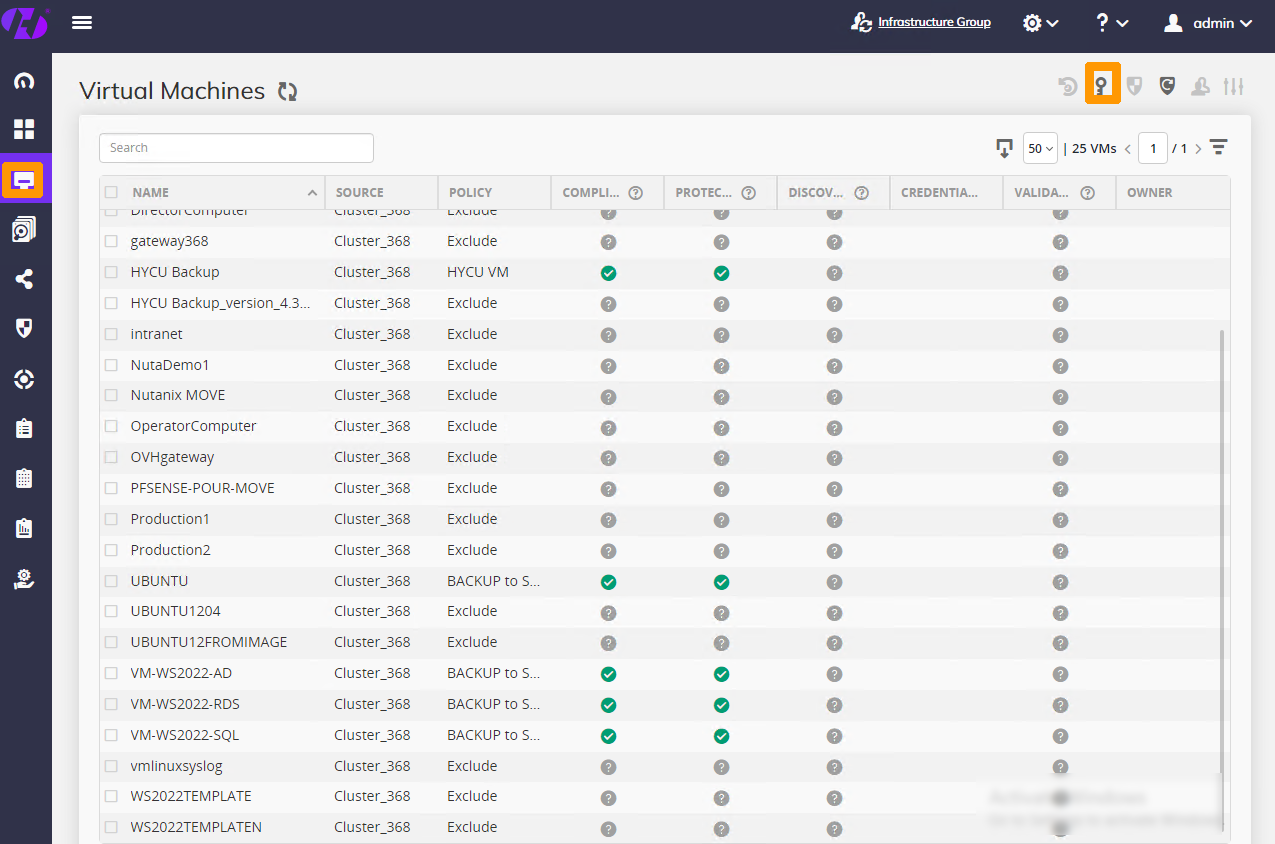
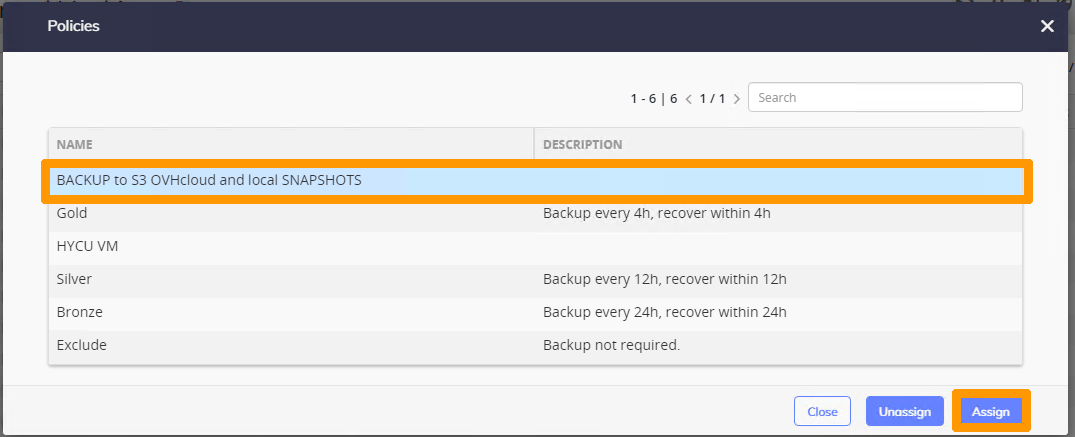
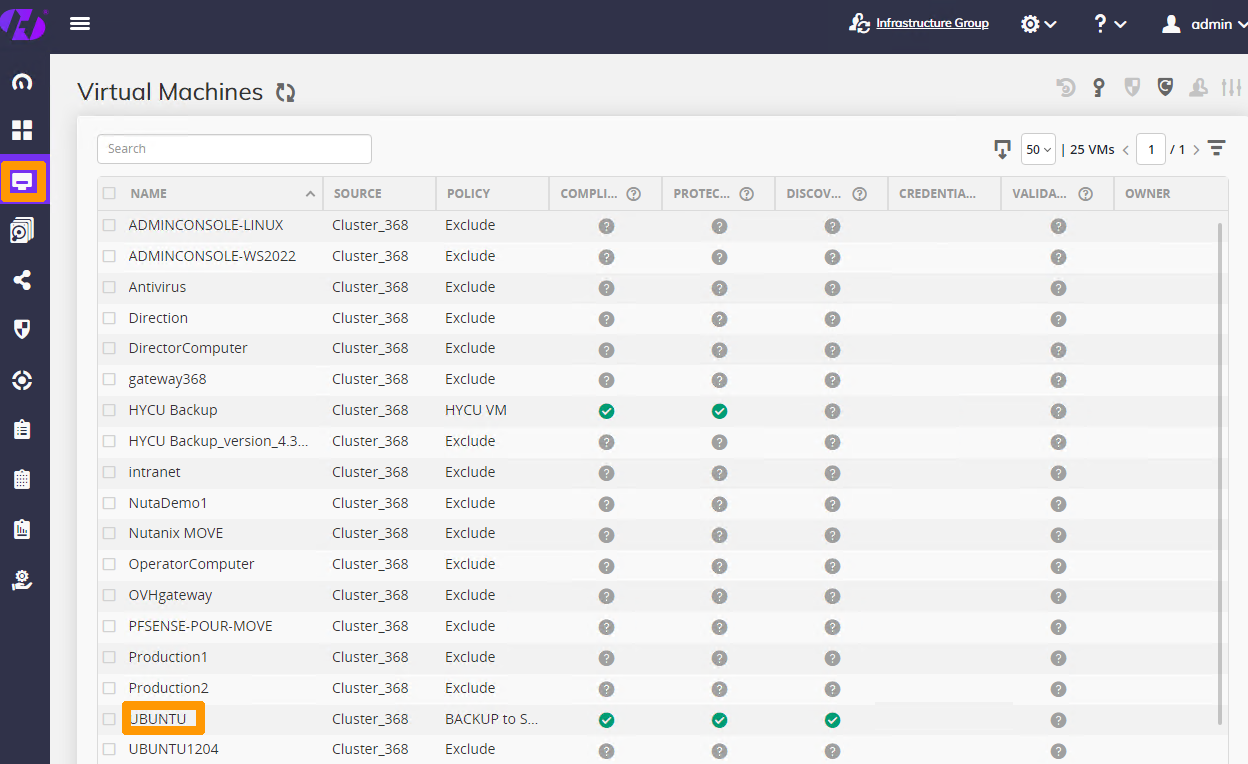
#### Assigning backup policies [](#)
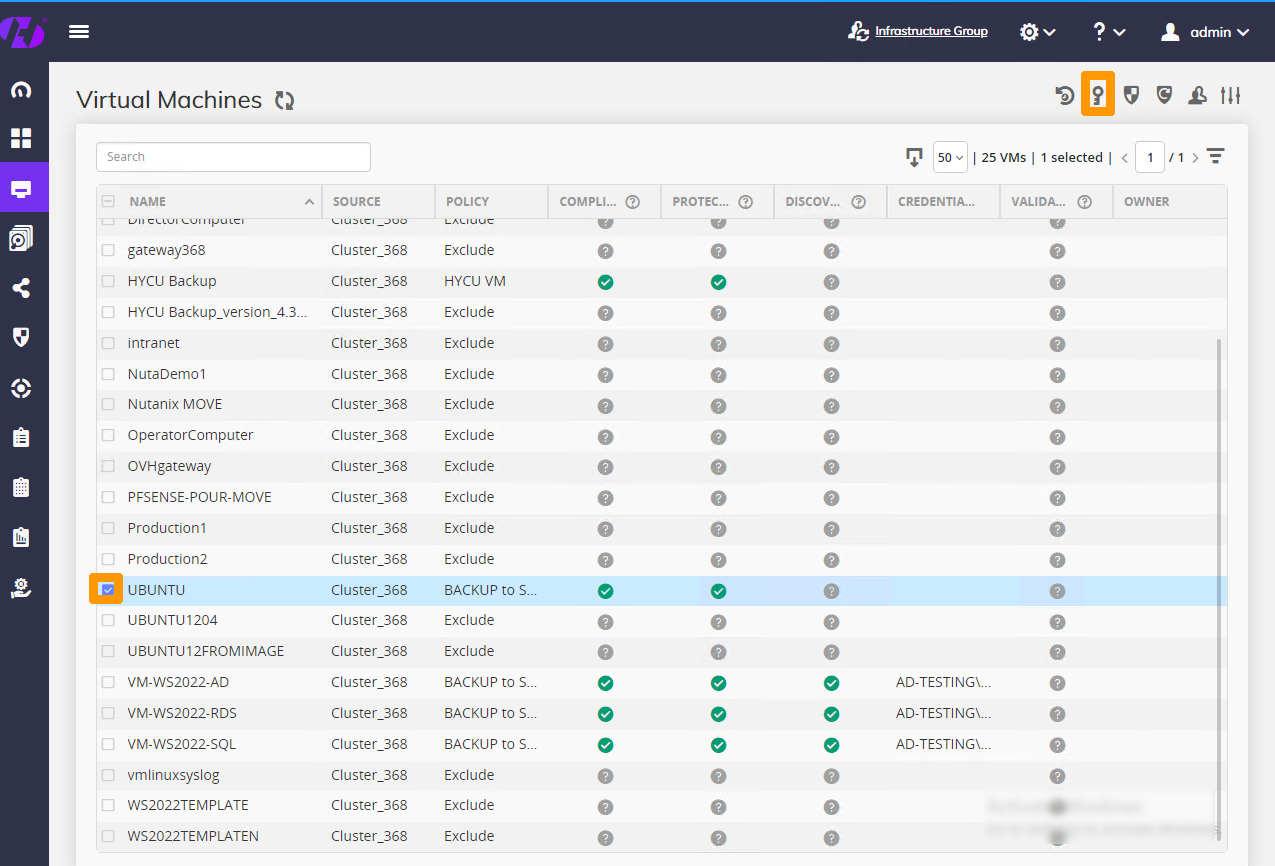
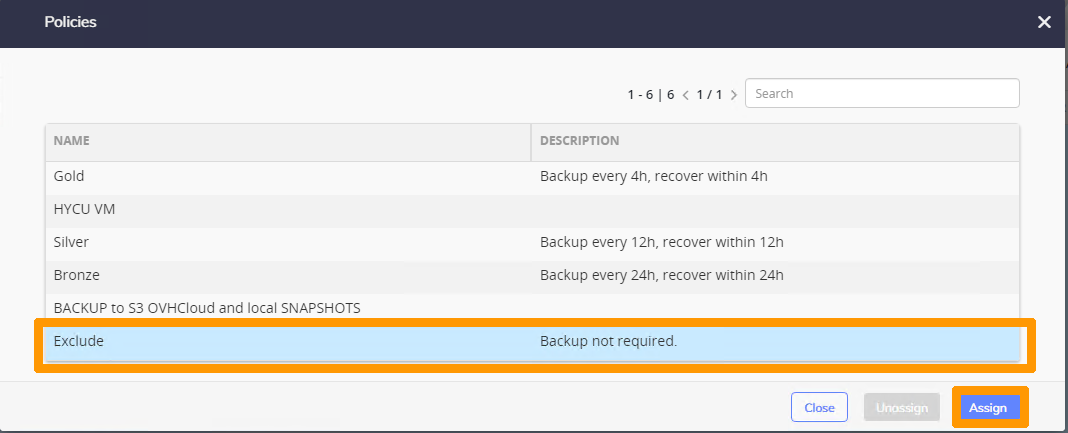
Select all VMs via the check box next to **NAME**
, then click the shield-shaped `Policies
` button in the top right to assign a policy to all VMs.
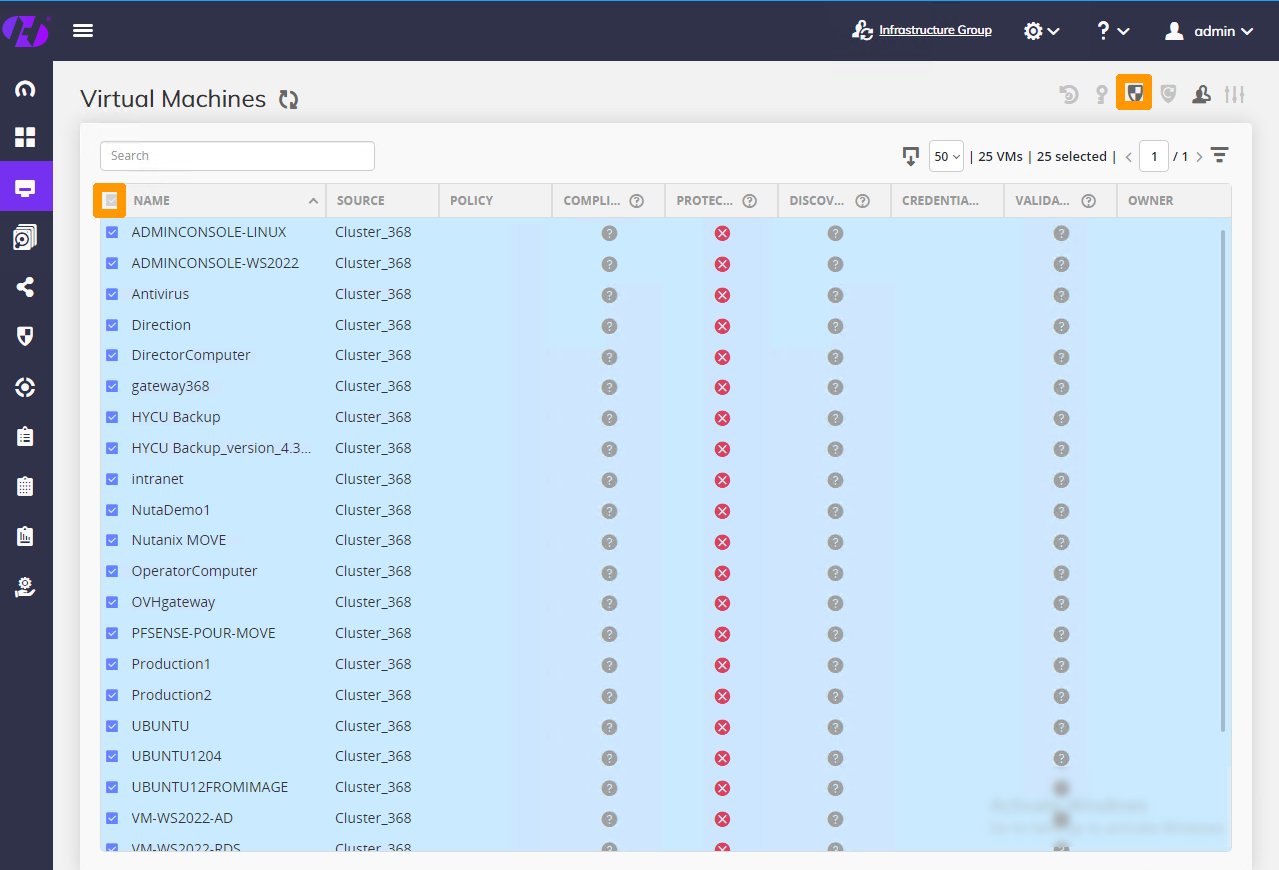
Choose the `Exclude
` policy and click `Assign
`.
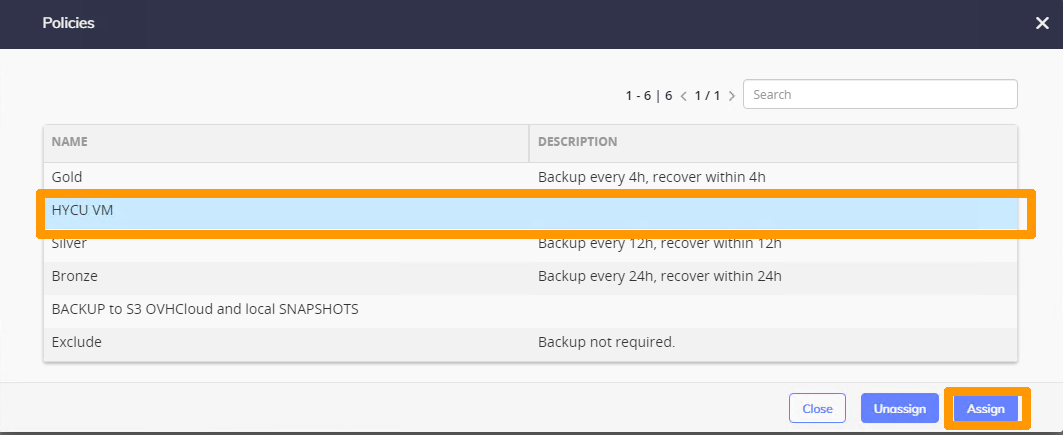
Select the HYCU virtual machine by selecting the check box next to it, then click the `Policies
` button to assign a policy to this virtual machine.
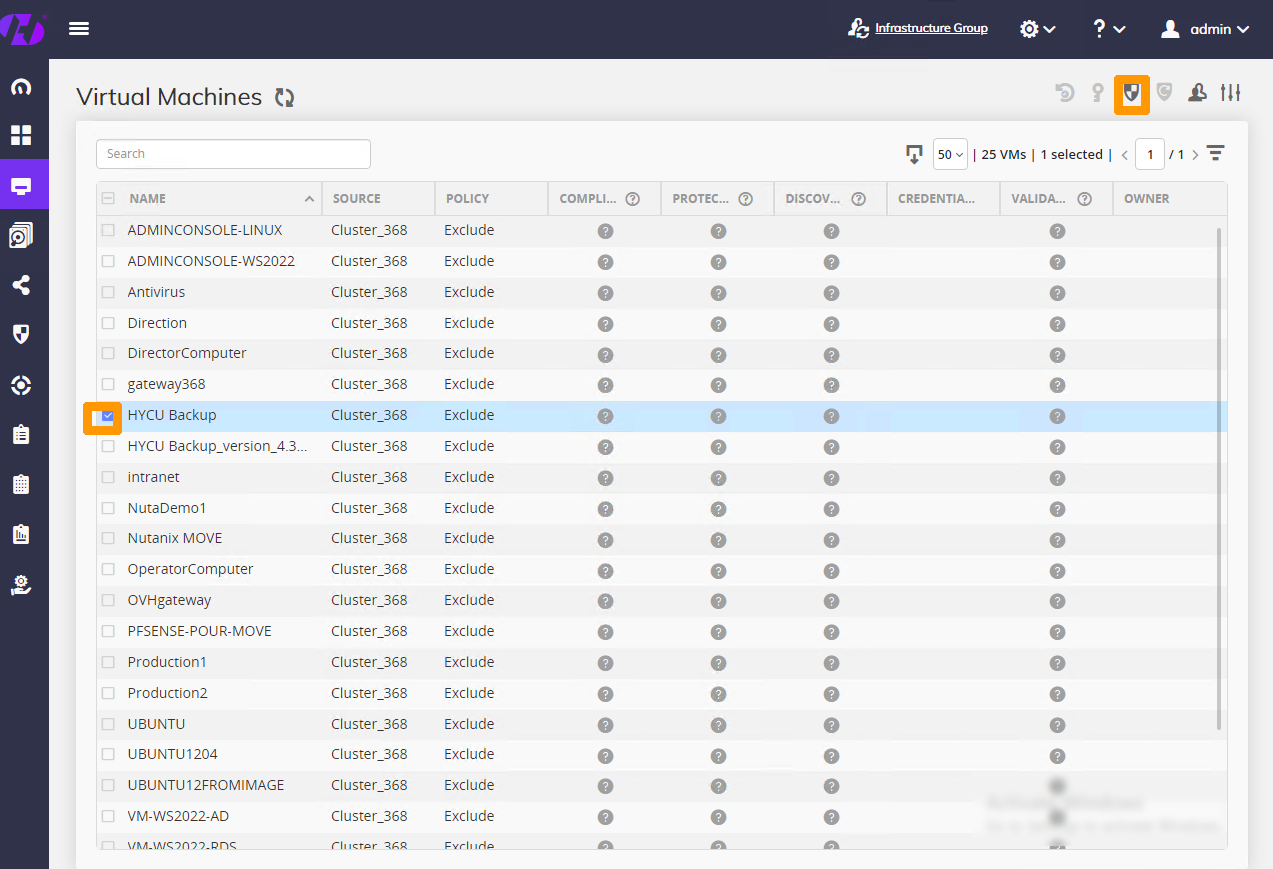
Choose the `HYCU VM
` policy and click `Assign
`.
Select four virtual machines and click the `Policies
` button to assign a policy.
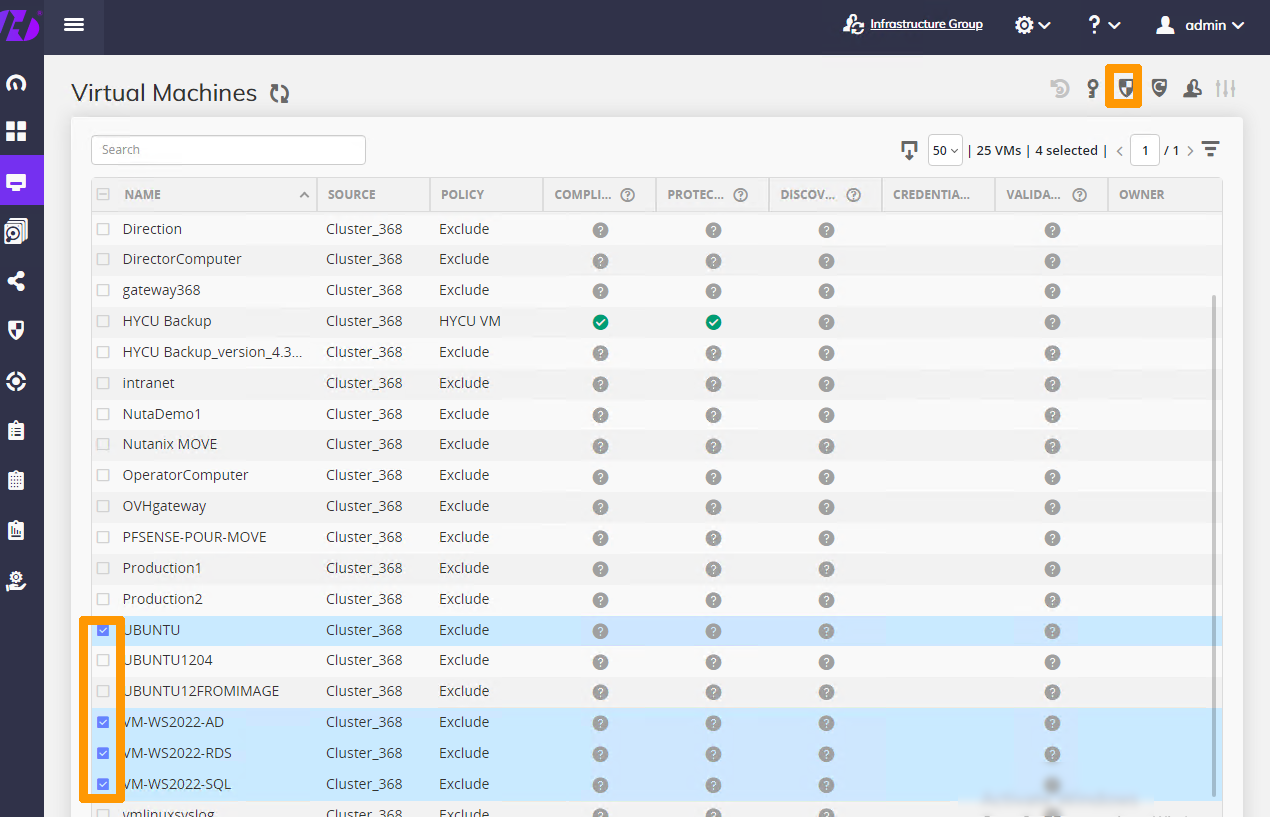
Choose the `BACKUP to Object Storage and local SNAPSHOTS
` policy and click `Assign
`.
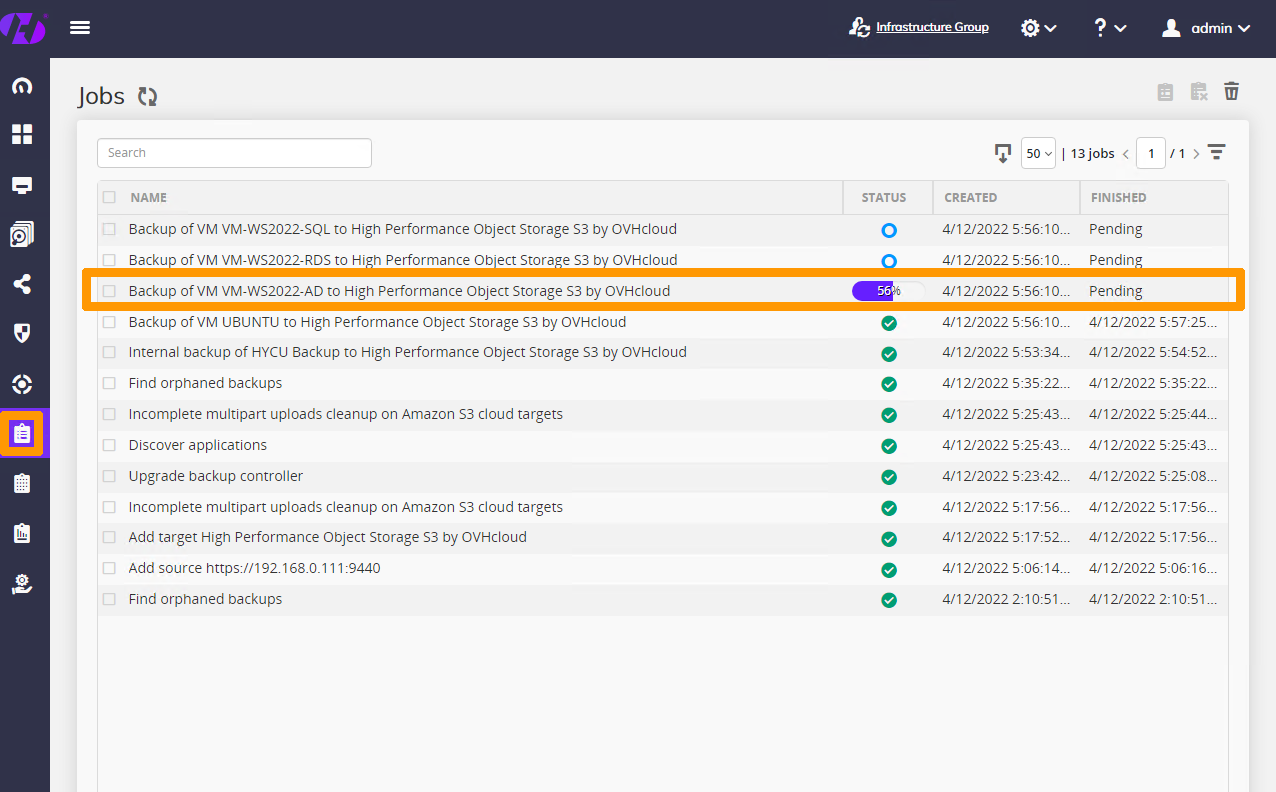
### Monitoring backup status [](#)
Go to the `Dashboard
` menu on the left to view the dashboard and view the backup status.
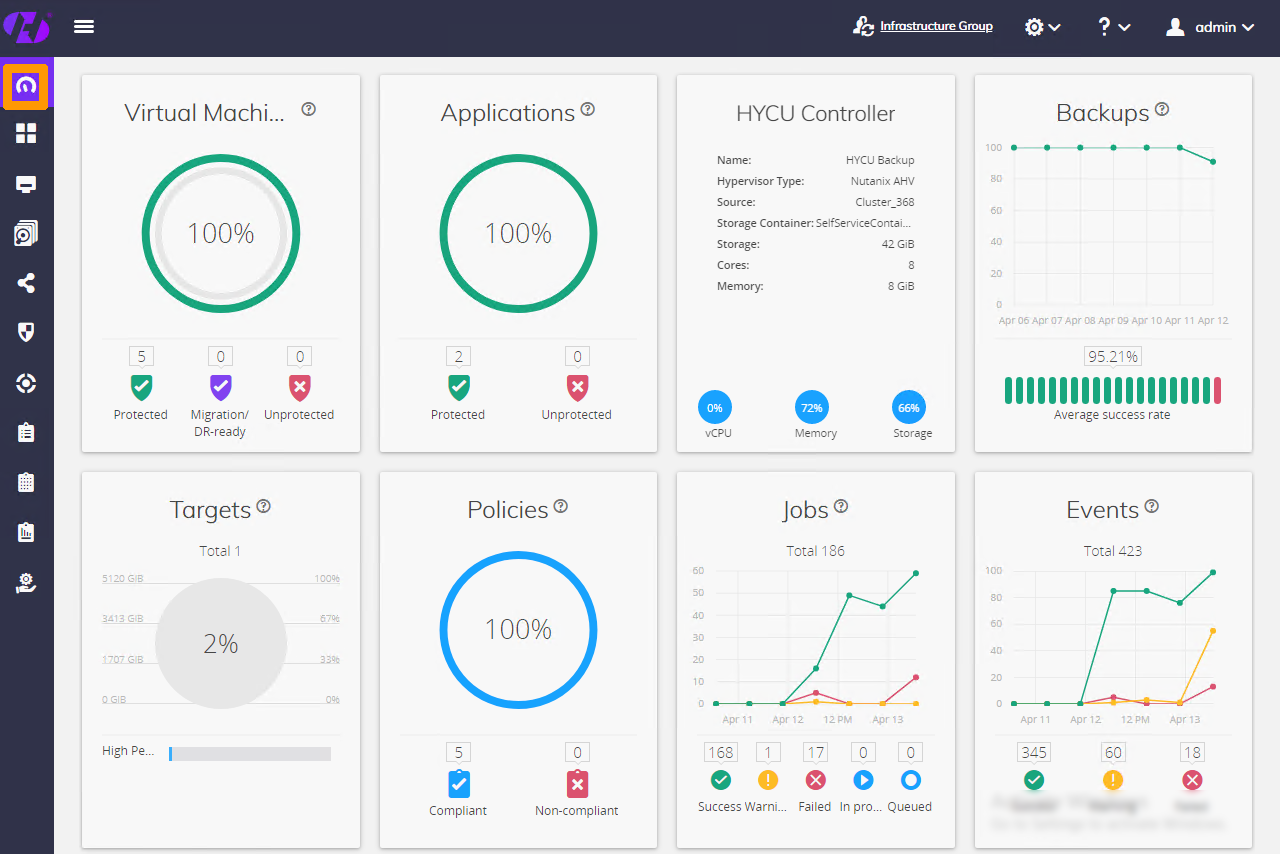
Open the `Jobs
` menu on the left to view the job status.
### Restoring from HYCU [](#)
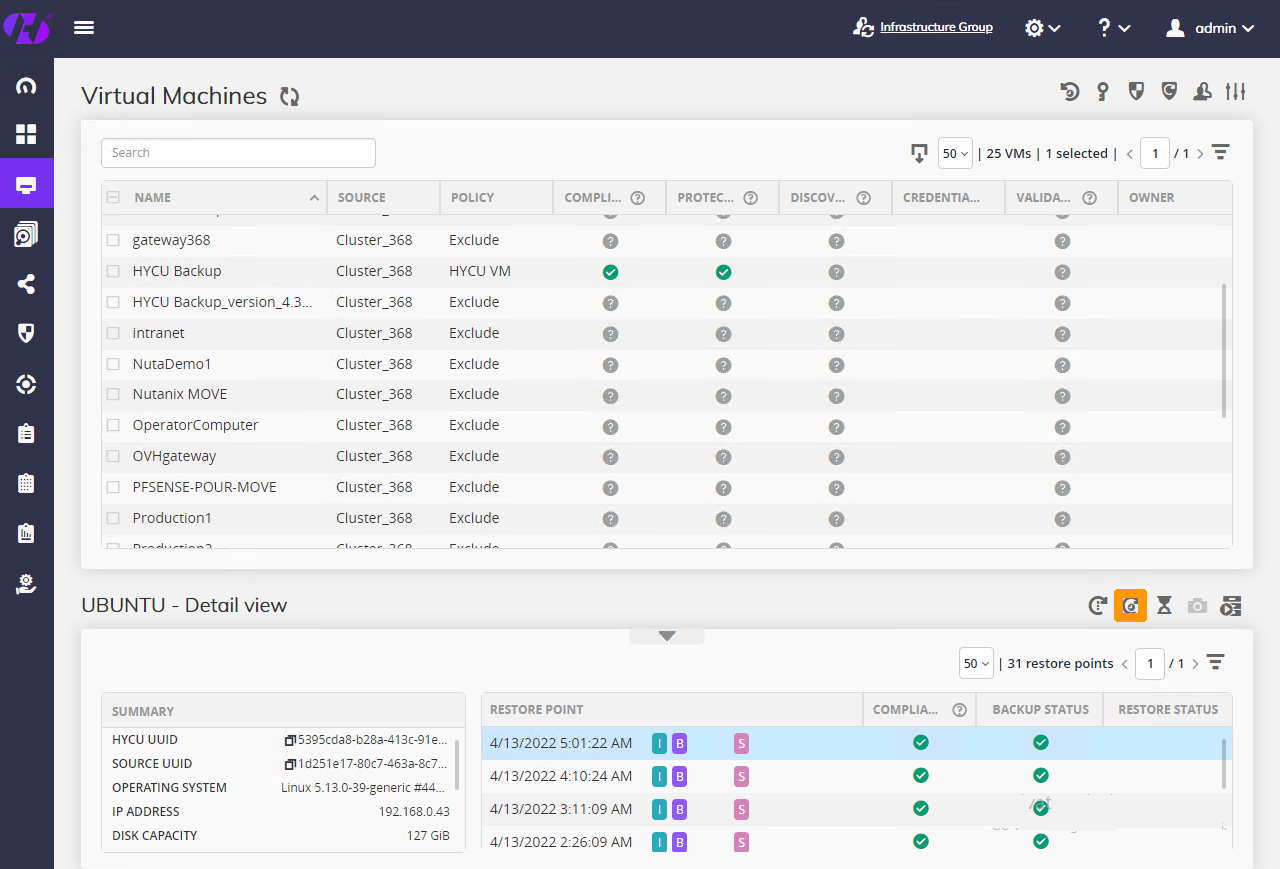
Use the `Virtual Machines
` menu and click a backed up virtual machine.
#### Restoring a virtual machine [](#)
Click the `Restore VM
` button in the bottom right-hand corner.
Select `Restore VM
` and click `Next
`.
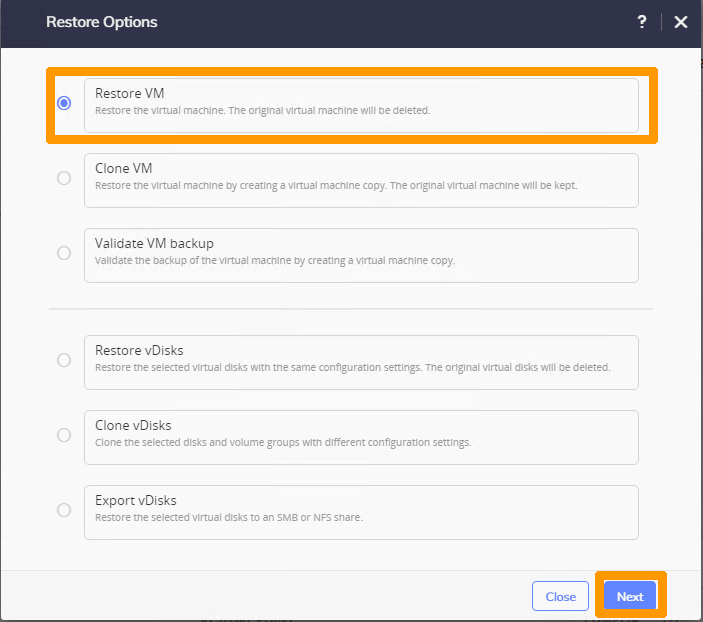
Leave the default options and click `Restore
`.
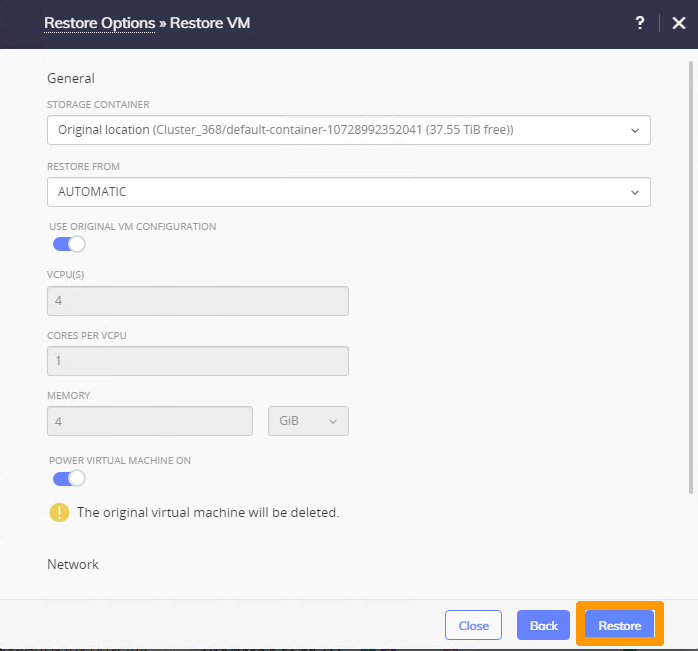
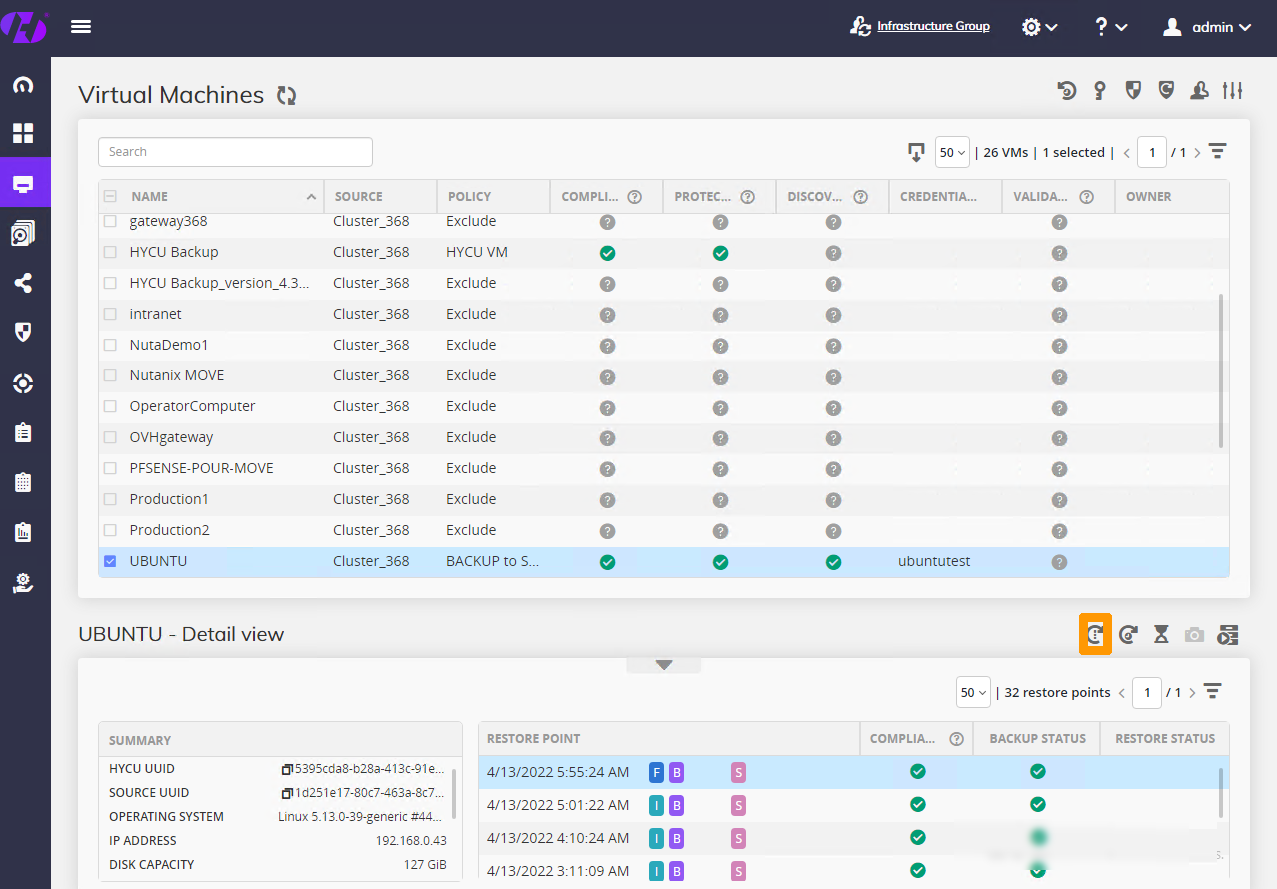
The virtual machine is fully restored.
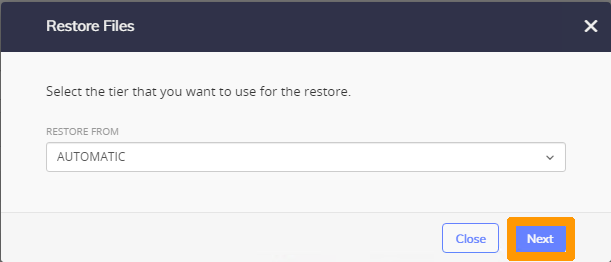
#### Retrieving a file [](#)
Click the `Restore files
` button in the bottom right-hand corner.
Leave `AUTOMATIC
` in the **RESTORE FROM**
drop-down menu and click `Next
`.
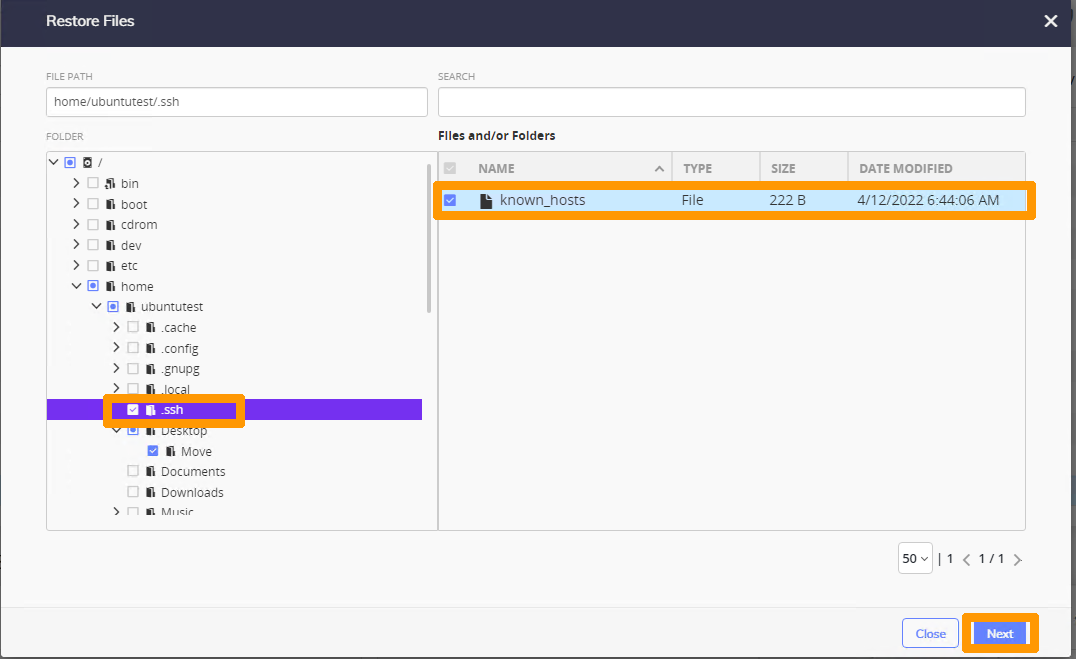
Select the file to restore and click `Next
`.
Leave the default options and click `Next
`.

Choose `Rename restored
` and click `Restore
`.
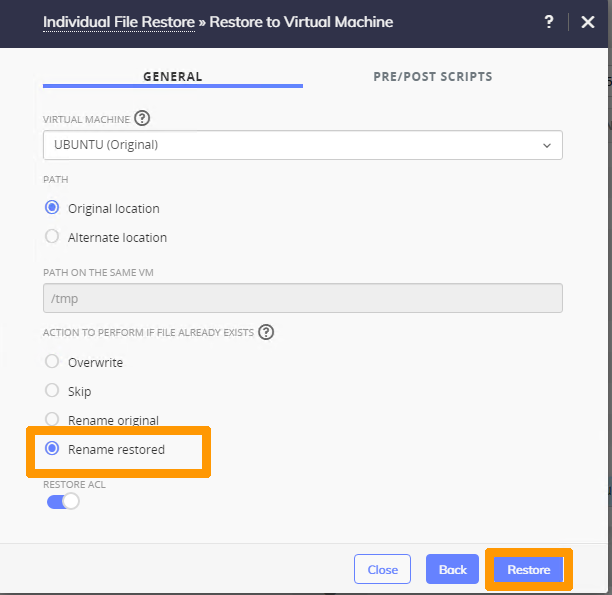
The restored file is located inside the virtual machine with a new name so as not to delete the old file.
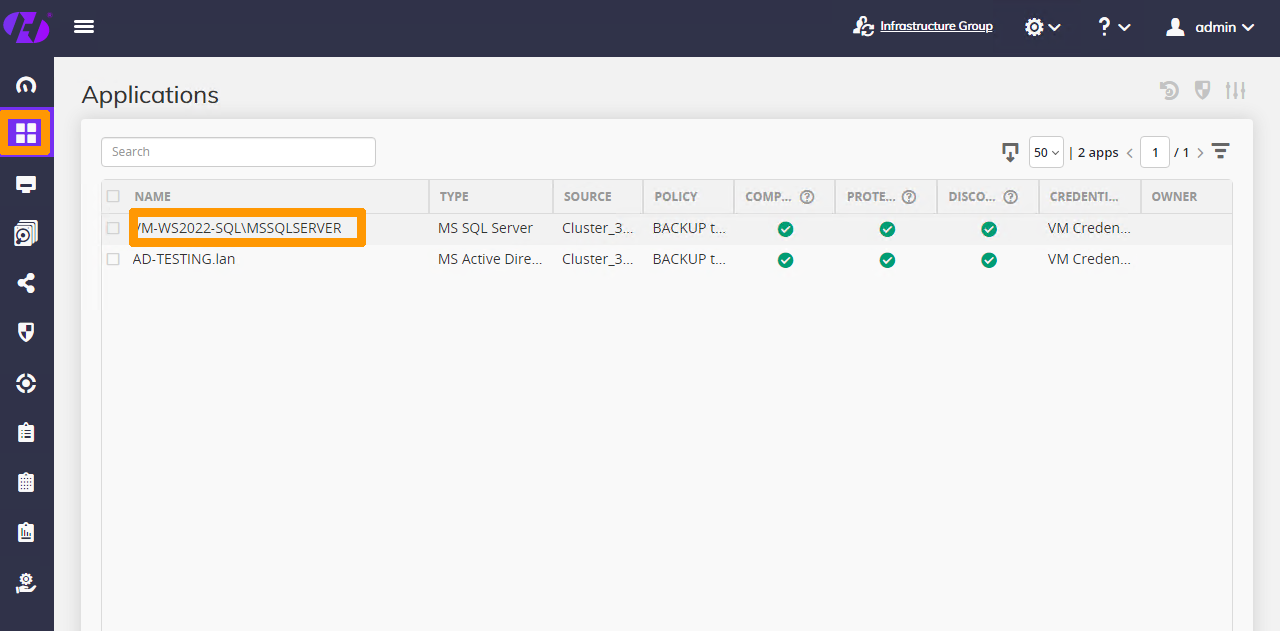
#### Restoring an application [](#)
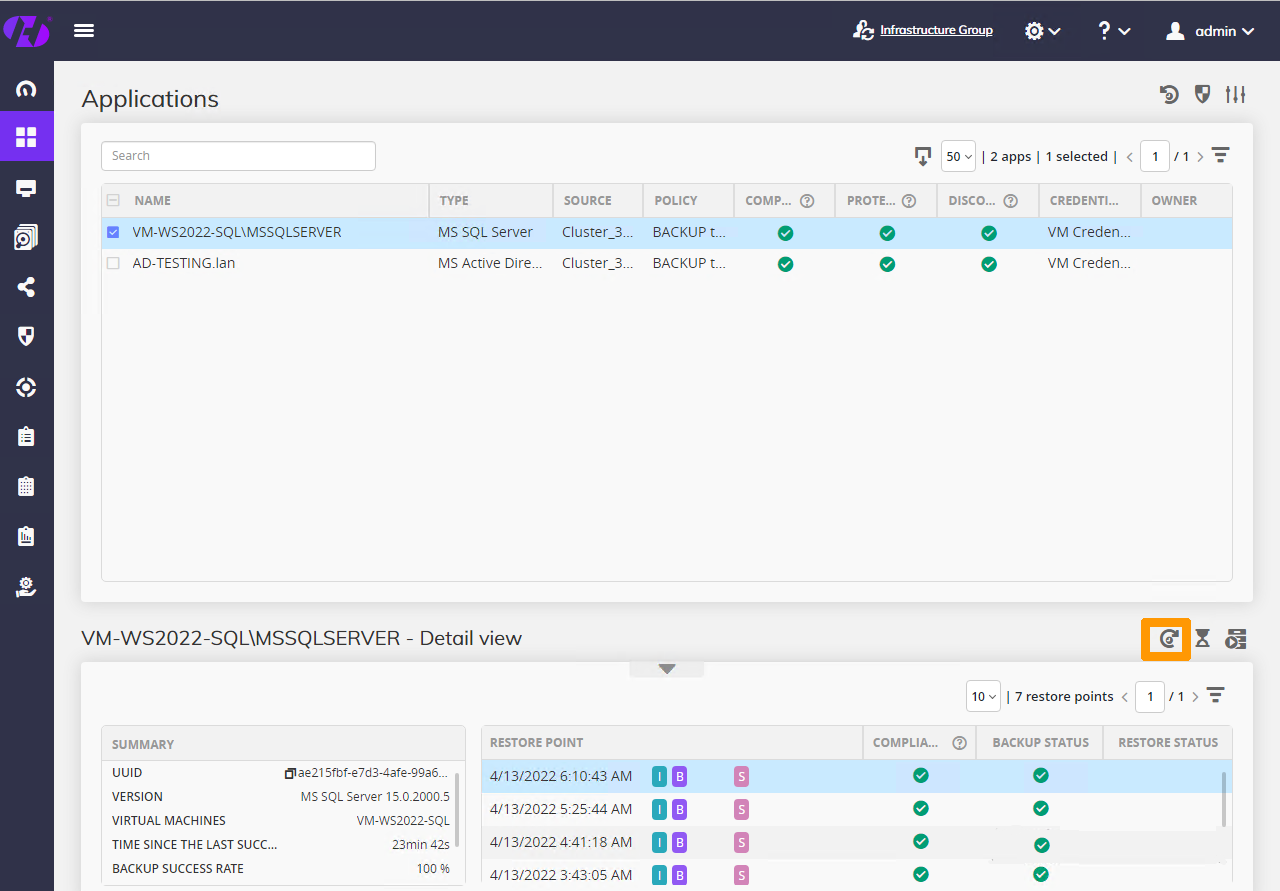
Click the `Applications
` menu and then choose an application to restore by clicking an application below **Name**
.
Click the `Restore
` button in the bottom right-hand corner.
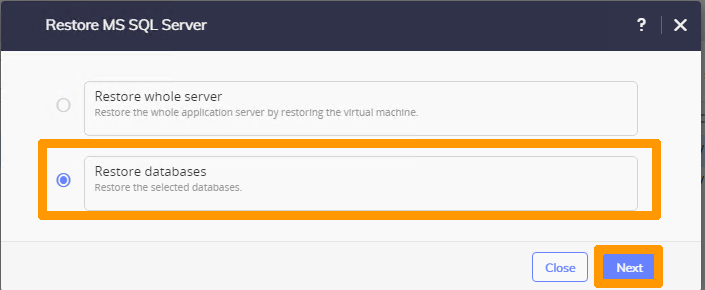
Select `Restore Databases
` and click `Next
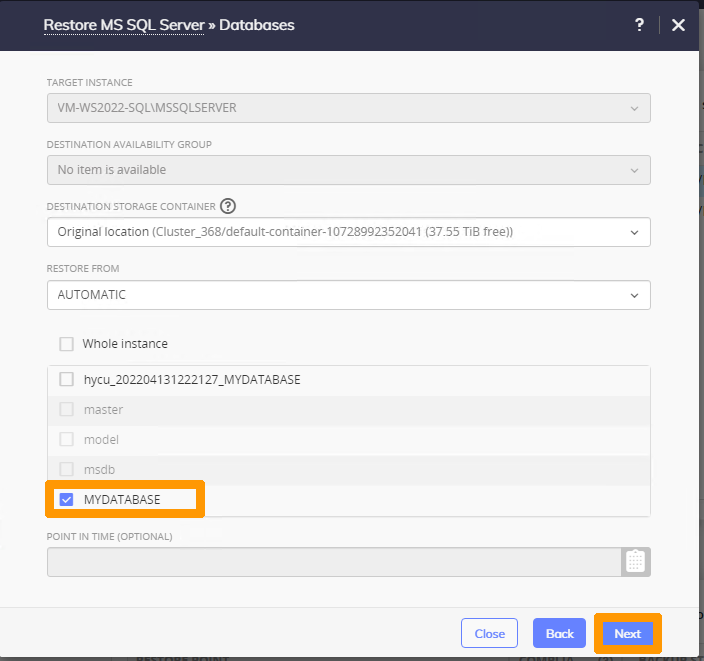
`.
Choose a database and click `Next
`.
Disable `OVERWRITE EXISTING DATABASES
` and click `Restore
`.
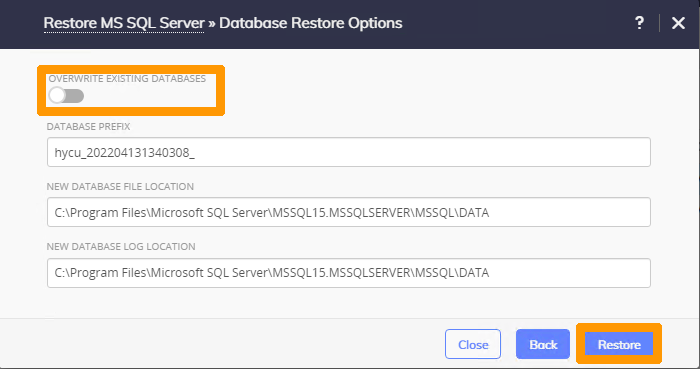
The database is restored into a new database.
## Go further [](#)
[Nutanix on OVHcloud - High-level documentation](/pt/guides/hosted-private-cloud/nutanix-on-ovhcloud/global-high-level-doc.md)
[Nutanix Hyper-Convergence](/pt/guides/hosted-private-cloud/nutanix-on-ovhcloud/nutanix-hci.md)
[Object Storage - Managing object immutability with Object Lock (WORM)](/pt/guides/storage-and-backup/object-storage/s3-managing-object-lock.md)
[HYCU Home Page](https://www.hycu.com/)
[HYCU documentation](https://support.hycu.com/hc/en-us/sections/115001018365-Product-documentation)
[OVHcloud Load Balancer documentation](/pt/guides/network/load-balancer/overview.md)
[Our OVHcloud Object Storage solutions](https://www.ovhcloud.com/pt/public-cloud/object-storage/)
If you need training or technical assistance for implementing our solutions, contact your sales representative or click [this link](https://www.ovhcloud.com/pt/professional-services/) to get a quote and request a personalized analysis of your project from our Professional Services team experts.
Join our [community of users](https://community.ovhcloud.com/community/en).