---
title: "Configuring a public IP block in a vRack on a Public Cloud instance"
description: "Find out how to link a block of public IP addresses to the vRack for configuration on a Public Cloud Instance"
url: https://docs.ovhcloud.com/it/guides/public-cloud/network-services/configure-ip-block-vrack-instance
lang: it
lastUpdated: 2026-05-28
---
# Configuring a public IP block in a vRack on a Public Cloud instance
## Objective
As well as private IP addressing, the [vRack](https://www.ovhcloud.com/it/network/vrack/) also lets you route public IP traffic through your server's [vRack](https://www.ovhcloud.com/it/network/vrack/) port using a public IP address block.
**This guide explains how to configure a block of public IP addresses for use with the vRack on a Public Cloud instance.**
## Requirements
- A public block of IP addresses in your account, with a minimum of four addresses
- An [OVHcloud Public Cloud instance](/it/guides/public-cloud/compute/first-steps-with-public-cloud-instance.md)
- A [vRack](https://www.ovhcloud.com/it/network/vrack/) service activated in your account
- Access to the [Horizon interface](/it/guides/public-cloud/cross-functional/introducing-horizon.md)
### Content overview
- [Add the Public Cloud project to the vRack](#addproject)
- [Add the IP block to the vRack](#addipblock)
- [Create a Private Network](#createnetwork)
- [Create a subnet](#subnet)
- [From the Horizon interface](#subnethorizon)
- [Attach a network interface to the instance](#attachinterface)
- [Configure a usable IP address](#ipconfig)
- [Create a new IP routing table](#routing)
- [Non-persistent application](#nonpersistent)
- [Persistent application by OS](#persistent)
## Instructions
***
### Accesso allo Spazio Cliente OVHcloud
- **Link diretto:** Public Cloud Projects
- **Percorso di navigazione:** Public Cloud > Seleziona il tuo project
***
This configuration involves several steps, using both the OVHcloud Control Panel and the Horizon interface.
[](#)
### Add the Public Cloud project to the vRack
:::info
This does not apply to newly created projects, which are automatically delivered with a vRack. To view the vRack once the project has been created, go to the `Network
` section and click on `vRack private network
` to view the vRack(s).
You can also remove the project from its allocated vRack and attach it to another vRack if you wish.
:::
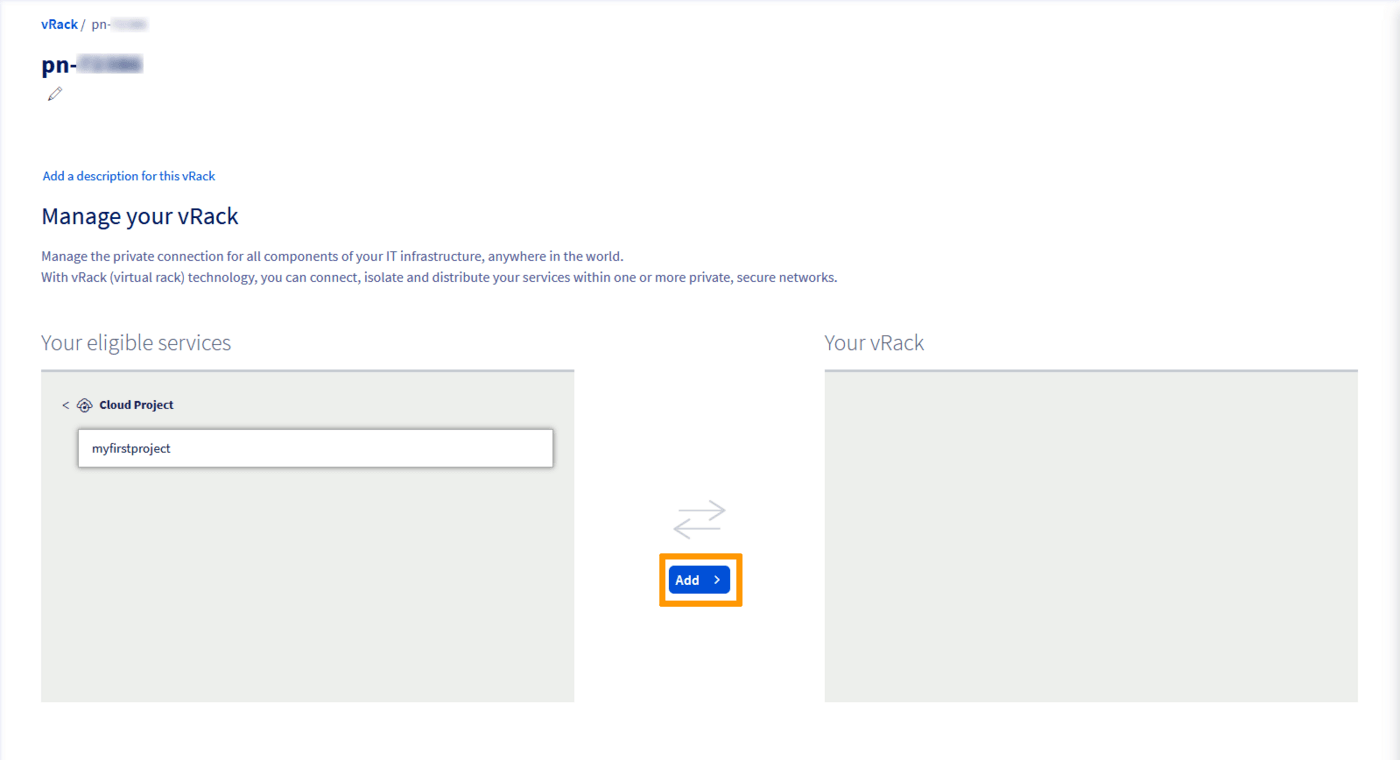
For older projects, go to the `Network
` section and click on `vRack private network
`. Next, select your vRack from the list.
From the list of eligible services, select the project you want to add to the vRack and click the `Add
` button.
[](#)
### Add the IP block to the vRack
:::warning
Once an IP block is added to the vRack, it is no longer attached to a physical server.
This setup allows you to configure IPs of the same block on multiple servers, provided that these servers are all in the same vRack as the IP block. The IP block must have at least 2 usable IPs or more for this to be possible.
:::
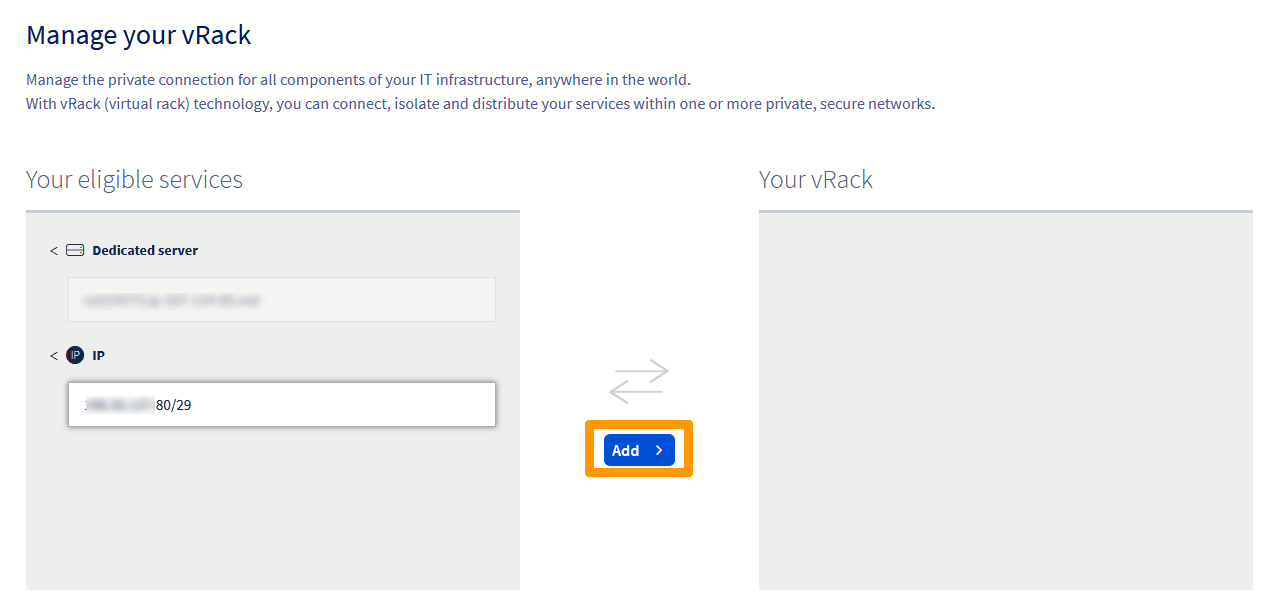
Go to the `Network
` section and click on `vRack private network
`.
Select your vRack from the list to display the list of eligible services. Click the IP block you wish to add to the vRack and click on `Add
`.
[](#)
### Create a Private Network
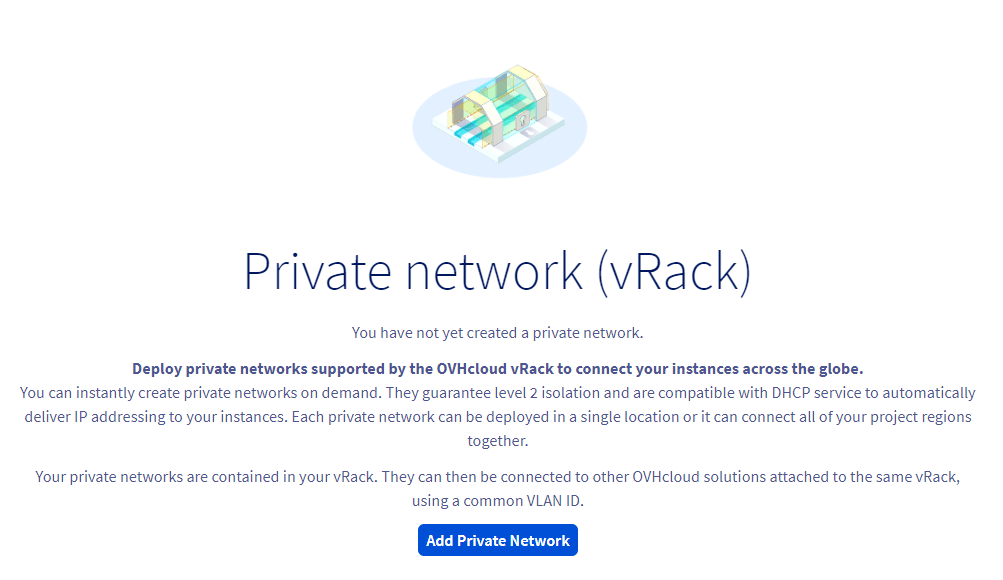
Once your project has been added to the vRack, create a Private Network to attach to the Public Cloud instance.
In the `Public Cloud
` section, click on `Private Network
` in the left-hand menu under **Network**
.
Click on `Add Private Network
`.
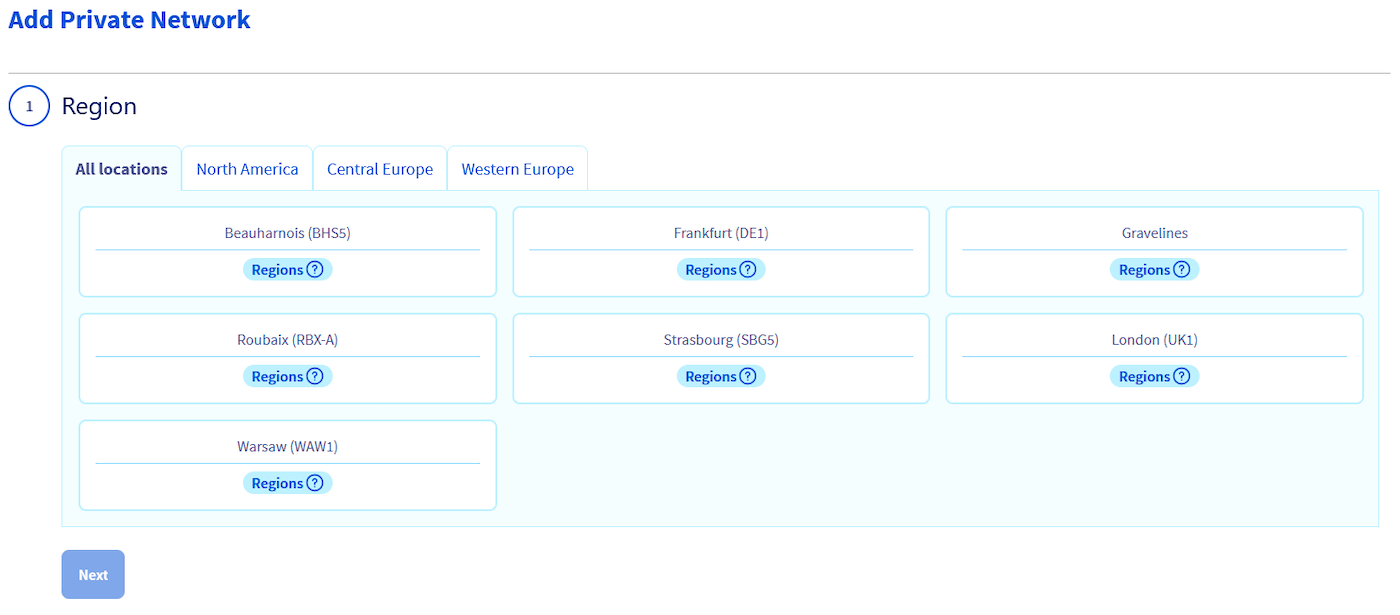
The following page allows you to customise multiple settings.
In step 1, select the region in which you want the private network to be located (this region must be the same as that of the instance).
Next, select a VLAN ID. For this configuration, you must tag your private network with VLAN ID 0.
This can be configured in step 2.

This step offers several configuration options. For the purpose of this guide, we will focus on the necessary ones. The necessary options are listed below:
- **Private Network Name**: Enter a name for your private network.
- **Layer 2 network options**: Tick the **Set a VLAN ID** box and select VLAN ID **0**.
- **DHCP address distribution options**: You can keep the default private IP range or use a different one. However, leave the **DHCP** box unchecked.
Once done, click on `Create
`.
[](#)
### Create a subnet
For the configuration, you need to create a subnet in the previously created private network and add the CIDR of the public IP block to it.
:::warning
This action can only be performed via the Horizon interface or the OpenStack client API.
:::
[](#)
#### From the Horizon interface
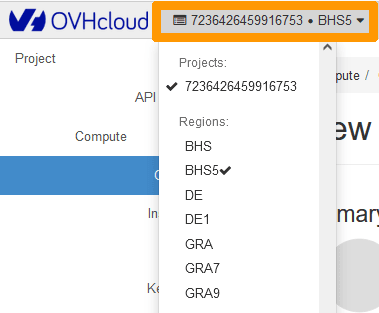
Log in to the [Horizon interface](https://horizon.cloud.ovh.net/auth/login/) and verify you are in the correct region (shown in the top left corner).
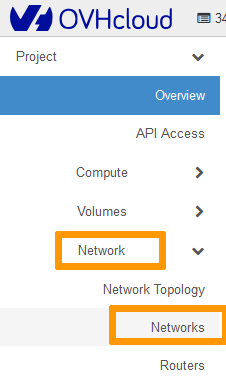
Click on `Network
` in the left-hand tab, then on `Networks
`.
Click on the drop-down arrow next to the private network and select `Create Subnet
`.

In the pop-up window, fill in the fields:
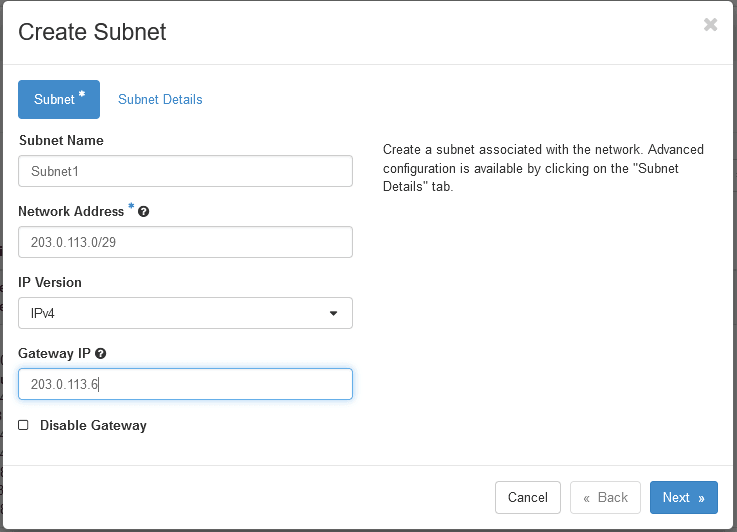
- **Subnet Name**: Enter a name of your choice.
- **Network address**\*: Enter the complete CIDR of your Public IP block (in this example: 203.0.113.0/29).
- **Gateway IP**: The penultimate IP of the IP block (in this example 203.0.113.6). When you purchase your IP block, this information is provided to you in an email.
Click `Next
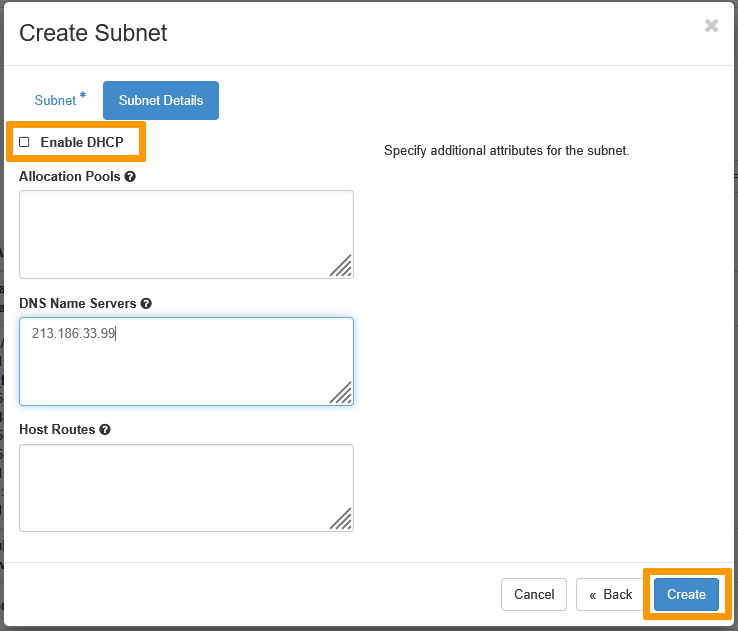
` and uncheck the `Enable DHCP
` box.
- **DNS Name Servers**: Optional. We recommend adding a DNS server, mainly for domain resolution.
Click on `Create
`.
Once the subnet has been created, your private network will appear as follows:

[](#)
### Attach a network interface to the instance
:::warning
This action should only be done via the Horizon interface.
If you have not yet created an instance, you must create it first, then attach the network later. Do not attach the private network during the creation of the instance.
:::
We recommend consulting the following guides if you are creating an instance for the first time: [How to create a Public Cloud instance and connect to it](/it/guides/public-cloud/compute/first-steps-with-public-cloud-instance.md) or [Creating an Instance via the Horizon interface](/it/guides/public-cloud/compute/create-instance-in-horizon.md).
If you already have an instance, you can proceed to the next step.
Log in to the [Horizon interface](https://horizon.cloud.ovh.net/auth/login/) and verify you are in the correct region (shown in the top left corner).

Next, select `Compute
` and then `Instances
` from the menu.
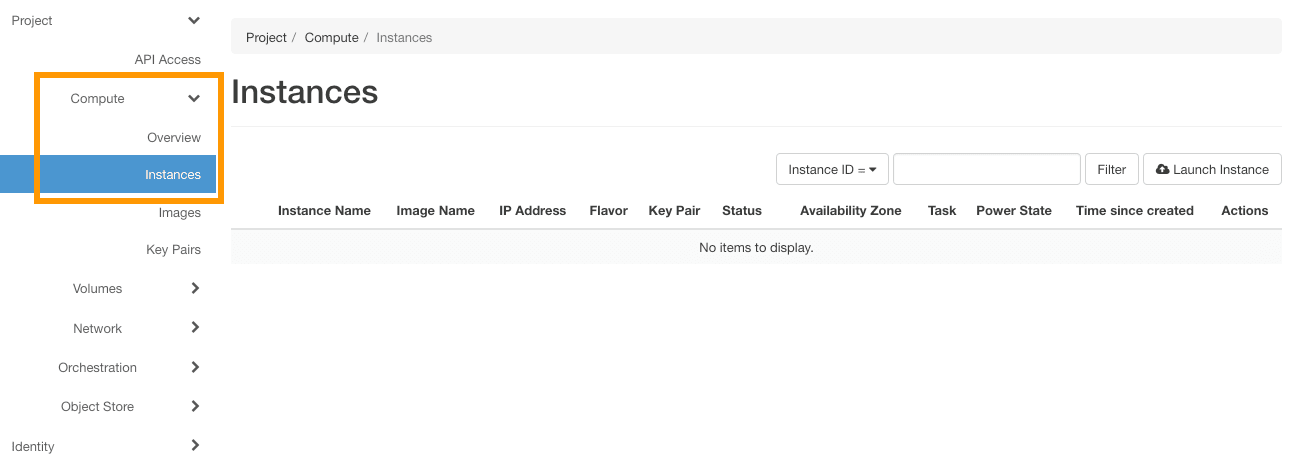
Select `Attach Interface
` in the drop-down list for the corresponding instance.

In the pop-up menu, select the appropriate options:
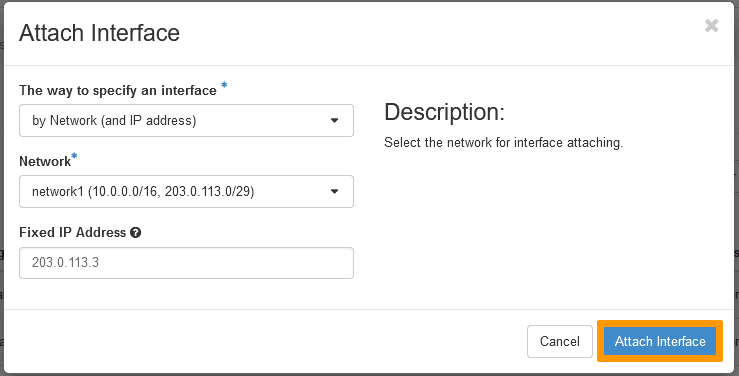
- **Network**: Select the private network created
- **Fixed IP Address**: Specify a public IP address from your block (if you don't, the system will automatically assign a private IP).
:::warning
It is not possible to add multiple IPs at once via the Horizon interface.
For each public IP you want to use, you need to follow the same procedure and enter a different usable public IP each time.
:::
[](#)
### Configure a usable IP address
For vRack purposes, the first, penultimate, and last addresses in any given IP block are always reserved for the network address, network gateway, and network broadcast respectively. This means that the first usable IP address is the second address in the block, as shown below:
```sh
203.0.113.0 # Reserved: Network address
203.0.113.1 # First usable IP
203.0.113.2
203.0.113.3
203.0.113.4
203.0.113.5 # Last usable IP
203.0.113.6 # Reserved: Network gateway
203.0.113.7 # Reserved: Network broadcast
```
To configure the first usable IP address, you need to edit the network configuration file as shown below. In this example, we use a subnet mask of **255.255.255.248**.
:::info
The subnet mask we've used in our example is appropriate for our IP block. Your subnet mask may differ depending on the size of your block. When you purchase your IP block, you'll receive an email that will tell you which subnet mask to use.
:::
[](#)
### Create a new IP routing table
First, download and install **iproute2**, a package for manual IP routing configuration. This package may already be available on your server — if so, skip to the next step.
Establish an SSH connection to your instance and run the following command from the command line. This will download and install iproute2.
```sh
sudo apt-get install iproute2
```
Next, we need to create a new IP route for the vRack. We'll be adding a new traffic rule by amending the file, as shown below:
**Linux**
```sh
sudo nano /etc/iproute2/rt_tables
#
# reserved values
#
255 local
254 main
253 default
0 unspec
#
# local
#
#1 inr.ruhep
1 vrack
```
**Fedora**
```sh
sudo nano /usr/share/iproute2/rt_tables
#
# reserved values
#
255 local
254 main
253 default
0 unspec
#
# local
#
#1 inr.ruhep
1 vrack
```
[](#)
#### Non-persistent application
:::warning
This configuration will be lost after a restart of your instance (non-persistent configuration).
:::
Connect to your server via SSH and enter the following commands. Replace `NETWORK_INTERFACE`, `IP_ADDRESS/PREFIX` and `GATEWAY_IP` with your own values.
```bash
ip addr add IP_ADDRESS/PREFIX dev NETWORK_INTERFACE
ip route add IP_ADDRESS/PREFIX dev NETWORK_INTERFACE
ip route add default via GATEWAY_IP dev NETWORK_INTERFACE
```
[](#)
#### Persistent application by OS
Click the tab that corresponds to your distribution:
**Debian (excluding Debian 12)**
The configuration below is based on Debian 11.
To identify your vRack interface, connect to your instance via SSH and run the following command:
```bash
ip a
```
Using a text editor of your choice, open the network configuration file located in `/etc/network/interfaces.d` for editing. Here the file is called `50-cloud-init`.
```bash
sudo nano /etc/network/interfaces.d/50-cloud-init
```
Add the following lines to your configuration file, replacing `NETWORK_INTERFACE`, `IP_ADDRESS`, `NETMASK_IP` and `BROADCAST_IP` with your own values.
```bash
auto NETWORK_INTERFACE
iface NETWORK_INTERFACE inet static
address IP_ADDRESS
netmask NETMASK_IP
broadcast BROADCAST_IP
```
We have determined that the gateway IP of our IP block is **203.0.113.6**. To route the vRack traffic through this gateway IP address, add the following lines to the network configuration file, replacing `NETWORK_INTERFACE`, `IP_BLOCK/PREFIX` and `GATEWAY_IP` with your own values:
```console
post-up ip route add IP_BLOCK/PREFIX dev NETWORK_INTERFACE table vrack
post-up ip route add default via GATEWAY_IP dev NETWORK_INTERFACE table vrack
post-up ip rule add from IP_BLOCK/PREFIX table vrack
post-up ip rule add to IP_BLOCK/PREFIX table vrack
```
**Configuration example:**
```bash
auto eth1
iface eth1 inet static
address 203.0.113.1
netmask 255.255.255.248
broadcast 203.0.113.7
post-up ip route add 203.0.113.0/29 dev eth1 table vrack
post-up ip route add default via 203.0.113.6 dev eth1 table vrack
post-up ip rule add from 203.0.113.0/29 table vrack
post-up ip rule add to 203.0.113.0/29 table vrack
```
Restart your network interface with the following command:
```bash
sudo /etc/init.d/networking restart
```
**Ubuntu & Debian 12**
The configuration below is based on Ubuntu 24.04.
To identify your vRack interface, connect to your instance via SSH and run the following command:
```bash
ip a
```
Using a text editor of your choice, open the network configuration file located in `/etc/netplan` for editing. Here the file is called `50-cloud-init.yaml`.
```bash
sudo nano /etc/netplan/50-cloud-init.yaml
```
Add the IP configuration after the first one, replacing `NETWORK_INTERFACE`, `IP_ADDRESS/PREFIX` and `GATEWAY_IP` with your own values.
```bash
NETWORK_INTERFACE:
dhcp4: false
addresses:
- IP_ADDRESS/PREFIX
routes:
- to: NETWORK_IP/PREFIX
via: GATEWAY_IP
```
**Configuration example:**
```bash
eno2:
dhcp4: false
addresses:
- 203.0.113.1/29
routes:
- to: 203.0.113.0/29
via: 203.0.113.6
```
Apply the configuration with the following command:
```bash
sudo netplan apply
```
**CentOS, AlmaLinux & Rocky Linux**
The configuration below is based on CentOS 7.
To identify your vRack interface, connect to your instance via SSH and run the following command:
```bash
ip a
```
Using a text editor of your choice, create a network configuration file in the folder `/etc/sysconfig/network-scripts` for editing.
In our example, our vRack interface is called `eth1`, we create the following configuration file (replace **eth1** with your own values):
```bash
sudo touch /etc/sysconfig/network-scripts/ifcfg-eth1
```
Add the following lines to your configuration file, replacing `NETWORK_INTERFACE`, `IP_ADDRESS`, `NETMASK_IP` and `BROADCAST_IP` with your own values.
```bash
DEVICE=NETWORK_INTERFACE
ONBOOT=yes
BOOTPROTO=none # For CentOS use "static"
IPADDR=IP_ADDRESS
NETMASK=NETMASK_IP
BROADCAST=BROADCAST_IP
```
**Configuration example:**
```bash
DEVICE=eth1
ONBOOT=yes
BOOTPROTO=static
IPADDR=203.0.113.1
NETMASK=255.255.255.248
BROADCAST=203.0.113.7
```
Restart your network interface with the following command:
```bash
sudo systemctl restart network
```
**Fedora**
The configuration below is based on Fedora 40.
Note the **NAME** and **DEVICE** parameters of your network interface by executing the following command:
```bash
sudo nmcli con show
```
**Example:**
```bash
$ sudo nmcli con show
NAME UUID TYPE DEVICE
cloud-init eth0 1dsdytd7-d123-55gt-84r6-c639tyhfla7c ethernet eth0
Wired connection 1 3sdfsd35-7064-5b6e-89pd-bfdsl934ngs8 ethernet eth1
```
Using the `nmcli` handler, set up your configuration, replacing `INTERFACE_NAME`, `IP_ADDRESS/PREFIX` and `GATEWAY_IP` with your own values.
:::warning
Please note that `INTERFACE_NAME` here is replaced by the **NAME** value (Wired connection 1) and not the **DEVICE** value (eth1). This information can be retrieved by running the command `nmcli con show`.
:::
Add the IP address:
```bash
sudo nmcli connection modify INTERFACE_NAME IPv4.address IP_ADDRESS/PREFIX
```
**Example:**
```bash
sudo nmcli connection modify 'Wired connection 1' IPv4.address 203.0.113.1/29
```
Add the Gateway:
```bash
sudo nmcli connection modify INTERFACE_NAME IPv4.gateway GATEWAY_IP
```
**Example:**
```bash
sudo nmcli connection modify 'Wired connection 1' IPv4.gateway 203.0.113.6
```
Add a DNS server:
```bash
sudo nmcli connection modify INTERFACE_NAME IPv4.dns 213.186.33.99
```
**Example:**
```bash
sudo nmcli connection modify 'Wired connection 1' IPv4.dns 213.186.33.99
```
Change the configuration to manual:
```bash
sudo nmcli connection modify INTERFACE_NAME IPv4.method manual
```
**Example:**
```bash
sudo nmcli connection modify 'Wired connection 1' IPv4.method manual
```
Make the configuration persistent:
```bash
sudo nmcli con mod INTERFACE_NAME connection.autoconnect true
```
**Example:**
```bash
sudo nmcli con mod 'Wired connection 1' connection.autoconnect true
```
Restart your network with the following command:
```bash
sudo systemctl restart NetworkManager
```
## Go further
Join our [community of users](https://community.ovhcloud.com/).